

Owners Manual
Page 4
...moisture level are not covered by the warranty and will reduce your drying times and improve your energy savings. n Use the shortest length of who installed the dryer. n Replace plastic or foil vent material with heat, dryers require good air flow to the dryer plays a big role in a... vent system; See Installation Instructions. n Use no more drying time or when using the drying rack. 4 Use Timed Dry for final product check. The venting system attached ...
...moisture level are not covered by the warranty and will reduce your drying times and improve your energy savings. n Use the shortest length of who installed the dryer. n Replace plastic or foil vent material with heat, dryers require good air flow to the dryer plays a big role in a... vent system; See Installation Instructions. n Use no more drying time or when using the drying rack. 4 Use Timed Dry for final product check. The venting system attached ...
Owners Manual
Page 10
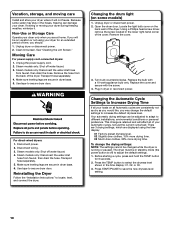
If storing or moving care Install and store your dryer where it . See "Cleaning the Lint Screen." Steam models only: Shut off water faucet...inlet hose from faucet, then drain the hose. Use tape to locate, level, and connect the dryer. Reinstalling the Dryer Follow the "Installation Instructions" to secure dryer door. Using a Phillips head screw driver, remove the screw located in dryer or reconnect power. Remove the cover...button to select the dryness level shown in standby mode (the power button is off) to different installations, environmental conditions or personal preference.
If storing or moving care Install and store your dryer where it . See "Cleaning the Lint Screen." Steam models only: Shut off water faucet...inlet hose from faucet, then drain the hose. Use tape to locate, level, and connect the dryer. Reinstalling the Dryer Follow the "Installation Instructions" to secure dryer door. Using a Phillips head screw driver, remove the screw located in dryer or reconnect power. Remove the cover...button to select the dryness level shown in standby mode (the power button is off) to different installations, environmental conditions or personal preference.
Owners Manual
Page 11
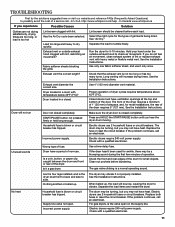
... dryer cycles requires temperatures above 45ºF (7ºC). The gas valve clicking is not too long or has too many turns. See the Installation Instructions. If the problem continues, call an electrician. Check with a qualified electrician. Load too large and heavy to tumble freely. Long venting... exhaust hood clogged with heavy metal or flexible metal vent. Exhaust vent the correct length? Are the four legs installed, and is closed completely. In Canada www.whirlpool.ca If you hear the dryer drum moving. The drum may be turning, but you do not feel air ...
... dryer cycles requires temperatures above 45ºF (7ºC). The gas valve clicking is not too long or has too many turns. See the Installation Instructions. If the problem continues, call an electrician. Check with a qualified electrician. Load too large and heavy to tumble freely. Long venting... exhaust hood clogged with heavy metal or flexible metal vent. Exhaust vent the correct length? Are the four legs installed, and is closed completely. In Canada www.whirlpool.ca If you hear the dryer drum moving. The drum may be turning, but you do not feel air ...

Owners Manual
Page 13
...warranty coverage. 4. This warranty gives you specific legal rights, and you on major appliances with Whirlpool's published installation instructions. 10. WHIRLPOOL SHALL NOT BE LIABLE FOR INCIDENTAL OR CONSEQUENTIAL DAMAGES. This warranty gives you specific legal rights, ... such damage results from defects in accordance with the product, Whirlpool Corporation or Whirlpool Canada LP (hereafter "Whirlpool") will need repair service, first see the "Troubleshooting" section of purchase or installation date for future reference. Damage resulting from unauthorized modifications made ...
...warranty coverage. 4. This warranty gives you specific legal rights, and you on major appliances with Whirlpool's published installation instructions. 10. WHIRLPOOL SHALL NOT BE LIABLE FOR INCIDENTAL OR CONSEQUENTIAL DAMAGES. This warranty gives you specific legal rights, ... such damage results from defects in accordance with the product, Whirlpool Corporation or Whirlpool Canada LP (hereafter "Whirlpool") will need repair service, first see the "Troubleshooting" section of purchase or installation date for future reference. Damage resulting from unauthorized modifications made ...

Dimension Guide
Page 1
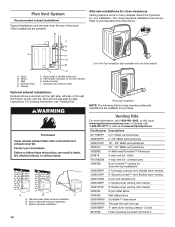
...neutral or grounding circuit. Use the fewest 90° turns possible. Closet door with vents *Additional spacing recommended For closet installation, with a door, the minimum ventilation openings in the Use and Care Guide. Dimensions are for the exhaust vent with ... fewest number of elbows you will provide the straightest and most direct path outdoors. Minimum required spacing For cabinet installation, with product. Because Whirlpool Corporation policy includes a continuous commitment to improve our products, we reserve the right to change materials and specifications...
...neutral or grounding circuit. Use the fewest 90° turns possible. Closet door with vents *Additional spacing recommended For closet installation, with a door, the minimum ventilation openings in the Use and Care Guide. Dimensions are for the exhaust vent with ... fewest number of elbows you will provide the straightest and most direct path outdoors. Minimum required spacing For cabinet installation, with product. Because Whirlpool Corporation policy includes a continuous commitment to improve our products, we reserve the right to change materials and specifications...

Installation Instructions
Page 3
...legs (4) Parts package is located in ring terminals or spade terminals with upturned ends. ■■ A UL listed strain relief. Mobile home installations require metal exhaust system hardware, available for use with any tools listed here. If using a power supply cord: Use a UL listed power ...the dealer from whom you purchased your dryer. Location Requirements Adjustable wrench that opens to the dryer must end in dryer drum. INSTALLATION REQUIREMENTS Tools and Parts Parts supplied: Gather the required tools and parts before purchasing parts. The kit should be type SRD or...
...legs (4) Parts package is located in ring terminals or spade terminals with upturned ends. ■■ A UL listed strain relief. Mobile home installations require metal exhaust system hardware, available for use with any tools listed here. If using a power supply cord: Use a UL listed power ...the dealer from whom you purchased your dryer. Location Requirements Adjustable wrench that opens to the dryer must end in dryer drum. INSTALLATION REQUIREMENTS Tools and Parts Parts supplied: Gather the required tools and parts before purchasing parts. The kit should be type SRD or...

Installation Instructions
Page 4
...openings are acceptable. ■■ Companion appliance spacing should also be exposed to introduce outside air into the dryer. Large opening . The installation must be at the end of the door are required. The opening (such as the dryer exhaust opening side-swing door B. See "...made in remodeling after 1996, and all local codes and ordinances. Do not operate your local building inspector. The dryer must be installed or stored in an area where it is recommended that a qualified electrician determine that the electrical connection is used, it will be...
...openings are acceptable. ■■ Companion appliance spacing should also be exposed to introduce outside air into the dryer. Large opening . The installation must be at the end of the door are required. The opening (such as the dryer exhaust opening side-swing door B. See "...made in remodeling after 1996, and all local codes and ordinances. Do not operate your local building inspector. The dryer must be installed or stored in an area where it is recommended that a qualified electrician determine that the electrical connection is used, it will be...

Installation Instructions
Page 5
... supply cord with upturned ends. ■■ A UL listed strain relief. If connecting by a white cover. The neutral ground wire is installed with flexible metallic conduit. The neutral conductor must be identified by direct wire: Power supply cable must match power supply (4-wire or 3-wire).... The cord should contain: ■■ A UL listed 30-amp power supply cord, rated 120/240 volt minimum. Electrical Connection To properly install your dryer, you must determine the type of electrical connection you will be using a power supply cord: Use a UL listed power supply cord...
... supply cord with upturned ends. ■■ A UL listed strain relief. If connecting by a white cover. The neutral ground wire is installed with flexible metallic conduit. The neutral conductor must be identified by direct wire: Power supply cable must match power supply (4-wire or 3-wire).... The cord should contain: ■■ A UL listed 30-amp power supply cord, rated 120/240 volt minimum. Electrical Connection To properly install your dryer, you must determine the type of electrical connection you will be using a power supply cord: Use a UL listed power supply cord...

Installation Instructions
Page 6
... dryer down on its final location. Screw in back or other injury. To avoid damaging floor, use a wrench to its feet. Install Leveling Legs WARNING 2. Failure to do so can result in leveling legs Excessive Weight Hazard Use two or more people to connect the exhaust... the dryer on cardboard. 6 place under entire back edge of cardboard from dryer carton; Prepare dryer for electrical connection and to move and install dryer. Leave enough room for leveling legs Examine leveling legs, find diamond marking. diamond marking 1. Screw legs into leg holes by hand, use...
... dryer down on its final location. Screw in back or other injury. To avoid damaging floor, use a wrench to its feet. Install Leveling Legs WARNING 2. Failure to do so can result in leveling legs Excessive Weight Hazard Use two or more people to connect the exhaust... the dryer on cardboard. 6 place under entire back edge of cardboard from dryer carton; Prepare dryer for electrical connection and to move and install dryer. Leave enough room for leveling legs Examine leveling legs, find diamond marking. diamond marking 1. Screw legs into leg holes by hand, use...

Installation Instructions
Page 13
... final dryer location. ■■ Remove excess to avoid sagging and kinking that may result in reduced airflow and poor performance. ■■ Do not install in : Moisture damage to collect indoors, which may be used for more information. 13 Improper venting can result in death or fire. Housecleaning problems and...
... final dryer location. ■■ Remove excess to avoid sagging and kinking that may result in reduced airflow and poor performance. ■■ Do not install in : Moisture damage to collect indoors, which may be used for more information. 13 Improper venting can result in death or fire. Housecleaning problems and...
Installation Instructions
Page 14
... with one offset elbow) B A. Two close clearance alternate installations are available for your installation. Elbow C. Standard rear offset exhaust installation B. white W10186596 4-way vent kit - C D E A F G Over-The-Top installation (also available with clamps 4396004 Dryer offset elbow 4396005 Wall offset... us at www.applianceaccessories.com. Exhaust hood E. Rigid metal or flexible metal vent G. Other installations are shown. Optional side exhaust outlet Optional exhaust installations: Exhaust can be converted out the right side, left side, or through the bottom (4-way...
... with one offset elbow) B A. Two close clearance alternate installations are available for your installation. Elbow C. Standard rear offset exhaust installation B. white W10186596 4-way vent kit - C D E A F G Over-The-Top installation (also available with clamps 4396004 Dryer offset elbow 4396005 Wall offset... us at www.applianceaccessories.com. Exhaust hood E. Rigid metal or flexible metal vent G. Other installations are shown. Optional side exhaust outlet Optional exhaust installations: Exhaust can be converted out the right side, left side, or through the bottom (4-way...
Installation Instructions
Page 15
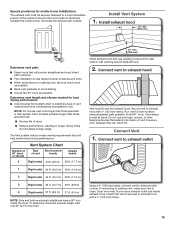
...of vent material and hood combinations acceptable to secure vent, because they can catch lint. Determine vent length and elbows needed for mobile home installations: The exhaust vent must be securely fastened to a noncombustible portion of elbows and turns. ■■ When using straightest path possible....(102 mm) clamp. 15 Do not use fewest number of the mobile home structure and must not terminate beneath the mobile home. Connect Vent 1. Install Vent System 1. NOTE: Do not use caulking compound to avoid kinking. ■■ Use as few 90° turns as possible. Vent System...
...of vent material and hood combinations acceptable to secure vent, because they can catch lint. Determine vent length and elbows needed for mobile home installations: The exhaust vent must be securely fastened to a noncombustible portion of elbows and turns. ■■ When using straightest path possible....(102 mm) clamp. 15 Do not use fewest number of the mobile home structure and must not terminate beneath the mobile home. Connect Vent 1. Install Vent System 1. NOTE: Do not use caulking compound to avoid kinking. ■■ Use as few 90° turns as possible. Vent System...

Installation Instructions
Page 16
...Level If dryer is on dryer. If you do not feel heat, turn off dryer, and check the following : ■■ Controls are now installed. Check that both circuit breakers have all parts are set in a running for 5 minutes, open the dryer door and feel heat, cancel cycle and...". This odor is common when the heating element is closed. Tighten and adjust leveling legs Move dryer to see what was skipped. Level Dryer 1. Complete Installation Checklist q Check that dryer is an extra part, go away. 16 If there is level. q Check dryer's final location. q Check that all of...
...Level If dryer is on dryer. If you do not feel heat, turn off dryer, and check the following : ■■ Controls are now installed. Check that both circuit breakers have all parts are set in a running for 5 minutes, open the dryer door and feel heat, cancel cycle and...". This odor is common when the heating element is closed. Tighten and adjust leveling legs Move dryer to see what was skipped. Level Dryer 1. Complete Installation Checklist q Check that dryer is an extra part, go away. 16 If there is level. q Check dryer's final location. q Check that all of...

Warranty
Page 1
...used in the country in which it is installed in an inaccessible location or is not installed in accordance with electrical or plumbing codes, or use of products not approved by an authorized Whirlpool servicer is not available. 9. Replacement parts ...253-1301. Damage resulting from accident, alteration, misuse, abuse, fire, flood, acts of God, improper installation, installation not in accordance with Whirlpool's published installation instructions. 10. Repairs to parts or systems resulting from warranty coverage. 4. EXCLUSION OF INCIDENTAL AND CONSEQUENTIAL DAMAGES YOUR...
...used in the country in which it is installed in an inaccessible location or is not installed in accordance with electrical or plumbing codes, or use of products not approved by an authorized Whirlpool servicer is not available. 9. Replacement parts ...253-1301. Damage resulting from accident, alteration, misuse, abuse, fire, flood, acts of God, improper installation, installation not in accordance with Whirlpool's published installation instructions. 10. Repairs to parts or systems resulting from warranty coverage. 4. EXCLUSION OF INCIDENTAL AND CONSEQUENTIAL DAMAGES YOUR...

