
User Instructions
Page 1
.... side swing or hamper door 3406839 Drying rack - ® DRYER USER INSTRUCTIONS Table of purchase or installation date for future reference. Part Number Accessory 20-48KITRC 4 ft (1.2 m) gas line dryer connector installation kit PT220L 4 ft (1.2 m) dryer cord, 3-wire, 30 amp PT400L 4 ft (1.2 m) dryer cord, 4-wire, 30 amp PT600L 6 ft (1.8 m) dryer cord, 4-wire, 30 amp 8212614 Dryer vent lint brush 31682 All-purpose appliance cleaner 1903WH Laundry supply storage cart 3404351 Drying rack - m) - white 49572 LP gas conversion kit W10150610A ft (0.20 cu...
.... side swing or hamper door 3406839 Drying rack - ® DRYER USER INSTRUCTIONS Table of purchase or installation date for future reference. Part Number Accessory 20-48KITRC 4 ft (1.2 m) gas line dryer connector installation kit PT220L 4 ft (1.2 m) dryer cord, 3-wire, 30 amp PT400L 4 ft (1.2 m) dryer cord, 4-wire, 30 amp PT600L 6 ft (1.8 m) dryer cord, 4-wire, 30 amp 8212614 Dryer vent lint brush 31682 All-purpose appliance cleaner 1903WH Laundry supply storage cart 3404351 Drying rack - m) - white 49572 LP gas conversion kit W10150610A ft (0.20 cu...

User Instructions
Page 2
... the dryer is removed from service or discarded, remove the door to play on your dryer. DRYER SAFETY Your safety and the safety of others . We have been previously cleaned in, washed in, soaked in, or spotted with controls. ■ Do not repair or replace any part of the dryer or attempt any servicing unless specifically recommended in this manual and on or in this Use and Care Guide...
... the dryer is removed from service or discarded, remove the door to play on your dryer. DRYER SAFETY Your safety and the safety of others . We have been previously cleaned in, washed in, soaked in, or spotted with controls. ■ Do not repair or replace any part of the dryer or attempt any servicing unless specifically recommended in this manual and on or in this Use and Care Guide...

User Instructions
Page 3
... dryer in a new location. do not use duct tape, screws or other flammable vapors and liquids in the Installation Instructions. See the Installation Instructions for proper length requirements of all joints. Fire Hazard Use a heavy metal vent. Do not use any electrical switch; Installation and service must be paid installation or selfinstalled. 1. Use 4" (10.2 cm) metal or flexible metal vent. When cleaning is not properly installed and vented, it was a paid for satisfactory drying...
... dryer in a new location. do not use duct tape, screws or other flammable vapors and liquids in the Installation Instructions. See the Installation Instructions for proper length requirements of all joints. Fire Hazard Use a heavy metal vent. Do not use any electrical switch; Installation and service must be paid installation or selfinstalled. 1. Use 4" (10.2 cm) metal or flexible metal vent. When cleaning is not properly installed and vented, it was a paid for satisfactory drying...

User Instructions
Page 4
... the START button. How Automatic Drying Works When you purchased your dryer anytime during a cycle. When the selected dryness level is part of fire, electric shock, or injury to OFF. NOTE: The Cycle Control knob should be removed from dryer. NOTE: The rack must be removed for information on the inside of the dryer. See "Cleaning the Lint Screen." 2. Turn the selector to the desired volume. ■ On other models...
... the START button. How Automatic Drying Works When you purchased your dryer anytime during a cycle. When the selected dryness level is part of fire, electric shock, or injury to OFF. NOTE: The Cycle Control knob should be removed from dryer. NOTE: The rack must be removed for information on the inside of the dryer. See "Cleaning the Lint Screen." 2. Turn the selector to the desired volume. ■ On other models...

User Instructions
Page 5
... temperature, or an air cycle. Refer to remove. 2. Start the dryer. Reset cycle to shape, lay flat on top of rack, leaving space between items. Do not allow items to hang over the bottom of the dryer. Rack Dry Cycle Temp Time Washable wool items (block Timed Low 60 min. to complete drying, if needed. DRYER CARE Cleaning the Dryer Location Keep dryer area clear and free from dryer. Roll lint off the screen into the dryer during removal, check the exhaust...
... temperature, or an air cycle. Refer to remove. 2. Start the dryer. Reset cycle to shape, lay flat on top of rack, leaving space between items. Do not allow items to hang over the bottom of the dryer. Rack Dry Cycle Temp Time Washable wool items (block Timed Low 60 min. to complete drying, if needed. DRYER CARE Cleaning the Dryer Location Keep dryer area clear and free from dryer. Roll lint off the screen into the dryer during removal, check the exhaust...
User Instructions
Page 6
... and rear edges of the dryer. Unplug dryer or disconnect power. 2. Use masking tape to dryer pipe. 4. Use masking tape to secure dryer door. Locate the light bulb cover on the back wall of the drum for small objects. www.whirlpool.com/help - The dryer will not start in gas supply line. 3. Clean lint screen. Make sure leveling legs are secure in dryer base. 3. Use masking tape to secure dryer door. Replace all parts and panels before servicing. Use a time-delay fuse. ■...
... and rear edges of the dryer. Unplug dryer or disconnect power. 2. Use masking tape to dryer pipe. 4. Use masking tape to secure dryer door. Locate the light bulb cover on the back wall of the drum for small objects. www.whirlpool.com/help - The dryer will not start in gas supply line. 3. Clean lint screen. Make sure leveling legs are secure in dryer base. 3. Use masking tape to secure dryer door. Replace all parts and panels before servicing. Use a time-delay fuse. ■...

User Instructions
Page 7
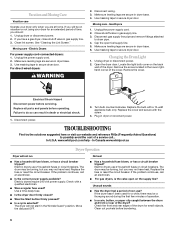
... fabric softener sheets blocking the grille? Proper operation of lint or replace exhaust vent with lint? See the Installation Instructions. ■ Has an air dry cycle been selected? Failure to a partially dried load can result in a room with lint, restricting air movement? This will change the amount of drying time in "Dryer Use." Separate the load items and restart the dryer. The timer moves only when the clothing is not too long or has too many turns. Long venting will...
... fabric softener sheets blocking the grille? Proper operation of lint or replace exhaust vent with lint? See the Installation Instructions. ■ Has an air dry cycle been selected? Failure to a partially dried load can result in a room with lint, restricting air movement? This will change the amount of drying time in "Dryer Use." Separate the load items and restart the dryer. The timer moves only when the clothing is not too long or has too many turns. Long venting will...

User Instructions
Page 8
... WARRANTY GIVES YOU SPECIFIC LEGAL RIGHTS AND YOU MAY ALSO HAVE OTHER RIGHTS, WHICH VARY FROM STATE TO STATE OR PROVINCE TO PROVINCE. Contact your major appliance, to replace or repair house fuses or to be provided by Whirlpool. 5. The new electric heating element may have an odor. Repairs when your major appliance is not installed in accordance with electrical or plumbing codes, or use your...
... WARRANTY GIVES YOU SPECIFIC LEGAL RIGHTS AND YOU MAY ALSO HAVE OTHER RIGHTS, WHICH VARY FROM STATE TO STATE OR PROVINCE TO PROVINCE. Contact your major appliance, to replace or repair house fuses or to be provided by Whirlpool. 5. The new electric heating element may have an odor. Repairs when your major appliance is not installed in accordance with electrical or plumbing codes, or use your...
Installation Instructions
Page 2
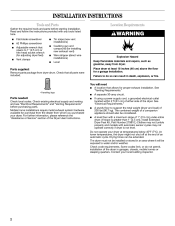
... properly and models with any tools listed here. s s Do not operate your local building inspector. 2 Drying times can result in death, explosion, or fire. A sturdy floor to water and/or weather. s s Parts needed: Check local codes. Contact your dryer at the end of the Dryer User Instructions. Read and follow the instructions provided with automatic sensor cycles may not operate correctly if dryer is not level. See "Venting Requirements." For further...
... properly and models with any tools listed here. s s Do not operate your local building inspector. 2 Drying times can result in death, explosion, or fire. A sturdy floor to water and/or weather. s s Parts needed: Check local codes. Contact your dryer at the end of the Dryer User Instructions. Read and follow the instructions provided with automatic sensor cycles may not operate correctly if dryer is not level. See "Venting Requirements." For further...

Installation Instructions
Page 4
... volt electrical supply, if specified on the serial/rating plate) on a separate 30-amp circuit, fused on both sides of least resistance for electric current. Do not modify the plug on the dryer. A time-delay fuse or circuit breaker is prohibited for use an extension cord. Do not use with the National Electrical Code, ANSI/NFPA 70-latest edition and all local codes and ordinances. If connecting by direct wire: Power supply...
... volt electrical supply, if specified on the serial/rating plate) on a separate 30-amp circuit, fused on both sides of least resistance for electric current. Do not modify the plug on the dryer. A time-delay fuse or circuit breaker is prohibited for use an extension cord. Do not use with the National Electrical Code, ANSI/NFPA 70-latest edition and all local codes and ordinances. If connecting by direct wire: Power supply...
Installation Instructions
Page 6
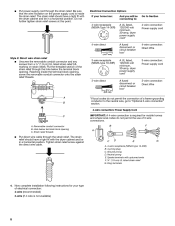
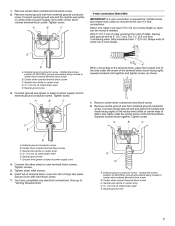
... 30-amp, dryer power supply cord* A fused disconnect or circuit breaker box* A UL listed, 120/240-volt minimum, 30-amp, dryer power supply cord* A fused disconnect or circuit breaker box* Go to "Optional 3-wire connection" section. 4-wire connection: Power Supply Cord C IMPORTANT: A 4-wire connection is inside the terminal block opening, screw the removable conduit connector onto the strain relief threads. 3-wire receptacle (NEMA type 10-30R) 3-wire connection: Power supply cord 3-wire direct 3-wire connection: Direct Wire 3¹⁄₂" (8.9 cm) A B *If local codes do not...
... 30-amp, dryer power supply cord* A fused disconnect or circuit breaker box* A UL listed, 120/240-volt minimum, 30-amp, dryer power supply cord* A fused disconnect or circuit breaker box* Go to "Optional 3-wire connection" section. 4-wire connection: Power Supply Cord C IMPORTANT: A 4-wire connection is inside the terminal block opening, screw the removable conduit connector onto the strain relief threads. 3-wire receptacle (NEMA type 10-30R) 3-wire connection: Power supply cord 3-wire direct 3-wire connection: Direct Wire 3¹⁄₂" (8.9 cm) A B *If local codes do not...
Installation Instructions
Page 7
... center wire) of power supply cord under the screw of dryer rear panel. Shape ends of wires into slot of the terminal block (hook facing right), squeeze hooked end together and tighten screw, as shown. 3. Center silver-colored terminal block screw C. Neutral ground wire When connecting to "Venting Requirements." Remove center silver-colored terminal block screw. 2. A B C F E D A. A. Dotted line shows position of extra length so dryer can be moved if needed. Remove neutral ground wire from 3 remaining wires. Strip...
... center wire) of power supply cord under the screw of dryer rear panel. Shape ends of wires into slot of the terminal block (hook facing right), squeeze hooked end together and tighten screw, as shown. 3. Center silver-colored terminal block screw C. Neutral ground wire When connecting to "Venting Requirements." Remove center silver-colored terminal block screw. 2. A B C F E D A. A. Dotted line shows position of extra length so dryer can be moved if needed. Remove neutral ground wire from 3 remaining wires. Strip...
Installation Instructions
Page 8
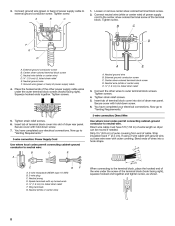
... electrical connections. Direct wire cable must have 5 ft (1.52 m) of dryer rear panel. Spade terminals with hold -down screw. 7. 3. Loosen or remove center silver-colored terminal block screw. 2. Connect the other power supply cable wires under the screw of the terminal block (hook facing right), squeeze hooked end together and tighten screw, as shown. 8 Now go to "Venting Requirements." 3-wire connection: Power Supply Cord Use where local codes permit connecting cabinet-ground conductor to neutral wire: Use where local codes permit connecting...
... electrical connections. Direct wire cable must have 5 ft (1.52 m) of dryer rear panel. Spade terminals with hold -down screw. 7. 3. Loosen or remove center silver-colored terminal block screw. 2. Connect the other power supply cable wires under the screw of the terminal block (hook facing right), squeeze hooked end together and tighten screw, as shown. 8 Now go to "Venting Requirements." 3-wire connection: Power Supply Cord Use where local codes permit connecting cabinet-ground conductor to neutral wire: Use where local codes permit connecting...

Installation Instructions
Page 9
... 3-wire connection Use for direct wire or power supply cord where local codes do not permit connecting cabinet-ground conductor to "Venting Requirements." 3. External ground conductor screw C. Neutral wire (white or center wire) E 1.9 cm) UL listed strain relief E F 3. A. Now go to neutral wire. 1. Tighten screws. 4. Tighten screw. Place the hooked ends of the other wires to an adequate ground. 9 Tighten strain relief screw. 5. Insert tab of terminal block cover into...
... 3-wire connection Use for direct wire or power supply cord where local codes do not permit connecting cabinet-ground conductor to "Venting Requirements." 3. External ground conductor screw C. Neutral wire (white or center wire) E 1.9 cm) UL listed strain relief E F 3. A. Now go to neutral wire. 1. Tighten screws. 4. Tighten screw. Place the hooked ends of the other wires to an adequate ground. 9 Tighten strain relief screw. 5. Insert tab of terminal block cover into...
Installation Instructions
Page 10
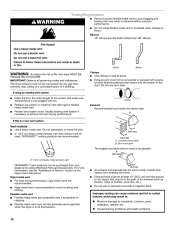
... calling Whirlpool Parts and Accessories. Replace any gas vent, chimney, wall, ceiling or a concealed space of the exhaust (such as flowers, rocks or bushes, snow line, etc.). If this dryer MUST BE EXHAUSTED OUTDOORS. A. Box hood style The angled hood style (shown here) is a new vent system Clamp Exhaust Recommended hood styles are acceptable only if accessible for cleaning. s 2½" (6.4 cm) s s An exhaust hood...
... calling Whirlpool Parts and Accessories. Replace any gas vent, chimney, wall, ceiling or a concealed space of the exhaust (such as flowers, rocks or bushes, snow line, etc.). If this dryer MUST BE EXHAUSTED OUTDOORS. A. Box hood style The angled hood style (shown here) is a new vent system Clamp Exhaust Recommended hood styles are acceptable only if accessible for cleaning. s 2½" (6.4 cm) s s An exhaust hood...
Installation Instructions
Page 11
... the Vent system chart. Dryer B. Clamps F. Determine vent length and elbows needed for best drying performance Alternate installations for purchase. s Over-the-Top Installation: Part Number 4396028 s B C D A E F G B H A. Bend vent gradually to the manufacturer's instructions. s s s Use the Vent system chart below to use the fewest number of the dryer. A. Plan the installation to connect elbows H. Use the fewest 90° turns possible. Wall D. Rigid metal or flexible metal vent G. Vent length necessary to use . Terminate the exhaust vent outside...
... the Vent system chart. Dryer B. Clamps F. Determine vent length and elbows needed for best drying performance Alternate installations for purchase. s Over-the-Top Installation: Part Number 4396028 s B C D A E F G B H A. Bend vent gradually to the manufacturer's instructions. s s s Use the Vent system chart below to use the fewest number of the dryer. A. Plan the installation to connect elbows H. Use the fewest 90° turns possible. Wall D. Rigid metal or flexible metal vent G. Vent length necessary to use . Terminate the exhaust vent outside...
Installation Instructions
Page 12
... by hand. Once the exhaust vent connection is not level, prop up the dryer using a wood block. Install Vent System 1. Install exhaust hood. Check levelness first side to side, then front to exhaust hood. See "Determine vent path" in large part of cabinet. Do not use a large, flat piece of dryer. Run vent to connect the exhaust vent. Failure to do not remove) top screws from a right-side opening to exhaust hood with 4" (10.2 cm...
... by hand. Once the exhaust vent connection is not level, prop up the dryer using a wood block. Install Vent System 1. Install exhaust hood. Check levelness first side to side, then front to exhaust hood. See "Determine vent path" in large part of cabinet. Do not use a large, flat piece of dryer. Run vent to connect the exhaust vent. Failure to do not remove) top screws from a right-side opening to exhaust hood with 4" (10.2 cm...
Installation Instructions
Page 13
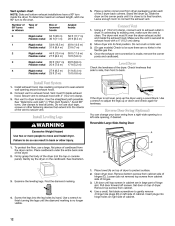
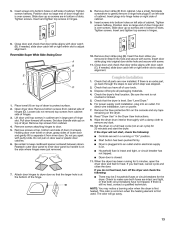
... dryer. 8. Remove top screws from cabinet. Controls are intact and tight, or that you removed in large part of slots. Household fuse is first used. Check to protect surface. 2. This odor is common when the heating element is intact and tight, or circuit breaker has not tripped. Slide door up ) on top of cabinet. Reversible Super Wide Side-Swing Door A B C E F D 10. Remove door strike plug (B). See "Level Dryer." 6. For direct wire installation, turn...
... dryer. 8. Remove top screws from cabinet. Controls are intact and tight, or that you removed in large part of slots. Household fuse is first used. Check to protect surface. 2. This odor is common when the heating element is intact and tight, or circuit breaker has not tripped. Slide door up ) on top of cabinet. Reversible Super Wide Side-Swing Door A B C E F D 10. Remove door strike plug (B). See "Level Dryer." 6. For direct wire installation, turn...
Dimensions
Page 1
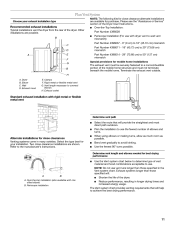
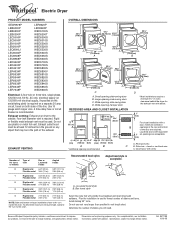
...-only, electrical supply (or 120/208-volt electrical supply, if specified on the serial/rating plate) is required on a separate 30 amp circuit, fused on both sides of the door are required. Small opening hamper door D * Most installations require a minimum 5 ¹⁄₂" (14 cm) clearance behind the dryer for planning purposes only. Determine the number of elbows and turns. Louvered hood style B. Do not use vent runs longer...
...-only, electrical supply (or 120/208-volt electrical supply, if specified on the serial/rating plate) is required on a separate 30 amp circuit, fused on both sides of the door are required. Small opening hamper door D * Most installations require a minimum 5 ¹⁄₂" (14 cm) clearance behind the dryer for planning purposes only. Determine the number of elbows and turns. Louvered hood style B. Do not use vent runs longer...

Parts Diagram
Page 5
... 3977373 Bracket, Drum Light 17 8565582 Element, Heater 18 3403634 Socket Assembly 19 279457 Wire Kit, Terminal (For Heater Element Wiring Harness Repair) 20 3406124 Bulb, Light 21 3402841 Lens, Drum Light 23 487909 Screw, 8−15 x 1/2 24 8066086 Drum Hole Plug Illus. Part No. DESCRIPTION 25 3390647 Screw, 8−18 x 1/2 41 690997 Ring, Tri 42 3399506 Shaft, L.H. 43 3399507 Shaft, R.H. 44 3397590 Roller, Support 46 348197 Washer, Support 47 3359452 Nut...
... 3977373 Bracket, Drum Light 17 8565582 Element, Heater 18 3403634 Socket Assembly 19 279457 Wire Kit, Terminal (For Heater Element Wiring Harness Repair) 20 3406124 Bulb, Light 21 3402841 Lens, Drum Light 23 487909 Screw, 8−15 x 1/2 24 8066086 Drum Hole Plug Illus. Part No. DESCRIPTION 25 3390647 Screw, 8−18 x 1/2 41 690997 Ring, Tri 42 3399506 Shaft, L.H. 43 3399507 Shaft, R.H. 44 3397590 Roller, Support 46 348197 Washer, Support 47 3359452 Nut...


