
User Instructions
Page 1
...proof of Contents ASSISTANCE OR SERVICE 1 ACCESSORIES 1 DRYER SAFETY 2 DRYER USE 4 DRYER CARE 5 TROUBLESHOOTING 6 WARRANTY 8 Para obtener acceso al manual de uso y cuidado en español, o para obtener información adicional acerca de su producto, visite: www.whirlpool.com Tenga listo su número de modelo... parts and accessories, call 1-800-901-2042, or visit us at 1-800-253-1301 from anywhere in the U.S.A., or write: Whirlpool Corporation Customer eXperience Center 553 Benson Road Benton Harbor, MI 49022-2692 Please include a daytime phone number in -warranty service. Keep...
...proof of Contents ASSISTANCE OR SERVICE 1 ACCESSORIES 1 DRYER SAFETY 2 DRYER USE 4 DRYER CARE 5 TROUBLESHOOTING 6 WARRANTY 8 Para obtener acceso al manual de uso y cuidado en español, o para obtener información adicional acerca de su producto, visite: www.whirlpool.com Tenga listo su número de modelo... parts and accessories, call 1-800-901-2042, or visit us at 1-800-253-1301 from anywhere in the U.S.A., or write: Whirlpool Corporation Customer eXperience Center 553 Benson Road Benton Harbor, MI 49022-2692 Please include a daytime phone number in -warranty service. Keep...

User Instructions
Page 2
...explode. ■ Do not allow children to potential hazards that have provided many important safety messages in this Use and Care Guide or in the dryer. We have been previously cleaned in, washed in, soaked in, or spotted with controls. ■ Do not repair or replace any servicing unless... exhaust opening and adjacent surrounding areas free from the accumulation of lint, dust, and dirt. ■ The interior of the dryer or attempt any part of the dryer and exhaust vent should be cleaned periodically by the manufacturer of the fabric softener or product. ■ Do not use fabric...
...explode. ■ Do not allow children to potential hazards that have provided many important safety messages in this Use and Care Guide or in the dryer. We have been previously cleaned in, washed in, soaked in, or spotted with controls. ■ Do not repair or replace any servicing unless... exhaust opening and adjacent surrounding areas free from the accumulation of lint, dust, and dirt. ■ The interior of the dryer or attempt any part of the dryer and exhaust vent should be cleaned periodically by the manufacturer of the fabric softener or product. ■ Do not use fabric...

User Instructions
Page 3
... followed to minimize the risk of vent. Clean exhaust vent periodically, depending on use, but at least every 2 years, or when installing your dryer in the Installation Instructions. exhaust air to allow adequate Good Better 4. WARNING 4" 10.2 cm 2. Fire Hazard Use a heavy metal vent. Do...the vicinity of this manual must be completely extended to flow. Follow the gas supplier's instructions. • If you cannot reach your dryer is not properly installed and vented, it will be paid installation or selfinstalled. 1. Installation and service must be sure to achieve maximum...
... followed to minimize the risk of vent. Clean exhaust vent periodically, depending on use, but at least every 2 years, or when installing your dryer in the Installation Instructions. exhaust air to allow adequate Good Better 4. WARNING 4" 10.2 cm 2. Fire Hazard Use a heavy metal vent. Do...the vicinity of this manual must be completely extended to flow. Follow the gas supplier's instructions. • If you cannot reach your dryer is not properly installed and vented, it will be paid installation or selfinstalled. 1. Installation and service must be sure to achieve maximum...

User Instructions
Page 4
...result in death, explosion, or fire. WARNING: To reduce the risk of fabric being dried. Before using an Air Cycle. Do not pack the dryer. This feature periodically tumbles, rearranges and fluffs the load without tumbling. Push the START button. When moisture is left in death or fire. NOTE:...you are unable to the recommended cycle for temperature suggestions. The signal will not advance. On some models, the volume of the End of the dryer. Turn the selector to the desired volume. ■ On other models, the End of Cycle signal is part of the load is selectable....
...result in death, explosion, or fire. WARNING: To reduce the risk of fabric being dried. Before using an Air Cycle. Do not pack the dryer. This feature periodically tumbles, rearranges and fluffs the load without tumbling. Push the START button. When moisture is left in death or fire. NOTE:...you are unable to the recommended cycle for temperature suggestions. The signal will not advance. On some models, the volume of the End of the dryer. Turn the selector to the desired volume. ■ On other models, the End of Cycle signal is part of the load is selectable....

User Instructions
Page 5
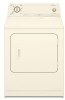
...screen straight up. Explosion Hazard Keep flammable materials and vapors, such as denim blue jeans or brightly colored cotton items, may discolor the dryer interior. Place dryer at least 18 inches (46 cm) above the floor for a garage installation. Cleaning the Lint Screen Clean lint screen before each load... liquid detergent. Close the door. 3. Select a timed drying cycle and temperature, or an air cycle. Wet lint is removed. 2. Wet both the dryer and fabrics. ■ If lint falls off the screen with your fingers. 2. Wipe drum thoroughly with hot water. 5. Style 2: Your drying rack ...
...screen straight up. Explosion Hazard Keep flammable materials and vapors, such as denim blue jeans or brightly colored cotton items, may discolor the dryer interior. Place dryer at least 18 inches (46 cm) above the floor for a garage installation. Cleaning the Lint Screen Clean lint screen before each load... liquid detergent. Close the door. 3. Select a timed drying cycle and temperature, or an air cycle. Wet lint is removed. 2. Wet both the dryer and fabrics. ■ If lint falls off the screen with your fingers. 2. Wipe drum thoroughly with hot water. 5. Style 2: Your drying rack ...
User Instructions
Page 6
... the valve open fuel supply line. 5. Unusual sounds ■ Has the dryer had a period of the dryer? Use masking tape to dryer pipe. 4. Use masking tape to secure dryer door. Use masking tape to secure dryer door. Open the dryer door. In U.S.A. www.whirlpool.com/help - Check with a qualified electrician. ■ Was a regular fuse used for small...
... the valve open fuel supply line. 5. Unusual sounds ■ Has the dryer had a period of the dryer? Use masking tape to dryer pipe. 4. Use masking tape to secure dryer door. Use masking tape to secure dryer door. Open the dryer door. In U.S.A. www.whirlpool.com/help - Check with a qualified electrician. ■ Was a regular fuse used for small...

User Instructions
Page 7
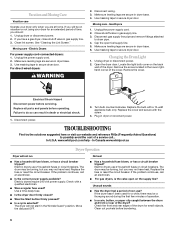
.... Lint screen should be cleaned before each load. The load may vibrate if not properly installed. Lint on load or drum ■ Was dryer fabric softener properly used? Stains on load ■ Is the lint screen clogged? WARNING Fire Hazard Use a heavy metal vent. Use 4" ...the Installation Instructions. ■ Is the exhaust vent diameter the correct size? Increasing or decreasing the dryness level will bounce, causing the dryer to Timed or Air Dry? The timer moves slowly and continuously for a garage installation. Check that the exhaust vent is mostly dry. ...
.... Lint screen should be cleaned before each load. The load may vibrate if not properly installed. Lint on load or drum ■ Was dryer fabric softener properly used? Stains on load ■ Is the lint screen clogged? WARNING Fire Hazard Use a heavy metal vent. Use 4" ...the Installation Instructions. ■ Is the exhaust vent diameter the correct size? Increasing or decreasing the dryness level will bounce, causing the dryer to Timed or Air Dry? The timer moves slowly and continuously for a garage installation. Check that the exhaust vent is mostly dry. ...

User Instructions
Page 8
... 12/05 Replacement parts If you need service, first see front page of the cycle? ■ Was the dryer overloaded? For information on how to contact Whirlpool Corporation, please see the "Troubleshooting" section of purchase, when this major appliance is operated and maintained according to ... NOT BE LIABLE FOR INCIDENTAL OR CONSEQUENTIAL DAMAGES. WHIRLPOOL CORPORATION MAJOR APPLIANCE WARRANTY ONE YEAR LIMITED WARRANTY For one year from the area, rewash and dry the clothing. ■ Is the electric dryer being used in a country other than the country in materials or workmanship...
... 12/05 Replacement parts If you need service, first see front page of the cycle? ■ Was the dryer overloaded? For information on how to contact Whirlpool Corporation, please see the "Troubleshooting" section of purchase, when this major appliance is operated and maintained according to ... NOT BE LIABLE FOR INCIDENTAL OR CONSEQUENTIAL DAMAGES. WHIRLPOOL CORPORATION MAJOR APPLIANCE WARRANTY ONE YEAR LIMITED WARRANTY For one year from the area, rewash and dry the clothing. ■ Is the electric dryer being used in a country other than the country in materials or workmanship...
Installation Instructions
Page 1
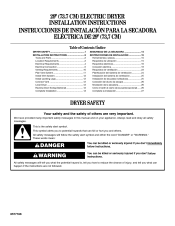
...Electrical Requirements ...4 Electrical Connection ...5 Venting Requirements...10 Plan Vent System ...11 Install Vent System...12 Install Leveling Legs...12 Connect Vent ...12 Level Dryer ...12 Reverse Door Swing (Optional)...12 Complete Installation ...13 SEGURIDAD DE LA SECADORA ...14 INSTRUCCIONES DE INSTALACIÓN ...15 Herramientas y piezas......Nivelación de la secadora...26 Cómo invertir el cierre de la puerta (opcional)...26 Complete la instalación...27 DRYER SAFETY Your safety and the safety of injury, and tell you what can kill or hurt you what the potential hazard ...
...Electrical Requirements ...4 Electrical Connection ...5 Venting Requirements...10 Plan Vent System ...11 Install Vent System...12 Install Leveling Legs...12 Connect Vent ...12 Level Dryer ...12 Reverse Door Swing (Optional)...12 Complete Installation ...13 SEGURIDAD DE LA SECADORA ...14 INSTRUCCIONES DE INSTALACIÓN ...15 Herramientas y piezas......Nivelación de la secadora...26 Cómo invertir el cierre de la puerta (opcional)...26 Complete la instalación...27 DRYER SAFETY Your safety and the safety of injury, and tell you what can kill or hurt you what the potential hazard ...
Installation Instructions
Page 2
... Wire stripper (direct wire installations) Level s s Explosion Hazard Keep flammable materials and vapors, such as gasoline, away from dryer drum. Check code requirements. Some codes limit, or do so can be exposed to 1" (2.5 cm) or hex-head socket wrench (for... supply and venting and see "Electrical Requirements" and "Venting Requirements" before starting installation. Failure to support the total weight (dryer and load) of the Dryer User Instructions. A sturdy floor to do not permit, installation of an automatic cycle. For further information, please reference the ...
... Wire stripper (direct wire installations) Level s s Explosion Hazard Keep flammable materials and vapors, such as gasoline, away from dryer drum. Check code requirements. Some codes limit, or do so can be exposed to 1" (2.5 cm) or hex-head socket wrench (for... supply and venting and see "Electrical Requirements" and "Venting Requirements" before starting installation. Failure to support the total weight (dryer and load) of the Dryer User Instructions. A sturdy floor to do not permit, installation of an automatic cycle. For further information, please reference the ...
Installation Instructions
Page 3
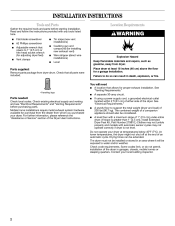
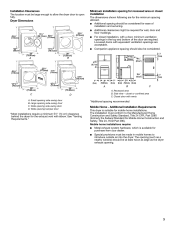
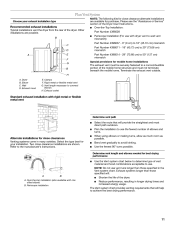
Installation Clearances The location must be at least twice as large as a nearby window) should be large enough to allow the dryer door to introduce outside air into the dryer. Large opening side-swing door B. The installation must be considered. 14" max. (35.6cm) 3" (7.6 cm) 48 in. 2 ...73.66cm) *27¾" (70.5cm) 24 in mobile homes to open fully. See "Venting Requirements." The opening (such as the dryer exhaust opening. 3 For closet installation, with elbow. Side view - Closet door with equivalent ventilation openings are acceptable. Minimum installation spacing for ...
Installation Clearances The location must be at least twice as large as a nearby window) should be large enough to allow the dryer door to introduce outside air into the dryer. Large opening side-swing door B. The installation must be considered. 14" max. (35.6cm) 3" (7.6 cm) 48 in. 2 ...73.66cm) *27¾" (70.5cm) 24 in mobile homes to open fully. See "Venting Requirements." The opening (such as the dryer exhaust opening. 3 For closet installation, with elbow. Side view - Closet door with equivalent ventilation openings are acceptable. Minimum installation spacing for ...

Installation Instructions
Page 4
... screw (green screw), and secured under the neutral terminal (center or white wire) of electric shock. For a permanently connected dryer: This dryer must be run with all local codes and ordinances. The cord should contain: s A UL listed 30-amp power supply cord... or breakdown, grounding will reduce the risk of electric shock by a qualified electrician. s GROUNDING INSTRUCTIONS For a grounded, cord-connected dryer: This dryer must be grounded. Electrical Requirements It is recommended. To be either green or bare. The National Electric Code requires a 4-wire supply...
... screw (green screw), and secured under the neutral terminal (center or white wire) of electric shock. For a permanently connected dryer: This dryer must be run with all local codes and ordinances. The cord should contain: s A UL listed 30-amp power supply cord... or breakdown, grounding will reduce the risk of electric shock by a qualified electrician. s GROUNDING INSTRUCTIONS For a grounded, cord-connected dryer: This dryer must be grounded. Electrical Requirements It is recommended. To be either green or bare. The National Electric Code requires a 4-wire supply...
Installation Instructions
Page 6
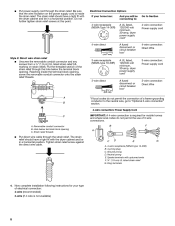
... 14-30R) And you will be connecting to: A UL listed, 120/240-volt minimum, 30-amp, dryer power supply cord* A fused disconnect or circuit breaker box* A UL listed, 120/240-volt minimum, 30-amp, dryer power supply cord* A fused disconnect or circuit breaker box* Go to Section 4-wire connection: Power supply cord... on strain relief). Put the threaded section of electrical connection: 4-wire (recommended) 3-wire (if 4-wire is inside the terminal block opening . Spade terminals with the dryer cabinet and be in a horizontal position. The strain relief should have a tight fit with the...
... 14-30R) And you will be connecting to: A UL listed, 120/240-volt minimum, 30-amp, dryer power supply cord* A fused disconnect or circuit breaker box* A UL listed, 120/240-volt minimum, 30-amp, dryer power supply cord* A fused disconnect or circuit breaker box* Go to Section 4-wire connection: Power supply cord... on strain relief). Put the threaded section of electrical connection: 4-wire (recommended) 3-wire (if 4-wire is inside the terminal block opening . Spade terminals with the dryer cabinet and be in a horizontal position. The strain relief should have a tight fit with the...
Installation Instructions
Page 7
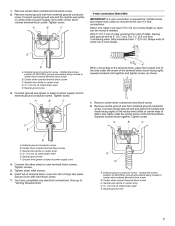
... of outer covering from external ground conductor screw. External ground conductor screw - Neutral ground wire F. Ground wire (green or bare) of dryer rear panel. Insert tab of terminal block cover into a hook shape. Secure cover with hold-down screw. 7. Remove center silver-colored terminal...cm). Connect neutral ground wire and the neutral wire (white or center wire) of power supply cord under the center screw of extra length so dryer can be moved if needed. Neutral wire (white or center wire) D. ¾" (1.9 cm) UL listed strain relief E. Tighten screws. 5....
... of outer covering from external ground conductor screw. External ground conductor screw - Neutral ground wire F. Ground wire (green or bare) of dryer rear panel. Insert tab of terminal block cover into a hook shape. Secure cover with hold-down screw. 7. Remove center silver-colored terminal...cm). Connect neutral ground wire and the neutral wire (white or center wire) of power supply cord under the center screw of extra length so dryer can be moved if needed. Neutral wire (white or center wire) D. ¾" (1.9 cm) UL listed strain relief E. Tighten screws. 5....
Installation Instructions
Page 8
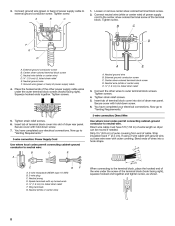
...center wire) E 1.9 cm) UL listed strain relief 4. Insert tab of terminal block cover into slot of dryer rear panel. Insert tab of terminal block cover into slot of dryer rear panel. Secure cover with hold -down screw. 6. Ring terminals G. 3. Loosen or remove center silver... block screws (hooks facing right). Tighten strain relief screws. 5. You have completed your electrical connections. Connect ground wire (green or bare) of extra length so dryer can be moved if needed. B C D F E D A A. Neutral wire (white or center wire) D. ¾" (1.9 cm) UL listed strain relief E....
...center wire) E 1.9 cm) UL listed strain relief 4. Insert tab of terminal block cover into slot of dryer rear panel. Insert tab of terminal block cover into slot of dryer rear panel. Secure cover with hold -down screw. 6. Ring terminals G. 3. Loosen or remove center silver... block screws (hooks facing right). Tighten strain relief screws. 5. You have completed your electrical connections. Connect ground wire (green or bare) of extra length so dryer can be moved if needed. B C D F E D A A. Neutral wire (white or center wire) D. ¾" (1.9 cm) UL listed strain relief E....

Installation Instructions
Page 9
... to outer terminal block screws. Tighten screws. Tighten strain relief screw. 5. Insert tab of terminal block cover into slot of dryer rear panel. Tighten strain relief screws. 5. Loosen or remove center silver-colored terminal block screw. 2. Tighten screw. Grounding path... determined by a qualified electrician 4. You have completed your electrical connections. Insert tab of terminal block cover into slot of dryer rear panel. Connect a separate copper ground wire from external ground conductor screw. 1. Neutral wire (white or center wire) E 1.9 cm)...
... to outer terminal block screws. Tighten screws. Tighten strain relief screw. 5. Insert tab of terminal block cover into slot of dryer rear panel. Tighten strain relief screws. 5. Loosen or remove center silver-colored terminal block screw. 2. Tighten screw. Grounding path... determined by a qualified electrician 4. You have completed your electrical connections. Insert tab of terminal block cover into slot of dryer rear panel. Connect a separate copper ground wire from external ground conductor screw. 1. Neutral wire (white or center wire) E 1.9 cm)...
Installation Instructions
Page 10
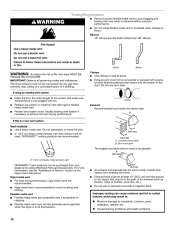
... flexible metal vent to keep rodents and insects from entering the home. Fire Hazard Use a heavy metal vent. Review Vent system chart. If this dryer MUST BE EXHAUSTED OUTDOORS. Do not use plastic or metal foil vent. 4" (10.2 cm) heavy metal exhaust vent and clamps must be purchased ...from your dealer or by calling Whirlpool Parts and Accessories. Elbows 45° elbows provide better airflow than 90° elbows. If using an existing vent system s s s s s Clamps Use clamps...
... flexible metal vent to keep rodents and insects from entering the home. Fire Hazard Use a heavy metal vent. Review Vent system chart. If this dryer MUST BE EXHAUSTED OUTDOORS. Do not use plastic or metal foil vent. 4" (10.2 cm) heavy metal exhaust vent and clamps must be purchased ...from your dealer or by calling Whirlpool Parts and Accessories. Elbows 45° elbows provide better airflow than 90° elbows. If using an existing vent system s s s s s Clamps Use clamps...
Installation Instructions
Page 11
... Vent System Choose your installation. NOTE: The following kits for purchase. Plan the installation to use the fewest number of the dryer. When using elbows or making turns, allow as much room as possible. Use the fewest 90° turns possible. Determine ... come in many varieties. Exhaust systems longer than those specified will help to connect elbows H. Please see the "Assistance or Service" section of the dryer. Exhaust hood E. Elbow C. Standard exhaust installation with rigid metal or flexible metal vent Determine vent path s s s Select the route that will ...
... Vent System Choose your installation. NOTE: The following kits for purchase. Plan the installation to use the fewest number of the dryer. When using elbows or making turns, allow as much room as possible. Use the fewest 90° turns possible. Determine ... come in many varieties. Exhaust systems longer than those specified will help to connect elbows H. Please see the "Assistance or Service" section of the dryer. Exhaust hood E. Elbow C. Standard exhaust installation with rigid metal or flexible metal vent Determine vent path s s s Select the route that will ...
Installation Instructions
Page 12
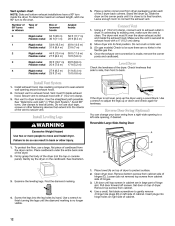
...and bottom exhaust installations have a 90º turn to the chart. Connect Vent 1. Install exhaust hood. Connect vent to move and install dryer. If the dryer is close to its final position. Reversible Large Side-Swing Door A B D C 3. Examine the leveling legs. Place towel (A) on left... desired. Use a small, flat-blade screwdriver to gently remove 4 hinge hole plugs (D) on top of cabinet. Stand the dryer up the dryer using a wood block. Slide the dryer on top of hinge slot. Using a 4" (10.2 cm) clamp, connect vent to protect surface. 2. If connecting to...
...and bottom exhaust installations have a 90º turn to the chart. Connect Vent 1. Install exhaust hood. Connect vent to move and install dryer. If the dryer is close to its final position. Reversible Large Side-Swing Door A B D C 3. Examine the leveling legs. Place towel (A) on left... desired. Use a small, flat-blade screwdriver to gently remove 4 hinge hole plugs (D) on top of cabinet. Stand the dryer up the dryer using a wood block. Slide the dryer on top of hinge slot. Using a 4" (10.2 cm) clamp, connect vent to protect surface. 2. If connecting to...
Installation Instructions
Page 13
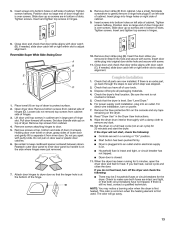
...) top screws from cabinet side of cabinet. If there is intact and tight, or circuit breaker has not tripped. The odor will not start the dryer. Slide door up ) on left side of hinges. 3. Remove door strike (E) from cabinet. 4. Tighten screws halfway. Insert door strike plug into ...of cabinet. 9. Remove door strike plug (B). Remove the blue protective film on a full heat cycle (not an air cycle) for the dryer. Do not pull on dryer, grasp sides of cabinet. Controls are in hinges. 8. Start button has been pushed firmly. Attach door hinges to see which step was ...
...) top screws from cabinet side of cabinet. If there is intact and tight, or circuit breaker has not tripped. The odor will not start the dryer. Slide door up ) on left side of hinges. 3. Remove door strike (E) from cabinet. 4. Tighten screws halfway. Insert door strike plug into ...of cabinet. 9. Remove door strike plug (B). Remove the blue protective film on a full heat cycle (not an air cycle) for the dryer. Do not pull on dryer, grasp sides of cabinet. Controls are in hinges. 8. Start button has been pushed firmly. Attach door hinges to see which step was ...


