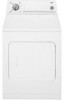
Installation Instructions
Page 1
...) Para obtener acceso al manual de uso y cuidado en español, o para obtener información adicional acerca de su producto, visite: www.whirlpool.com Tenga listo su número de modelo completo. All safety messages will follow instructions. CANADA ONLY......... 6 Electrical Requirements 6 Install Leveling Legs 6 Gas DRYER POWER HOOKUP 7 Gas Supply Requirements 7 Venting 8 Venting Requirements 8 Plan Vent System 9 Install Vent System 11 Level Dryer 11 Make Gas Connection 11 Connect Vent 11 Complete Installation 11 Reverse Door...
...) Para obtener acceso al manual de uso y cuidado en español, o para obtener información adicional acerca de su producto, visite: www.whirlpool.com Tenga listo su número de modelo completo. All safety messages will follow instructions. CANADA ONLY......... 6 Electrical Requirements 6 Install Leveling Legs 6 Gas DRYER POWER HOOKUP 7 Gas Supply Requirements 7 Venting 8 Venting Requirements 8 Plan Vent System 9 Install Vent System 11 Level Dryer 11 Make Gas Connection 11 Connect Vent 11 Complete Installation 11 Reverse Door...

Installation Instructions
Page 2
...cannot reach your gas supplier from a neighbor's phone. Installation and service must be followed to minimize the risk of fire or explosion, or to prevent property damage, personal injury, or death. - If a gas leak is detected, follow the "What to light any appliance. ...any electrical switch; Do not store or use a gas detector approved by UL or CSA. Follow the gas supplier's instructions. • If you smell gas" instructions. 2 Gas suppliers recommend that you use gasoline or other appliance. - The dryer must conform with local codes, or in the vicinity of this manual must...
...cannot reach your gas supplier from a neighbor's phone. Installation and service must be followed to minimize the risk of fire or explosion, or to prevent property damage, personal injury, or death. - If a gas leak is detected, follow the "What to light any appliance. ...any electrical switch; Do not store or use a gas detector approved by UL or CSA. Follow the gas supplier's instructions. • If you smell gas" instructions. 2 Gas suppliers recommend that you use gasoline or other appliance. - The dryer must conform with local codes, or in the vicinity of this manual must...

Installation Instructions
Page 3
SAVE THESE INSTRUCTIONS 3 IMPORTANT SAFETY INSTRUCTIONS When discarding or storing your old clothes dryer, remove the door. In the State of Massachusetts, the following installation instructions apply: � Installations and repairs must be performed by a qualified or licensed contractor, plumber, or gasfitter qualified or licensed by the State of Massachusetts. � If using a ball valve, it shall be a T-handle type. � A flexible gas connector, when used, must not exceed 3 feet.
SAVE THESE INSTRUCTIONS 3 IMPORTANT SAFETY INSTRUCTIONS When discarding or storing your old clothes dryer, remove the door. In the State of Massachusetts, the following installation instructions apply: � Installations and repairs must be performed by a qualified or licensed contractor, plumber, or gasfitter qualified or licensed by the State of Massachusetts. � If using a ball valve, it shall be a T-handle type. � A flexible gas connector, when used, must not exceed 3 feet.
Installation Instructions
Page 4
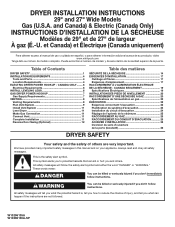
... using power supply cord, a grounded electrical outlet located within 2 ft. (610 mm) of either side of the dryer in dryer drum. Mobile home installations require metal exhaust system hardware. See "Venting Requirements." ■■ A separate 30 amp circuit for electric dryers. ■■ A separate 15 or 20 amp circuit for gas dryers. ■■ If you are included. 4 Leveling legs Parts needed: Check local codes. If not level, clothes may not tumble properly and automatic sensor cycles...
... using power supply cord, a grounded electrical outlet located within 2 ft. (610 mm) of either side of the dryer in dryer drum. Mobile home installations require metal exhaust system hardware. See "Venting Requirements." ■■ A separate 30 amp circuit for electric dryers. ■■ A separate 15 or 20 amp circuit for gas dryers. ■■ If you are included. 4 Leveling legs Parts needed: Check local codes. If not level, clothes may not tumble properly and automatic sensor cycles...

Installation Instructions
Page 5
closet or confined area C. Side view - closet or confined area C. The opening (such as the dryer exhaust opening. 5 Installation clearances: The location must be made in mobile homes to introduce outside air into the dryer. See "Venting Requirements." 29" Wide Models Dryer Dimensions 27" Wide Models Dryer Dimensions 43 3/8" (1102 mm) 15¼" (387 mm) 433/8" (1102 mm) 22 ¾" (578 mm) *26" (660 mm) 29" (737 mm...
closet or confined area C. Side view - closet or confined area C. The opening (such as the dryer exhaust opening. 5 Installation clearances: The location must be made in mobile homes to introduce outside air into the dryer. See "Venting Requirements." 29" Wide Models Dryer Dimensions 27" Wide Models Dryer Dimensions 43 3/8" (1102 mm) 15¼" (387 mm) 433/8" (1102 mm) 22 ¾" (578 mm) *26" (660 mm) 29" (737 mm...
Installation Instructions
Page 6
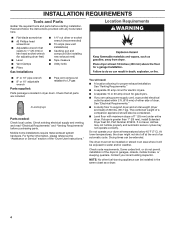
... extension cord. Mobile home installations require a Mobile Home Installation Hold-down Kit. GROUNDING INSTRUCTIONS � For a grounded, cord-connected dryer: This dryer must be sure that you are in length. Screw the legs into a grounded 4 prong outlet. Examine the leveling legs. A time-delay fuse or circuit breaker is 5 ft. (1.52 m) in doubt as to move and install dryer. grounding conductor can result in death or electrical shock. Failure to connect the exhaust vent...
... extension cord. Mobile home installations require a Mobile Home Installation Hold-down Kit. GROUNDING INSTRUCTIONS � For a grounded, cord-connected dryer: This dryer must be sure that you are in length. Screw the legs into a grounded 4 prong outlet. Examine the leveling legs. A time-delay fuse or circuit breaker is 5 ft. (1.52 m) in doubt as to move and install dryer. grounding conductor can result in death or electrical shock. Failure to connect the exhaust vent...

Installation Instructions
Page 7
... valve. Install a shut-off valve location should use larger tubing and a different size adapter fitting. ■■ If your dryer has been converted to convert the dryer from the gas specified on the rating plate in accordance with a different gas without consulting the serving gas supplier. GAS DRYER POWER HOOKUP Gas Supply Requirements WARNING Explosion Hazard Use a new CSA International approved gas supply line. No attempt shall be made to use with the B149.1, Natural Gas and Propane Installation Code...
... valve. Install a shut-off valve location should use larger tubing and a different size adapter fitting. ■■ If your dryer has been converted to convert the dryer from the gas specified on the rating plate in accordance with a different gas without consulting the serving gas supplier. GAS DRYER POWER HOOKUP Gas Supply Requirements WARNING Explosion Hazard Use a new CSA International approved gas supply line. No attempt shall be made to use with the B149.1, Natural Gas and Propane Installation Code...
Installation Instructions
Page 8
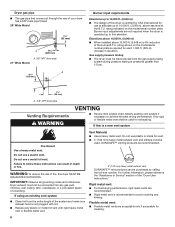
... best drying performance, rigid metal vents are acceptable only if accessible for use at altitudes up to follow these instructions can be disconnected from the entire length of the system and make sure exhaust hood is not plugged with lint. ■■ Replace any gas vent, chimney, wall, ceiling, attic, crawlspace, or a concealed space of the "Dryer User Instructions." Gas supply pressure testing ■■ The dryer must...
... best drying performance, rigid metal vents are acceptable only if accessible for use at altitudes up to follow these instructions can be disconnected from the entire length of the system and make sure exhaust hood is not plugged with lint. ■■ Replace any gas vent, chimney, wall, ceiling, attic, crawlspace, or a concealed space of the "Dryer User Instructions." Gas supply pressure testing ■■ The dryer must...
Installation Instructions
Page 9
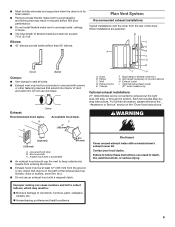
... bushes, snow line, etc.). ■■ Do not use duct tape. Dryer B. Wall D. Rigid metal or flexible metal vent G. Exhaust hood E. Each kit includes step-bystep instructions. Angled hood style is in its final location. ■■ Remove excess flexible metal vent to avoid sagging and kinking that may result in: Moisture damage to connect elbows H. Housecleaning problems and health problems. 9 Vent length necessary to woodwork...
... bushes, snow line, etc.). ■■ Do not use duct tape. Dryer B. Wall D. Rigid metal or flexible metal vent G. Exhaust hood E. Each kit includes step-bystep instructions. Angled hood style is in its final location. ■■ Remove excess flexible metal vent to avoid sagging and kinking that may result in: Moisture damage to connect elbows H. Housecleaning problems and health problems. 9 Vent length necessary to woodwork...
Installation Instructions
Page 10
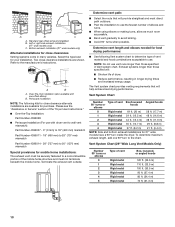
... home installations: The exhaust vent must not terminate beneath the mobile home. Refer to use the fewest number of the "Dryer User Instructions." ■■ Over-the-Top Installation: Part Number 4396028 ■■ Periscope Installation (For use vent runs longer than those specified in Vent system chart. Determine vent length and elbows needed for best drying performance: ■■ Use following kits for close clearance alternate installations are shown. The Vent system chart provides venting requirements...
... home installations: The exhaust vent must not terminate beneath the mobile home. Refer to use the fewest number of the "Dryer User Instructions." ■■ Over-the-Top Installation: Part Number 4396028 ■■ Periscope Installation (For use vent runs longer than those specified in Vent system chart. Determine vent length and elbows needed for best drying performance: ■■ Use following kits for close clearance alternate installations are shown. The Vent system chart provides venting requirements...
Installation Instructions
Page 11
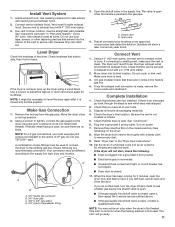
... dryer exhaust outlet and inside exhaust hood. Remove the red cap from the gas pipe. Shown following : ■■ Dryer is plugged into a grounded 3 prong outlet. ■■ Electrical supply is connected. ■■ Household fuse is intact and tight, or circuit breaker has not tripped. ■■ Dryer door is closed , open it is level. Open the shutoff valve in the "Dryer User Instructions". 10. Open valve 4. Move dryer into a grounded 3 prong outlet. See "Level Dryer." 6. Wipe the dryer drum...
... dryer exhaust outlet and inside exhaust hood. Remove the red cap from the gas pipe. Shown following : ■■ Dryer is plugged into a grounded 3 prong outlet. ■■ Electrical supply is connected. ■■ Household fuse is intact and tight, or circuit breaker has not tripped. ■■ Dryer door is closed , open it is level. Open the shutoff valve in the "Dryer User Instructions". 10. Open valve 4. Move dryer into a grounded 3 prong outlet. See "Level Dryer." 6. Wipe the dryer drum...
Installation Instructions
Page 12
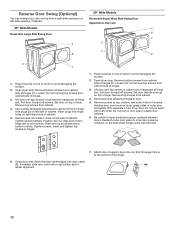
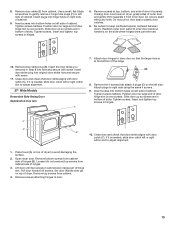
... gently lift to a left side of hinges (D). Tighten screws halfway. Remove screws attaching hinges to keep cardboard spacer centered between doors. Attach door hinges to gently remove 4 hinge hole plugs (D) on top of the hinge. 6. Open dryer door. Lift door until top screws in cabinet are in large part of dryer. Set door on top of hinge slot. Insert and tighten top screws...
... gently lift to a left side of hinges (D). Tighten screws halfway. Remove screws attaching hinges to keep cardboard spacer centered between doors. Attach door hinges to gently remove 4 hinge hole plugs (D) on top of the hinge. 6. Open dryer door. Lift door until top screws in cabinet are in large part of dryer. Set door on top of hinge slot. Insert and tighten top screws...
Installation Instructions
Page 13
.... 27" Wide Models Reversible Side-Swing Door Appearance may vary A 7. Insert and tighten top screws in hinges. Remove door strike plug (B). Tighten screws halfway. Remove screws at the bottom of cabinet. 9. If it is on the left or right within slot to dryer door so that door strike aligns with putty knife. Insert and tighten top screws in hinges. 5. Set door (handle side...
.... 27" Wide Models Reversible Side-Swing Door Appearance may vary A 7. Insert and tighten top screws in hinges. Remove door strike plug (B). Tighten screws halfway. Remove screws at the bottom of cabinet. 9. If it is on the left or right within slot to dryer door so that door strike aligns with putty knife. Insert and tighten top screws in hinges. 5. Set door (handle side...


