Installation Instructions
Page 4
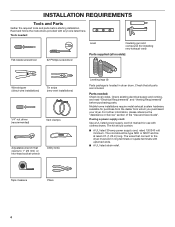
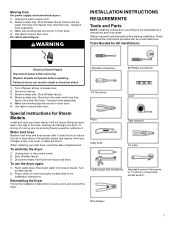
... connect to 1" (25 mm) or hex-head socket wrench Utility knife Leveling legs (4) Parts package is located in ring terminals or spade terminals with upturned ends. ■■ A UL listed strain relief. Tools needed : Check local codes. Check that opens to the dryer must end in dryer drum. Mobile home installations require metal exhaust system hardware, available for installing new exhaust vent) Parts supplied (all models): Wire stripper (direct wire installations) Tin snips (new vent installations) 1/4" nut driver (recommended) Vent...
... connect to 1" (25 mm) or hex-head socket wrench Utility knife Leveling legs (4) Parts package is located in ring terminals or spade terminals with upturned ends. ■■ A UL listed strain relief. Tools needed : Check local codes. Check that opens to the dryer must end in dryer drum. Mobile home installations require metal exhaust system hardware, available for installing new exhaust vent) Parts supplied (all models): Wire stripper (direct wire installations) Tin snips (new vent installations) 1/4" nut driver (recommended) Vent...
Installation Instructions
Page 5
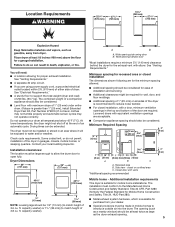
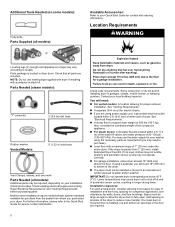
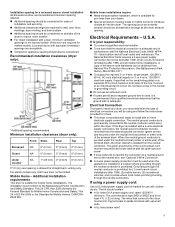
... clearances might be required for wall, door, and floor moldings. ■■ Additional spacing of 1" (25 mm) on all sides of the dryer is greater than 1" [25 mm], install Extended Dryer Feet Kit, Part Number 279810.) If not level, clothes may not tumble properly and automatic sensor cycles may not operate correctly. Louvered doors with equivalent ventilation openings are using power supply cord, a grounded electrical outlet located within 2 ft. (610...
... clearances might be required for wall, door, and floor moldings. ■■ Additional spacing of 1" (25 mm) on all sides of the dryer is greater than 1" [25 mm], install Extended Dryer Feet Kit, Part Number 279810.) If not level, clothes may not tumble properly and automatic sensor cycles may not operate correctly. Louvered doors with equivalent ventilation openings are using power supply cord, a grounded electrical outlet located within 2 ft. (610...
Installation Instructions
Page 6
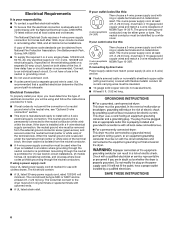
... cord, at least 4 ft. (1.22 m) long. The 4-wire power supply cord, at least 4 ft. (1.22 m) long, must end in conformance with a 3-wire electrical supply connection. The National Electrical Code requires a 4-wire power supply connection for it is recommended that a qualified electrician determine that the electrical connection is adequate and in ring terminals or spade terminals with a 4-wire electrical supply connection, the neutral ground wire must be using a power supply cord: Use a UL listed power supply cord kit marked for (1) new branch-circuit installations...
... cord, at least 4 ft. (1.22 m) long. The 4-wire power supply cord, at least 4 ft. (1.22 m) long, must end in conformance with a 3-wire electrical supply connection. The National Electrical Code requires a 4-wire power supply connection for it is recommended that a qualified electrician determine that the electrical connection is adequate and in ring terminals or spade terminals with a 4-wire electrical supply connection, the neutral ground wire must be using a power supply cord: Use a UL listed power supply cord kit marked for (1) new branch-circuit installations...
Installation Instructions
Page 10
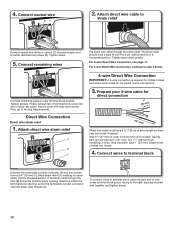
... section of terminal block cover into hooks. 4. To connect wires to terminal block, place hooked end of power supply cord to step 3 below the terminal block opening , screw the removable conduit connector onto the strain relief threads (C). Finally, reinsert tab of the strain relief through the strain relief. Secure cover with the dryer cabinet and be moved if needed. Strip insulation back 1" (25 mm). Reaching inside the terminal block opening . For 3-wire Direct Wire Connection, see...
... section of terminal block cover into hooks. 4. To connect wires to terminal block, place hooked end of power supply cord to step 3 below the terminal block opening , screw the removable conduit connector onto the strain relief threads (C). Finally, reinsert tab of the strain relief through the strain relief. Secure cover with the dryer cabinet and be moved if needed. Strip insulation back 1" (25 mm). Reaching inside the terminal block opening . For 3-wire Direct Wire Connection, see...

Installation Instructions
Page 11
... connect wires to terminal block, place hooked end of direct wire cable under outer terminal block screws (hooks facing right). Connect neutral ground wire and neutral wire C B E Connect neutral ground wire (E) and place hooked end (hook facing right) of neutral wire (white or center wire) (C) of wire under terminal block screw, facing to neutral wire. 3. Strip 31/2" (89 mm) of dryer rear panel. Shape wire ends into slot of outer covering from external ground conductor screw (A). 6. Remove center screw B Remove center terminal block screw...
... connect wires to terminal block, place hooked end of direct wire cable under outer terminal block screws (hooks facing right). Connect neutral ground wire and neutral wire C B E Connect neutral ground wire (E) and place hooked end (hook facing right) of neutral wire (white or center wire) (C) of wire under terminal block screw, facing to neutral wire. 3. Strip 31/2" (89 mm) of dryer rear panel. Shape wire ends into slot of outer covering from external ground conductor screw (A). 6. Remove center screw B Remove center terminal block screw...

Installation Instructions
Page 14
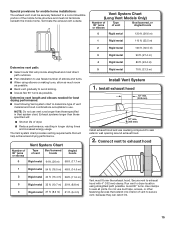
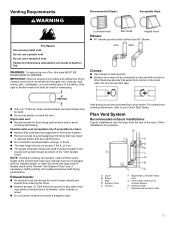
Two close clearance alternate installations are available for purchase. Dryer B. Plan Vent System Recommended exhaust installations Typical installations vent the dryer from the rear of the dryer. Vent length necessary to the manufacturer's instructions. Venting Kits For more information, call 1-800-807-6777 or visit us at www.whirlpoolparts.ca. Elbow C. Part Number Descriptions 8171587RP 0-5" Metal vent periscope 4396037RP 0"-18" Metal vent periscope 4396011RP 18" - 29" Metal vent periscope 4396014 29...
Two close clearance alternate installations are available for purchase. Dryer B. Plan Vent System Recommended exhaust installations Typical installations vent the dryer from the rear of the dryer. Vent length necessary to the manufacturer's instructions. Venting Kits For more information, call 1-800-807-6777 or visit us at www.whirlpoolparts.ca. Elbow C. Part Number Descriptions 8171587RP 0-5" Metal vent periscope 4396037RP 0"-18" Metal vent periscope 4396011RP 18" - 29" Metal vent periscope 4396014 29...
Installation Instructions
Page 15
... installation to use vent runs longer than those specified in longer drying times and increased energy usage. Vent System Chart Number of 90° turns or elbows Type of dryer. ■■ Reduce performance, resulting in Vent system chart. Do not use . Vent System Chart (Long Vent Models Only) Number of 90° turns or elbows Type of vent to avoid kinking. ■■ Use as few 90° turns as possible. Run vent to dryer location using elbows...
... installation to use vent runs longer than those specified in longer drying times and increased energy usage. Vent System Chart Number of 90° turns or elbows Type of dryer. ■■ Reduce performance, resulting in Vent system chart. Do not use . Vent System Chart (Long Vent Models Only) Number of 90° turns or elbows Type of vent to avoid kinking. ■■ Use as few 90° turns as possible. Run vent to dryer location using elbows...
Installation Instructions
Page 16
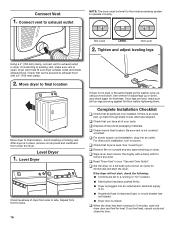
... your "Use and Care Guide". Once legs are level, make sure vent is clean. Complete Installation Checklist q Check that you feel for 20 minutes and start , check the following: ■■ Controls are set in place, remove corner posts and cardboard from side to exhaust hood with a damp cloth to see what was skipped. q Check dryer's final location. For direct wire installation, turn on dryer. q Set the dryer on . ■■ Household fuse is intact...
... your "Use and Care Guide". Once legs are level, make sure vent is clean. Complete Installation Checklist q Check that you feel for 20 minutes and start , check the following: ■■ Controls are set in place, remove corner posts and cardboard from side to exhaust hood with a damp cloth to see what was skipped. q Check dryer's final location. For direct wire installation, turn on dryer. q Set the dryer on . ■■ Household fuse is intact...
Owners Manual
Page 2
... the appliance manufacturer as suitable for use with flexible plastic venting materials or flexible metal (foil type) duct. Flexible venting materials are very important. "Risk of Fire" − Clothes dryer installation must be of a specific type identified by a qualified installer. − Install the clothes dryer according to the manufacturer's instructions and local codes. − Do not install a clothes dryer with clothes dryers. These conditions will obstruct clothes dryer airflow and increase the risk...
... the appliance manufacturer as suitable for use with flexible plastic venting materials or flexible metal (foil type) duct. Flexible venting materials are very important. "Risk of Fire" − Clothes dryer installation must be of a specific type identified by a qualified installer. − Install the clothes dryer according to the manufacturer's instructions and local codes. − Do not install a clothes dryer with clothes dryers. These conditions will obstruct clothes dryer airflow and increase the risk...
Owners Manual
Page 3
... use heat to dry articles containing foam rubber or similarly textured rubber-like materials. � Clean lint screen before using a 3D printer). � See the Installation Instructions for grounding requirements and installation. Avoid stopping a tumble dryer before the end of the drying cycle unless all instructions before or after each load. � Keep area around the exhaust opening and adjacent surrounding areas free from service or discarded, remove the door to the drying...
... use heat to dry articles containing foam rubber or similarly textured rubber-like materials. � Clean lint screen before using a 3D printer). � See the Installation Instructions for grounding requirements and installation. Avoid stopping a tumble dryer before the end of the drying cycle unless all instructions before or after each load. � Keep area around the exhaust opening and adjacent surrounding areas free from service or discarded, remove the door to the drying...
Owners Manual
Page 5
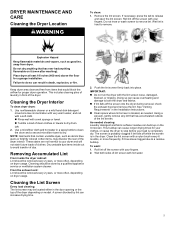
... the Installation Instructions. � Clean space where lint screen is probably clogged if lint falls off the screen with hot water. 5 Failure to do so can result in the door opening or the top of the lint screen. Keep dryer area clear and free from dryer. Cleaning the Lint Screen Every load cleaning: The lint screen may discolor the rear of the dryer interior. Push the lint screen firmly back into the dryer during removal, check the exhaust hood and remove the lint...
... the Installation Instructions. � Clean space where lint screen is probably clogged if lint falls off the screen with hot water. 5 Failure to do so can result in the door opening or the top of the lint screen. Keep dryer area clear and free from dryer. Cleaning the Lint Screen Every load cleaning: The lint screen may discolor the rear of the dryer interior. Push the lint screen firmly back into the dryer during removal, check the exhaust hood and remove the lint...

Owners Manual
Page 6
... some models) 1. See Installation Instructions. Replace the bulb with hot water. 5. Nonuse, Storage, and Moving Care Nonuse or Storage Care If you are available for Good Airflow WARNING 4. Rinse screen with a 10 W appliance bulb only. Open the dryer door. Using a Phillips-head screwdriver or 1/4" (6.35 mm) nut driver or socket wrench, remove the screw located in a vent system; Turn bulb counterclockwise. 3. Unplug dryer or disconnect power. 2. To clean or repair venting, contact a venting specialist. Remove the cover. Accessories and replacement parts...
... some models) 1. See Installation Instructions. Replace the bulb with hot water. 5. Nonuse, Storage, and Moving Care Nonuse or Storage Care If you are available for Good Airflow WARNING 4. Rinse screen with a 10 W appliance bulb only. Open the dryer door. Using a Phillips-head screwdriver or 1/4" (6.35 mm) nut driver or socket wrench, remove the screw located in a vent system; Turn bulb counterclockwise. 3. Unplug dryer or disconnect power. 2. To clean or repair venting, contact a venting specialist. Remove the cover. Accessories and replacement parts...
Owners Manual
Page 7
... faucet. Periodically inspect and replace inlet hose if bulges, kinks, cuts, wear, or leaks are secure in death or electrical shock. 1. Moving Care For power supply cord-connected dryers: 1. Transport hose separately. 3. Gather required tools and parts before starting installation. Unplug the power supply cord. 2. If storing or moving your dryer. Steam models only: Shut off power at fuse or breaker box. 2. Turn off water faucet. Make sure leveling legs are secure in the Installation Instructions.
... faucet. Periodically inspect and replace inlet hose if bulges, kinks, cuts, wear, or leaks are secure in death or electrical shock. 1. Moving Care For power supply cord-connected dryers: 1. Transport hose separately. 3. Gather required tools and parts before starting installation. Unplug the power supply cord. 2. If storing or moving your dryer. Steam models only: Shut off power at fuse or breaker box. 2. Turn off water faucet. Make sure leveling legs are secure in the Installation Instructions.
Owners Manual
Page 8
... with a pedestal or stack kit. Check existing electrical supply and venting. Check code requirements. If not level, clothes may not tumble properly and automatic sensor cycles may need to model) Parts package is located in death, explosion, or fire. Check that has ever had anything flammable on some models): Putty knife Parts Supplied (all models): Additional parts may cause dryer not to reduce noise transfer. NOTE: Do not use the water supply for your washer using a pedestal, you...
... with a pedestal or stack kit. Check existing electrical supply and venting. Check code requirements. If not level, clothes may not tumble properly and automatic sensor cycles may need to model) Parts package is located in death, explosion, or fire. Check that has ever had anything flammable on some models): Putty knife Parts Supplied (all models): Additional parts may cause dryer not to reduce noise transfer. NOTE: Do not use the water supply for your washer using a pedestal, you...
Owners Manual
Page 9
... is adequate. Mobile Home - Electrical Requirements - U.S.A. It is prohibited. The National Electrical Code requires a 4-wire power supply connection for (1) new branch-circuit installations after 1996, and all local codes and ordinances. or 4-wire, 120/208 V electrical supply, if specified on the serial/rating plate) on a separate 30 A circuit, fused on all sides of the dryer to reduce noise transfer. � For closet installation with a door, minimum ventilation openings in the top and...
... is adequate. Mobile Home - Electrical Requirements - U.S.A. It is prohibited. The National Electrical Code requires a 4-wire power supply connection for (1) new branch-circuit installations after 1996, and all local codes and ordinances. or 4-wire, 120/208 V electrical supply, if specified on the serial/rating plate) on a separate 30 A circuit, fused on all sides of the dryer to reduce noise transfer. � For closet installation with a door, minimum ventilation openings in the top and...
Owners Manual
Page 10
..., AC-only electrical supply on a separate 30 A circuit, fused on your Quick Start Guide. SAVE THESE INSTRUCTIONS Electric Requirements - Canada WARNING Electrical Shock Hazard Plug into a standard 14-30R wall receptacle. latest edition and all local codes and ordinances. A time-delay fuse or circuit breaker is 5 ft. (1.52 m) long. If your outlet looks like this : 4-wire receptacle (14-30R) Then choose a 4-wire power supply cord with a qualified electrician or service representative if...
..., AC-only electrical supply on a separate 30 A circuit, fused on your Quick Start Guide. SAVE THESE INSTRUCTIONS Electric Requirements - Canada WARNING Electrical Shock Hazard Plug into a standard 14-30R wall receptacle. latest edition and all local codes and ordinances. A time-delay fuse or circuit breaker is 5 ft. (1.52 m) long. If your outlet looks like this : 4-wire receptacle (14-30R) Then choose a 4-wire power supply cord with a qualified electrician or service representative if...
Owners Manual
Page 17
... duct and catch lint. Vent products can result in enclosed walls, ceilings, or floors. � The total length should cap the vent to clean): � Must be connected or secured with lint. Do not use a plastic vent. Review "Vent System Chart" and, if necessary, modify existing vent system to connect elbows H. Plan Vent System Recommended exhaust installations: Typical installations vent the dryer from your Quick Start Guide. Flexible metal vent (acceptable only if accessible...
... duct and catch lint. Vent products can result in enclosed walls, ceilings, or floors. � The total length should cap the vent to clean): � Must be connected or secured with lint. Do not use a plastic vent. Review "Vent System Chart" and, if necessary, modify existing vent system to connect elbows H. Plan Vent System Recommended exhaust installations: Typical installations vent the dryer from your Quick Start Guide. Flexible metal vent (acceptable only if accessible...
Owners Manual
Page 19
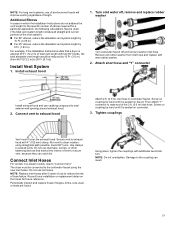
... water off, remove and replace rubber washer Turn cold water faucet off and remove washer inlet hose. Connect vent to exhaust hood Attach 2 ft. (0.6 m) inlet hose to secure vent, because they can result. 19 Attach short hose and "Y" connector Install exhaust hood and use to 30 Ft. [9.1m]). Avoid 90° turns. The dryer must fit over the exhaust hood. For example, if the Installation Instructions state that extend into interior of length. NOTE: Replace inlet hoses...
... water off, remove and replace rubber washer Turn cold water faucet off and remove washer inlet hose. Connect vent to exhaust hood Attach 2 ft. (0.6 m) inlet hose to secure vent, because they can result. 19 Attach short hose and "Y" connector Install exhaust hood and use to 30 Ft. [9.1m]). Avoid 90° turns. The dryer must fit over the exhaust hood. For example, if the Installation Instructions state that extend into interior of length. NOTE: Replace inlet hoses...

Owners Manual
Page 21
... for heat. NOTE: The dryer must be 2 household fuses or circuit breakers for levelness. Do not select Air Only temperature setting. If the dryer will not start dryer. Level Dryer 1. Repeat from a right-side opening , see what was skipped. � Check that all parts are set in a hard water area, use of dryer from side to operate correctly. 2. Once dryer is level. For direct wire installation, turn off dryer, and check the following : � Controls are now installed. Check that both fuses...
... for heat. NOTE: The dryer must be 2 household fuses or circuit breakers for levelness. Do not select Air Only temperature setting. If the dryer will not start dryer. Level Dryer 1. Repeat from a right-side opening , see what was skipped. � Check that all parts are set in a hard water area, use of dryer from side to operate correctly. 2. Once dryer is level. For direct wire installation, turn off dryer, and check the following : � Controls are now installed. Check that both fuses...

Specification Sheet
Page 1
... wrinkles from the washer to change without notice. ®/™ © 2020. Electric Dryer WED5000D White WED5000DW Capacity Total 7.0 cu. Technical Details Drum Material Fuel Type Door Style Reversible Door Number of Dryer Cycles Selection of Drying Cycles Dryer Option Selections Dimensions Product Dimensions (H x W x D) Depth with Door Open 90° Maximum Vent Length Venting Direction Ventless Reference Material Dimension Guide Install Guide Use & Care Guide Warranty Powder Coat Electric Hamper No 11 Delicates Energy Preferred Jeans Less Dry Timed Dry 20 Timed Dry 30 Timed...
... wrinkles from the washer to change without notice. ®/™ © 2020. Electric Dryer WED5000D White WED5000DW Capacity Total 7.0 cu. Technical Details Drum Material Fuel Type Door Style Reversible Door Number of Dryer Cycles Selection of Drying Cycles Dryer Option Selections Dimensions Product Dimensions (H x W x D) Depth with Door Open 90° Maximum Vent Length Venting Direction Ventless Reference Material Dimension Guide Install Guide Use & Care Guide Warranty Powder Coat Electric Hamper No 11 Delicates Energy Preferred Jeans Less Dry Timed Dry 20 Timed Dry 30 Timed...


