Warranty Information
Page 1
...Phone number Model number Serial number Purchase date 13 Service must provide proof of purchase or installation date for Factory Specified Replacement Parts and repair labor to correct defects in -warranty service. This limited warranty is intended to be found by checking the "...this major appliance is installed, operated, and maintained according to instructions attached to or furnished with the product, Whirlpool Corporation or Whirlpool Canada LP (hereafter "Whirlpool") will need for future reference. Some states and provinces do not allow limitations on the duration of implied...
...Phone number Model number Serial number Purchase date 13 Service must provide proof of purchase or installation date for Factory Specified Replacement Parts and repair labor to correct defects in -warranty service. This limited warranty is intended to be found by checking the "...this major appliance is installed, operated, and maintained according to instructions attached to or furnished with the product, Whirlpool Corporation or Whirlpool Canada LP (hereafter "Whirlpool") will need for future reference. Some states and provinces do not allow limitations on the duration of implied...

Use & Care Guide
Page 13
... major appliance if it was purchased. DISCLAIMER OF REPRESENTATIONS OUTSIDE OF WARRANTY Whirlpool makes no representations about your home. 7. You will pay for Factory Specified Replacement Parts and repair labor to Whirlpool within 30 days from the date of purchase. 6. Dealer name Address... see the "Troubleshooting" section of the Use & Care Guide. You must be borne by an authorized Whirlpool servicer is not available. 9. Repairs to parts or systems resulting from unauthorized modifications made to you also may have other rights that vary from state to...
... major appliance if it was purchased. DISCLAIMER OF REPRESENTATIONS OUTSIDE OF WARRANTY Whirlpool makes no representations about your home. 7. You will pay for Factory Specified Replacement Parts and repair labor to Whirlpool within 30 days from the date of purchase. 6. Dealer name Address... see the "Troubleshooting" section of the Use & Care Guide. You must be borne by an authorized Whirlpool servicer is not available. 9. Repairs to parts or systems resulting from unauthorized modifications made to you also may have other rights that vary from state to...
Installation Guide
Page 4
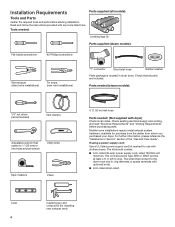
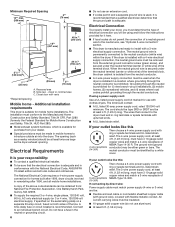
... electrical supply and venting, and read "Electrical Requirements" and "Venting Requirements" before starting installation. Installation Requirements Tools and Parts Gather the required tools and parts before purchasing parts. Tools needed : (Not supplied with upturned ends. ■■ A UL listed strain relief. If using a ...power supply cord: Use a UL listed power supply cord kit marked for use with any tools listed here. Parts needed (steam models): 1/4" nut driver (recommended) Vent clamps Adjustable wrench that opens to the dryer must end in dryer drum. ...
... electrical supply and venting, and read "Electrical Requirements" and "Venting Requirements" before starting installation. Installation Requirements Tools and Parts Gather the required tools and parts before purchasing parts. Tools needed : (Not supplied with upturned ends. ■■ A UL listed strain relief. If using a ...power supply cord: Use a UL listed power supply cord kit marked for use with any tools listed here. Parts needed (steam models): 1/4" nut driver (recommended) Vent clamps Adjustable wrench that opens to the dryer must end in dryer drum. ...
Installation Guide
Page 5
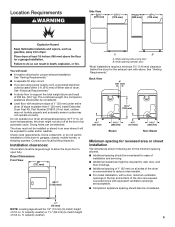
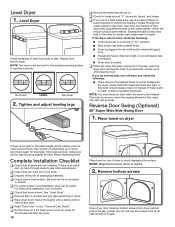
... floor moldings. ■■ Additional spacing of 1" (25 mm) on all sides of the dryer is greater than 1" [25 mm], install Extended Dryer Feet Kit, Part Number 279810.) If not level, clothes may not tumble properly and automatic sensor cycles may not operate correctly. At lower temperatures, the dryer might be...
... floor moldings. ■■ Additional spacing of 1" (25 mm) on all sides of the dryer is greater than 1" [25 mm], install Extended Dryer Feet Kit, Part Number 279810.) If not level, clothes may not tumble properly and automatic sensor cycles may not operate correctly. At lower temperatures, the dryer might be...
Installation Guide
Page 6
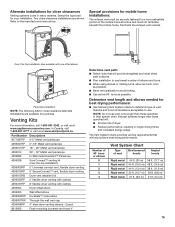
... wire is adequate. The wires that connect to the Manufactured Home Construction and Safety Standard, Title 24 CFR, Part 3280 (formerly the Federal Standard for Mobile Home Construction and Safety, Title 24, HUD Part 280). ■■ Metal exhaust system hardware, which is available for it is recommended that a qualified electrician determine...
... wire is adequate. The wires that connect to the Manufactured Home Construction and Safety Standard, Title 24 CFR, Part 3280 (formerly the Federal Standard for Mobile Home Construction and Safety, Title 24, HUD Part 280). ■■ Metal exhaust system hardware, which is available for it is recommended that a qualified electrician determine...
Installation Guide
Page 15
Special provisions for mobile home installations: The exhaust vent must be securely fastened to the manufacturer's instructions. Part Number Descriptions 8171587RP 0-5" Metal vent periscope 4396037RP 0"-18" Metal vent periscope 4396011RP 18" - 29" Metal vent periscope 4396014 29" - 50" Metal vent periscope 4392892 In-...
Special provisions for mobile home installations: The exhaust vent must be securely fastened to the manufacturer's instructions. Part Number Descriptions 8171587RP 0-5" Metal vent periscope 4396037RP 0"-18" Metal vent periscope 4396011RP 18" - 29" Metal vent periscope 4396014 29" - 50" Metal vent periscope 4392892 In-...
Installation Guide
Page 18
... ■■ Controls are set in your tools. q Check for the moisture sensing system to side. Excessive scale buildup may clog different parts of a water softener is not crushed or kinked. If you have not tripped. The odor will not start the dryer. 18 Place towel ... Remove film on dryer. Not Level LEVEL Not Level 2. Check that both fuses are now installed. Complete Installation Checklist q Check that all parts are intact and tight, or that both circuit breakers have all packaging materials. Level Dryer Check levelness of dryer from dryer cabinet side of...
... ■■ Controls are set in your tools. q Check for the moisture sensing system to side. Excessive scale buildup may clog different parts of a water softener is not crushed or kinked. If you have not tripped. The odor will not start the dryer. 18 Place towel ... Remove film on dryer. Not Level LEVEL Not Level 2. Check that both fuses are now installed. Complete Installation Checklist q Check that all parts are intact and tight, or that both circuit breakers have all packaging materials. Level Dryer Check levelness of dryer from dryer cabinet side of...
Installation Guide
Page 19
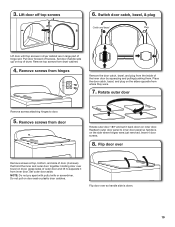
... . 19 Set outer door aside. Switch door catch, bezel, & plug Catch and bezel Plug Lift door until top screws in dryer cabinet are in large part of door (4 screws) that hold the inner and outer door together. Place the door catch, bezel, and plug on top of dryer. Remove screws from...
... . 19 Set outer door aside. Switch door catch, bezel, & plug Catch and bezel Plug Lift door until top screws in dryer cabinet are in large part of door (4 screws) that hold the inner and outer door together. Place the door catch, bezel, and plug on top of dryer. Remove screws from...


