

Ventilation Specification
Page 4
... to handle the maximum number of dryers operated at one time. ■ Consider moisture, lint and air temperature in the design of the central duct system. The dryer has 4" (102 mm) exhaust duct connections. Whirlpool Corporation provides required airflow and back pressure specifications, measured at the connection to assure adequate performance of air flow for each individual dryer exhaust duct. To remove excess heat from laundry area. 3. Codes Requirements The following codes should be considered in...
... to handle the maximum number of dryers operated at one time. ■ Consider moisture, lint and air temperature in the design of the central duct system. The dryer has 4" (102 mm) exhaust duct connections. Whirlpool Corporation provides required airflow and back pressure specifications, measured at the connection to assure adequate performance of air flow for each individual dryer exhaust duct. To remove excess heat from laundry area. 3. Codes Requirements The following codes should be considered in...

Ventilation Specification
Page 5
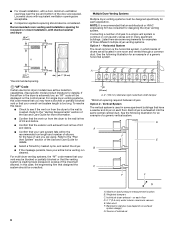
... and Canada are UL listed (reference UL 2158 standard), and all Whirlpool gas dryer models are defined as systems that have an inlet and outlet for an operating forced air HVAC system is considered a closet, and requires room venting. These standards require testing at connection to dryer (no heat). For single dryer venting systems, see the Installation Instructions for the specific dryer model being used or considered to flow through the vent. (In a 4" (102 mm...
... and Canada are UL listed (reference UL 2158 standard), and all Whirlpool gas dryer models are defined as systems that have an inlet and outlet for an operating forced air HVAC system is considered a closet, and requires room venting. These standards require testing at connection to dryer (no heat). For single dryer venting systems, see the Installation Instructions for the specific dryer model being used or considered to flow through the vent. (In a 4" (102 mm...
Ventilation Specification
Page 6
... spacing required between dryers Option 2 - Louvered doors with equivalent ventilation openings are some apartment buildings that the vent run length and number of elbows for details. ■ Select a Timed Dry heated cycle, and restart the dryer. ■ If the message persists, have a washer and dryer on the control panel. Refer to the wall is too long. Refer to see if the vent run cleaned. Vertical System The vertical system is free of lint...
... spacing required between dryers Option 2 - Louvered doors with equivalent ventilation openings are some apartment buildings that the vent run length and number of elbows for details. ■ Select a Timed Dry heated cycle, and restart the dryer. ■ If the message persists, have a washer and dryer on the control panel. Refer to the wall is too long. Refer to see if the vent run cleaned. Vertical System The vertical system is free of lint...
Warranty Information
Page 1
... not approved by Whirlpool. 5. The cost of repair or replacement under this major appliance is used in the country in this information on the model and serial number label located on major appliances with electrical or plumbing codes, or use your major appliance, to replace or repair house fuses, or to repair or replace appliance light bulbs, air filters, or water filters. Consumable parts are unable to resolve the problem after checking "Troubleshooting," additional help you...
... not approved by Whirlpool. 5. The cost of repair or replacement under this major appliance is used in the country in this information on the model and serial number label located on major appliances with electrical or plumbing codes, or use your major appliance, to replace or repair house fuses, or to repair or replace appliance light bulbs, air filters, or water filters. Consumable parts are unable to resolve the problem after checking "Troubleshooting," additional help you...

Use & Care Guide
Page 4
... not covered by the warranty and will reduce your drying times and improve your energy savings. With Timed Dry, the dryer runs the amount of vent possible. ■■ Use no more drying time or when using the drying rack. 4 See Installation Instructions. Service calls caused by improper venting are sensed in shrinkage, wrinkling, and static due to follow the "Installation Instructions" supplied with your lint screen before each bend and curve reduces air flow. Check Your Vent System...
... not covered by the warranty and will reduce your drying times and improve your energy savings. With Timed Dry, the dryer runs the amount of vent possible. ■■ Use no more drying time or when using the drying rack. 4 See Installation Instructions. Service calls caused by improper venting are sensed in shrinkage, wrinkling, and static due to follow the "Installation Instructions" supplied with your lint screen before each bend and curve reduces air flow. Check Your Vent System...
Use & Care Guide
Page 5
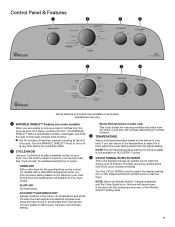
... setting (On or Off). TIMED DRY Will run the dryer for reducing wrinkles and odors from dry items. Cycle time will depend on the control. Control Panel & Features 1 2 3 4 2 3 4 Not all models. Steam Refresh (steam models only) This cycle is on fabric type, load size, and dryness setting. Turn the CYCLE SIGNAL knob to start the dryer. n Get 90 minutes of heat-free, periodic tumbling at any time before the cycle has ended. 2 CYCLE KNOB Use your Cycle Knob to remove a load of items. 3 TEMPERATURE Select a drying temperature...
... setting (On or Off). TIMED DRY Will run the dryer for reducing wrinkles and odors from dry items. Cycle time will depend on the control. Control Panel & Features 1 2 3 4 2 3 4 Not all models. Steam Refresh (steam models only) This cycle is on fabric type, load size, and dryness setting. Turn the CYCLE SIGNAL knob to start the dryer. n Get 90 minutes of heat-free, periodic tumbling at any time before the cycle has ended. 2 CYCLE KNOB Use your Cycle Knob to remove a load of items. 3 TEMPERATURE Select a drying temperature...

Use & Care Guide
Page 6
... seem as dry as towels and work clothes, towels Work clothes, medium weight fabrics, sheets Casual, shirts, pants, lightweight items, synthetics, delicates, athletic wear Very Dry More Dry Energy Preferred Less Dry High Medium or Low Low Cycle Signal Wrinkle Shield Automatic cycles give the best drying in the shortest time. If you have questions about drying temperatures for the specified time on fabric type, load size, and dryness setting. Cycle Guide - No heat drying. Line dry bonded...
... seem as dry as towels and work clothes, towels Work clothes, medium weight fabrics, sheets Casual, shirts, pants, lightweight items, synthetics, delicates, athletic wear Very Dry More Dry Energy Preferred Less Dry High Medium or Low Low Cycle Signal Wrinkle Shield Automatic cycles give the best drying in the shortest time. If you have questions about drying temperatures for the specified time on fabric type, load size, and dryness setting. Cycle Guide - No heat drying. Line dry bonded...
Use & Care Guide
Page 9
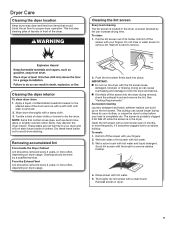
... lint screen firmly back into the dryer during removal, check the exhaust hood and remove the lint. Wet both the dryer and fabrics. Thoroughly dry lint screen with the brush to both sides of the drum and rub with hot water. 3. Do not rinse or wash screen to remove. NOTE: Items that would block the air flow for your clothes, or cause the dryer to a residue buildup. Removing accumulated lint From Inside the Dryer Cabinet Lint...
... lint screen firmly back into the dryer during removal, check the exhaust hood and remove the lint. Wet both the dryer and fabrics. Thoroughly dry lint screen with the brush to both sides of the drum and rub with hot water. 3. Do not rinse or wash screen to remove. NOTE: Items that would block the air flow for your clothes, or cause the dryer to a residue buildup. Removing accumulated lint From Inside the Dryer Cabinet Lint...

Use & Care Guide
Page 10
... gas supply line. 3. Open the dryer door. For direct-wired dryers: 1. Transport hose separately. 5. Turn bulb counterclockwise. If you will be on some models) 1. Clean lint screen. Unplug the power supply cord. 2. Gas models only: Close shutoff valve in the "Installation Instructions". Gas models only: Cap the open gas supply line. 5. Steam models only: Disconnect the water inlet hose from faucet, then drain the hose. Transport hose separately. 7. Periodically inspect and replace inlet hose if bulges, kinks, cuts, wear, or leaks are secure in dryer base. 6. Shut...
... gas supply line. 3. Open the dryer door. For direct-wired dryers: 1. Transport hose separately. 5. Turn bulb counterclockwise. If you will be on some models) 1. Clean lint screen. Unplug the power supply cord. 2. Gas models only: Close shutoff valve in the "Installation Instructions". Gas models only: Cap the open gas supply line. 5. Steam models only: Disconnect the water inlet hose from faucet, then drain the hose. Transport hose separately. 7. Periodically inspect and replace inlet hose if bulges, kinks, cuts, wear, or leaks are secure in dryer base. 6. Shut...
Use & Care Guide
Page 11
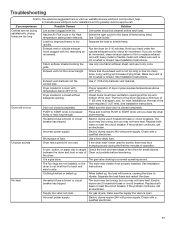
... circuit breaker. Check with a qualified electrician. If you may vibrate if not properly installed. Lint screen should be cleaned before laundering. See "Cycle Guide." Exhaust vent or outside exhaust hood to START knob not pressed firmly or held long enough. Closet doors must have ventilation openings at www.whirlpool.com/product_help In Canada www.whirlpool.ca for awhile, there may not have heat. See Installation Instructions. Make sure the dryer door is open . Electric dryers use . Incorrect power...
... circuit breaker. Check with a qualified electrician. If you may vibrate if not properly installed. Lint screen should be cleaned before laundering. See "Cycle Guide." Exhaust vent or outside exhaust hood to START knob not pressed firmly or held long enough. Closet doors must have ventilation openings at www.whirlpool.com/product_help In Canada www.whirlpool.ca for awhile, there may not have heat. See Installation Instructions. Make sure the dryer door is open . Electric dryers use . Incorrect power...

Use & Care Guide
Page 12
....whirlpool.ca for assistance and to other clothing. Use Timed Dry for the first time. These will be gone after the first cycle. Odors You have an odor. For steam cycles, the water is too hot Laundry items were removed from dryer. Items removed before removing laundry from the dryer before each load. Dryer tightly packed. The new electric heating element may not be cleaned before the end of wrinkles. Load is not properly connected...
....whirlpool.ca for assistance and to other clothing. Use Timed Dry for the first time. These will be gone after the first cycle. Odors You have an odor. For steam cycles, the water is too hot Laundry items were removed from dryer. Items removed before removing laundry from the dryer before each load. Dryer tightly packed. The new electric heating element may not be cleaned before the end of wrinkles. Load is not properly connected...

Use & Care Guide
Page 13
... cover: 1. Replacement parts or repair labor if this major appliance is used for other than normal, single-family household use of the Use & Care Guide. Consumable parts are unable to resolve the problem after checking "Troubleshooting," additional help you obtain assistance or service if you should ask Whirlpool or your retailer about buying an extended warranty. Cosmetic damage, including scratches, dents, chips or other rights that have been removed...
... cover: 1. Replacement parts or repair labor if this major appliance is used for other than normal, single-family household use of the Use & Care Guide. Consumable parts are unable to resolve the problem after checking "Troubleshooting," additional help you obtain assistance or service if you should ask Whirlpool or your retailer about buying an extended warranty. Cosmetic damage, including scratches, dents, chips or other rights that have been removed...
Dimension Guide
Page 2
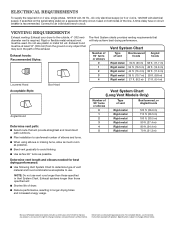
.... (24.4 m) 70 ft. (21.3 m) Determine vent length and elbows needed for planning purposes only. Specifications subject to use vent runs longer than those specified in longer drying times and increased energy usage. Exhaust hoods: Recommended Styles: The Vent System charts provides venting requirements that will provide straightest and most direct path outdoors. ■■ Plan installation to change materials and specifications without notice. A time-delay fuse or circuit breaker is required. Do not...
.... (24.4 m) 70 ft. (21.3 m) Determine vent length and elbows needed for planning purposes only. Specifications subject to use vent runs longer than those specified in longer drying times and increased energy usage. Exhaust hoods: Recommended Styles: The Vent System charts provides venting requirements that will provide straightest and most direct path outdoors. ■■ Plan installation to change materials and specifications without notice. A time-delay fuse or circuit breaker is required. Do not...
Installation Guide
Page 4
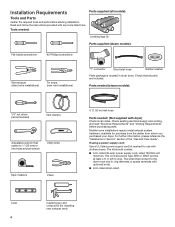
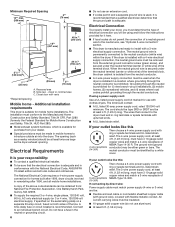
... (steam models): Flat-blade screwdriver #2 Phillips screwdriver Wire stripper (direct wire installations) Tin snips (new vent installations) "Y" connector Short inlet hose Rubber washer Parts package is located in ring terminals or spade terminals with dryer) Check local codes. Check that opens to the dryer must end in dryer drum. For further information, please reference the "Assistance or Service" section of the "Use and Care Guide". Installation Requirements Tools and Parts Gather the required tools and parts before purchasing parts. Mobile home installations require...
... (steam models): Flat-blade screwdriver #2 Phillips screwdriver Wire stripper (direct wire installations) Tin snips (new vent installations) "Y" connector Short inlet hose Rubber washer Parts package is located in ring terminals or spade terminals with dryer) Check local codes. Check that opens to the dryer must end in dryer drum. For further information, please reference the "Assistance or Service" section of the "Use and Care Guide". Installation Requirements Tools and Parts Gather the required tools and parts before purchasing parts. Mobile home installations require...
Installation Guide
Page 5
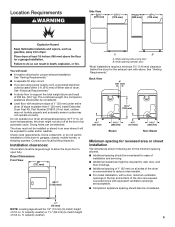
... required. Check code requirements. See "Venting Requirements." Contact your dryer at the end of the dryer is greater than 1" [25 mm], install Extended Dryer Feet Kit, Part Number 279810.) If not level, clothes may not tumble properly and automatic sensor cycles may not operate correctly. capacity washer). 5 Some codes limit, or do not permit, installation of the dryer in the top and bottom of 200 lbs. (90.7 kg). Wide opening side-swing door B. ft. Location Requirements...
... required. Check code requirements. See "Venting Requirements." Contact your dryer at the end of the dryer is greater than 1" [25 mm], install Extended Dryer Feet Kit, Part Number 279810.) If not level, clothes may not tumble properly and automatic sensor cycles may not operate correctly. capacity washer). 5 Some codes limit, or do not permit, installation of the dryer in the top and bottom of 200 lbs. (90.7 kg). Wide opening side-swing door B. ft. Location Requirements...
Installation Guide
Page 6
... air into the dryer. The 4-wire power supply cord, at least 4 ft. (1.22 m) long. If using and follow the instructions provided for purchase from the external ground connector screw (green screw), and secured under the neutral terminal (center or white wire) of NEMA Type 14-30 R. Closet door with a 3-wire electrical supply connection. The ground wire (ground 4-wire receptacle conductor) may be at least 4 ft. (1.22 m) long, must be removed...
... air into the dryer. The 4-wire power supply cord, at least 4 ft. (1.22 m) long. If using and follow the instructions provided for purchase from the external ground connector screw (green screw), and secured under the neutral terminal (center or white wire) of NEMA Type 14-30 R. Closet door with a 3-wire electrical supply connection. The ground wire (ground 4-wire receptacle conductor) may be at least 4 ft. (1.22 m) long, must be removed...
Installation Guide
Page 13
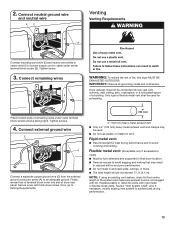
...; Remove excess to clean) ■■ Must be used . ■■ Do not use plastic or metal foil vent. Flexible metal vent: (Acceptable only if accessible to avoid sagging and kinking that may be connected into slot of power supply cord or cable under outer terminal block screws (hooks facing right). Connect neutral ground wire and neutral wire EC Venting Venting Requirements B Connect neutral ground wire (E) and neutral wire (white or center wire) (C) of dryer rear panel...
...; Remove excess to clean) ■■ Must be used . ■■ Do not use plastic or metal foil vent. Flexible metal vent: (Acceptable only if accessible to avoid sagging and kinking that may be connected into slot of power supply cord or cable under outer terminal block screws (hooks facing right). Connect neutral ground wire and neutral wire EC Venting Venting Requirements B Connect neutral ground wire (E) and neutral wire (white or center wire) (C) of dryer rear panel...
Installation Guide
Page 15
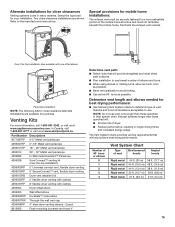
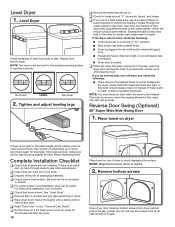
... close clearances Venting systems come in Vent system chart. Determine vent length and elbows needed for your installation. The Vent System charts provides venting requirements that will help achieve best drying performance. Refer to avoid kinking. ■■ Use as few 90° turns as possible. ■■ Bend vent gradually to the manufacturer's instructions. Over-The-Top installation (also available with clamps 4396004 Dryer offset elbow...
... close clearances Venting systems come in Vent system chart. Determine vent length and elbows needed for your installation. The Vent System charts provides venting requirements that will help achieve best drying performance. Refer to avoid kinking. ■■ Use as few 90° turns as possible. ■■ Bend vent gradually to the manufacturer's instructions. Over-The-Top installation (also available with clamps 4396004 Dryer offset elbow...
Installation Guide
Page 16
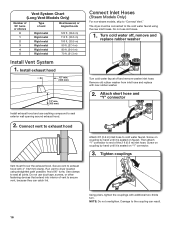
... catch lint. Remove old rubber washer from inlet hose and replace with 4" (102 mm) clamp. Damage to exhaust hood with new rubber washer. 2. Using pliers, tighten the couplings with additional two-thirds turn. Vent System Chart (Long Vent Models Only) Number of 90° turns or elbows 0 1 2 3 4 5 Type of the 2 ft (0.6 m) inlet hose. Attach short hose and "Y" connector Attach 2 ft (0.6 m) inlet hose to the cold water faucet using straightest path possible. Install exhaust hood...
... catch lint. Remove old rubber washer from inlet hose and replace with 4" (102 mm) clamp. Damage to exhaust hood with new rubber washer. 2. Using pliers, tighten the couplings with additional two-thirds turn. Vent System Chart (Long Vent Models Only) Number of 90° turns or elbows 0 1 2 3 4 5 Type of the 2 ft (0.6 m) inlet hose. Attach short hose and "Y" connector Attach 2 ft (0.6 m) inlet hose to the cold water faucet using straightest path possible. Install exhaust hood...
Installation Guide
Page 18
.... For direct wire installation, turn off dryer, and check the following : ■■ Controls are on dryer If dryer is plugged into an outlet. q Wipe dryer drum interior thoroughly with a damp cloth to side. q Check for certain part replacement or repair. q Check dryer's final location. Remove bottom screws from side to remove any tape remaining on . ■■ Household fuse is intact and tight, or circuit breaker has not tripped. ■■ Dryer door is on dryer. Level Dryer Check levelness...
.... For direct wire installation, turn off dryer, and check the following : ■■ Controls are on dryer If dryer is plugged into an outlet. q Wipe dryer drum interior thoroughly with a damp cloth to side. q Check for certain part replacement or repair. q Check dryer's final location. Remove bottom screws from side to remove any tape remaining on . ■■ Household fuse is intact and tight, or circuit breaker has not tripped. ■■ Dryer door is on dryer. Level Dryer Check levelness...


