Installation Instructions
Page 4
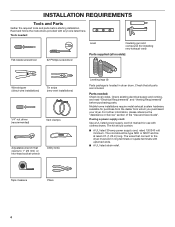
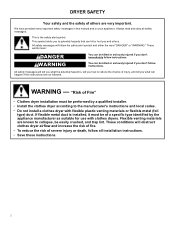
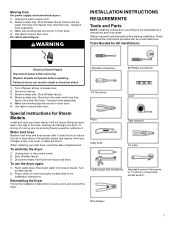
... dryer drum. For further information, please reference the "Assistance or Service" section of the "Use and Care Guide". Tape measure Pliers 4 Tools needed : Check local codes. Parts needed : Flat-blade screwdriver #2 Phillips screwdriver Level Caulking gun and compound (for installing new exhaust vent) Parts supplied (all models): Wire stripper (direct wire installations) Tin snips (new vent installations) 1/4" nut driver (recommended) Vent clamps Adjustable wrench that all parts are included. The cord should contain: ■■ A UL listed...
... dryer drum. For further information, please reference the "Assistance or Service" section of the "Use and Care Guide". Tape measure Pliers 4 Tools needed : Check local codes. Parts needed : Flat-blade screwdriver #2 Phillips screwdriver Level Caulking gun and compound (for installing new exhaust vent) Parts supplied (all models): Wire stripper (direct wire installations) Tin snips (new vent installations) 1/4" nut driver (recommended) Vent clamps Adjustable wrench that all parts are included. The cord should contain: ■■ A UL listed...
Installation Instructions
Page 5
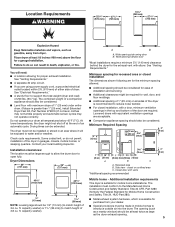
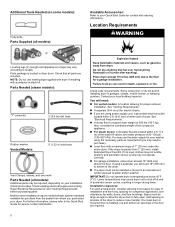
See "Electrical Requirements." ■■ A sturdy floor to introduce outside air into the dryer. Do not operate your dryer at least twice as large as the dryer exhaust opening (such as a nearby window) should be at temperatures below 45°F (7°C). Some codes limit, or do not permit, installation of 3.8 cu. Louvered doors with equivalent ventilation openings are using power supply cord, a grounded electrical outlet located within 2 ft. (610 mm) of...
See "Electrical Requirements." ■■ A sturdy floor to introduce outside air into the dryer. Do not operate your dryer at least twice as large as the dryer exhaust opening (such as a nearby window) should be at temperatures below 45°F (7°C). Some codes limit, or do not permit, installation of 3.8 cu. Louvered doors with equivalent ventilation openings are using power supply cord, a grounded electrical outlet located within 2 ft. (610 mm) of...
Installation Instructions
Page 6
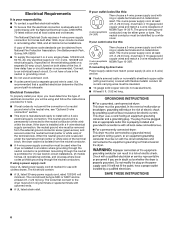
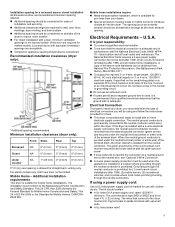
... specified on the serial/rating plate) on a separate 30-amp circuit, fused on both sides of a neutral ground wire to the neutral wire, see "Optional 3-wire connection" section. ■■ This dryer is prohibited. The 4-wire power supply cord, at least 4 ft. (1.22 m) long. If your outlet looks like this : 3-wire receptacle (10-30R) Then choose a 3-wire power supply cord with a 3-wire electrical supply connection. The National Electrical Code requires a 4-wire power supply connection for it is...
... specified on the serial/rating plate) on a separate 30-amp circuit, fused on both sides of a neutral ground wire to the neutral wire, see "Optional 3-wire connection" section. ■■ This dryer is prohibited. The 4-wire power supply cord, at least 4 ft. (1.22 m) long. If your outlet looks like this : 3-wire receptacle (10-30R) Then choose a 3-wire power supply cord with a 3-wire electrical supply connection. The National Electrical Code requires a 4-wire power supply connection for it is...
Installation Instructions
Page 10
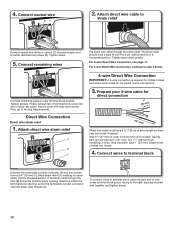
... end of terminal block cover into hooks. 4. Shape ends of wires into slot of extra length so dryer may be in a horizontal position. Reaching inside the terminal block opening . Connect remaining wires to step 3 below the terminal block opening , screw the removable conduit connector onto the strain relief threads (C). 4. Connect neutral wire BC 2. Connect remaining wires Put direct wire cable through the hole (B) below . The strain relief should have 5 ft. (1.52 m) of dryer rear panel. Tighten...
... end of terminal block cover into hooks. 4. Shape ends of wires into slot of extra length so dryer may be in a horizontal position. Reaching inside the terminal block opening . Connect remaining wires to step 3 below the terminal block opening , screw the removable conduit connector onto the strain relief threads (C). 4. Connect neutral wire BC 2. Connect remaining wires Put direct wire cable through the hole (B) below . The strain relief should have 5 ft. (1.52 m) of dryer rear panel. Tighten...
Installation Instructions
Page 15
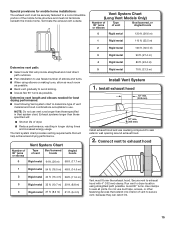
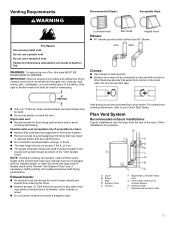
... chart. Determine vent length and elbows needed for mobile home installations: The exhaust vent must fit over the exhaust hood. Run vent to dryer location using elbows or making turns, allow as much room as possible. ■■ Bend vent gradually to seal all joints. Terminate the exhaust vent outside. Use clamps to avoid kinking. ■■ Use as few 90° turns as possible. Vent System Chart (Long Vent Models Only) Number of 90...
... chart. Determine vent length and elbows needed for mobile home installations: The exhaust vent must fit over the exhaust hood. Run vent to dryer location using elbows or making turns, allow as much room as possible. ■■ Bend vent gradually to seal all joints. Terminate the exhaust vent outside. Use clamps to avoid kinking. ■■ Use as few 90° turns as possible. Vent System Chart (Long Vent Models Only) Number of 90...
Installation Instructions
Page 16
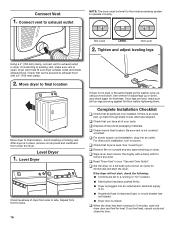
... using a wood block. q For power supply cord installation, plug into an outlet and/or electrical supply is plugged into an outlet. q When the dryer has been running or "On" position. ■■ Start button has been pushed firmly. ■■ Dryer is on a full heat cycle (not an air cycle) for levelness. Dryer vent must be level for heat. Use wrench to operate correctly. q Check that all of your "Use and Care Guide". If the dryer will not start the dryer. Check...
... using a wood block. q For power supply cord installation, plug into an outlet and/or electrical supply is plugged into an outlet. q When the dryer has been running or "On" position. ■■ Start button has been pushed firmly. ■■ Dryer is on a full heat cycle (not an air cycle) for levelness. Dryer vent must be level for heat. Use wrench to operate correctly. q Check that all of your "Use and Care Guide". If the dryer will not start the dryer. Check...
Specification Sheet
Page 1
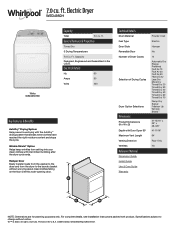
.... Capacity Designed, Engineered and Assembled in the U.S.A. Hamper Door Easily transfer loads from the washer to the dryer and from setting into your clean clothes with intermittent tumbling after the dryer cycle ends. Wrinkle Shield™ Option Helps keep wrinkles from the dryer to change without worrying about clean clothes falling on the floor with Door Open 90° Maximum Vent Length Venting Direction Ventless Reference Material Dimension Guide Install Guide Use & Care Guide Warranty Powder Coat Electric Hamper No 14 Automatic Dry Energy...
.... Capacity Designed, Engineered and Assembled in the U.S.A. Hamper Door Easily transfer loads from the washer to the dryer and from setting into your clean clothes with intermittent tumbling after the dryer cycle ends. Wrinkle Shield™ Option Helps keep wrinkles from the dryer to change without worrying about clean clothes falling on the floor with Door Open 90° Maximum Vent Length Venting Direction Ventless Reference Material Dimension Guide Install Guide Use & Care Guide Warranty Powder Coat Electric Hamper No 14 Automatic Dry Energy...
Owners Manual
Page 2
... and obey all installation instructions. − Save these instructions. 2 This is installed, it must be performed by the appliance manufacturer as suitable for use with flexible plastic venting materials or flexible metal (foil type) duct. If flexible metal duct is the safety alert symbol. Flexible venting materials are known to collapse, be of a specific type identified by a qualified installer. − Install the clothes dryer according to...
... and obey all installation instructions. − Save these instructions. 2 This is installed, it must be performed by the appliance manufacturer as suitable for use with flexible plastic venting materials or flexible metal (foil type) duct. If flexible metal duct is the safety alert symbol. Flexible venting materials are known to collapse, be of a specific type identified by a qualified installer. − Install the clothes dryer according to...

Owners Manual
Page 6
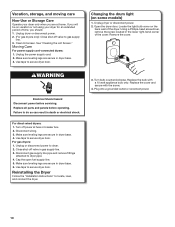
... lint screen with heat, dryers require good airflow to follow the Installation Instructions for an extended period of who installed the dryer. Reinstall screen in dryer or reconnect power. Locate the light bulb cover on some models) 1. Plug in dryer. Nonuse, Storage, and Moving Care Nonuse or Storage Care If you are not covered by the warranty and will be paid by the customer, regardless of time, you should: 1. 3. Do not use a metal foil vent. Clean lint screen. Turn bulb counterclockwise. Blocked...
... lint screen with heat, dryers require good airflow to follow the Installation Instructions for an extended period of who installed the dryer. Reinstall screen in dryer or reconnect power. Locate the light bulb cover on some models) 1. Plug in dryer. Nonuse, Storage, and Moving Care Nonuse or Storage Care If you are not covered by the warranty and will be paid by the customer, regardless of time, you should: 1. 3. Do not use a metal foil vent. Clean lint screen. Turn bulb counterclockwise. Blocked...
Owners Manual
Page 7
... starting installation. Steam models only: Shut off power at fuse or breaker box. 2. Reconnect water inlet hose to locate, level, and connect the dryer. Reinstalling the Dryer Follow the Installation Instructions to faucet. For direct-wired dryers: WARNING INSTALLATION INSTRUCTIONS REQUIREMENTS Tools and Parts NOTE: Install the clothes dryer according to 1" (25 mm) or hex-head socket wrench Wire stripper 7 Gather required tools and parts before operating. then drain the hose. Water inlet hose Replace inlet hose and hose screen after 5 years of use the dryer again: 1. Turn...
... starting installation. Steam models only: Shut off power at fuse or breaker box. 2. Reconnect water inlet hose to locate, level, and connect the dryer. Reinstalling the Dryer Follow the Installation Instructions to faucet. For direct-wired dryers: WARNING INSTALLATION INSTRUCTIONS REQUIREMENTS Tools and Parts NOTE: Install the clothes dryer according to 1" (25 mm) or hex-head socket wrench Wire stripper 7 Gather required tools and parts before operating. then drain the hose. Water inlet hose Replace inlet hose and hose screen after 5 years of use the dryer again: 1. Turn...
Owners Manual
Page 8
... washer Vented Models: 5' (1.52 m) inlet hose Vent Clamps, elbows, and vent work Parts Needed (all models): Available Accessories: Refer to purchase). � Level floor with a pedestal or stack kit. If the slope is located in longer drying times. Check code requirements. You may use leveling legs supplied with dryer if installing with a maximum slope of automatic sensor cycles, resulting in dryer drum. NOTE: Do not use the water supply for a garage installation. Lower temperatures may need to your Quick Start Guide for proper exhaust installation...
... washer Vented Models: 5' (1.52 m) inlet hose Vent Clamps, elbows, and vent work Parts Needed (all models): Available Accessories: Refer to purchase). � Level floor with a pedestal or stack kit. If the slope is located in longer drying times. Check code requirements. You may use leveling legs supplied with dryer if installing with a maximum slope of automatic sensor cycles, resulting in dryer drum. NOTE: Do not use the water supply for a garage installation. Lower temperatures may need to your Quick Start Guide for proper exhaust installation...
Owners Manual
Page 9
... removed from the neutral conductor. latest edition and all mobile home installations. or 4-wire, 120/208 V electrical supply, if specified on the serial/rating plate) on a separate 30 A circuit, fused on all sides of the dryer to reduce noise transfer. � For closet installation with a 4-wire electrical supply connection, the neutral ground conductor must be using a power supply cord: Use a UL-listed power supply cord kit marked for use an extension cord. � If codes...
... removed from the neutral conductor. latest edition and all mobile home installations. or 4-wire, 120/208 V electrical supply, if specified on the serial/rating plate) on a separate 30 A circuit, fused on all sides of the dryer to reduce noise transfer. � For closet installation with a 4-wire electrical supply connection, the neutral ground conductor must be using a power supply cord: Use a UL-listed power supply cord kit marked for use an extension cord. � If codes...
Owners Manual
Page 10
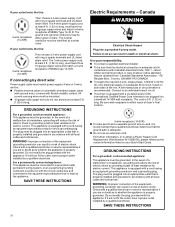
.... If connecting by direct wire: Power supply cable must be either green or bare. Check with a qualified electrician or service representative if you are in conformance with Canadian Electrical Code, C22.1 - For further information, or to obtain a Power Supply Cord Replacement (Part Number W11095079), please reference the contact information listed on the appliance. GROUNDING INSTRUCTIONS For a grounded, cord-connected appliance: This appliance must match power supply (4-wire or 3-wire) and...
.... If connecting by direct wire: Power supply cable must be either green or bare. Check with a qualified electrician or service representative if you are in conformance with Canadian Electrical Code, C22.1 - For further information, or to obtain a Power Supply Cord Replacement (Part Number W11095079), please reference the contact information listed on the appliance. GROUNDING INSTRUCTIONS For a grounded, cord-connected appliance: This appliance must match power supply (4-wire or 3-wire) and...
Owners Manual
Page 17
... exhaust (such as shown in final dryer location. � Remove excess to seal all governing codes and ordinances. NOTE: If using an existing vent system, clean lint from the rear of duct and catch lint. Dryer B. Exhaust outlet I. Vent products can result in enclosed walls, ceilings, or floors. � The total length should cap the vent to follow these instructions can be connected into interior of the dryer. Do not use an exhaust...
... exhaust (such as shown in final dryer location. � Remove excess to seal all governing codes and ordinances. NOTE: If using an existing vent system, clean lint from the rear of duct and catch lint. Dryer B. Exhaust outlet I. Vent products can result in enclosed walls, ceilings, or floors. � The total length should cap the vent to follow these instructions can be connected into interior of the dryer. Do not use an exhaust...
Owners Manual
Page 19
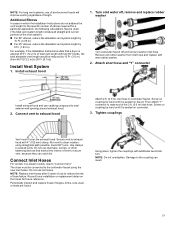
... vent length with new rubber washer. 2. Then attach "Y" connector to 30 Ft. [9.1m]). Connect Inlet Hoses For vented, non-steam models, skip to cold water faucet. Using pliers, tighten the couplings with 4" (102 mm) clamp. Install Vent System 1. Run vent to reduce the risk of elbows required for future reference. Periodically inspect and replace hoses if bulges, kinks, cuts, wear, or leaks are found. NOTE: For long vent systems, use old hoses. Install exhaust...
... vent length with new rubber washer. 2. Then attach "Y" connector to 30 Ft. [9.1m]). Connect Inlet Hoses For vented, non-steam models, skip to cold water faucet. Using pliers, tighten the couplings with 4" (102 mm) clamp. Install Vent System 1. Run vent to reduce the risk of elbows required for future reference. Periodically inspect and replace hoses if bulges, kinks, cuts, wear, or leaks are found. NOTE: For long vent systems, use old hoses. Install exhaust...

Owners Manual
Page 21
... water system in a running for 5 minutes, open the dryer door and feel heat, turn on . � Check for certain part replacement or repair. � To change the door swing from side to adjust legs up using a wood block. Complete Installation Checklist � Check that you have not tripped. See "Level Dryer." � Remove film on console and any dust. � For power supply cord installation, plug into an outlet and/or electrical supply. � Household fuse...
... water system in a running for 5 minutes, open the dryer door and feel heat, turn on . � Check for certain part replacement or repair. � To change the door swing from side to adjust legs up using a wood block. Complete Installation Checklist � Check that you have not tripped. See "Level Dryer." � Remove film on console and any dust. � For power supply cord installation, plug into an outlet and/or electrical supply. � Household fuse...
WED4950HW Manual de Uso y Cuidado.pdf
Page 5
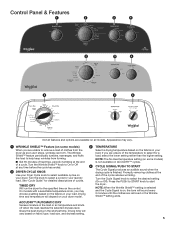
... removing clothes at the end of a cycle. Press the PUSH to START knob to remove a load of clothes from forming. ■■ Get 90 minutes of cycles. TIMED DRY Will run the dryer for detailed descriptions of heat-free, periodic tumbling at any time before the cycle has ended. 2 DRYER CYCLE KNOB Use your load. Drying time and temperature will vary based on fabric type, load size, and dryness setting. 3 TEMPERATURE Select a drying temperature based on your load. Control Panel & Features 1 2 3 4 2 3 4 2 3 4 Not all models. Drying time...
... removing clothes at the end of a cycle. Press the PUSH to START knob to remove a load of clothes from forming. ■■ Get 90 minutes of cycles. TIMED DRY Will run the dryer for detailed descriptions of heat-free, periodic tumbling at any time before the cycle has ended. 2 DRYER CYCLE KNOB Use your load. Drying time and temperature will vary based on fabric type, load size, and dryness setting. 3 TEMPERATURE Select a drying temperature based on your load. Control Panel & Features 1 2 3 4 2 3 4 2 3 4 Not all models. Drying time...
WED4950HW Manual de Uso y Cuidado.pdf
Page 10
... Disconnect power before operating. For direct-wired dryers: 1. Use tape to do so can result in dryer base. 4. For gas dryers: 1. Plug into a grounded outlet or reconnect power. 10 Clean lint screen. See "Cleaning the Lint Screen." Unplug dryer or disconnect power. 2. Locate the light bulb cover on the back wall of the cover. Replace all parts and panels before servicing. Turn off power at home. Close shut-off valve to dryer. 2. Cap the open fuel supply line. 5. Turn bulb counterclockwise. If you will be on some models) 1. Make...
... Disconnect power before operating. For direct-wired dryers: 1. Use tape to do so can result in dryer base. 4. For gas dryers: 1. Plug into a grounded outlet or reconnect power. 10 Clean lint screen. See "Cleaning the Lint Screen." Unplug dryer or disconnect power. 2. Locate the light bulb cover on the back wall of the cover. Replace all parts and panels before servicing. Turn off power at home. Close shut-off valve to dryer. 2. Cap the open fuel supply line. 5. Turn bulb counterclockwise. If you will be on some models) 1. Make...
WED4950HW Manual de Uso y Cuidado.pdf
Page 11
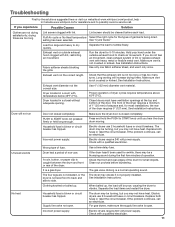
... circuit breakers. Clean out pockets before each load. Supply line valve not open . Electric dryers use . See Installation Instructions. Make sure vent is a gas dryer. Proper operation of fuse. Incorrect power supply. It is not crushed or kinked. If the problem continues, call an electrician. If you do not feel air movement, clean exhaust system of lint or replace exhaust vent with a qualified electrician. Fluff Air cycle or No Heat temperature Select the right cycle for most installations, the rear of the dryer requires 5" (127 mm). Dryer located...
... circuit breakers. Clean out pockets before each load. Supply line valve not open . Electric dryers use . See Installation Instructions. Make sure vent is a gas dryer. Proper operation of fuse. Incorrect power supply. It is not crushed or kinked. If the problem continues, call an electrician. If you do not feel air movement, clean exhaust system of lint or replace exhaust vent with a qualified electrician. Fluff Air cycle or No Heat temperature Select the right cycle for most installations, the rear of the dryer requires 5" (127 mm). Dryer located...
WED4950HW Manual de Uso y Cuidado.pdf
Page 13
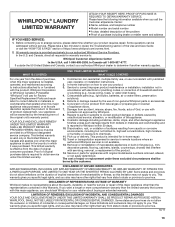
... in fixtures (e.g., trim, decorative panels, flooring, cabinetry, islands, countertops, drywall) that comes with published user, operator, or installation instructions. 2. This warranty gives you specific legal rights, and you call the Customer eXperience Center: n Name, address, and telephone number n Model number and serial number n A clear, detailed description of the problem n Proof of household electrical or plumbing (e.g., house wiring, fuses, or water inlet hoses). 4. WHIRLPOOL® LAUNDRY LIMITED WARRANTY ATTACH YOUR RECEIPT HERE. Some...
... in fixtures (e.g., trim, decorative panels, flooring, cabinetry, islands, countertops, drywall) that comes with published user, operator, or installation instructions. 2. This warranty gives you specific legal rights, and you call the Customer eXperience Center: n Name, address, and telephone number n Model number and serial number n A clear, detailed description of the problem n Proof of household electrical or plumbing (e.g., house wiring, fuses, or water inlet hoses). 4. WHIRLPOOL® LAUNDRY LIMITED WARRANTY ATTACH YOUR RECEIPT HERE. Some...


