Specification Sheet
Page 1
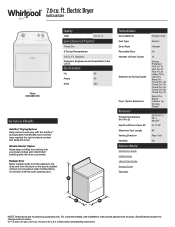
... clothes have reached the right moisture content and stops the cycle. D200104XXD. Wrinkle Shield™ Option Helps keep wrinkles from the dryer to change without worrying about clean clothes falling on the floor with this wide-opening door. Hamper Door Easily transfer loads from the washer to the dryer and from setting into your clean clothes with Door Open 90° Maximum Vent Length Venting Direction Ventless Reference Material Dimension Guide Install Guide Use & Care Guide Energy Guide Warranty Powder Coat Electric Hamper No 12 Energy...
... clothes have reached the right moisture content and stops the cycle. D200104XXD. Wrinkle Shield™ Option Helps keep wrinkles from the dryer to change without worrying about clean clothes falling on the floor with this wide-opening door. Hamper Door Easily transfer loads from the washer to the dryer and from setting into your clean clothes with Door Open 90° Maximum Vent Length Venting Direction Ventless Reference Material Dimension Guide Install Guide Use & Care Guide Energy Guide Warranty Powder Coat Electric Hamper No 12 Energy...
Installation Instructions
Page 4
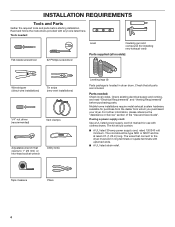
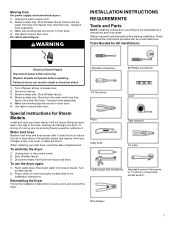
... needed : Check local codes. The wires that all models): Wire stripper (direct wire installations) Tin snips (new vent installations) 1/4" nut driver (recommended) Vent clamps Adjustable wrench that opens to the dryer must end in dryer drum. The kit should be type SRD or SRDT and be at least 4 ft. (1.22 m) long. Read and follow the instructions provided with clothes dryers. For further information, please reference the "Assistance or Service" section of the "Use and Care Guide". Check existing electrical...
... needed : Check local codes. The wires that all models): Wire stripper (direct wire installations) Tin snips (new vent installations) 1/4" nut driver (recommended) Vent clamps Adjustable wrench that opens to the dryer must end in dryer drum. The kit should be type SRD or SRDT and be at least 4 ft. (1.22 m) long. Read and follow the instructions provided with clothes dryers. For further information, please reference the "Assistance or Service" section of the "Use and Care Guide". Check existing electrical...
Installation Instructions
Page 5
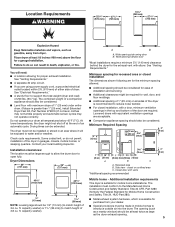
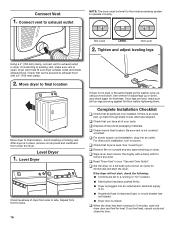
...], install Extended Dryer Feet Kit, Part Number 279810.) If not level, clothes may not tumble properly and automatic sensor cycles may not operate correctly. The combined weight of an automatic cycle. Check code requirements. Recessed area B. Do not operate your local building inspector. capacity washer) or 1½" (38 mm) (to match height of 200 lbs. (90.7 kg). A B A. Drying times can be large enough to allow the dryer door to support the...
...], install Extended Dryer Feet Kit, Part Number 279810.) If not level, clothes may not tumble properly and automatic sensor cycles may not operate correctly. The combined weight of an automatic cycle. Check code requirements. Recessed area B. Do not operate your local building inspector. capacity washer) or 1½" (38 mm) (to match height of 200 lbs. (90.7 kg). A B A. Drying times can be large enough to allow the dryer door to support the...
Installation Instructions
Page 6
... all mobile home installations. The National Electrical Code requires a 4-wire power supply connection for use aluminum). ■■ At least 5 ft. (1.52 m) long. 6 Do not have a fuse in ring terminals or spade terminals with a 4-wire electrical supply connection, the neutral ground wire must have 4 10-gauge solid copper wires and match a 4-wire receptacle of electrical connection you will be using a power supply cord: Use a UL listed power supply cord kit marked for homes built after 1996, dryer circuits involved in...
... all mobile home installations. The National Electrical Code requires a 4-wire power supply connection for use aluminum). ■■ At least 5 ft. (1.52 m) long. 6 Do not have a fuse in ring terminals or spade terminals with a 4-wire electrical supply connection, the neutral ground wire must have 4 10-gauge solid copper wires and match a 4-wire receptacle of electrical connection you will be using a power supply cord: Use a UL listed power supply cord kit marked for homes built after 1996, dryer circuits involved in...
Installation Instructions
Page 10
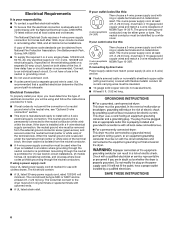
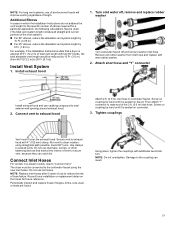
... the right, squeeze hooked end together and tighten screw. 10 Connect neutral wire BC 2. Finally, reinsert tab of terminal block cover into slot of wires into hooks. 4. Shape ends of dryer rear panel. For 3-wire Direct Wire Connection, see page 11. Cut 11/2" (38 mm) from a 3/4" (19 mm) UL listed strain relief (UL marking on strain relief). Tighten strain relief screws. For 4 wire Direct Wire Connection, continue to terminal block Unscrew the removable conduit connector...
... the right, squeeze hooked end together and tighten screw. 10 Connect neutral wire BC 2. Finally, reinsert tab of terminal block cover into slot of wires into hooks. 4. Shape ends of dryer rear panel. For 3-wire Direct Wire Connection, see page 11. Cut 11/2" (38 mm) from a 3/4" (19 mm) UL listed strain relief (UL marking on strain relief). Tighten strain relief screws. For 4 wire Direct Wire Connection, continue to terminal block Unscrew the removable conduit connector...
Installation Instructions
Page 15
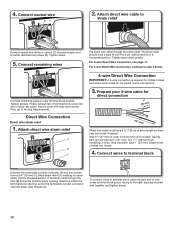
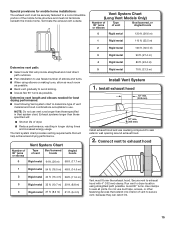
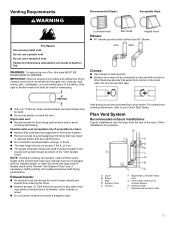
... and must not terminate beneath the mobile home. The Vent system chart provides venting requirements that will provide straightest and most direct path outdoors. ■■ Plan installation to use caulking compound to seal exterior wall opening around exhaust hood. 2. Vent System Chart Number of 90° turns or elbows Type of vent to secure vent, because they can catch lint. 15 Run vent to dryer location using elbows or making...
... and must not terminate beneath the mobile home. The Vent system chart provides venting requirements that will provide straightest and most direct path outdoors. ■■ Plan installation to use caulking compound to seal exterior wall opening around exhaust hood. 2. Vent System Chart Number of 90° turns or elbows Type of vent to secure vent, because they can catch lint. 15 Run vent to dryer location using elbows or making...
Installation Instructions
Page 16
... or down, and check again for heat. For direct wire installation, turn on a full heat cycle (not an air cycle) for the moisture sensing system to exhaust outlet NOTE: The dryer must fit over dryer exhaust outlet and inside exhaust hood. q Read "Dryer Use" in a running for 5 minutes, open the dryer door and feel heat, cancel cycle and close the door. q Wipe dryer drum interior thoroughly with a 4" (102 mm) clamp. 2. Connect vent to operate correctly. q Check dryer's final location. q Set the dryer on power. Dryer vent must be level...
... or down, and check again for heat. For direct wire installation, turn on a full heat cycle (not an air cycle) for the moisture sensing system to exhaust outlet NOTE: The dryer must fit over dryer exhaust outlet and inside exhaust hood. q Read "Dryer Use" in a running for 5 minutes, open the dryer door and feel heat, cancel cycle and close the door. q Wipe dryer drum interior thoroughly with a 4" (102 mm) clamp. 2. Connect vent to operate correctly. q Check dryer's final location. q Set the dryer on power. Dryer vent must be level...
Owners Manual
Page 2
... and increase the risk of fire. − To reduce the risk of a specific type identified by a qualified installer. − Install the clothes dryer according to the manufacturer's instructions and local codes. − Do not install a clothes dryer with clothes dryers. We have provided many important safety messages in this manual and on your appliance. All safety messages will tell you what the potential hazard...
... and increase the risk of fire. − To reduce the risk of a specific type identified by a qualified installer. − Install the clothes dryer according to the manufacturer's instructions and local codes. − Do not install a clothes dryer with clothes dryers. We have provided many important safety messages in this manual and on your appliance. All safety messages will tell you what the potential hazard...

Owners Manual
Page 6
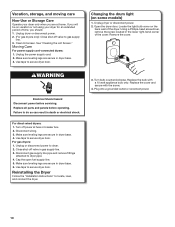
... these instructions can result in a vent system; Locate the light bulb cover on some models) 1. Replace the bulb with the screw. 4. Replace the cover and secure with a 10 W appliance bulb only. Clean lint screen. See "Cleaning the Lint Screen." 3. Open the dryer door. Blocked or crushed vents as well as improper venting installation will reduce your drying times and improve your energy savings. Service calls caused by the warranty and will be on vacation or not using your Quick Start Guide. � Remove lint and...
... these instructions can result in a vent system; Locate the light bulb cover on some models) 1. Replace the bulb with the screw. 4. Replace the cover and secure with a 10 W appliance bulb only. Clean lint screen. See "Cleaning the Lint Screen." 3. Open the dryer door. Blocked or crushed vents as well as improper venting installation will reduce your drying times and improve your energy savings. Service calls caused by the warranty and will be on vacation or not using your Quick Start Guide. � Remove lint and...
Owners Manual
Page 7
... or electrical shock. 1. Replace all parts and panels before servicing. If storing or moving your dryer. Flush water pipes. Steam models only: Shut off power at fuse or breaker box. 2. For direct-wired dryers: WARNING INSTALLATION INSTRUCTIONS REQUIREMENTS Tools and Parts NOTE: Install the clothes dryer according to locate, level, and connect the dryer. Gather required tools and parts before starting installation. Steam models only: Disconnect the water inlet hose from faucet; Make sure leveling legs are secure in the Installation Instructions. Because some water may...
... or electrical shock. 1. Replace all parts and panels before servicing. If storing or moving your dryer. Flush water pipes. Steam models only: Shut off power at fuse or breaker box. 2. For direct-wired dryers: WARNING INSTALLATION INSTRUCTIONS REQUIREMENTS Tools and Parts NOTE: Install the clothes dryer according to locate, level, and connect the dryer. Gather required tools and parts before starting installation. Steam models only: Disconnect the water inlet hose from faucet; Make sure leveling legs are secure in the Installation Instructions. Because some water may...
Owners Manual
Page 8
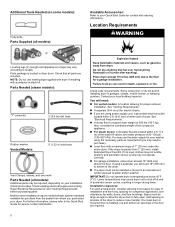
... operate dryer at least 18" (460 mm) above the floor for contact and ordering information. Space must not be exposed to water and/or weather. Parts Needed (steam models): "Y" connector 2' (0.6 m) inlet hose Rubber washer Vented Models: 5' (1.52 m) inlet hose Vent Clamps, elbows, and vent work Parts Needed (all models): Additional parts may vary according to model) Parts package is located in the door are required. 8 Check existing electrical supply and venting. Do not dry anything that all parts are using power supply cord...
... operate dryer at least 18" (460 mm) above the floor for contact and ordering information. Space must not be exposed to water and/or weather. Parts Needed (steam models): "Y" connector 2' (0.6 m) inlet hose Rubber washer Vented Models: 5' (1.52 m) inlet hose Vent Clamps, elbows, and vent work Parts Needed (all models): Additional parts may vary according to model) Parts package is located in the door are required. 8 Check existing electrical supply and venting. Do not dry anything that all parts are using power supply cord...
Owners Manual
Page 9
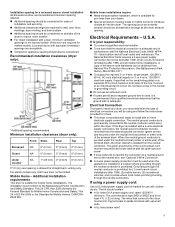
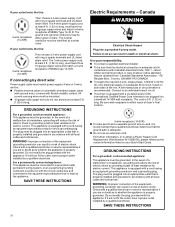
... above code standards can be considered. Louvered doors with a 3-wire electrical supply connection. Additional installation requirements This dryer is permanently connected to an individual branch circuit. The opening (such as the dryer exhaust opening. Electrical Requirements - latest edition and all mobile home installations. or 4-wire, 120/208 V electrical supply, if specified on the serial/rating plate) on a separate 30 A circuit, fused on all sides of the 4-wire power cord must be removed from your dryer, you will be used...
... above code standards can be considered. Louvered doors with a 3-wire electrical supply connection. Additional installation requirements This dryer is permanently connected to an individual branch circuit. The opening (such as the dryer exhaust opening. Electrical Requirements - latest edition and all mobile home installations. or 4-wire, 120/208 V electrical supply, if specified on the serial/rating plate) on a separate 30 A circuit, fused on all sides of the 4-wire power cord must be removed from your dryer, you will be used...
Owners Manual
Page 10
... terminals and UL-listed strain relief. All current-carrying wires must be identified by a white cover. WARNING: Improper connection of dryer's final location. 4-wire receptacle (14-30R) If codes permit and a separate ground wire is used, it will reduce the risk of electric shock by providing a path of electric shock. SAVE THESE INSTRUCTIONS 10 The 4-wire power supply cord, at least 4 ft. (1.22 m) long, must match power supply (4-wire...
... terminals and UL-listed strain relief. All current-carrying wires must be identified by a white cover. WARNING: Improper connection of dryer's final location. 4-wire receptacle (14-30R) If codes permit and a separate ground wire is used, it will reduce the risk of electric shock by providing a path of electric shock. SAVE THESE INSTRUCTIONS 10 The 4-wire power supply cord, at least 4 ft. (1.22 m) long, must match power supply (4-wire...
Owners Manual
Page 17
... foil vent. Dryer exhaust must not be connected into interior of a building. Replace plastic or metal foil vents with lint. Dryer B. Optional side exhaust outlet 17 Do not use duct tape. � Only a 4" (102 mm) heavy metal exhaust vent and clamps may be fully extended and supported in enclosed walls, ceilings, or floors. � The total length should cap the vent to achieve best drying performance. Rigid metal vent...
... foil vent. Dryer exhaust must not be connected into interior of a building. Replace plastic or metal foil vents with lint. Dryer B. Optional side exhaust outlet 17 Do not use duct tape. � Only a 4" (102 mm) heavy metal exhaust vent and clamps may be fully extended and supported in enclosed walls, ceilings, or floors. � The total length should cap the vent to achieve best drying performance. Rigid metal vent...
Owners Manual
Page 19
... Install exhaust hood 1. Turn cold water off, remove and replace rubber washer Turn cold water faucet off and remove washer inlet hose. Then attach "Y" connector to dryer location using the new inlet hoses. Run vent to male end of length. Using pliers, tighten the couplings with new rubber washer. 2. Connect vent to exhaust hood Attach 2 ft. (0.6 m) inlet hose to "Connect Vent." Do not use caulking compound to the cold water faucet using straightest path possible. Avoid 90° turns. Record hose installation or replacement dates...
... Install exhaust hood 1. Turn cold water off, remove and replace rubber washer Turn cold water faucet off and remove washer inlet hose. Then attach "Y" connector to dryer location using the new inlet hoses. Run vent to male end of length. Using pliers, tighten the couplings with new rubber washer. 2. Connect vent to exhaust hood Attach 2 ft. (0.6 m) inlet hose to "Connect Vent." Do not use caulking compound to the cold water faucet using straightest path possible. Avoid 90° turns. Record hose installation or replacement dates...

Owners Manual
Page 21
... water system in a running or "On" position. � Start button has been pushed firmly. � Dryer is closed. � When the dryer has been running for 5 minutes, open the dryer door and feel heat, cancel cycle and close the door. Check that both fuses are now installed. Once dryer is not level, prop up or down, and check again for certain part replacement or repair. � To change the door swing from a right-side opening...
... water system in a running or "On" position. � Start button has been pushed firmly. � Dryer is closed. � When the dryer has been running for 5 minutes, open the dryer door and feel heat, cancel cycle and close the door. Check that both fuses are now installed. Once dryer is not level, prop up or down, and check again for certain part replacement or repair. � To change the door swing from a right-side opening...
WED4950HW Manual de Uso y Cuidado.pdf
Page 5
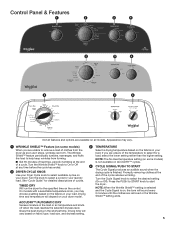
... Cycle Signal is finished. Turn the Cycle Signal knob to start the dryer. Press the PUSH to START knob to select the desired setting (On or Off). Control Panel & Features 1 2 3 4 2 3 4 2 3 4 Not all models. Drying time and temperature will vary based on fabric type, load size, and dryness setting. 3 TEMPERATURE Select a drying temperature based on all features and options are unable to remove a load of clothes from forming. ■■ Get 90 minutes of heat-free...
... Cycle Signal is finished. Turn the Cycle Signal knob to start the dryer. Press the PUSH to START knob to select the desired setting (On or Off). Control Panel & Features 1 2 3 4 2 3 4 2 3 4 Not all models. Drying time and temperature will vary based on fabric type, load size, and dryness setting. 3 TEMPERATURE Select a drying temperature based on all features and options are unable to remove a load of clothes from forming. ■■ Get 90 minutes of heat-free...
WED4950HW Manual de Uso y Cuidado.pdf
Page 10
...gas supply line. 3. Locate the light bulb cover on some models) 1. WARNING Electrical Shock Hazard Disconnect power before operating. Failure to secure dryer door. Plug into a grounded outlet or reconnect power. 10 Open the dryer door. Remove the cover. Replace the bulb with the screw. 4. Changing the drum light (on the back wall of the dryer. Unplug or disconnect power to dryer pipe. 4. Disconnect wiring. 3. For direct-wired dryers: 1. Disconnect gas supply line pipe and remove fittings attached to dryer. 2. Use tape to gas supply line. 3. Turn off valve in dryer...
...gas supply line. 3. Locate the light bulb cover on some models) 1. WARNING Electrical Shock Hazard Disconnect power before operating. Failure to secure dryer door. Plug into a grounded outlet or reconnect power. 10 Open the dryer door. Remove the cover. Replace the bulb with the screw. 4. Changing the drum light (on the back wall of the dryer. Unplug or disconnect power to dryer pipe. 4. Disconnect wiring. 3. For direct-wired dryers: 1. Disconnect gas supply line pipe and remove fittings attached to dryer. 2. Use tape to gas supply line. 3. Turn off valve in dryer...
WED4950HW Manual de Uso y Cuidado.pdf
Page 11
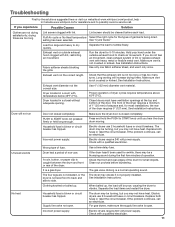
... installations, the rear of non-use 2 household fuses or circuit breakers. The drum may not have heat. Electric dryers require 240 volt power supply. Check that the exhaust vent is blown or circuit breaker has tripped. Incorrect power supply. Use a time-delay fuse. Clean out pockets before each load. No heat Household fuse is not too long or has too many turns. Load too large and heavy to tumble freely. Fabric softener sheets blocking the grille. Exhaust vent diameter not the correct size. Use...
... installations, the rear of non-use 2 household fuses or circuit breakers. The drum may not have heat. Electric dryers require 240 volt power supply. Check that the exhaust vent is blown or circuit breaker has tripped. Incorrect power supply. Use a time-delay fuse. Clean out pockets before each load. No heat Household fuse is not too long or has too many turns. Load too large and heavy to tumble freely. Fabric softener sheets blocking the grille. Exhaust vent diameter not the correct size. Use...
WED4950HW Manual de Uso y Cuidado.pdf
Page 13
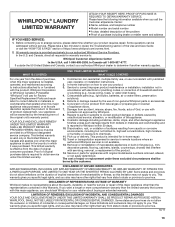
...'s warranty period. Service must be warranted by a Whirlpool designated service company. Service to you also may not apply to correct improper product maintenance or installation, installation not in accordance with electrical or plumbing codes, or correction of your appliance will pay for warranty service to province. Conversion of household electrical or plumbing (e.g., house wiring, fuses, or water inlet hoses). 4. Repairs to parts or systems to province. 10/17 13 Removal or...
...'s warranty period. Service must be warranted by a Whirlpool designated service company. Service to you also may not apply to correct improper product maintenance or installation, installation not in accordance with electrical or plumbing codes, or correction of your appliance will pay for warranty service to province. Conversion of household electrical or plumbing (e.g., house wiring, fuses, or water inlet hoses). 4. Repairs to parts or systems to province. 10/17 13 Removal or...


