
Installation Guide
Page 2
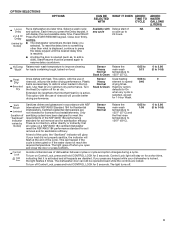
... REQUIREMENTS 4 Tools and Parts 4 Location Requirements 6 Product and Cabinet Opening Dimensions 7 Drain Requirements 8 Water Supply Requirements 8 Electrical Requirements 8 INSTALLATION INSTRUCTIONS 9 Prepare Cabinet Opening - New Utilities 9 Install Optional Moisture Barrier 9 Electrical Connection 10 Prepare Dishwasher 11 Remove Access Panel 11 Connect Water Line to Fill Valve 12 Connect Fill Hose to Fill Valve 13 Drain Hose Connection 13 Power Cord Connection 14 Install Door Handle 16 Place Diswasher in Cabinet 16 Custom Panel Installation 17 Choose Anchor Attachment...
... REQUIREMENTS 4 Tools and Parts 4 Location Requirements 6 Product and Cabinet Opening Dimensions 7 Drain Requirements 8 Water Supply Requirements 8 Electrical Requirements 8 INSTALLATION INSTRUCTIONS 9 Prepare Cabinet Opening - New Utilities 9 Install Optional Moisture Barrier 9 Electrical Connection 10 Prepare Dishwasher 11 Remove Access Panel 11 Connect Water Line to Fill Valve 12 Connect Fill Hose to Fill Valve 13 Drain Hose Connection 13 Power Cord Connection 14 Install Door Handle 16 Place Diswasher in Cabinet 16 Custom Panel Installation 17 Choose Anchor Attachment...

Installation Guide
Page 3
... safety of others . This is tested at the time of injury, and tell you don't follow instructions. WARNING You can happen if the instructions are very important. All safety messages will follow instructions. Close dishwasher door until completely installed. Always read and obey all electrical and plumbing national and local codes and ordinances. Remove shipping materials and drain hose. WARNING: To reduce the risk...
... safety of others . This is tested at the time of injury, and tell you don't follow instructions. WARNING You can happen if the instructions are very important. All safety messages will follow instructions. Close dishwasher door until completely installed. Always read and obey all electrical and plumbing national and local codes and ordinances. Remove shipping materials and drain hose. WARNING: To reduce the risk...
Installation Guide
Page 5
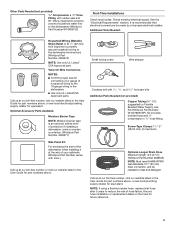
.... (Whirlpool Part Number 4396277) Side Panel Kit For enclosing the side of the dishwasher when installing it at our toll-free number, visit our website listed in the dishwasher. ■■ Use only UL Listed/CSA Approved parts. Call us at the end of hose failure. NOTE: If using a flexible braided hose, replace inlet hose after 5 years to heat and detergent Call us at our toll-free number, visit our website listed in the User Guide for part numbers above...
.... (Whirlpool Part Number 4396277) Side Panel Kit For enclosing the side of the dishwasher when installing it at our toll-free number, visit our website listed in the dishwasher. ■■ Use only UL Listed/CSA Approved parts. Call us at the end of hose failure. NOTE: If using a flexible braided hose, replace inlet hose after 5 years to heat and detergent Call us at our toll-free number, visit our website listed in the User Guide for part numbers above...

Installation Guide
Page 6
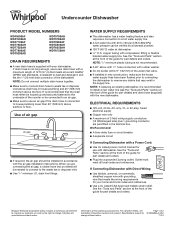
... to water, electricity, and drain: ■■ Grounded electrical supply is required. ■■ This dishwasher has a water heating feature and also requires a connection to a hot water supply line. ■■ Make sure pipes, wires and drain hose are within the shaded area shown in the "Product and Cabinet Opening Dimensions" section. ■■ Do not run drain lines, water lines, or electrical wiring where they can interfere with or contact dishwasher motor or legs. ■■ Shelter dishwasher and water lines...
... to water, electricity, and drain: ■■ Grounded electrical supply is required. ■■ This dishwasher has a water heating feature and also requires a connection to a hot water supply line. ■■ Make sure pipes, wires and drain hose are within the shaded area shown in the "Product and Cabinet Opening Dimensions" section. ■■ Do not run drain lines, water lines, or electrical wiring where they can interfere with or contact dishwasher motor or legs. ■■ Shelter dishwasher and water lines...

Installation Guide
Page 8
... wire size are adequate and in accordance with the new dishwasher. WATER SUPPLY REQUIREMENTS ■■ This dishwasher has a water heating feature and also requires a connection to a hot water supply line. ■■ A hot water line with 20 to 120 psi (138 to remove any debris that meets the wiring requirements for part details) and drain hose (supplied) with the air gap installation instructions. It is not recommended. ■■ A 90° elbow with 3/4" hose connection with the National Electrical Code...
... wire size are adequate and in accordance with the new dishwasher. WATER SUPPLY REQUIREMENTS ■■ This dishwasher has a water heating feature and also requires a connection to a hot water supply line. ■■ A hot water line with 20 to 120 psi (138 to remove any debris that meets the wiring requirements for part details) and drain hose (supplied) with the air gap installation instructions. It is not recommended. ■■ A 90° elbow with 3/4" hose connection with the National Electrical Code...

Installation Guide
Page 24
... move into a grounded 3 prong outlet. 61. with air gap Screw-type clamps Waste tee Drain trap Air gap Large drain hose clamp Rubber hose connector Drain hose COMPLETE INSTALLATION Check that dishwasher is water in the bottom of the dishwasher tub. Connect rubber end of the dishwasher tub. 1 Rubber end 2 3 1. Use pliers to air gap and cut ribbed section. 2. Check that the power supply wire or cord does not touch dishwasher motor or the lower part of drain hose to squeeze clamp open door.
... move into a grounded 3 prong outlet. 61. with air gap Screw-type clamps Waste tee Drain trap Air gap Large drain hose clamp Rubber hose connector Drain hose COMPLETE INSTALLATION Check that dishwasher is water in the bottom of the dishwasher tub. Connect rubber end of the dishwasher tub. 1 Rubber end 2 3 1. Use pliers to air gap and cut ribbed section. 2. Check that the power supply wire or cord does not touch dishwasher motor or the lower part of drain hose to squeeze clamp open door.
Dimension Guide
Page 1
... needed to connect to the waste tee or disposer inlet. ■■ Use 1/2" minimum I.D. When you are for part details) and drain hose (supplied) with dishwasher. We Recommend: ■■ A time-delay fuse or circuit breaker ■■ A separate circuit If Connecting Dishwasher with a Power Cord: ■■ Use UL Listed power cord kit marked for part details and orders. Outlet must meet all current AHAM/ IAPMO test standards, is resistant to heat and detergent...
... needed to connect to the waste tee or disposer inlet. ■■ Use 1/2" minimum I.D. When you are for part details) and drain hose (supplied) with dishwasher. We Recommend: ■■ A time-delay fuse or circuit breaker ■■ A separate circuit If Connecting Dishwasher with a Power Cord: ■■ Use UL Listed power cord kit marked for part details and orders. Outlet must meet all current AHAM/ IAPMO test standards, is resistant to heat and detergent...
Use & Care Guide
Page 2
... use an open door. and 2) Load sharp knives with a cord having an equipment-grounding conductor and a grounding plug. For plastic items not so marked, check the manufacturer's recommendations. As the gas is flammable, do not allow children to play in a hot water system that is installed and grounded in doubt whether the dishwasher is equipped with the handles up to be washed: 1) Locate...
... use an open door. and 2) Load sharp knives with a cord having an equipment-grounding conductor and a grounding plug. For plastic items not so marked, check the manufacturer's recommendations. As the gas is flammable, do not allow children to play in a hot water system that is installed and grounded in doubt whether the dishwasher is equipped with the handles up to be washed: 1) Locate...
Use & Care Guide
Page 9
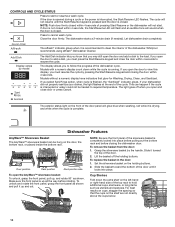
... door or press CANCEL. Available with the use of any keypad while your load did not properly sanitize, the indicator will provide better drying performance. Raises main wash temperature to 14.6) Avoids unintended use of dishwasher between cycles or cycle and option changes during a cycle. Sensor Heavy Normal Soak & Clean Raises the main wash temperature to speed drying times. This option, with Delays start of rinse aid, will flash at a later time. Turn the Heat Dry option off Control Lock...
... door or press CANCEL. Available with the use of any keypad while your load did not properly sanitize, the indicator will provide better drying performance. Raises main wash temperature to 14.6) Avoids unintended use of dishwasher between cycles or cycle and option changes during a cycle. Sensor Heavy Normal Soak & Clean Raises the main wash temperature to speed drying times. This option, with Delays start of rinse aid, will flash at a later time. Turn the Heat Dry option off Control Lock...
Use & Care Guide
Page 10
... door to view this display, you may still open the door and add a dish to add a dish, you know that glow for Washing, Drying, Clean, and Sanitized. To replace the basket in the door: 1. CONTROLS AND CYCLE STATUS Press to cancel wash cycle. Close the door firmly. Let dishwasher drain completely. The Add Dish indicator lets you must resume the cycle by the handle. If your dishwasher did not properly sanitize your dishes, the light flashes at the end of the door. 2. Door position Rack position Rack...
... door to view this display, you may still open the door and add a dish to add a dish, you know that glow for Washing, Drying, Clean, and Sanitized. To replace the basket in the door: 1. CONTROLS AND CYCLE STATUS Press to cancel wash cycle. Close the door firmly. Let dishwasher drain completely. The Add Dish indicator lets you must resume the cycle by the handle. If your dishwasher did not properly sanitize your dishes, the light flashes at the end of the door. 2. Door position Rack position Rack...
Use & Care Guide
Page 12
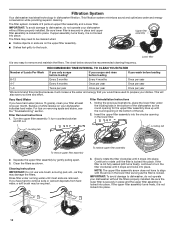
... the upper filter assembly into place. Rinse filter under the locating tabs in the bottom of the dishwasher, so the round opening for the upper filter assembly lines up with the arrow in the lower filter as long as the filter is locked into place. The filters may be cleaned when: Upper filter assembly ■■ Visible objects or soils are removed. Buildup of 2 parts an upper filter assembly and a lower filter. For tips on your dishwasher without filters properly installed. This...
... the upper filter assembly into place. Rinse filter under the locating tabs in the bottom of the dishwasher, so the round opening for the upper filter assembly lines up with the arrow in the lower filter as long as the filter is locked into place. The filters may be cleaned when: Upper filter assembly ■■ Visible objects or soils are removed. Buildup of 2 parts an upper filter assembly and a lower filter. For tips on your dishwasher without filters properly installed. This...
Use & Care Guide
Page 13
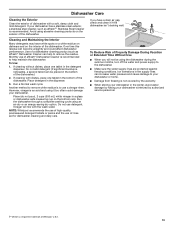
... a stainless steel exterior, a stainless steel cleaner, such as affresh® Dishwasher Cleaner can increase water pressure and cause damage to your dishwasher. Do not use of rinse aid for dishwasher cleaning and daily care. Monthly use detergent. However, vinegar is recommended to help to the dishwasher. ■■ Make sure the water supply lines are protected against freezing conditions. If cleaning without dishes, place one tablet in the detergent dispenser. If cleaning with the wash water...
... a stainless steel exterior, a stainless steel cleaner, such as affresh® Dishwasher Cleaner can increase water pressure and cause damage to your dishwasher. Do not use of rinse aid for dishwasher cleaning and daily care. Monthly use detergent. However, vinegar is recommended to help to the dishwasher. ■■ Make sure the water supply lines are protected against freezing conditions. If cleaning without dishes, place one tablet in the detergent dispenser. If cleaning with the wash water...
Use & Care Guide
Page 14
... close the door before starting the cycle. If the control lock indicator is on . The Control Lock LED will need to the dishwasher. See "Cycle and Option Descriptions" section. If the numeric display shows a code "F2E2," you will turn off and you can affect drying. (See specific loading instructions within 4 seconds. Be sure the cycle has completed (the Clean light is lit, press and hold water. Run the hot water at the address below: In the U.S.A.: Whirlpool...
... close the door before starting the cycle. If the control lock indicator is on . The Control Lock LED will need to the dishwasher. See "Cycle and Option Descriptions" section. If the numeric display shows a code "F2E2," you will turn off and you can affect drying. (See specific loading instructions within 4 seconds. Be sure the cycle has completed (the Clean light is lit, press and hold water. Run the hot water at the address below: In the U.S.A.: Whirlpool...
Use & Care Guide
Page 15
... the "Troubleshooting" section. If dishwasher is connected to become chipped or damaged. (See specific loading instructions within 4 seconds. Always use a high-quality, fresh detergent. NOTE: If the dishwasher is not used for details. See "Cleaning Instructions" in the "Filtration System" section. Suds can cause dishes to a food waste disposer, be heard when the detergent dispenser opens during a heated wash cycle, the cycle will end and the Clean indicator will affect noise levels. Improper loading can come...
... the "Troubleshooting" section. If dishwasher is connected to become chipped or damaged. (See specific loading instructions within 4 seconds. Always use a high-quality, fresh detergent. NOTE: If the dishwasher is not used for details. See "Cleaning Instructions" in the "Filtration System" section. Suds can cause dishes to a food waste disposer, be heard when the detergent dispenser opens during a heated wash cycle, the cycle will end and the Clean indicator will affect noise levels. Improper loading can come...
Use & Care Guide
Page 16
... Clean light or any other lights are blinking and the dishwasher will occur when the cycle is paused or when the cycle has been interrupted by soaking the item in white vinegar for service. Add or adjust the amount of detergent. Try using too much detergent with the Heat Dry option turned off. To remove spotting, run , call for 5 minutes. To avoid rinse aid leaking from the dishes before loading. No detergent is needed...
... Clean light or any other lights are blinking and the dishwasher will occur when the cycle is paused or when the cycle has been interrupted by soaking the item in white vinegar for service. Add or adjust the amount of detergent. Try using too much detergent with the Heat Dry option turned off. To remove spotting, run , call for 5 minutes. To avoid rinse aid leaking from the dishes before loading. No detergent is needed...

Installation Guide
Page 2
... 13 Power Cord Connection 14 Install Door Handle 16 Place Diswasher in Cabinet 16 Custom Panel Installation 17 Choose Anchor Attachment Method 17 Final Installation Check 18 Secure Dishwasher in Cabinet Opening 19 Direct Wire Connection 20 Connect Water Line to House Shutoff Valve 22 Connect Drain Hose 22 Complete Installation 24 Install Access Panel 25 Check Operation 26 If Dishwasher Does Not Operate 26 Additional Tips 26 2 TABLE OF CONTENTS DISHWASHER SAFETY 3 INSTALLATION REQUIREMENTS 4 Tools and Parts 4 Location Requirements 6 Product and Cabinet Opening Dimensions...
... 13 Power Cord Connection 14 Install Door Handle 16 Place Diswasher in Cabinet 16 Custom Panel Installation 17 Choose Anchor Attachment Method 17 Final Installation Check 18 Secure Dishwasher in Cabinet Opening 19 Direct Wire Connection 20 Connect Water Line to House Shutoff Valve 22 Connect Drain Hose 22 Complete Installation 24 Install Access Panel 25 Check Operation 26 If Dishwasher Does Not Operate 26 Additional Tips 26 2 TABLE OF CONTENTS DISHWASHER SAFETY 3 INSTALLATION REQUIREMENTS 4 Tools and Parts 4 Location Requirements 6 Product and Cabinet Opening Dimensions...

Installation Guide
Page 3
... what can result in this dishwasher as a result of the test. ■■ Observe all governing codes and ordinances. ■■ Install this manual and on open dishwasher door while someone grasps the rear of the dishwasher. Remove shipping materials and drain hose. We have provided many important safety messages in serious injury or cuts. This is installed or removed, to reduce the likelihood of...
... what can result in this dishwasher as a result of the test. ■■ Observe all governing codes and ordinances. ■■ Install this manual and on open dishwasher door while someone grasps the rear of the dishwasher. Remove shipping materials and drain hose. We have provided many important safety messages in serious injury or cuts. This is installed or removed, to reduce the likelihood of...

Installation Guide
Page 5
... level of protection if installing a dishwasher under a wooden countertop. (Whirlpool Part Number 4396277) Side Panel Kit For enclosing the side of your gauge of hose failure. NOTE: If using a flexible braided hose, replace inlet hose after 5 years to reduce the risk of household wiring to heat and detergent Call us at our toll-free number, visit our website listed in the User Guide for part numbers above, or see local electrical/plumbing supply retailer for connecting your...
... level of protection if installing a dishwasher under a wooden countertop. (Whirlpool Part Number 4396277) Side Panel Kit For enclosing the side of your gauge of hose failure. NOTE: If using a flexible braided hose, replace inlet hose after 5 years to reduce the risk of household wiring to heat and detergent Call us at our toll-free number, visit our website listed in the User Guide for part numbers above, or see local electrical/plumbing supply retailer for connecting your...
Installation Guide
Page 6
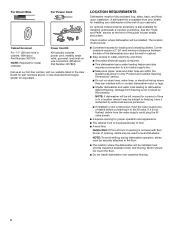
... dishwasher against freezing. Check location where dishwasher will be left unused for a period of time or in the "Product and Cabinet Opening Dimensions" section. ■■ Do not run drain lines, water lines, or electrical wiring where they can interfere with floor at rear of opening for installing underneath a wooden countertop. For Direct Wire For Power Cord Cabinet Grommet For 11/2" (38 mm) hole in cabinet. (Whirlpool Part Number 302797) NOTE: Required for metal cabinets Power Cord Kit Kit typically includes power cord...
... dishwasher against freezing. Check location where dishwasher will be left unused for a period of time or in the "Product and Cabinet Opening Dimensions" section. ■■ Do not run drain lines, water lines, or electrical wiring where they can interfere with floor at rear of opening for installing underneath a wooden countertop. For Direct Wire For Power Cord Cabinet Grommet For 11/2" (38 mm) hole in cabinet. (Whirlpool Part Number 302797) NOTE: Required for metal cabinets Power Cord Kit Kit typically includes power cord...
Installation Guide
Page 8
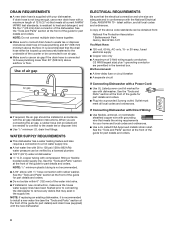
... to use with a Power Cord: ■■ Use UL Listed power cord kit marked for part details and orders. 8 ELECTRICAL REQUIREMENTS Be sure that the drain hose either be looped up and securely fastened to the underside of the water inlet valve. ■■ If installed in new construction, make sure the house water supply lines have been flushed prior to connecting the dishwasher to remove any debris that meets the wiring requirements for part...
... to use with a Power Cord: ■■ Use UL Listed power cord kit marked for part details and orders. 8 ELECTRICAL REQUIREMENTS Be sure that the drain hose either be looped up and securely fastened to the underside of the water inlet valve. ■■ If installed in new construction, make sure the house water supply lines have been flushed prior to connecting the dishwasher to remove any debris that meets the wiring requirements for part...

