Whirlpool WDT970SAK Support and Manuals
Get Help and Manuals for this Whirlpool item
View All Support Options Below
Free Whirlpool WDT970SAK manuals!
Problems with Whirlpool WDT970SAK?
Ask a Question
Free Whirlpool WDT970SAK manuals!
Problems with Whirlpool WDT970SAK?
Ask a Question
Popular Whirlpool WDT970SAK Manual Pages
Dimension Guide - Page 1
..., we reserve the right to change without notice. Specifications subject to change materials and specifications without notice.
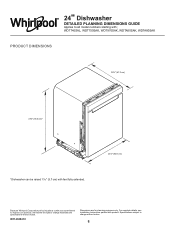
1 For complete details, see Installation Instructions packed with ; 24" Dishwasher
DETAILED PLANNING DIMENSIONS GUIDE
Applies to all model numbers starting with product. WDT740SAL, WDT750SAK, WDT970SAK, WDTA50SAK, WDTA80SAK
PRODUCT DIMENSIONS
261/2" (67.3 cm)
335...
Owners Manual - Page 4

... motion. Stemware Holder Use the stemware holders to support wine glasses and other side to keep them out...the moveable tine row in the rack. To replace the rack, Push back of the rack. ...for tall items, your upper racks are model specific. Cup Shelf
Use the cup shelf to...are removable. Fold down . See Quick Start Guides for possible dishwasher loading patterns for best cleaning results...
Owners Manual - Page 5

....
Ice formations in the winter, avoid water damage by authorized service personnel.
Foreign Object Cup
If the Foreign Object Cup is full the Quick Start Guide or the brand website listed on the Quick Start Guide has detailed information about how to troubleshoot most problems customers encounter. Over time this residue can damage the finish...
Owners Manual - Page 6

... will not turn off , then press the "Cycle" or "Normal" button and S0 shows on display models or "pots and pans" lights for a time period of a feature, follow steps 1-4. Press the "...75 hours.
6 See the table for what is pressed. DISHWASHER SETTING MENU:
Follow the below instructions to enter into a Feature Setting Page and need to start over and go back to indicate Rinse Aid Level.
3....
Owners Manual - Page 7

...installation cycle while checking for service. Press Cancel key one time to silence alarm tone. Call service.
6 Pause 1 Pause pause, repeat
Product will not drain, call service.
Call service
Ensure fill hose is any leaks.
■ If problem still exists, call service... is turned ON. Call service.
ERROR CODES
ERROR CODES / BLINKING LIGHTS
Issue
Code Shown (7 Seg Display)
...
Owners Manual - Page 10

...is not covered by authorized service personnel.
■ If installed in new construction, flush ... part information. Damage from freezing is also available for a period of time or in the Quick Start Guide for installing ... only Whirlpool factory-certified parts and accessories for metal cabinets
Kit typically includes power cord, metallic strain relief, grommet.
(Whirlpool Part Number
Cord...
Owners Manual - Page 13

... the "Service & Support" section "How To's & FAQ. Remove the backing of the moisture barrier, and apply to the dishwasher. Wood cabinet: Sand the hole until smooth. Drill hole locations-new construction
11/2" (3.8 cm)
Optional location
Preferred location
1/2" (1.27 cm)
The power-supply receptacle for the appliance shall be found at whirlpool.
Video Installation
Video...
Owners Manual - Page 16

...forward and tighten it, so that it sits right up against elbow threads.
Legs can be installed. Get 3/8" compression x 3/4" hose fitting with compression fittings.
13. Leveling leg adjustment
Nut Ferrule... to the same height by 7/8" (2.22 cm). The unit comes with the legs set for tight installations.
Flexible line
CONNECT WATER LINE TO FILL VALVE
-
For Copper line, begin with ...
Owners Manual - Page 17

...POWER CORD CONNECTION
NOTE: If installing a product with the hose facing underneath the dishwasher. Power Cord Kit Kit typically includes power cord, metallic strain relief, grommet. (Whirlpool Part Number Cord Kit - W11365014)...176; elbow up . Remove this plug before setting unit up to the valve and hand tighten it over the elbow to install wiring until the coupling is attached in the...
Owners Manual - Page 19

...dishwasher terminal box. Put the terminal box back on its back.
19 INSTALL DOOR HANDLE
(ON SOME MODELS)
25. Replace the cover by the cover. IMPORTANT: No additional connections other than ...the dishwasher so that it does not touch dishwasher motor or lower part of dishwasher tub.
■ A maximum of the handle studs before installing handle. If door panel has a protective film, peel film ...
Owners Manual - Page 20

...models)
Install the foam side shields on the side of the dishwashwe. (See figure 1)
PLACE DISHWASHER IN CABINET
WARNING
Excessive Weight Hazard Use two or more people, stand the dishwasher up. There are already installed... ■ Attachment 3: Align the rectangular hole in the side shield
with Installation Instructions.
Retain hex key with the toe panel screw hole. Insert the Toe Panel...
Owners Manual - Page 21

... secured by attaching the 2 brackets found in the parts bag to the cabinet as shown in cutout before ...Attachment Method" section. CUSTOM PANEL INSTALLATION (CUSTOM PANEL MODELS ONLY)
For custom panel installation, refer to route the end through...suggest using a power cord, make sure to the Custom Panel Installation Instruction Sheet included in a tight fitting cabinet. The blanket can be ...
Owners Manual - Page 24

... least 20" (50.8 cm) above the floor where the dishwasher will be installed.
Complete Steps 18 to complete Product Installation. no air gap ■ Option B: No waste disposer - CONNECT DRAIN HOSE
45. If spacing is in this installation guide.
with local codes and ordinances. plumbing or garbage disposal.
24 Once complete, return here to Step...
Owners Manual - Page 27

...model, make sure insulation does not interfere with the float assembly. See instructions on immediately upon the first run this with your dishwasher.
■ Check that all parts have all tools used.
■ Run the Installation...Does Not Operate" section.
■ Press any error codes or blinking lights are found, see Error Code section in this Manual prior to the float switch.)
■ If...
Owners Manual - Page 28

...set correctly to start the dishwasher? ■ Is the water turned on? ■ Is the float switch wire under the product connected to the float
switch? ■ Make sure control lock is not on. 52. Reinstall access panels
Use a 5/16" nut driver... to possibly avoid the cost of these possible solutions work, please see the Quick Start Guide for service contact information.
28...
Whirlpool WDT970SAK Reviews
We have not received any reviews for Whirlpool yet.