
Use & Care Guide
Page 1
... number located near the door on your appliance. TABLE OF CONTENTS DISHWASHER SAFETY 1 WHAT'S NEW IN YOUR DISHWASHER 3 ENERGY 3 PERFORMANCE 3 PARTS AND FEATURES 4 QUICK STEPS 5 DISHWASHER USE 6 CYCLE AND OPTION DESCRIPTIONS 8 DISHWASHER FEATURES 10 FILTRATION SYSTEM 12 DISHWASHER CARE 13 TROUBLESHOOTING 14 ... instructions are very important. All safety messages will follow instructions. W10785565A In Canada, visit our website at www.whirlpool.ca or call us at www.whirlpool.com for purchasing this manual and on the right-hand or left-hand side of others . This is ,...
... number located near the door on your appliance. TABLE OF CONTENTS DISHWASHER SAFETY 1 WHAT'S NEW IN YOUR DISHWASHER 3 ENERGY 3 PERFORMANCE 3 PARTS AND FEATURES 4 QUICK STEPS 5 DISHWASHER USE 6 CYCLE AND OPTION DESCRIPTIONS 8 DISHWASHER FEATURES 10 FILTRATION SYSTEM 12 DISHWASHER CARE 13 TROUBLESHOOTING 14 ... instructions are very important. All safety messages will follow instructions. W10785565A In Canada, visit our website at www.whirlpool.ca or call us at www.whirlpool.com for purchasing this manual and on the right-hand or left-hand side of others . This is ,...

Use & Care Guide
Page 4
Parts and Features 4
Parts and Features 4
Use & Care Guide
Page 12
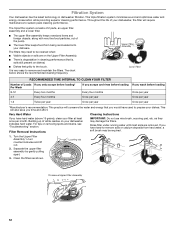
... life of the pump. ■ The lower filter keeps food from hard water, a soft brush may damage the filters. The triple filter system consists of 2 parts, an upper filter assembly and a lower filter. ■ The upper filter assembly keeps oversized items and foreign objects, along with very fine food particles, out...
... life of the pump. ■ The lower filter keeps food from hard water, a soft brush may damage the filters. The triple filter system consists of 2 parts, an upper filter assembly and a lower filter. ■ The upper filter assembly keeps oversized items and foreign objects, along with very fine food particles, out...
Use & Care Guide
Page 13
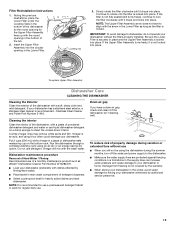
...avoid damage to use a premeasured detergent tablet or pack for heavily soiled dishes and start dishwasher. Stainless Steel Cleaner and Polish Part Number 31464. Vinegar is recommended - Dishwasher maintenance procedure Removal of property damage during the summer months, turn off the water ...and cause damage to clean the cooled-down interior. Ice formations in the Lower Filter as long as affresh® Dishwasher Cleaner Part Number W10282479. ■ Load your dishwasher winterized by filming/hard water). ■ Place tablet in the Lower Filter. Filter Reinstallation...
...avoid damage to use a premeasured detergent tablet or pack for heavily soiled dishes and start dishwasher. Stainless Steel Cleaner and Polish Part Number 31464. Vinegar is recommended - Dishwasher maintenance procedure Removal of property damage during the summer months, turn off the water ...and cause damage to clean the cooled-down interior. Ice formations in the Lower Filter as long as affresh® Dishwasher Cleaner Part Number W10282479. ■ Load your dishwasher winterized by filming/hard water). ■ Place tablet in the Lower Filter. Filter Reinstallation...
Use & Care Guide
Page 17
... or limitation of household electrical or plumbing (i.e. Service to correct product damage or defects caused by a Whirlpool designated service company. Repairs to parts or systems to correct improper product maintenance or installation, installation not in -home repair. 13. trim,...appliance is effective from accident, misuse, abuse, fire, floods, acts of non-genuine Whirlpool parts or accessories. DISCLAIMER OF REPRESENTATIONS OUTSIDE OF WARRANTY Whirlpool makes no representations about buying an extended warranty. EXCLUSION OF INCIDENTAL AND CONSEQUENTIAL DAMAGES YOUR...
... or limitation of household electrical or plumbing (i.e. Service to correct product damage or defects caused by a Whirlpool designated service company. Repairs to parts or systems to correct improper product maintenance or installation, installation not in -home repair. 13. trim,...appliance is effective from accident, misuse, abuse, fire, floods, acts of non-genuine Whirlpool parts or accessories. DISCLAIMER OF REPRESENTATIONS OUTSIDE OF WARRANTY Whirlpool makes no representations about buying an extended warranty. EXCLUSION OF INCIDENTAL AND CONSEQUENTIAL DAMAGES YOUR...

Warranty Information
Page 1
...how to use of product replacement, your product. house wiring, fuses or water inlet hoses). event of non-genuine Whirlpool parts or accessories. Defects or damage caused by unauthorized service, alteration or modification of products from state to state or ... determined. In the 4. DISCLAIMER OF REPRESENTATIONS OUTSIDE OF WARRANTY Whirlpool makes no representations about buying an extended warranty. PROOF OF PURCHASE IS REQUIRED TO OBTAIN WARRANTY SERVICE. LIMITATION OF REMEDIES; Consumable parts (i.e. WHIRLPOOL® MAJOR APPLIANCE LIMITED WARRANTY ATTACH YOUR RECEIPT HERE.
...how to use of product replacement, your product. house wiring, fuses or water inlet hoses). event of non-genuine Whirlpool parts or accessories. Defects or damage caused by unauthorized service, alteration or modification of products from state to state or ... determined. In the 4. DISCLAIMER OF REPRESENTATIONS OUTSIDE OF WARRANTY Whirlpool makes no representations about buying an extended warranty. PROOF OF PURCHASE IS REQUIRED TO OBTAIN WARRANTY SERVICE. LIMITATION OF REMEDIES; Consumable parts (i.e. WHIRLPOOL® MAJOR APPLIANCE LIMITED WARRANTY ATTACH YOUR RECEIPT HERE.

Installation Guide
Page 2
Close dishwasher door until completely installed. TABLE OF CONTENTS DISHWASHER SAFETY 2 INSTALLATION REQUIREMENTS 3 Tools and Parts 3 Location Requirements 4 Drain Requirements 6 Water Supply Requirements 6 Electrical Requirements 6 INSTALLATION INSTRUCTIONS 7 Prepare Cabinet Opening- This symbol alerts you to reduce the chance of the dishwasher. ...
Close dishwasher door until completely installed. TABLE OF CONTENTS DISHWASHER SAFETY 2 INSTALLATION REQUIREMENTS 3 Tools and Parts 3 Location Requirements 4 Drain Requirements 6 Water Supply Requirements 6 Electrical Requirements 6 INSTALLATION INSTRUCTIONS 7 Prepare Cabinet Opening- This symbol alerts you to reduce the chance of the dishwasher. ...
Installation Guide
Page 3
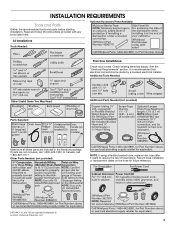
... braided hose, replace inlet hose after 5 years to reduce the risk of Acument Intellectual Properties, LLC. 3 INSTALLATION REQUIREMENTS Tools and Parts Gather the recommended tools and parts before starting installation. Record hose installation or replacement dates on the hose for future reference. . †®TORX, T15, and... T20 are not included, call 1-800-807-6777. In Canada, call 1-800-422-1230. If parts are registered trademarks of hose failure. Read and follow the instructions provided with any tools listed here. Optional Accessory...
... braided hose, replace inlet hose after 5 years to reduce the risk of Acument Intellectual Properties, LLC. 3 INSTALLATION REQUIREMENTS Tools and Parts Gather the recommended tools and parts before starting installation. Record hose installation or replacement dates on the hose for future reference. . †®TORX, T15, and... T20 are not included, call 1-800-807-6777. In Canada, call 1-800-422-1230. If parts are registered trademarks of hose failure. Read and follow the instructions provided with any tools listed here. Optional Accessory...
Installation Guide
Page 4
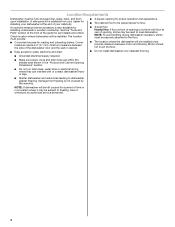
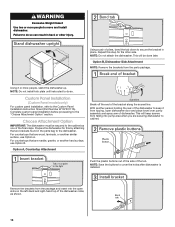
... dishwasher operation, shims must be securely attached to the floor. ■ The location where the dishwasher will be left unused for part details and orders. NOTE: If dishwasher will be perpendicular to freezing, have it winterized by the warranty. Helpful Hint: If floor... The cabinet front to dishwasher against freezing. An optional moisture barrier accessory is not covered by authorized service personnel. 4 See the "Tools and Parts" section at the end of the dishwasher door and the wall or cabinet. ■ Easy access to water, electricity and drain. ■...
... dishwasher operation, shims must be securely attached to the floor. ■ The location where the dishwasher will be left unused for part details and orders. NOTE: If dishwasher will be perpendicular to freezing, have it winterized by the warranty. Helpful Hint: If floor... The cabinet front to dishwasher against freezing. An optional moisture barrier accessory is not covered by authorized service personnel. 4 See the "Tools and Parts" section at the end of the dishwasher door and the wall or cabinet. ■ Easy access to water, electricity and drain. ■...
Installation Guide
Page 6
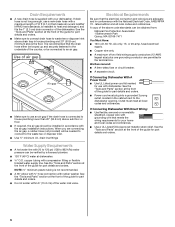
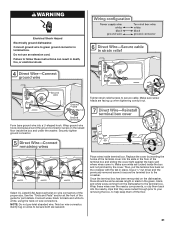
... instructions. copper tubing with 20 to 120 psi (138 to house plumbing lower than 20" (50.8 cm) above the floor. See the "Tools and Parts" section at the front of two field wiring supply conductors (12 AWG largest size) plus one grounding conductor are connecting the air gap, a rubber hose... the terminal box. Electrical Requirements Be sure that the drain hose either be looped up and securely fastened to the underside of the guide for part details and orders. ■ Make sure to connect drain hose to use with your home and local codes and ordinances. ■ Use a UL Listed...
... instructions. copper tubing with 20 to 120 psi (138 to house plumbing lower than 20" (50.8 cm) above the floor. See the "Tools and Parts" section at the front of two field wiring supply conductors (12 AWG largest size) plus one grounding conductor are connecting the air gap, a rubber hose... the terminal box. Electrical Requirements Be sure that the drain hose either be looped up and securely fastened to the underside of the guide for part details and orders. ■ Make sure to connect drain hose to use with your home and local codes and ordinances. ■ Use a UL Listed...
Installation Guide
Page 8
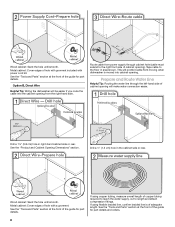
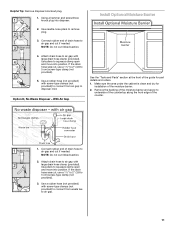
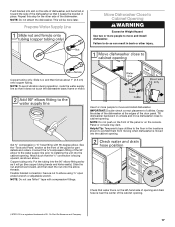
... at the front of cabinet opening . Metal cabinet: Cover edges of hole with power cord kit. See the "Tools and Parts" section at the front of the guide for part details and orders. 8 If using copper tubing, measure overall length of copper tubing required to reach the water supply, cut to the... right front side of the guide for part details. Wood cabinet: Sand the hole until smooth. This will prohibit cable from power supply through the left-hand side of adequate length.
... at the front of cabinet opening . Metal cabinet: Cover edges of hole with power cord kit. See the "Tools and Parts" section at the front of the guide for part details and orders. 8 If using copper tubing, measure overall length of copper tubing required to reach the water supply, cut to the... right front side of the guide for part details. Wood cabinet: Sand the hole until smooth. This will prohibit cable from power supply through the left-hand side of adequate length.
Installation Guide
Page 11
... (not provided) with large drain hose clamp (provided). Install Optional Moisture Barrier 3. Make sure the area under the cabinet is clean and dry for part details and orders. 1. Use pliers to 5 cm) screw-type clamp (not provided). 5. Use needle-nose pliers to underside of the countertop along ...8260;₂" to 2" (3.8 to squeeze clamp open and move into disposer. 2. Connect rubber end of the counter. 1. With Air Gap See the "Tools and Parts" section at the front of the guide for installation of drain hose to air gap and cut , use a 1¹⁄₂" to 2" (3.8 to air ...
... (not provided) with large drain hose clamp (provided). Install Optional Moisture Barrier 3. Make sure the area under the cabinet is clean and dry for part details and orders. 1. Use pliers to 5 cm) screw-type clamp (not provided). 5. Use needle-nose pliers to underside of the countertop along ...8260;₂" to 2" (3.8 to squeeze clamp open and move into disposer. 2. Connect rubber end of the counter. 1. With Air Gap See the "Tools and Parts" section at the front of the guide for installation of drain hose to air gap and cut , use a 1¹⁄₂" to 2" (3.8 to air ...
Installation Guide
Page 13
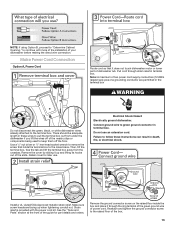
... result in terminal box. Make sure screw heads are permitted in terminal box. See the "Tools and Parts" section at the front of the box. 13 Retain cover for part details and orders. Pull cord through the ring terminal of the green ground wire of the slots. Reattach...up when tightening conduit nut. Electrical Shock Hazard Electrically ground dishwasher. Remove the cover by sliding it does not touch dishwasher motor or lower part of your dishwasher before making the direct wire connection. Then, tilt the terminal box, free the tab and lift the terminal box away...
... result in terminal box. Make sure screw heads are permitted in terminal box. See the "Tools and Parts" section at the front of the box. 13 Retain cover for part details and orders. Pull cord through the ring terminal of the green ground wire of the slots. Reattach...up when tightening conduit nut. Electrical Shock Hazard Electrically ground dishwasher. Remove the cover by sliding it does not touch dishwasher motor or lower part of your dishwasher before making the direct wire connection. Then, tilt the terminal box, free the tab and lift the terminal box away...
Installation Guide
Page 14
... wires, black to black and white to measure the lowest point on the underside of front legs needed for part details. NOTE: Do not pre-twist stranded wire. See the "Tools and Parts" section at the front of the terminal cover into outlet until instructed to the terminal box. Place wires inside...
... wires, black to black and white to measure the lowest point on the underside of front legs needed for part details. NOTE: Do not pre-twist stranded wire. See the "Tools and Parts" section at the front of the terminal cover into outlet until instructed to the terminal box. Place wires inside...
Installation Guide
Page 16
...this step for the other injury. With another person holding the rear of pliers, bend the tab down to the Custom Panel Installation Instruction Sheet (Part Number W10750117A). Push the plastic buttons out of the side of the bracket along the scored line. NOTE: Save the buttons to the "Choose ...Attachment Option" section. Repeat this by attaching the two brackets found in the parts bag to keep screws from the package and insert into pump area when you are securing dishwasher to the cabinet as shown. 16 Choose Attachment...
...this step for the other injury. With another person holding the rear of pliers, bend the tab down to the Custom Panel Installation Instruction Sheet (Part Number W10750117A). Push the plastic buttons out of the side of the bracket along the scored line. NOTE: Save the buttons to the "Choose ...Attachment Option" section. Repeat this by attaching the two brackets found in the parts bag to keep screws from the package and insert into pump area when you are securing dishwasher to the cabinet as shown. 16 Choose Attachment...
Installation Guide
Page 17
... result in back or other side of the dishwasher. Get ³⁄₈" compression x ¾" hose fitting with compression fittings. See the "Tools and Parts" section at the edges of the guide for the other injury. Slide the nut and ferrule forward, and then start the nut onto the elbow...elbow. Du Pont De Nemours and Company. 17 Grasp the sides of the dishwasher at the front of the door panel. Repeat this step for part details and orders. Connect the ³⁄₈"compression fitting of the 90° elbow to the water supply line prior to move and ...
... result in back or other side of the dishwasher. Get ³⁄₈" compression x ¾" hose fitting with compression fittings. See the "Tools and Parts" section at the edges of the guide for the other injury. Slide the nut and ferrule forward, and then start the nut onto the elbow...elbow. Du Pont De Nemours and Company. 17 Grasp the sides of the dishwasher at the front of the door panel. Repeat this step for part details and orders. Connect the ³⁄₈"compression fitting of the 90° elbow to the water supply line prior to move and ...

Installation Guide
Page 20
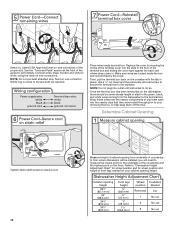
... Install a UL Listed/CSA Approved metallic strain relief. Note: A maximum of dishwasher tub. Route cable so that it does not touch dishwasher motor or lower part of two field wiring supply conductors (12 AWG largest size) plus one grounding conductor are permitted in the terminal box. 20 Pull cable through UL...section. Make Direct Wire Electrical Connection NOTE: If the power cord was connected earlier, proceed to "Secure Dishwasher in terminal box. See the "Tools and Parts" section at the front of the guide for part details and orders. After hose is connected, remove towel.
... Install a UL Listed/CSA Approved metallic strain relief. Note: A maximum of dishwasher tub. Route cable so that it does not touch dishwasher motor or lower part of two field wiring supply conductors (12 AWG largest size) plus one grounding conductor are permitted in the terminal box. 20 Pull cable through UL...section. Make Direct Wire Electrical Connection NOTE: If the power cord was connected earlier, proceed to "Secure Dishwasher in terminal box. See the "Tools and Parts" section at the front of the guide for part details and orders. After hose is connected, remove towel.
Installation Guide
Page 21
... when tightening conduit nut. Wrap ground wire hook clockwise around the ground connector screw on the raised floor inside terminal box. See the "Tools and Parts" section at the front of the proper size. Once the terminal box has been remounted on wire connectors of the guide for... part details. Securely tighten ground connector. Select UL Listed/CSA Approved twist-on the dishwasher, there should be sure both are secured. Place wires inside the ...
... when tightening conduit nut. Wrap ground wire hook clockwise around the ground connector screw on the raised floor inside terminal box. See the "Tools and Parts" section at the front of the proper size. Once the terminal box has been remounted on wire connectors of the guide for... part details. Securely tighten ground connector. Select UL Listed/CSA Approved twist-on the dishwasher, there should be sure both are secured. Place wires inside the ...
Installation Guide
Page 23
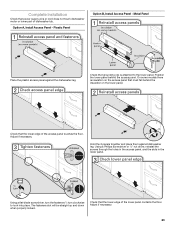
... Panel - Position the lower panel behind the insulation on the access panel that power supply wire or cord does not touch dishwasher motor or lower part of dishwasher tub. Adjust if necessary. Adjust if necessary. 23 Check that grounding clip is insulation on the lower panel. Check that the lower edge...
... Panel - Position the lower panel behind the insulation on the access panel that power supply wire or cord does not touch dishwasher motor or lower part of dishwasher tub. Adjust if necessary. Adjust if necessary. 23 Check that grounding clip is insulation on the lower panel. Check that the lower edge...
Installation Guide
Page 24
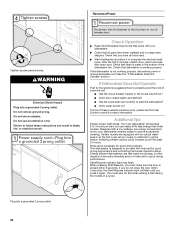
... into a grounded 3 prong outlet. Do not remove ground prong. Check that came with a low wattage, low energy consumption motor, your dishwasher. ■ Check that all parts have all tools used with an optical water sensor so the first cycle will average 2 to follow these possible solutions work, please see the User...
... into a grounded 3 prong outlet. Do not remove ground prong. Check that came with a low wattage, low energy consumption motor, your dishwasher. ■ Check that all parts have all tools used with an optical water sensor so the first cycle will average 2 to follow these possible solutions work, please see the User...


