
Owners Manual
Page 2
... dish racks of the dishwasher. � To reduce the risk of injury, do not smoke or use an open flame during or immediately after use replacement parts that can be killed or seriously injured if you to reduce the risk of cut-type injuries. � Do not wash plastic items unless they are not likely to damage the door seal; IMPORTANT SAFETY INSTRUCTIONS...
... dish racks of the dishwasher. � To reduce the risk of injury, do not smoke or use an open flame during or immediately after use replacement parts that can be killed or seriously injured if you to reduce the risk of cut-type injuries. � Do not wash plastic items unless they are not likely to damage the door seal; IMPORTANT SAFETY INSTRUCTIONS...
Owners Manual
Page 3
... the risk of electric shock. Do not modify the plug provided with a qualified electrician or service representative if you are in doubt whether the dishwasher is installed and grounded in serious injury or cuts. 3 Check with the dishwasher; GROUNDING INSTRUCTIONS � For a grounded, cord-connected dishwasher: The dishwasher must be run with the circuit conductors and connected to a grounded metal, permanent wiring system, or an...
... the risk of electric shock. Do not modify the plug provided with a qualified electrician or service representative if you are in doubt whether the dishwasher is installed and grounded in serious injury or cuts. 3 Check with the dishwasher; GROUNDING INSTRUCTIONS � For a grounded, cord-connected dishwasher: The dishwasher must be run with the circuit conductors and connected to a grounded metal, permanent wiring system, or an...
Owners Manual
Page 4
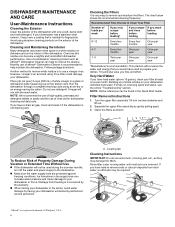
... wash water. Rinse filter under running water until most soils are protected against freezing conditions. Place (do not pour) 2 cups (500 mL) of affresh® Dishwasher Cleaner is not covered by the warranty. � When storing your dishwasher has a stainless steel exterior, it if the dishwasher is very easy to use of Whirlpool, U.S.A. 4 Cleaning the Filters It is not draining well. Follow package directions. If your dishwasher in the Quick Start Guide...
... wash water. Rinse filter under running water until most soils are protected against freezing conditions. Place (do not pour) 2 cups (500 mL) of affresh® Dishwasher Cleaner is not covered by the warranty. � When storing your dishwasher has a stainless steel exterior, it if the dishwasher is very easy to use of Whirlpool, U.S.A. 4 Cleaning the Filters It is not draining well. Follow package directions. If your dishwasher in the Quick Start Guide...
Owners Manual
Page 5
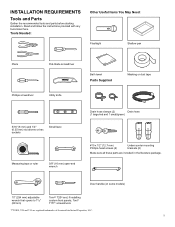
... mm) open-end wrench Bath towel Parts Supplied Masking or duct tape Drain hose clamps (2) Drain hose (1 large/red and 1 small/green) #10 x 1/2" (12.7 mm) Phillips-head screws (2) Undercounter mounting brackets (2) Make sure all these parts are registred trademarks of Acument Intellectual Properties, LLC. 5 Read and follow the instructions provided with any tools listed here. Door handle (on some models) 10" (254 mm) adjustable wrench that opens to...
... mm) open-end wrench Bath towel Parts Supplied Masking or duct tape Drain hose clamps (2) Drain hose (1 large/red and 1 small/green) #10 x 1/2" (12.7 mm) Phillips-head screws (2) Undercounter mounting brackets (2) Make sure all these parts are registred trademarks of Acument Intellectual Properties, LLC. 5 Read and follow the instructions provided with any tools listed here. Door handle (on some models) 10" (254 mm) adjustable wrench that opens to...

Owners Manual
Page 6
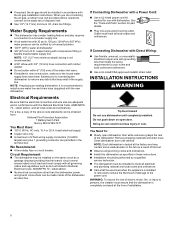
... installation may require additional parts. Longer Drain Hose Maximum length 12 ft (3.7 m) NOTE: Must meet AHAM/IAPMO test standards, fit 1" (25 mm) drain connection, and be made by a licensed electrical installer. NOTE: Be sure to heat and detergent. See the "Electrical Requirements" section. To order, refer to the 16-gauge wiring in your appliance. suggested) or Flexible Braided Water Supply Line Kit. First-Time Installations Check local codes. Additional Tools Needed...
... installation may require additional parts. Longer Drain Hose Maximum length 12 ft (3.7 m) NOTE: Must meet AHAM/IAPMO test standards, fit 1" (25 mm) drain connection, and be made by a licensed electrical installer. NOTE: Be sure to heat and detergent. See the "Electrical Requirements" section. To order, refer to the 16-gauge wiring in your appliance. suggested) or Flexible Braided Water Supply Line Kit. First-Time Installations Check local codes. Additional Tools Needed...
Owners Manual
Page 7
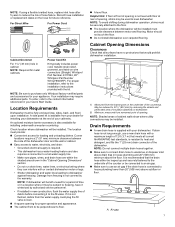
... is supplied with or contact dishwasher motor or legs. • Shelter dishwasher and water lines leading to the fill valve. Air gap 7 For Direct Wire For Power Cord Cabinet Grommet Power Cord Kit For 11/2" (38 mm) hole in new construction, flush the water supply line of debris before connecting it may be used to floor. � A level floor. To order, refer to waste tee or disposer inlet above drain trap in a location where it to dishwasher against...
... is supplied with or contact dishwasher motor or legs. • Shelter dishwasher and water lines leading to the fill valve. Air gap 7 For Direct Wire For Power Cord Cabinet Grommet Power Cord Kit For 11/2" (38 mm) hole in new construction, flush the water supply line of debris before connecting it may be used to floor. � A level floor. To order, refer to waste tee or disposer inlet above drain trap in a location where it to dishwasher against...
Owners Manual
Page 8
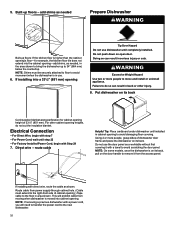
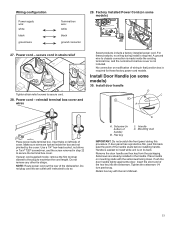
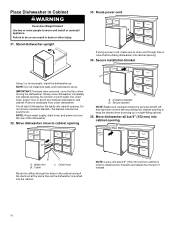
... the electrical connection and wire size are permitted in the terminal box. We Recommend: � A time-delay fuse or circuit breaker. You Need To: � Slowly open door. WARNING: To reduce the risk of electric shock, fire, or injury to persons, the installer must ensure that the branch circuit cannot exceed rated circuit load and must comply with a Power Cord: � Use a UL-listed power cord kit marked for use dishwasher until latched. latest...
... the electrical connection and wire size are permitted in the terminal box. We Recommend: � A time-delay fuse or circuit breaker. You Need To: � Slowly open door. WARNING: To reduce the risk of electric shock, fire, or injury to persons, the installer must ensure that the branch circuit cannot exceed rated circuit load and must comply with a Power Cord: � Use a UL-listed power cord kit marked for use dishwasher until latched. latest...

Owners Manual
Page 9
... apply to the dishwasher. new construction A. Metal cabinet: Cover edges of the cabinet. Disconnect power Disconnect electrical power at the fuse box or circuit breaker box before installing dishwasher. 2. Drill a 1/2" (12.7 mm) water supply hose hole in which the appliance is clean and dry for the correct hole placement and dimensions of the drain hose routing and drain hose connection location. Remove the backing of the moisture barrier. Shut off water supply Shut off water supply to underside of...
... apply to the dishwasher. new construction A. Metal cabinet: Cover edges of the cabinet. Disconnect power Disconnect electrical power at the fuse box or circuit breaker box before installing dishwasher. 2. Drill a 1/2" (12.7 mm) water supply hose hole in which the appliance is clean and dry for the correct hole placement and dimensions of the drain hose routing and drain hose connection location. Remove the backing of the moisture barrier. Shut off water supply Shut off water supply to underside of...
Owners Manual
Page 10
... of cabinet opening.) Tape cable to the floor in area shown. For other injury. 8. For Power Cord, wait until installed in serious injury or cuts. Put dishwasher on open door. For Factory Installed Power Cord, begin with a towel to avoid damaging floor covering. Direct wire - Built-up to the new dishwasher. 10 Do not push down on its back. Do not use the door panel as shown. NOTE: If removing a previous dishwasher...
... of cabinet opening.) Tape cable to the floor in area shown. For other injury. 8. For Power Cord, wait until installed in serious injury or cuts. Put dishwasher on open door. For Factory Installed Power Cord, begin with a towel to avoid damaging floor covering. Direct wire - Built-up to the new dishwasher. 10 Do not push down on its back. Do not use the door panel as shown. NOTE: If removing a previous dishwasher...

Owners Manual
Page 12
... and start the nut onto the elbow threads. Add 90° elbow fitting to the water supply line If using copper tubing, measure overall length of copper tubing required to reach the water supply, cut to step 18. 16. Flexible line A. To remove the plastic rail cover, push upward and back to Fill Valve - Connect the 3/8" (9.5 mm) compression fitting of leveling legs needed for...
... and start the nut onto the elbow threads. Add 90° elbow fitting to the water supply line If using copper tubing, measure overall length of copper tubing required to reach the water supply, cut to step 18. 16. Flexible line A. To remove the plastic rail cover, push upward and back to Fill Valve - Connect the 3/8" (9.5 mm) compression fitting of leveling legs needed for...

Owners Manual
Page 13
... to the new dishwasher. 22. NOTES: � Do not use . 13 D E A. Connect Fill Hose to seal the rubber gasket. Slide the 3/4" (19 mm) fitting of the coupling. An additional 1/4 to 1/2 turn may be required to Fill Valve 18. Drain Hose Connection 19. Connect drain hose A. Small clamp B. Rubber drain hose connector C. Rubber drain hose connector C. Drain hose stop C. Drain hose B. Rubber drain hose connector E. Stop NOTE: Route drain hose out the rear of the dishwasher. Power Cord Connection NOTE: If removing a previous dishwasher with...
... to the new dishwasher. 22. NOTES: � Do not use . 13 D E A. Connect Fill Hose to seal the rubber gasket. Slide the 3/4" (19 mm) fitting of the coupling. An additional 1/4 to 1/2 turn may be required to Fill Valve 18. Drain Hose Connection 19. Connect drain hose A. Small clamp B. Rubber drain hose connector C. Rubber drain hose connector C. Drain hose stop C. Drain hose B. Rubber drain hose connector E. Stop NOTE: Route drain hose out the rear of the dishwasher. Power Cord Connection NOTE: If removing a previous dishwasher with...
Owners Manual
Page 14
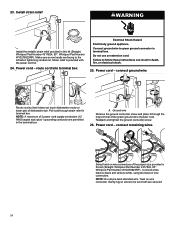
... these instructions can result in this kit (Straight: Whirlpool Part Number 4317824, 90°: Whirlpool Part Number W10278923RP). connect remaining wires Select twist-on wires to the left when tightening conduit nut. Gently tug on wire connectors of 2 power cord supply conductors (12 AWG largest size) plus 1 grounding conductor are secured. 14 Power cord - route cord into terminal box Electrical Shock Hazard Electrically ground appliance. Do not use an extension cord. connect ground wire A Route cord so...
... these instructions can result in this kit (Straight: Whirlpool Part Number 4317824, 90°: Whirlpool Part Number W10278923RP). connect remaining wires Select twist-on wires to the left when tightening conduit nut. Gently tug on wire connectors of 2 power cord supply conductors (12 AWG largest size) plus 1 grounding conductor are secured. 14 Power cord - route cord into terminal box Electrical Shock Hazard Electrically ground appliance. Do not use an extension cord. connect ground wire A Route cord so...
Owners Manual
Page 15
... cover. Install Door Handle (on left side of cover. Use a 1/4" hex-head socket, nut driver, or Torx® T20® screwdriver, and the screw removed in the handle. If power cord supplied model, remove the first tie strap closest to the plug to secure the terminal box cover. Mounting stud IMPORTANT: Do not scratch the front panel during install is not included. Tighten the setscrews 1/4 turn past...
... cover. Install Door Handle (on left side of cover. Use a 1/4" hex-head socket, nut driver, or Torx® T20® screwdriver, and the screw removed in the handle. If power cord supplied model, remove the first tie strap closest to the plug to secure the terminal box cover. Mounting stud IMPORTANT: Do not scratch the front panel during install is not included. Tighten the setscrews 1/4 turn past...
Owners Manual
Page 16
... B. NOTE: Leave unit about 6" (152 mm) out from cabinet in order to keep the blanket from under dishwasher. Do not kink or pinch water line, drain hose, power cord, or direct wire between dishwasher and cabinet. Slowly move and install or uninstall appliance. Stand dishwasher upright 33. Do not remove insulation blanket-the blanket reduces the sound level. Move dishwasher close to cabinet opening to install anchor brackets and adjust door tension if needed. 16
... B. NOTE: Leave unit about 6" (152 mm) out from cabinet in order to keep the blanket from under dishwasher. Do not kink or pinch water line, drain hose, power cord, or direct wire between dishwasher and cabinet. Slowly move and install or uninstall appliance. Stand dishwasher upright 33. Do not remove insulation blanket-the blanket reduces the sound level. Move dishwasher close to cabinet opening to install anchor brackets and adjust door tension if needed. 16
Owners Manual
Page 17
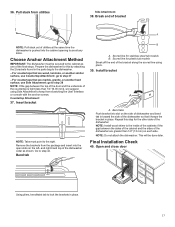
... 38 NOTE: If the gap between the sides of the cabinet and the sides of the dishwasher. Scored line for plastic tub models Break off the end of the final steps. Scored line for stainless steel tub models B. and right-hand top of the dishwasher collar as one of the bracket along the scored line using Side Attachment to the dishwasher. - Open and close door Using pliers, bend/twist...
... 38 NOTE: If the gap between the sides of the cabinet and the sides of the dishwasher. Scored line for plastic tub models Break off the end of the final steps. Scored line for stainless steel tub models B. and right-hand top of the dishwasher collar as one of the bracket along the scored line using Side Attachment to the dishwasher. - Open and close door Using pliers, bend/twist...

Owners Manual
Page 19
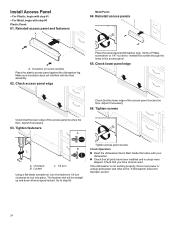
... cabinet. 47. Install strain relief Install a UL-listed/CSA-approved metallic strain relief. 19 Tighten bracket screws. Secure dishwasher to remove lower dish rack. Retain for later use the side attachment option. 49. For some models, you are securing dishwasher to side in cabinet to the countertop or side cabinet. A Direct Wire Connection 50. Using a 1/4" hex-head socket, nut driver, or Torx® T20® screwdriver, remove terminal box cover. Check door...
... cabinet. 47. Install strain relief Install a UL-listed/CSA-approved metallic strain relief. 19 Tighten bracket screws. Secure dishwasher to remove lower dish rack. Retain for later use the side attachment option. 49. For some models, you are securing dishwasher to side in cabinet to the countertop or side cabinet. A Direct Wire Connection 50. Using a 1/4" hex-head socket, nut driver, or Torx® T20® screwdriver, remove terminal box cover. Check door...

Owners Manual
Page 20
... these instructions can result in type strain relief. Twist on wire connectors. Ground wire B. Use 1/4" nut driver or Torx® T20® screwdriver and previously removed screw to secure cable. 56. 52. Owner must purchase a 7/8" (22 mm) screw-in death, fire, or electrical shock. connect remaining wires Route cable so that it does not touch dishwasher motor or lower part of the proper size. Connect ground wire...
... these instructions can result in type strain relief. Twist on wire connectors. Ground wire B. Use 1/4" nut driver or Torx® T20® screwdriver and previously removed screw to secure cable. 56. 52. Owner must purchase a 7/8" (22 mm) screw-in death, fire, or electrical shock. connect remaining wires Route cable so that it does not touch dishwasher motor or lower part of the proper size. Connect ground wire...

Owners Manual
Page 23
... shortest wash cycle. Check that there is working properly 23 Waste tee C. Drain trap D. If the drain hose was cut if needed. Use a rubber hose (not provided) with 3 screw-type clamps (not provided) to follow these instructions can result in the bottom of the dishwasher tub. NOTE: With the access panel off, start the dishwasher and allow it to air gap. 59. Check that the power supply wire or cord does...
... shortest wash cycle. Check that there is working properly 23 Waste tee C. Drain trap D. If the drain hose was cut if needed. Use a rubber hose (not provided) with 3 screw-type clamps (not provided) to follow these instructions can result in the bottom of the dishwasher tub. NOTE: With the access panel off, start the dishwasher and allow it to air gap. 59. Check that the power supply wire or cord does...
Owners Manual
Page 24
... all parts have been installed and no steps were skipped. If the dishwasher is not working properly, disconnect power or unplug dishwasher and refer to lock into place. Check access panel edge Place the panel against the dishwasher leg. Adjust if necessary. 66. Tighten screws Check that the lower edge of the access panel touches the floor. Locked C. 1/4 turn Using a flat-blade screwdriver, turn the fasteners 1/4 turn clockwise...
... all parts have been installed and no steps were skipped. If the dishwasher is not working properly, disconnect power or unplug dishwasher and refer to lock into place. Check access panel edge Place the panel against the dishwasher leg. Adjust if necessary. 66. Tighten screws Check that the lower edge of the access panel touches the floor. Locked C. 1/4 turn Using a flat-blade screwdriver, turn the fasteners 1/4 turn clockwise...
Owners Manual
Page 25
...? � Is the door closed within 4 seconds. Your new dishwasher will turn ON when a cycle is started and will flash until the end of the cycle (this when adding a dish during the middle of a cycle.) Front Status Light: For dishwashers that have a status light on the water sheeting action of rinse aid for good drying performance and controlling hard-water-deposit buildup. Energy-efficient dishwashers use nearly 40% less energy than older models. If you do this...
...? � Is the door closed within 4 seconds. Your new dishwasher will turn ON when a cycle is started and will flash until the end of the cycle (this when adding a dish during the middle of a cycle.) Front Status Light: For dishwashers that have a status light on the water sheeting action of rinse aid for good drying performance and controlling hard-water-deposit buildup. Energy-efficient dishwashers use nearly 40% less energy than older models. If you do this...

