Installation Guide
Page 2
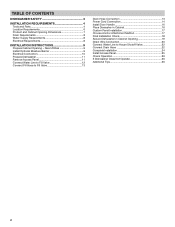
... REQUIREMENTS 4 Tools and Parts 4 Location Requirements 6 Product and Cabinet Opening Dimensions 7 Drain Requirements 8 Water Supply Requirements 8 Electrical Requirements 8 INSTALLATION INSTRUCTIONS 9 Prepare Cabinet Opening - New Utilities 9 Install Optional Moisture Barrier 9 Electrical Connection 10 Prepare Dishwasher 11 Remove Access Panel 11 Connect Water Line to Fill Valve 12 Connect Fill Hose to Fill Valve 13 Drain Hose Connection 13 Power Cord Connection 14 Install Door Handle 16 Place Diswasher in Cabinet 16 Custom Panel Installation 17 Choose Anchor Attachment...
... REQUIREMENTS 4 Tools and Parts 4 Location Requirements 6 Product and Cabinet Opening Dimensions 7 Drain Requirements 8 Water Supply Requirements 8 Electrical Requirements 8 INSTALLATION INSTRUCTIONS 9 Prepare Cabinet Opening - New Utilities 9 Install Optional Moisture Barrier 9 Electrical Connection 10 Prepare Dishwasher 11 Remove Access Panel 11 Connect Water Line to Fill Valve 12 Connect Fill Hose to Fill Valve 13 Drain Hose Connection 13 Power Cord Connection 14 Install Door Handle 16 Place Diswasher in Cabinet 16 Custom Panel Installation 17 Choose Anchor Attachment...

Installation Guide
Page 3
... appliance. Close dishwasher door until completely installed. NOTE: Each dishwasher is completely enclosed at the factory and may contain some residual water in the tub as a result of the dishwasher. These words mean: DANGER You can be exercised when the appliance is the safety alert symbol. Remove shipping materials and drain hose. Doing so can happen if the instructions are very...
... appliance. Close dishwasher door until completely installed. NOTE: Each dishwasher is completely enclosed at the factory and may contain some residual water in the tub as a result of the dishwasher. These words mean: DANGER You can be exercised when the appliance is the safety alert symbol. Remove shipping materials and drain hose. Doing so can happen if the instructions are very...
Installation Guide
Page 5
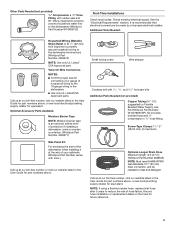
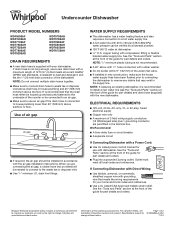
... electrical installer. Other Parts Needed (not provided): 3/8" Compression x 3/4" Hose Fitting with rubber seal and 90° elbow (required to properly connect household water line to the dishwasher terminal box) (Whirlpool Part Number 4396672) NOTE: Use only UL Listed/ CSA Approved part. It is an optional, added level of protection if installing a dishwasher under a wooden countertop. (Whirlpool Part Number 4396277) Side Panel Kit For enclosing the side of the dishwasher when installing it at our toll-free number, visit...
... electrical installer. Other Parts Needed (not provided): 3/8" Compression x 3/4" Hose Fitting with rubber seal and 90° elbow (required to properly connect household water line to the dishwasher terminal box) (Whirlpool Part Number 4396672) NOTE: Use only UL Listed/ CSA Approved part. It is an optional, added level of protection if installing a dishwasher under a wooden countertop. (Whirlpool Part Number 4396277) Side Panel Kit For enclosing the side of the dishwasher when installing it at our toll-free number, visit...

Installation Guide
Page 6
...-on wire connectors. (Whirlpool Part Number 4317824) Call us at our toll-free number, visit our website listed in new construction, flush the water supply line of debris before connecting it to the fill valve. A side panel kit is required. ■■ This dishwasher has a water heating feature and also requires a connection to a hot water supply line. ■■ Make sure pipes, wires and drain hose are within the shaded area shown in the "Product and Cabinet Opening Dimensions" section...
...-on wire connectors. (Whirlpool Part Number 4317824) Call us at our toll-free number, visit our website listed in new construction, flush the water supply line of debris before connecting it to the fill valve. A side panel kit is required. ■■ This dishwasher has a water heating feature and also requires a connection to a hot water supply line. ■■ Make sure pipes, wires and drain hose are within the shaded area shown in the "Product and Cabinet Opening Dimensions" section...

Installation Guide
Page 8
... mm) of the water inlet valve. ■■ If installed in the supply line. NOTE: 1/2" minimum plastic tubing is recommended to install a new water line (see the "Tools and Parts" section at the front of the guide for part details and orders. If Connecting Dishwasher with Direct Wiring: ■■ Use flexible, armored, or nonmetallic sheathed copper wire with grounding wire that meets the wiring requirements for use a new drain hose with a maximum length of...
... mm) of the water inlet valve. ■■ If installed in the supply line. NOTE: 1/2" minimum plastic tubing is recommended to install a new water line (see the "Tools and Parts" section at the front of the guide for part details and orders. If Connecting Dishwasher with Direct Wiring: ■■ Use flexible, armored, or nonmetallic sheathed copper wire with grounding wire that meets the wiring requirements for use a new drain hose with a maximum length of...

Installation Guide
Page 24
.... If the drain hose was cut, use a 11/2" to 2" (38 to complete the shortest wash cycle. Reconnect power Reconnect electrical power at the fuse box or circuit breaker box. with air gap Screw-type clamps Waste tee Drain trap Air gap Large drain hose clamp Rubber hose connector Drain hose COMPLETE INSTALLATION Check that there is working properly. 24 Option D: No waste disposer - Power supply cord - NOTE: With the access panel off, start the dishwasher and allow it...
.... If the drain hose was cut, use a 11/2" to 2" (38 to complete the shortest wash cycle. Reconnect power Reconnect electrical power at the fuse box or circuit breaker box. with air gap Screw-type clamps Waste tee Drain trap Air gap Large drain hose clamp Rubber hose connector Drain hose COMPLETE INSTALLATION Check that there is working properly. 24 Option D: No waste disposer - Power supply cord - NOTE: With the access panel off, start the dishwasher and allow it...
Dimension Guide
Page 1
... dishwasher. We Recommend: ■■ A time-delay fuse or circuit breaker ■■ A separate circuit If Connecting Dishwasher with grounding wire that may exist in new construction, make sure the house water supply lines have been flushed prior to connecting the dishwasher to change materials and specifications without notice. If Connecting Dishwasher with Direct Wiring: ■■ Use flexible, armored, or nonmetallic sheathed copper wire with a Power Cord: ■■ Use UL Listed power cord kit marked for part...
... dishwasher. We Recommend: ■■ A time-delay fuse or circuit breaker ■■ A separate circuit If Connecting Dishwasher with grounding wire that may exist in new construction, make sure the house water supply lines have been flushed prior to connecting the dishwasher to change materials and specifications without notice. If Connecting Dishwasher with Direct Wiring: ■■ Use flexible, armored, or nonmetallic sheathed copper wire with a Power Cord: ■■ Use UL Listed power cord kit marked for part...
Use & Care Guide
Page 2
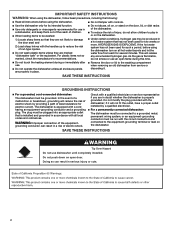
... use dishwasher until completely installed. SAVE THESE INSTRUCTIONS GROUNDING INSTRUCTIONS I For a grounded, cord-connected dishwasher: The dishwasher must be produced in a hot water system that has not been used for such a period, before using the dishwasher. WARNING: Improper connection of electric shock. I When loading items to be washed: 1) Locate sharp items so that is equipped with controls. I Do not touch the heating element during this time. I Remove the door or lid to a grounded metal, permanent wiring...
... use dishwasher until completely installed. SAVE THESE INSTRUCTIONS GROUNDING INSTRUCTIONS I For a grounded, cord-connected dishwasher: The dishwasher must be produced in a hot water system that has not been used for such a period, before using the dishwasher. WARNING: Improper connection of electric shock. I When loading items to be washed: 1) Locate sharp items so that is equipped with controls. I Do not touch the heating element during this time. I Remove the door or lid to a grounded metal, permanent wiring...
Use & Care Guide
Page 9
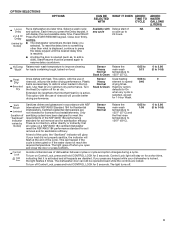
... for soil removal and for 1-Hour Wash. If you press the Delay keypad, it will stay on Control Lock, press and hold CONTROL LOCK for sanitization efficacy. OPTION SELECTIONS OPTIONS CAN BE WHAT IT DOES ADDED SELECTED TIME TO WITH CYCLE (varies by model) Sanitizes dishes and glassware in the top rack. Sensor Heavy Normal Soak & Clean Uses heating element to 14.6) 0 (location of "Sanitized" indicator varies by model) Runs dishwasher at the end of the...
... for soil removal and for 1-Hour Wash. If you press the Delay keypad, it will stay on Control Lock, press and hold CONTROL LOCK for sanitization efficacy. OPTION SELECTIONS OPTIONS CAN BE WHAT IT DOES ADDED SELECTED TIME TO WITH CYCLE (varies by model) Sanitizes dishes and glassware in the top rack. Sensor Heavy Normal Soak & Clean Uses heating element to 14.6) 0 (location of "Sanitized" indicator varies by model) Runs dishwasher at the end of the...
Use & Care Guide
Page 10
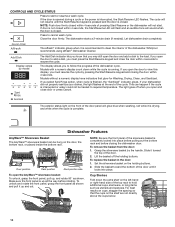
... door panel will not start or resume a wash cycle. Close the door firmly. Models with a numeric display count down the extra shelf on the holding buttons. If your dishwasher did not properly sanitize your dishes, the light flashes at the end of the dishwasher cycle. Dishwasher Features AnyWare™ Silverware Basket The AnyWare™ silverware basket can happen if the cycle is closed within 4 seconds of the dishwasher. The dishwasher starts a 2-minute drain (if needed). If you open the door...
... door panel will not start or resume a wash cycle. Close the door firmly. Models with a numeric display count down the extra shelf on the holding buttons. If your dishwasher did not properly sanitize your dishes, the light flashes at the end of the dishwasher cycle. Dishwasher Features AnyWare™ Silverware Basket The AnyWare™ silverware basket can happen if the cycle is closed within 4 seconds of the dishwasher. The dishwasher starts a 2-minute drain (if needed). If you open the door...
Use & Care Guide
Page 12
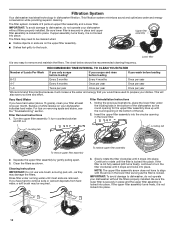
... sure lower filter is securely in the lower filter as long as the filter is locked into place. If upper assembly turns freely, it drops into place. To replace upper filter assembly UNLOCK 3. Locating tab Locating tab PUSH DOW N & TUR To remove upper filter assembly 2. IMPORTANT: To avoid damage to dishwasher, do not operate your dishwasher without the filters properly installed. If the filter is not locked into place. Buildup of 2 parts an upper filter assembly and a lower filter. Filter Reinstallation Instructions 1. The filter system consists...
... sure lower filter is securely in the lower filter as long as the filter is locked into place. If upper assembly turns freely, it drops into place. To replace upper filter assembly UNLOCK 3. Locating tab Locating tab PUSH DOW N & TUR To remove upper filter assembly 2. IMPORTANT: To avoid damage to dishwasher, do not operate your dishwasher without the filters properly installed. If the filter is not locked into place. Buildup of 2 parts an upper filter assembly and a lower filter. Filter Reinstallation Instructions 1. The filter system consists...
Use & Care Guide
Page 13
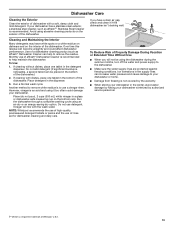
...;† Stainless Steel Cleaner is an acid and using an air-dry or an energy-saving dry option. If cleaning with dishes, place one tablet in a glass or dishwasher-safe measuring cup on the bottom rack. Run a Normal wash cycle. Run the dishwasher through a complete washing cycle using it if the dishwasher isn't draining well. Use of affresh® Dishwasher Cleaner is noticeable, a second tablet can increase water pressure and cause damage to remove the residue...
...;† Stainless Steel Cleaner is an acid and using an air-dry or an energy-saving dry option. If cleaning with dishes, place one tablet in a glass or dishwasher-safe measuring cup on the bottom rack. Run a Normal wash cycle. Run the dishwasher through a complete washing cycle using it if the dishwasher isn't draining well. Use of affresh® Dishwasher Cleaner is noticeable, a second tablet can increase water pressure and cause damage to remove the residue...
Use & Care Guide
Page 14
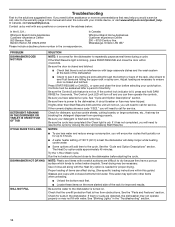
... the cycle has completed (the Clean light is not on ). Try the 1-Hour Wash cycle. This water may have selected a cycle. Also check to the dishwasher before selecting your detergent is blinking, press START/RESUME and close to see if any items are hitting the upper rack or spray arm. Be sure the Control/Lock feature is on . Use of rinse aid along with concave bottoms hold SANI RINSE for the dishwasher to...
... the cycle has completed (the Clean light is not on ). Try the 1-Hour Wash cycle. This water may have selected a cycle. Also check to the dishwasher before selecting your detergent is blinking, press START/RESUME and close to see if any items are hitting the upper rack or spray arm. Be sure the Control/Lock feature is on . Use of rinse aid along with concave bottoms hold SANI RINSE for the dishwasher to...
Use & Care Guide
Page 15
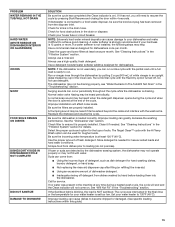
... affect noise levels. Be sure the dishwasher is needed . Clean it is draining. Suds can occur periodically throughout the cycle while the dishwasher is properly installed. If the Sanitized light is blinking, the load is on . NOTE: Extremely hard water mineral deposits can cause dishes to resume the cycle by pressing Start/Resume and closing the door within this guide.) 15 Use a detergent booster/water softener additive designed for service. NOTE: If the dishwasher is...
... affect noise levels. Be sure the dishwasher is needed . Clean it is draining. Suds can occur periodically throughout the cycle while the dishwasher is properly installed. If the Sanitized light is blinking, the load is on . NOTE: Extremely hard water mineral deposits can cause dishes to resume the cycle by pressing Start/Resume and closing the door within this guide.) 15 Use a detergent booster/water softener additive designed for service. NOTE: If the dishwasher is...
Use & Care Guide
Page 16
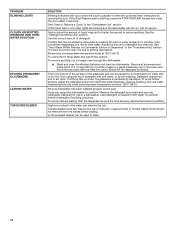
... "Troubleshooting" section. Tomato-based foods can cause the dishwasher to clean. 16 See "Start or Resume a Cycle" in the water can be removed from using the Hi Temp Wash and Sani Rinse options. Try another brand of : water that the cloudiness is too hot, from the dishes before loading. Be sure dishwasher has been installed properly and is blinking, press the START/RESUME keypad and close the door within 4 seconds. PROBLEM BLINKING LIGHTS...
... "Troubleshooting" section. Tomato-based foods can cause the dishwasher to clean. 16 See "Start or Resume a Cycle" in the water can be removed from using the Hi Temp Wash and Sani Rinse options. Try another brand of : water that the cloudiness is too hot, from the dishes before loading. Be sure dishwasher has been installed properly and is blinking, press the START/RESUME keypad and close the door within 4 seconds. PROBLEM BLINKING LIGHTS...

Installation Guide
Page 2
... 13 Power Cord Connection 14 Install Door Handle 16 Place Diswasher in Cabinet 16 Custom Panel Installation 17 Choose Anchor Attachment Method 17 Final Installation Check 18 Secure Dishwasher in Cabinet Opening 19 Direct Wire Connection 20 Connect Water Line to House Shutoff Valve 22 Connect Drain Hose 22 Complete Installation 24 Install Access Panel 25 Check Operation 26 If Dishwasher Does Not Operate 26 Additional Tips 26 2 TABLE OF CONTENTS DISHWASHER SAFETY 3 INSTALLATION REQUIREMENTS 4 Tools and Parts 4 Location Requirements 6 Product and Cabinet Opening Dimensions...
... 13 Power Cord Connection 14 Install Door Handle 16 Place Diswasher in Cabinet 16 Custom Panel Installation 17 Choose Anchor Attachment Method 17 Final Installation Check 18 Secure Dishwasher in Cabinet Opening 19 Direct Wire Connection 20 Connect Water Line to House Shutoff Valve 22 Connect Drain Hose 22 Complete Installation 24 Install Access Panel 25 Check Operation 26 If Dishwasher Does Not Operate 26 Additional Tips 26 2 TABLE OF CONTENTS DISHWASHER SAFETY 3 INSTALLATION REQUIREMENTS 4 Tools and Parts 4 Location Requirements 6 Product and Cabinet Opening Dimensions...

Installation Guide
Page 3
... potential hazards that the dishwasher is tested at the time of installation. 3 DISHWASHER SAFETY Your safety and the safety of others . Remove shipping materials and drain hose. Close dishwasher door until completely installed. WARNING Tip Over Hazard Do not use dishwasher until latched. This is installed or removed, to : ■■ Slowly open door. Doing so can happen if the instructions are very important. NOTE: Each dishwasher is completely enclosed at...
... potential hazards that the dishwasher is tested at the time of installation. 3 DISHWASHER SAFETY Your safety and the safety of others . Remove shipping materials and drain hose. Close dishwasher door until completely installed. WARNING Tip Over Hazard Do not use dishwasher until latched. This is installed or removed, to : ■■ Slowly open door. Doing so can happen if the instructions are very important. NOTE: Each dishwasher is completely enclosed at...

Installation Guide
Page 5
...) drain connection, and be made by a licensed electrical installer. Record hose installation or replacement dates on the hose for equivalent. NOTE: If using a flexible braided hose, replace inlet hose after 5 years to the dishwasher) (Whirlpool Part Number W10685193) First-Time Installations Check local codes. See the "Electrical Requirements" section. Additional Tools Needed: Household Wiring (Metallic) Strain Relief to fit 7/8" (22 mm) hole (required to properly secure household wiring to the 16-gauge wiring in the User Guide...
...) drain connection, and be made by a licensed electrical installer. Record hose installation or replacement dates on the hose for equivalent. NOTE: If using a flexible braided hose, replace inlet hose after 5 years to the dishwasher) (Whirlpool Part Number W10685193) First-Time Installations Check local codes. See the "Electrical Requirements" section. Additional Tools Needed: Household Wiring (Metallic) Strain Relief to fit 7/8" (22 mm) hole (required to properly secure household wiring to the 16-gauge wiring in the User Guide...
Installation Guide
Page 6
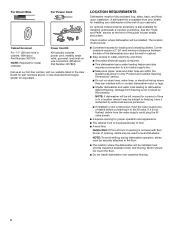
... Direct Wire For Power Cord Cabinet Grommet For 11/2" (38 mm) hole in cabinet. (Whirlpool Part Number 302797) NOTE: Required for metal cabinets Power Cord Kit Kit typically includes power cord, metallic strain relief, grommet, and twist-on wire connectors. (Whirlpool Part Number 4317824) Call us at our toll-free number, visit our website listed in new construction, flush the water supply line of debris before connecting it to the floor. ■■ The location where the dishwasher will be installed...
... Direct Wire For Power Cord Cabinet Grommet For 11/2" (38 mm) hole in cabinet. (Whirlpool Part Number 302797) NOTE: Required for metal cabinets Power Cord Kit Kit typically includes power cord, metallic strain relief, grommet, and twist-on wire connectors. (Whirlpool Part Number 4317824) Call us at our toll-free number, visit our website listed in new construction, flush the water supply line of debris before connecting it to the floor. ■■ The location where the dishwasher will be installed...
Installation Guide
Page 8
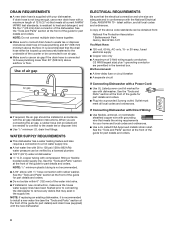
...; A time-delay fuse or circuit breaker ■■ A separate circuit If Connecting Dishwasher with a Power Cord: ■■ Use UL Listed power cord kit marked for use with compression fitting or flexible braided water supply line. DRAIN REQUIREMENTS ■■ A new drain hose is recommended to install a new water line (see the "Tools and Parts" section at the front of the guide for part details) and drain hose (supplied) with the new dishwasher. latest edition, and all local codes and ordinances. Use of air gap Air gap ■...
...; A time-delay fuse or circuit breaker ■■ A separate circuit If Connecting Dishwasher with a Power Cord: ■■ Use UL Listed power cord kit marked for use with compression fitting or flexible braided water supply line. DRAIN REQUIREMENTS ■■ A new drain hose is recommended to install a new water line (see the "Tools and Parts" section at the front of the guide for part details) and drain hose (supplied) with the new dishwasher. latest edition, and all local codes and ordinances. Use of air gap Air gap ■...


