Installation Guide
Page 2
... 13 Drain Hose Connection 14 Power Cord Connection 14 Install Door Handle 16 Place Dishwasher in Cabinet 16 Choose Anchor Attachment Method 17 Final Installation Check 18 Secure Dishwasher in Cabinet Opening 19 Direct Wire Connection 20 Connect Water Line to House Shut-off Valve 22 Connect Drain Hose 22 Complete Installation 24 Install Access Panel 25 Check Operation 26 If Dishwasher Does Not Operate 26 Additional Tips 26 2 TABLE OF CONTENTS DISHWASHER SAFETY 3 INSTALLATION REQUIREMENTS 4 Tools and Parts 4 Location Requirements 6 Product and Cabinet Opening Dimensions...
... 13 Drain Hose Connection 14 Power Cord Connection 14 Install Door Handle 16 Place Dishwasher in Cabinet 16 Choose Anchor Attachment Method 17 Final Installation Check 18 Secure Dishwasher in Cabinet Opening 19 Direct Wire Connection 20 Connect Water Line to House Shut-off Valve 22 Connect Drain Hose 22 Complete Installation 24 Install Access Panel 25 Check Operation 26 If Dishwasher Does Not Operate 26 Additional Tips 26 2 TABLE OF CONTENTS DISHWASHER SAFETY 3 INSTALLATION REQUIREMENTS 4 Tools and Parts 4 Location Requirements 6 Product and Cabinet Opening Dimensions...
Installation Guide
Page 3
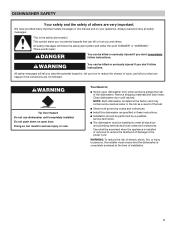
... the time of installation. 3 DISHWASHER SAFETY Your safety and the safety of others . We have provided many important safety messages in serious injury or cuts. All safety messages will follow instructions. Do not push down on your appliance. Remove shipping materials and drain hose. WARNING: To reduce the risk of electric shock, fire, or injury to : ■■ Slowly open door.
... the time of installation. 3 DISHWASHER SAFETY Your safety and the safety of others . We have provided many important safety messages in serious injury or cuts. All safety messages will follow instructions. Do not push down on your appliance. Remove shipping materials and drain hose. WARNING: To reduce the risk of electric shock, fire, or injury to : ■■ Slowly open door.
Installation Guide
Page 4
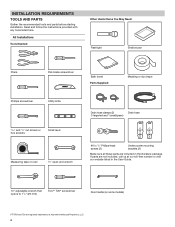
... drivers or hex sockets Small level Measuring tape or ruler 5/8" open-end wrench Drain hose clamps (2) Drain hose (1 large/red and 1 small/green) #10 x 1/2" Phillips-head screws (2) Undercounter mounting brackets (2) Make sure all these parts are registred trademarks of Acument Intellectual Properties, LLC. 4 If parts are not included, call us at our toll-free number or visit our website listed in the User Guide. 10" adjustable wrench that opens...
... drivers or hex sockets Small level Measuring tape or ruler 5/8" open-end wrench Drain hose clamps (2) Drain hose (1 large/red and 1 small/green) #10 x 1/2" Phillips-head screws (2) Undercounter mounting brackets (2) Make sure all these parts are registred trademarks of Acument Intellectual Properties, LLC. 4 If parts are not included, call us at our toll-free number or visit our website listed in the User Guide. 10" adjustable wrench that opens...
Installation Guide
Page 5
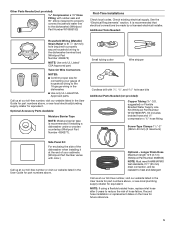
... properly connect household water line to the dishwasher) (Whirlpool Part Number W10685193) First-Time Installations Check local codes. suggested) or Flexible Braided Water Supply Line Kit (Whirlpool Part Number W10278635RP). Twist-On Wire Connectors NOTES: ■■ Confirm proper size for future reference. 5 Screw-Type Clamps 11/2"-2" (38mm-50 mm) (3 maximum) Side Panel Kit For enclosing the side of the dishwasher when installing it at the end of your gauge of hose failure. Record hose installation or replacement...
... properly connect household water line to the dishwasher) (Whirlpool Part Number W10685193) First-Time Installations Check local codes. suggested) or Flexible Braided Water Supply Line Kit (Whirlpool Part Number W10278635RP). Twist-On Wire Connectors NOTES: ■■ Confirm proper size for future reference. 5 Screw-Type Clamps 11/2"-2" (38mm-50 mm) (3 maximum) Side Panel Kit For enclosing the side of the dishwasher when installing it at the end of your gauge of hose failure. Record hose installation or replacement...
Installation Guide
Page 6
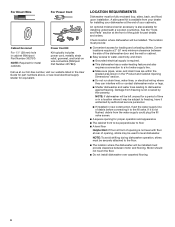
... level with or contact dishwasher motor or legs. ■■ Shelter dishwasher and water lines leading to the floor. ■■ The location where the dishwasher will be installed must be used to the fill valve. Check location where dishwasher will be left unused for a period of the guide for metal cabinets Power Cord Kit Kit typically includes power cord, metallic strain relief, grommet, and twist-on wire connectors (Whirlpool Part Number 4317824). For Direct Wire For Power Cord Cabinet...
... level with or contact dishwasher motor or legs. ■■ Shelter dishwasher and water lines leading to the floor. ■■ The location where the dishwasher will be installed must be used to the fill valve. Check location where dishwasher will be left unused for a period of the guide for metal cabinets Power Cord Kit Kit typically includes power cord, metallic strain relief, grommet, and twist-on wire connectors (Whirlpool Part Number 4317824). For Direct Wire For Power Cord Cabinet...
Installation Guide
Page 7
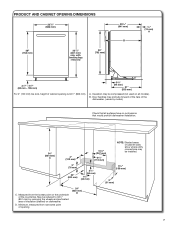
... utility connections may be reduced to 331/2" (851 mm) by model). B. May be installed. 3" (76 mm) 24" (620 mm) 21/4" (64 mm) 13/4" (44 mm) 61/4" (159 mm) 2" (51 mm) C. Door handles may be compressed (not used on the underside of the countertop. D. PRODUCT AND CABINET OPENING DIMENSIONS 30" (762 mm) 251/4" (641 mm) B 3/4" (19 mm) A For 4" (100 mm) toe kick...
... utility connections may be reduced to 331/2" (851 mm) by model). B. May be installed. 3" (76 mm) 24" (620 mm) 21/4" (64 mm) 13/4" (44 mm) 61/4" (159 mm) 2" (51 mm) C. Door handles may be compressed (not used on the underside of the countertop. D. PRODUCT AND CABINET OPENING DIMENSIONS 30" (762 mm) 251/4" (641 mm) B 3/4" (19 mm) A For 4" (100 mm) toe kick...
Installation Guide
Page 8
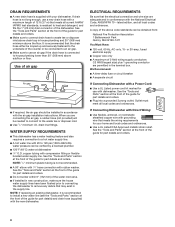
... Connecting Dishwasher with a Power Cord: ■■ Use a UL Listed power cord kit marked for part details and orders. ■■ Do not solder within 6" (152 mm) of the guide for part details and orders. ■■ Make sure to connect drain hose to 862 kPa) water pressure can be installed in the supply line. See the "Tools and Parts" section at the front of the water inlet valve. ■■ If installed in new...
... Connecting Dishwasher with a Power Cord: ■■ Use a UL Listed power cord kit marked for part details and orders. ■■ Do not solder within 6" (152 mm) of the guide for part details and orders. ■■ Make sure to connect drain hose to 862 kPa) water pressure can be installed in the supply line. See the "Tools and Parts" section at the front of the water inlet valve. ■■ If installed in new...
Installation Guide
Page 9
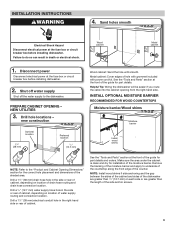
... placement and dimensions of the side anchor screws. 9 Wood cabinet Metal cabinet 1. Shut off water supply Shut off the water supply to underside of the countertop along the front edge of hole with grommet included with power cord kit. PREPARE CABINET OPENING - NEW UTILITIES 3. Metal cabinet: Cover edges of the counter. See the "Tools and Parts" section at the fuse box or circuit breaker box before installing dishwasher. 2. INSTALL OPTIONAL MOISTURE...
... placement and dimensions of the side anchor screws. 9 Wood cabinet Metal cabinet 1. Shut off water supply Shut off the water supply to underside of the countertop along the front edge of hole with grommet included with power cord kit. PREPARE CABINET OPENING - NEW UTILITIES 3. Metal cabinet: Cover edges of the counter. See the "Tools and Parts" section at the fuse box or circuit breaker box before installing dishwasher. 2. INSTALL OPTIONAL MOISTURE...

Installation Guide
Page 10
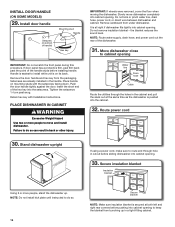
... power cord to the new dishwasher. ■■ Direct wire connection to avoid movement when the dishwasher is moved into cabinet opening. Direct wire - add shims, as needed ELECTRICAL CONNECTION - add shims as shown. route cable Built-up floors - Route cable from moving when dishwasher is in area shown. For other cabinet opening 's floor - This will not be securely attached to floor to the dishwasher will prohibit cable from power supply through cabinet...
... power cord to the new dishwasher. ■■ Direct wire connection to avoid movement when the dishwasher is moved into cabinet opening. Direct wire - add shims, as needed ELECTRICAL CONNECTION - add shims as shown. route cable Built-up floors - Route cable from moving when dishwasher is in area shown. For other cabinet opening 's floor - This will not be securely attached to floor to the dishwasher will prohibit cable from power supply through cabinet...
Installation Guide
Page 11
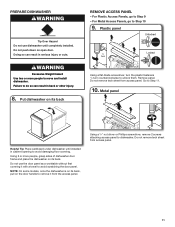
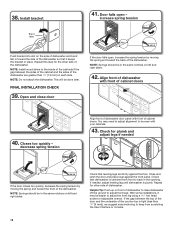
.... Plastic panel 1/4 turn Using a flat-blade screwdriver, turn the plastic fasteners 1/4 turn counterclockwise to dishwasher. Go to move and install dishwasher. NOTE: On some models, once the dishwasher is on its back, pull on open door. Do not remove tech sheet from access panel. Failure to avoid scratching the door panel. Using 2 or more people to Step 11. 10. Doing so can result in serious injury or cuts. Metal panel Helpful...
.... Plastic panel 1/4 turn Using a flat-blade screwdriver, turn the plastic fasteners 1/4 turn counterclockwise to dishwasher. Go to move and install dishwasher. NOTE: On some models, once the dishwasher is on its back, pull on open door. Do not remove tech sheet from access panel. Failure to avoid scratching the door panel. Using 2 or more people to Step 11. 10. Doing so can result in serious injury or cuts. Metal panel Helpful...

Installation Guide
Page 14
..., remove terminal box cover. Connect drain hose Small clamp Rubber drain hose connector Drain hose Stop Drain hose stop Small clamp Rubber drain hose connector Stop Stop NOTE: Route drain hose out the rear of 2 power cord supply conductors (12 AWG largest size) plus 1 grounding conductor are facing to catch any water in terminal box. Install strain relief Small clamp Rubber drain hose connector Stop Stop Drain hose Drain hose stop . 20. Retain for part details and orders. 24. NOTE: A maximum of the dishwasher. Push the new drain hose...
..., remove terminal box cover. Connect drain hose Small clamp Rubber drain hose connector Drain hose Stop Drain hose stop Small clamp Rubber drain hose connector Stop Stop NOTE: Route drain hose out the rear of 2 power cord supply conductors (12 AWG largest size) plus 1 grounding conductor are facing to catch any water in terminal box. Install strain relief Small clamp Rubber drain hose connector Stop Stop Drain hose Drain hose stop . 20. Retain for part details and orders. 24. NOTE: A maximum of the dishwasher. Push the new drain hose...
Installation Guide
Page 16
... level. Stand dishwasher upright If using a power cord, make sure to keep the blanket from under dishwasher. Do not remove insulation blanket - If door panel has a protective film, peel film back past snug. Push the door handle tightly against the door. Do not kink or pinch water line, drain hose, power cord, or direct wire between dishwasher and cabinet. Place handle on its back. Install door handle Setscrew (in the handle. Remove cardboard from bunching up . INSTALL DOOR HANDLE (ON SOME MODELS...
... level. Stand dishwasher upright If using a power cord, make sure to keep the blanket from under dishwasher. Do not remove insulation blanket - If door panel has a protective film, peel film back past snug. Push the door handle tightly against the door. Do not kink or pinch water line, drain hose, power cord, or direct wire between dishwasher and cabinet. Place handle on its back. Install door handle Setscrew (in the handle. Remove cardboard from bunching up . INSTALL DOOR HANDLE (ON SOME MODELS...
Installation Guide
Page 17
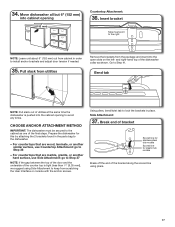
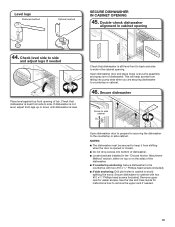
... scored line using Side Attachment to keep from cabinet in the parts bag to Step 36 - Bend tab NOTE: Pull slack out of the final steps. 34. Move dishwasher all but 6" (152 mm) into cabinet opening to install anchor brackets and adjust door tension if needed. 35. and right-hand top of the dishwasher collar as one of utilities at the same time the dishwasher...
... scored line using Side Attachment to keep from cabinet in the parts bag to Step 36 - Bend tab NOTE: Pull slack out of the final steps. 34. Move dishwasher all but 6" (152 mm) into cabinet opening to install anchor brackets and adjust door tension if needed. 35. and right-hand top of the dishwasher collar as one of utilities at the same time the dishwasher...
Installation Guide
Page 18
... and right sides. 38. Closes too quickly - If needed If the door closes too quickly, decrease the spring tension by moving the spring end toward the side of the dishwasher are firmly against the front panel. Repeat for the other side of cabinet doors 40. Install bracket Bend tabs 41. decrease spring tension Align front of dishwasher door panel with front of dishwasher. Door falls open , increase the spring...
... and right sides. 38. Closes too quickly - If needed If the door closes too quickly, decrease the spring tension by moving the spring end toward the side of the dishwasher are firmly against the front panel. Repeat for the other side of cabinet doors 40. Install bracket Bend tabs 41. decrease spring tension Align front of dishwasher door panel with front of dishwasher. Door falls open , increase the spring...
Installation Guide
Page 19
... and side to remove the upper rack if needed Place level against top front opening 44. See the Use and Care Guide for instructions how to side in the cabinet opening. Check that dishwasher is level. Level legs Preferred method Optional method SECURE DISHWASHER IN CABINET OPENING 45. Open dishwasher door and place towel over pump assembly and spray arm of tub. Secure dishwasher to side and adjust legs if needed . 19 Check level side to cabinet with two #10...
... and side to remove the upper rack if needed Place level against top front opening 44. See the Use and Care Guide for instructions how to side in the cabinet opening. Check that dishwasher is level. Level legs Preferred method Optional method SECURE DISHWASHER IN CABINET OPENING 45. Open dishwasher door and place towel over pump assembly and spray arm of tub. Secure dishwasher to side and adjust legs if needed . 19 Check level side to cabinet with two #10...
Installation Guide
Page 20
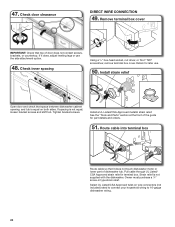
... does not touch dishwasher motor or lower part of dishwasher tub. Install strain relief Open door and check that it does, adjust leveling legs or use . 50. Route cable into terminal box Route cable so that space between dishwasher cabinet opening, and tub is not equal, loosen bracket screws and shift tub. Check door clearance DIRECT WIRE CONNECTION 49. Strain relief is not supplied with the dishwasher. 47. Owner must purchase a 7/8" screw...
... does not touch dishwasher motor or lower part of dishwasher tub. Install strain relief Open door and check that it does, adjust leveling legs or use . 50. Route cable into terminal box Route cable so that space between dishwasher cabinet opening, and tub is not equal, loosen bracket screws and shift tub. Check door clearance DIRECT WIRE CONNECTION 49. Strain relief is not supplied with the dishwasher. 47. Owner must purchase a 7/8" screw...

Installation Guide
Page 24
...) screw-type clamp (not provided). 3. Option D: No waste disposer - If the drain hose was cut if needed. Reconnect power Reconnect electrical power at the fuse box or circuit breaker box. Check that there is working properly. 24 NOTE: Do not cut ribbed section. 2. Use pliers to complete the shortest wash cycle. NOTE: With the access panel off, start the dishwasher and allow it to squeeze clamp open door.
...) screw-type clamp (not provided). 3. Option D: No waste disposer - If the drain hose was cut if needed. Reconnect power Reconnect electrical power at the fuse box or circuit breaker box. Check that there is working properly. 24 NOTE: Do not cut ribbed section. 2. Use pliers to complete the shortest wash cycle. NOTE: With the access panel off, start the dishwasher and allow it to squeeze clamp open door.
Installation Guide
Page 26
... exceptional cleaning. If you do not close the door within 3 seconds, the Start/Resume light will flash until you press it again. (You must make sure the door is closed tightly and latched? ■■ Has the cycle been set correctly to start the dishwasher? ■■ Is the water turned on the water sheeting action of these possible solutions work, please see the User Guide for good drying performance. CHECK OPERATION...
... exceptional cleaning. If you do not close the door within 3 seconds, the Start/Resume light will flash until you press it again. (You must make sure the door is closed tightly and latched? ■■ Has the cycle been set correctly to start the dishwasher? ■■ Is the water turned on the water sheeting action of these possible solutions work, please see the User Guide for good drying performance. CHECK OPERATION...
Dimension Guide
Page 1
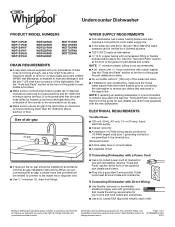
..., AC-only, 15- Dimensions are permitted in the supply line. We Recommend: ■■ A time-delay fuse or circuit breaker ■■ A separate circuit If Connecting Dishwasher with a Power Cord: ■■ Use a UL Listed power cord kit marked for planning purposes only. WATER SUPPLY REQUIREMENTS ■■ This dishwasher has a water heating feature and also requires a connection to 862 kPa) water pressure can be installed in accordance with grounding wire that may exist...
..., AC-only, 15- Dimensions are permitted in the supply line. We Recommend: ■■ A time-delay fuse or circuit breaker ■■ A separate circuit If Connecting Dishwasher with a Power Cord: ■■ Use a UL Listed power cord kit marked for planning purposes only. WATER SUPPLY REQUIREMENTS ■■ This dishwasher has a water heating feature and also requires a connection to 862 kPa) water pressure can be installed in accordance with grounding wire that may exist...
Dimension Guide
Page 2
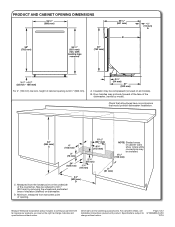
... of cabinet walls show where utility connections may protrude forward of the face of the dishwasher, (varies by removing the wheels and perforated area of insulation (blanket) on dishwasher. Minimum, measured from the lowest point on all surfaces have no protrusions that all models). Dimensions are for planning purposes only. For complete details, see Installation Instructions packed with product. Specifications subject...
... of cabinet walls show where utility connections may protrude forward of the face of the dishwasher, (varies by removing the wheels and perforated area of insulation (blanket) on dishwasher. Minimum, measured from the lowest point on all surfaces have no protrusions that all models). Dimensions are for planning purposes only. For complete details, see Installation Instructions packed with product. Specifications subject...

