
Installation Guide
Page 2
...of electric shock, fire, or injury to : ■ Slowly open door. All safety messages will follow instructions. Care shall be installed to Drain 18 Make Direct Wire Electrical Connection 19 Secure Dishwasher in serious injury or cuts. Existing Utilities 7 Prepare Cabinet Opening-New ...Utilities 7 Prepare and Route Water Line 8 Install Drain Hose 9 Prepare Dishwasher 11 Make Power Supply Cord Connection 12 Determine Cabinet Opening 14 Choose Attachment Option 15 Prepare Water Supply...
...of electric shock, fire, or injury to : ■ Slowly open door. All safety messages will follow instructions. Care shall be installed to Drain 18 Make Direct Wire Electrical Connection 19 Secure Dishwasher in serious injury or cuts. Existing Utilities 7 Prepare Cabinet Opening-New ...Utilities 7 Prepare and Route Water Line 8 Install Drain Hose 9 Prepare Dishwasher 11 Make Power Supply Cord Connection 12 Determine Cabinet Opening 14 Choose Attachment Option 15 Prepare Water Supply...
Installation Guide
Page 3
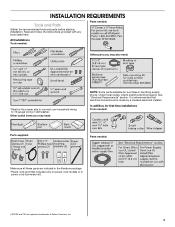
... needed: Other parts you may also need : NOTE: Some parts available for first-time installations Tools needed: Parts supplied: Parts needed: Make sure all these parts are included in the literature package. *Power cord grommet... are registered trademarks of Saturn Fasteners, Inc. 3 See "Electrical Requirements" section. Check existing electrical supply. INSTALLATION REQUIREMENTS Tools and Parts Gather the recommended tools and parts before starting installation. Check local codes. In addition, for purchase in dishwasher. Read and follow the instructions provided with any ...
... needed: Other parts you may also need : NOTE: Some parts available for first-time installations Tools needed: Parts supplied: Parts needed: Make sure all these parts are included in the literature package. *Power cord grommet... are registered trademarks of Saturn Fasteners, Inc. 3 See "Electrical Requirements" section. Check existing electrical supply. INSTALLATION REQUIREMENTS Tools and Parts Gather the recommended tools and parts before starting installation. Check local codes. In addition, for purchase in dishwasher. Read and follow the instructions provided with any ...
Installation Guide
Page 4
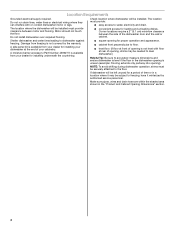
... provide: ■ easy access to dishwasher against freezing. A moisture barrier accessory (Part Number 4396277) is available from your dealer for installing underneath the countertop. ■ square opening for a period of the dishwasher door and the wall or cabinet. Shelter dishwasher and water...If floor at front of opening is not level with or contact dishwasher motor or legs. Do not install dishwasher over carpeted flooring. ■ convenient access for installing your cabinetry. A side panel kit is available from freezing is uneven (example: Flooring extends only partway...
... provide: ■ easy access to dishwasher against freezing. A moisture barrier accessory (Part Number 4396277) is available from your dealer for installing underneath the countertop. ■ square opening for a period of the dishwasher door and the wall or cabinet. Shelter dishwasher and water...If floor at front of opening is not level with or contact dishwasher motor or legs. Do not install dishwasher over carpeted flooring. ■ convenient access for installing your cabinetry. A side panel kit is available from freezing is uneven (example: Flooring extends only partway...
Installation Guide
Page 6
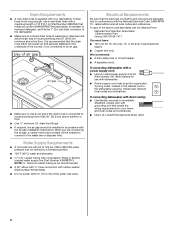
...only, 15- It is recommended that meets all local codes and ordinances. drain line fittings. ■ If required, the air gap should be installed in conformance with the National Electrical Code, ANSI/NFPA 70 - When you are adequate and in accordance with dishwasher. ■ Power supply cord ...local codes and ordinances. ■ Use a UL Listed/CSA Approved strain relief. 6 If drain hose is not long enough, use with the air gap installation instructions. A copy of the counter, or be needed to connect to 862 kPa) water pressure can be verified by a licensed plumber. ■ 120...
...only, 15- It is recommended that meets all local codes and ordinances. drain line fittings. ■ If required, the air gap should be installed in conformance with the National Electrical Code, ANSI/NFPA 70 - When you are adequate and in accordance with dishwasher. ■ Power supply cord ...local codes and ordinances. ■ Use a UL Listed/CSA Approved strain relief. 6 If drain hose is not long enough, use with the air gap installation instructions. A copy of the counter, or be needed to connect to 862 kPa) water pressure can be verified by a licensed plumber. ■ 120...

Installation Guide
Page 7
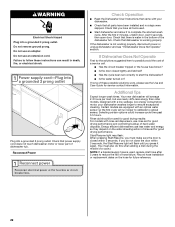
... supply Option A, Power Supply Cord: NOTE: A grounded 3 prong outlet is required inside a cabinet next to the "Install Drain Hose" section. INSTALLATION INSTRUCTIONS WARNING Prepare Cabinet Opening- Existing Utilities Electrical Shock Hazard Disconnect electrical power at the fuse box or circuit breaker box ...before installing dishwasher. If they do so can result in death or electrical shock. See "Product and Cabinet Opening Dimensions" section...
... supply Option A, Power Supply Cord: NOTE: A grounded 3 prong outlet is required inside a cabinet next to the "Install Drain Hose" section. INSTALLATION INSTRUCTIONS WARNING Prepare Cabinet Opening- Existing Utilities Electrical Shock Hazard Disconnect electrical power at the fuse box or circuit breaker box ...before installing dishwasher. If they do so can result in death or electrical shock. See "Product and Cabinet Opening Dimensions" section...

Installation Guide
Page 9
..." position. 9 This will be far enough into a shallow pan until clear to the dishwasher inlet on the front left side of particles that is required. Install Drain Hose IMPORTANT: Always use a new drain hose. Slowly route water supply line through hole in cabinet to the front center of the opening . Flush...
..." position. 9 This will be far enough into a shallow pan until clear to the dishwasher inlet on the front left side of particles that is required. Install Drain Hose IMPORTANT: Always use a new drain hose. Slowly route water supply line through hole in cabinet to the front center of the opening . Flush...
Installation Guide
Page 10
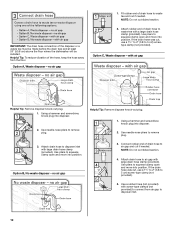
... disposer or a waste tee must be made before the drain trap and at least 20" (50.8 cm) above the floor where the dishwasher will be installed. Use needle-nose pliers to remove plug. 3. Use pliers to 5 cm) screwtype clamp (not provided). Use a rubber hose (not provided) with screw-type clamps (not...
... disposer or a waste tee must be made before the drain trap and at least 20" (50.8 cm) above the floor where the dishwasher will be installed. Use needle-nose pliers to remove plug. 3. Use pliers to 5 cm) screwtype clamp (not provided). Use a rubber hose (not provided) with screw-type clamps (not...

Installation Guide
Page 11
...drain hose clamp (provided). NOTE: Do not cut if needed. Attach drain hose to air gap. If the drain hose was cut, use dishwasher until installed in serious injury or cuts. WARNING Excessive Weight Hazard Use two or more people to squeeze clamp open door. Be sure to 5 cm) screw-type... tub. Using the precut slots in back or other injury. Use pliers to move into position. Do not push down on open and move and install dishwasher. Tip Over Hazard Do not use a 1¹⁄₂" to 2" (3.8 to fasten the insulation down on both sides of drain hose to avoid damaging...
...drain hose clamp (provided). NOTE: Do not cut if needed. Attach drain hose to air gap. If the drain hose was cut, use dishwasher until installed in serious injury or cuts. WARNING Excessive Weight Hazard Use two or more people to squeeze clamp open door. Be sure to 5 cm) screw-type... tub. Using the precut slots in back or other injury. Use pliers to move into position. Do not push down on open and move and install dishwasher. Tip Over Hazard Do not use a 1¹⁄₂" to 2" (3.8 to fasten the insulation down on both sides of drain hose to avoid damaging...

Installation Guide
Page 12
...: Using a ¹⁄₄" hex-head socket, nut driver or Torx® T20® screwdriver, remove terminal box cover. Strain relief is provided with the installation of your dishwasher. Pull cord through strain relief in terminal box. 12 Using 2 or more people, grasp sides of dishwasher tub. Using a flat-blade screwdriver... lower part of dishwasher door frame and place dishwasher on its back. Route cord so that it does not touch dishwasher motor to unlock them. Install a UL Listed/CSA Approved strain relief. Remove panel.
...: Using a ¹⁄₄" hex-head socket, nut driver or Torx® T20® screwdriver, remove terminal box cover. Strain relief is provided with the installation of your dishwasher. Pull cord through strain relief in terminal box. 12 Using 2 or more people, grasp sides of dishwasher tub. Using a flat-blade screwdriver... lower part of dishwasher door frame and place dishwasher on its back. Route cord so that it does not touch dishwasher motor to unlock them. Install a UL Listed/CSA Approved strain relief. Remove panel.

Installation Guide
Page 14
NOTE: If the minimum cabinet opening , but the dishwasher will be installed (you will be more difficult to move. (Measurements are preset at the factory for additional clearance. Refer to "Dishwasher Height Adjustment Chart" to "Dishwasher Height ...
NOTE: If the minimum cabinet opening , but the dishwasher will be installed (you will be more difficult to move. (Measurements are preset at the factory for additional clearance. Refer to "Dishwasher Height Adjustment Chart" to "Dishwasher Height ...

Installation Guide
Page 15
This will be secured to move and install dishwasher. NOTE: Shims must be done later. Failure to avoid movement when the dishwasher is in back or other injury. Repeat this step for example, ... up to secure the bracket in the parts bag. Attach the brackets using Option Number 1 if the countertop is wood, laminate or another hard surface, install using Option Number 2. Option 1, Countertop Attachment Built-up floors: If the kitchen floor is higher than the cabinet opening - for the other hard surface countertops...
This will be secured to move and install dishwasher. NOTE: Shims must be done later. Failure to avoid movement when the dishwasher is in back or other injury. Repeat this step for example, ... up to secure the bracket in the parts bag. Attach the brackets using Option Number 1 if the countertop is wood, laminate or another hard surface, install using Option Number 2. Option 1, Countertop Attachment Built-up floors: If the kitchen floor is higher than the cabinet opening - for the other hard surface countertops...

Installation Guide
Page 16
... Put the tubing into the cabinet opening . Move Dishwasher Close to do so can result in the locations shown to move and install dishwasher. NOTE: Springs should be adjusted. IMPORTANT: Double-check correct placement of the door panel. WARNING Excessive Weight Hazard Use two ...or more people to prohibit them from tipping, open ended wrench or adjustable wrench. NOTE: Do not install kick plate until instructed to Cabinet Opening Check that the ³⁄₄" connection is a registered trademark of E.I. Grasp the sides...
... Put the tubing into the cabinet opening . Move Dishwasher Close to do so can result in the locations shown to move and install dishwasher. NOTE: Springs should be adjusted. IMPORTANT: Double-check correct placement of the door panel. WARNING Excessive Weight Hazard Use two ...or more people to prohibit them from tipping, open ended wrench or adjustable wrench. NOTE: Do not install kick plate until instructed to Cabinet Opening Check that the ³⁄₄" connection is a registered trademark of E.I. Grasp the sides...

Installation Guide
Page 17
With some installations, it may need to adjust alignment to be easier to adjust the front leg using power cord, make sure to route end through hole in ...
With some installations, it may need to adjust alignment to be easier to adjust the front leg using power cord, make sure to route end through hole in ...

Installation Guide
Page 21
... bracket screws. The fasteners slot will be straight up and down when properly locked. 21 Place the plastic access panel against the dishwasher leg. Complete Installation Check that top of this step. Adjust if necessary. If needed, see website for animated representation of door does not contact screws, brackets or countertop...
... bracket screws. The fasteners slot will be straight up and down when properly locked. 21 Place the plastic access panel against the dishwasher leg. Complete Installation Check that top of this step. Adjust if necessary. If needed, see website for animated representation of door does not contact screws, brackets or countertop...
Installation Guide
Page 22
... wattage, low energy consumption motor, your dishwasher. ■ Check that came with rinse aid dispensers, use an extension cord. Record hose installation or replacement dates on the water sheeting action of hard water deposits. If Dishwasher Does Not Operate First try the solutions suggested here to possibly... set correctly to complete the shortest wash cycle. Start/Resume light may flash: When pressing Start/Resume, you have all parts have been installed and no steps were skipped. Check that you must also do this when adding a dish during the middle of a service call. &#...
... wattage, low energy consumption motor, your dishwasher. ■ Check that came with rinse aid dispensers, use an extension cord. Record hose installation or replacement dates on the water sheeting action of hard water deposits. If Dishwasher Does Not Operate First try the solutions suggested here to possibly... set correctly to complete the shortest wash cycle. Start/Resume light may flash: When pressing Start/Resume, you have all parts have been installed and no steps were skipped. Check that you must also do this when adding a dish during the middle of a service call. &#...

Use & Care Guide
Page 2
...damage the door seal; WARNING: This product contains one or more . In the event of least resistance for use dishwasher until completely installed. If the hot water system has not been used for two weeks or more chemicals known to the State of California to the ...washing compartment when removing an old dishwasher from each for such a period, before using the dishwasher turn on the dishwasher. The dishwasher is installed and grounded in place. ■ Remove the door or lid to cause birth defects or other reproductive harm. 2 WARNING: Improper connection of ...
...damage the door seal; WARNING: This product contains one or more . In the event of least resistance for use dishwasher until completely installed. If the hot water system has not been used for two weeks or more chemicals known to the State of California to the ...washing compartment when removing an old dishwasher from each for such a period, before using the dishwasher turn on the dishwasher. The dishwasher is installed and grounded in place. ■ Remove the door or lid to cause birth defects or other reproductive harm. 2 WARNING: Improper connection of ...
Use & Care Guide
Page 13
...9632; Place tablet in the supply lines can increase water pressure and cause damage to clean the cooled-down interior. To Reduce Risk of Whirlpool, U.S.A. 13 Insert the Upper Filter Assembly into place. NOTE: The Upper Filter Assembly arrow does not have a drain air gap, check...■ When storing your dishwasher in a glass or dishwasher-safe measuring cup on a damp sponge to your dishwasher without the filters properly installed. Do not use liquid dishwasher detergent on the bottom rack. Ice formations in main wash compartment of detergent dispenser. ■ Select cycle/option...
...9632; Place tablet in the supply lines can increase water pressure and cause damage to clean the cooled-down interior. To Reduce Risk of Whirlpool, U.S.A. 13 Insert the Upper Filter Assembly into place. NOTE: The Upper Filter Assembly arrow does not have a drain air gap, check...■ When storing your dishwasher in a glass or dishwasher-safe measuring cup on a damp sponge to your dishwasher without the filters properly installed. Do not use liquid dishwasher detergent on the bottom rack. Ice formations in main wash compartment of detergent dispenser. ■ Select cycle/option...

Use & Care Guide
Page 14
...your correspondence. Moisture from : 1. Mississauga, Ontario L5N 0B7 Dishwasher is flashing Check the following the new installation of your mobile device, or visit www.whirlpool.com/product_help. Press down to release. ■ Dishwasher seems to an overload? Replace detergent if necessary....Using an excessive amount of detergent, such as described in "Filtration System" section for several seconds during installation? (See "Install the drain hose" section in the Installation Instructions.) ■ Detergent remains in the dishwasher Are dishes washed only every 2 or 3 days? ...
...your correspondence. Moisture from : 1. Mississauga, Ontario L5N 0B7 Dishwasher is flashing Check the following the new installation of your mobile device, or visit www.whirlpool.com/product_help. Press down to release. ■ Dishwasher seems to an overload? Replace detergent if necessary....Using an excessive amount of detergent, such as described in "Filtration System" section for several seconds during installation? (See "Install the drain hose" section in the Installation Instructions.) ■ Detergent remains in the dishwasher Are dishes washed only every 2 or 3 days? ...
Use & Care Guide
Page 15
... rinse aid to allow proper water drainage? Conditioning the final rinse water with detergent. Using dishwasher detergent tablets and packs have the softener installed onto your entire cycle. This is designed to use rinse aid for good drying performance. Your dishwasher is usually caused by some combination ... do not dry completely ■ Dishes do not wish to drink softened water, have been proven better than every other month, the installation of tomato-based foods on cookware with spray jets or spray arm. Is the rinse aid dispenser empty? If your dishes. It may...
... rinse aid to allow proper water drainage? Conditioning the final rinse water with detergent. Using dishwasher detergent tablets and packs have the softener installed onto your entire cycle. This is designed to use rinse aid for good drying performance. Your dishwasher is usually caused by some combination ... do not dry completely ■ Dishes do not wish to drink softened water, have been proven better than every other month, the installation of tomato-based foods on cookware with spray jets or spray arm. Is the rinse aid dispenser empty? If your dishes. It may...
Use & Care Guide
Page 17
... when the major appliance is installed, operated and maintained according to instructions attached to use with original model/serial numbers removed, altered or not easily determined. Pick-up or delivery. The cost of original purchase date is reported to province. 1/14 W10656408A ®/™ ©2014 Whirlpool. WHIRLPOOL SHALL NOT BE LIABLE FOR...
... when the major appliance is installed, operated and maintained according to instructions attached to use with original model/serial numbers removed, altered or not easily determined. Pick-up or delivery. The cost of original purchase date is reported to province. 1/14 W10656408A ®/™ ©2014 Whirlpool. WHIRLPOOL SHALL NOT BE LIABLE FOR...


