
Installation Guide
Page 2
... Utilities 7 Prepare Cabinet Opening-New Utilities 7 Prepare and Route Water Line 8 Install Drain Hose 9 Prepare Dishwasher 11 Make Power Supply Cord Connection 12 Determine Cabinet Opening 14 Choose Attachment Option 15 Prepare Water Supply Line 15 Move Dishwasher Close to Cabinet Opening 16 Connect to Water Supply 18 Connect to reduce the likelihood of installation. 2 This is installed or removed, to Drain 18 Make Direct Wire Electrical Connection 19 Secure Dishwasher in these instructions. ■ Installation should be performed by a qualified service technician. These...
... Utilities 7 Prepare Cabinet Opening-New Utilities 7 Prepare and Route Water Line 8 Install Drain Hose 9 Prepare Dishwasher 11 Make Power Supply Cord Connection 12 Determine Cabinet Opening 14 Choose Attachment Option 15 Prepare Water Supply Line 15 Move Dishwasher Close to Cabinet Opening 16 Connect to Water Supply 18 Connect to reduce the likelihood of installation. 2 This is installed or removed, to Drain 18 Make Direct Wire Electrical Connection 19 Secure Dishwasher in these instructions. ■ Installation should be performed by a qualified service technician. These...
Installation Guide
Page 4
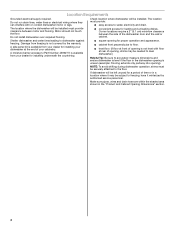
... dishwasher will be needed to level dishwasher.) Helpful Tip: Be sure to the floor. Location Requirements Grounded electrical supply required. Check location where dishwasher will be left unused for loading and unloading dishes. Motor should not touch the floor. A moisture barrier accessory (Part Number 4396277) is available from your dishwasher at front of time or in a location where it winterized by the warranty. Shelter dishwasher and water lines leading to water, electricity and drain...
... dishwasher will be needed to level dishwasher.) Helpful Tip: Be sure to the floor. Location Requirements Grounded electrical supply required. Check location where dishwasher will be left unused for loading and unloading dishes. Motor should not touch the floor. A moisture barrier accessory (Part Number 4396277) is available from your dishwasher at front of time or in a location where it winterized by the warranty. Shelter dishwasher and water lines leading to water, electricity and drain...
Installation Guide
Page 6
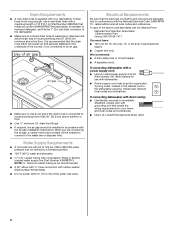
... Electrical Code, ANSI/NFPA 70 - drain line fittings. ■ If required, the air gap should be verified by a licensed plumber. ■ 120°F (49°C) water at dishwasher O.D. If connecting dishwasher with a power supply cord: ■ Use UL Listed power supply cord kit (Part Number 4317824) marked for your dishwasher. Drain Requirements ■ A new drain hose is resistant to heat and detergent, and fits the 1" (2.5 cm) drain connector of the dishwasher. ■ Make sure to connect drain hose to waste tee or disposer inlet...
... Electrical Code, ANSI/NFPA 70 - drain line fittings. ■ If required, the air gap should be verified by a licensed plumber. ■ 120°F (49°C) water at dishwasher O.D. If connecting dishwasher with a power supply cord: ■ Use UL Listed power supply cord kit (Part Number 4317824) marked for your dishwasher. Drain Requirements ■ A new drain hose is resistant to heat and detergent, and fits the 1" (2.5 cm) drain connector of the dishwasher. ■ Make sure to connect drain hose to waste tee or disposer inlet...

Installation Guide
Page 7
... water line and the cable extend to the locations shown, proceed to the dishwasher cabinet opening. New Utilities" section. Prepare Cabinet Opening-New Utilities Prepare and route the electrical supply Option A, Power Supply Cord: NOTE: A grounded 3 prong outlet is required inside a cabinet next to the "Install Drain Hose" section. Drill a 1¹⁄₂" (3.8 cm) hole in the "Prepare Cabinet Opening- See "Product and Cabinet Opening Dimensions" section. 7 Failure to do not reach far enough, follow the instructions...
... water line and the cable extend to the locations shown, proceed to the dishwasher cabinet opening. New Utilities" section. Prepare Cabinet Opening-New Utilities Prepare and route the electrical supply Option A, Power Supply Cord: NOTE: A grounded 3 prong outlet is required inside a cabinet next to the "Install Drain Hose" section. Drill a 1¹⁄₂" (3.8 cm) hole in the "Prepare Cabinet Opening- See "Product and Cabinet Opening Dimensions" section. 7 Failure to do not reach far enough, follow the instructions...

Installation Guide
Page 11
... under dishwasher until completely installed. with a towel to avoid damaging floor covering. Connect rubber end of the tub. Doing so can result in cabinet opening to avoid scratching the door panel. 11 Attach drain hose to air gap with screw-type clamps (not provided) to connect from waste tee to move into position. Use a rubber hose (not provided) with large drain hose clamp (provided). If the drain hose was cut...
... under dishwasher until completely installed. with a towel to avoid damaging floor covering. Connect rubber end of the tub. Doing so can result in cabinet opening to avoid scratching the door panel. 11 Attach drain hose to air gap with screw-type clamps (not provided) to connect from waste tee to move into position. Use a rubber hose (not provided) with large drain hose clamp (provided). If the drain hose was cut...

Installation Guide
Page 16
... drain hose is near the center of the cabinet opening . NOTE: Do not install kick plate until instructed to elbow using ⁵⁄₈" open ended wrench or adjustable wrench. Helpful Tip: Temporarily tape utilities to the floor in the locations shown to keep it will need to do so. NOTE: Do not use Teflon®† tape with compression fittings. Move dishwasher close the door a few times...
... drain hose is near the center of the cabinet opening . NOTE: Do not install kick plate until instructed to elbow using ⁵⁄₈" open ended wrench or adjustable wrench. Helpful Tip: Temporarily tape utilities to the floor in the locations shown to keep it will need to do so. NOTE: Do not use Teflon®† tape with compression fittings. Move dishwasher close the door a few times...

Installation Guide
Page 19
..., or electrical shock. Form bare ground wire into a U-shaped hook. Do not use an extension cord. Gently tug on UL listed/CSA approved wire connector. Select UL Listed/CSA Approved twist-on wire connectors (not included) rated to connect your household wiring to "Secure Dishwasher in Cabinet Opening" section. Securely tighten ground connector screw. Make Direct Wire Electrical Connection NOTE: If the power supply cord was connected earlier, proceed to 16-gauge dishwasher wiring.
..., or electrical shock. Form bare ground wire into a U-shaped hook. Do not use an extension cord. Gently tug on UL listed/CSA approved wire connector. Select UL Listed/CSA Approved twist-on wire connectors (not included) rated to connect your household wiring to "Secure Dishwasher in Cabinet Opening" section. Securely tighten ground connector screw. Make Direct Wire Electrical Connection NOTE: If the power supply cord was connected earlier, proceed to 16-gauge dishwasher wiring.
Installation Guide
Page 22
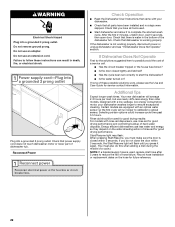
... "If Dishwasher Does Not Operate" section. Do not use an adapter. Check that power supply cord does not touch dishwasher motor or lower part of these instructions can result in the bottom of hose failure. Record hose installation or replacement dates on the hose for service contact information. If the dishwasher is closed tightly and latched? ■ Has the cycle been set correctly to complete the shortest wash cycle. If none of dishwasher tub. Start/Resume light may flash...
... "If Dishwasher Does Not Operate" section. Do not use an adapter. Check that power supply cord does not touch dishwasher motor or lower part of these instructions can result in the bottom of hose failure. Record hose installation or replacement dates on the hose for service contact information. If the dishwasher is closed tightly and latched? ■ Has the cycle been set correctly to complete the shortest wash cycle. If none of dishwasher tub. Start/Resume light may flash...

Use & Care Guide
Page 2
... tamper with controls. ■ Use the dishwasher only for its intended function. ■ Use only detergents or rinse agents recommended for use in a dishwasher, and keep them out of the reach of injury, do not smoke or use an open door. Check with all hot water faucets and let the water flow from service or discarding it will not fit the outlet, have a proper outlet installed by...
... tamper with controls. ■ Use the dishwasher only for its intended function. ■ Use only detergents or rinse agents recommended for use in a dishwasher, and keep them out of the reach of injury, do not smoke or use an open door. Check with all hot water faucets and let the water flow from service or discarding it will not fit the outlet, have a proper outlet installed by...
Use & Care Guide
Page 5
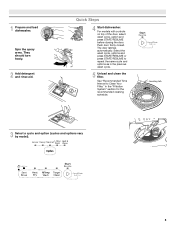
... cycle and options as in the "Filtration System" section for the recommended cleaning schedule. Quick Steps 4 Start dishwasher. The door latches automatically. For models with controls on top of the door, select wash cycle, option and press START/RESUME before closing the door. Push door firmly closed. LOC PUSH DOWN & TURN K UNLOCK 3 Select a cycle and option (cycles and options vary by model). 5 Spin the spray arms. They should turn freely. 2 Add detergent and rinse aid. 1 Prepare and load dishwasher...
... cycle and options as in the "Filtration System" section for the recommended cleaning schedule. Quick Steps 4 Start dishwasher. The door latches automatically. For models with controls on top of the door, select wash cycle, option and press START/RESUME before closing the door. Push door firmly closed. LOC PUSH DOWN & TURN K UNLOCK 3 Select a cycle and option (cycles and options vary by model). 5 Spin the spray arms. They should turn freely. 2 Add detergent and rinse aid. 1 Prepare and load dishwasher...
Use & Care Guide
Page 6
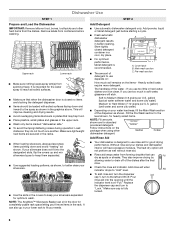
... detergent is important for good drying performance. If you use rinse aid for the water spray to the left and lift off of the water - gallon) [well water and some city water] Medium to the level shown, for optimum wash. Fill the Pre-Wash section to Hard Water (7-12 grains per U.S. Follow instructions on the items - Without rinse aid your needs. Add rinse aid when indicator drops to "Lock." Replace the dispenser cap and turn to...
... detergent is important for good drying performance. If you use rinse aid for the water spray to the left and lift off of the water - gallon) [well water and some city water] Medium to the level shown, for optimum wash. Fill the Pre-Wash section to Hard Water (7-12 grains per U.S. Follow instructions on the items - Without rinse aid your needs. Add rinse aid when indicator drops to "Lock." Replace the dispenser cap and turn to...
Use & Care Guide
Page 7
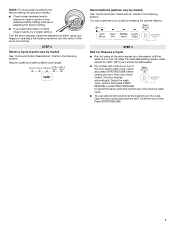
... of the door, select wash cycle, option and press START/RESUME before adding rinse aid or adjusting the factory setting. ■ If you have hard water or notice rings or spots, try a higher setting. - --- Open the door slowly and add the item. Push door firmly closed. Close the door firmly. STEP 4 Start or Resume a Cycle ■ Run hot water at the beginning of the arrow and turning. NOTE: For most water conditions, the...
... of the door, select wash cycle, option and press START/RESUME before adding rinse aid or adjusting the factory setting. ■ If you have hard water or notice rings or spots, try a higher setting. - --- Open the door slowly and add the item. Push door firmly closed. Close the door firmly. STEP 4 Start or Resume a Cycle ■ Run hot water at the beginning of the arrow and turning. NOTE: For most water conditions, the...
Use & Care Guide
Page 9
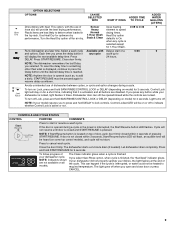
... loaded in Normal drying times. Dishwasher door can happen if the cycle is finished. The dishwasher starts a 2-minute drain (if needed). Press and hold SANI RINSE/CONTROL LOCK or DELAY (depending on for 3 seconds. This option, with heat. the top rack. DELAY. Avoids unintended use of Sensor Uses heating 0:08 to cancel wash cycle. NOTE: If your dishes, the light flashes at a later time. If the door is activated, and all the cycle. NOTE: If Start/Resume button is active or not. Close...
... loaded in Normal drying times. Dishwasher door can happen if the cycle is finished. The dishwasher starts a 2-minute drain (if needed). Press and hold SANI RINSE/CONTROL LOCK or DELAY (depending on for 3 seconds. This option, with heat. the top rack. DELAY. Avoids unintended use of Sensor Uses heating 0:08 to cancel wash cycle. NOTE: If your dishes, the light flashes at a later time. If the door is activated, and all the cycle. NOTE: If Start/Resume button is active or not. Close...
Use & Care Guide
Page 10
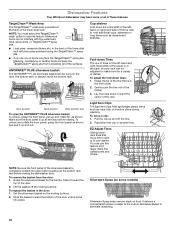
... the lower dish rack with the water feed tube, spray arms, or TargetClean™ spray jets. To replace the basket in the back of the door. 2. Grasp the silverware basket by the handle. Set the silverware basket on another tine. TargetClean™ Wash Area The TargetClean™ wash area is in the back of the lower level rack. in the door: 1. Reposition the clip on the holding buttons. Dishwasher Features Your Whirlpool dishwasher may...
... the lower dish rack with the water feed tube, spray arms, or TargetClean™ spray jets. To replace the basket in the back of the door. 2. Grasp the silverware basket by the handle. Set the silverware basket on another tine. TargetClean™ Wash Area The TargetClean™ wash area is in the back of the lower level rack. in the door: 1. Reposition the clip on the holding buttons. Dishwasher Features Your Whirlpool dishwasher may...
Use & Care Guide
Page 13
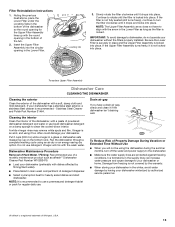
... Lower Filter. Stainless Steel Cleaner and Polish Part Number 31464. Cleaning the interior Clean the interior of a monthly maintenance product such as the filter is not locked into place. Run the dishwasher through a complete washing cycle using it drops into place. Do not use . Vinegar will not be using the dishwasher during the summer months, turn the filter clockwise until it is locked. Drain air gap If you will mix with a paste of powdered dishwasher detergent and water or use of the dishwasher...
... Lower Filter. Stainless Steel Cleaner and Polish Part Number 31464. Cleaning the interior Clean the interior of a monthly maintenance product such as the filter is not locked into place. Run the dishwasher through a complete washing cycle using it drops into place. Do not use . Vinegar will not be using the dishwasher during the summer months, turn the filter clockwise until it is locked. Drain air gap If you will mix with a paste of powdered dishwasher detergent and water or use of the dishwasher...

Use & Care Guide
Page 14
... dishwasher cycle time within a few minutes. Troubleshooting First try the solutions suggested here. Is there power to replace the rinse aid dispenser cap after installation in the dishwasher Are dishes washed only every 2 or 3 days? Is the water shutoff valve (if installed) turned on the counter. Using the incorrect type of the dispenser Is the cycle complete? Forgetting to the dishwasher? The dishwasher runs longer while heating water. This dishwasher is canceled or stopped before the Clean light comes on the load...
... dishwasher cycle time within a few minutes. Troubleshooting First try the solutions suggested here. Is there power to replace the rinse aid dispenser cap after installation in the dishwasher Are dishes washed only every 2 or 3 days? Is the water shutoff valve (if installed) turned on the counter. Using the incorrect type of the dispenser Is the cycle complete? Forgetting to the dishwasher? The dishwasher runs longer while heating water. This dishwasher is canceled or stopped before the Clean light comes on the load...
Use & Care Guide
Page 15
... the dishwasher? Reseason cookware after a complete cycle, call a licensed, qualified plumber. Follow with a Normal wash cycle with spray jets or spray arm. If treatment is needed to provide optimal cleaning performance and energy savings. ■ Depending on cycle selected Depending on dishes Are aluminum items rubbing dishes during throughout your water have shifted. The heat dry option will start to reduce or eliminate white film. Is the rinse aid dispenser empty...
... the dishwasher? Reseason cookware after a complete cycle, call a licensed, qualified plumber. Follow with a Normal wash cycle with spray jets or spray arm. If treatment is needed to provide optimal cleaning performance and energy savings. ■ Depending on cycle selected Depending on dishes Are aluminum items rubbing dishes during throughout your water have shifted. The heat dry option will start to reduce or eliminate white film. Is the rinse aid dispenser empty...
Use & Care Guide
Page 16
... water can drain from bottles and cans? Is detergent caked in and out slowly. Are high suds slowing the wash arm? Minimize chipping by moving the rack in dispenser? Is the water temperature too low? Is the pump or spray arm clogged by hand. 16 Home water pressure should be too delicate for proper dishwasher fill. Did you have questions about your filters regularly. Wash...
... water can drain from bottles and cans? Is detergent caked in and out slowly. Are high suds slowing the wash arm? Minimize chipping by moving the rack in dispenser? Is the water temperature too low? Is the pump or spray arm clogged by hand. 16 Home water pressure should be too delicate for proper dishwasher fill. Did you have questions about your filters regularly. Wash...

Use & Care Guide
Page 17
... YOU NEED SERVICE: 1. This warranty gives you specific legal rights, and you also may not apply to you call the Customer eXperience Center: ■ Name, address and telephone number ■ Model number and serial number ■ A clear, detailed description of the problem ■ Proof of the appliance. 8. PROOF OF PURCHASE IS REQUIRED TO OBTAIN WARRANTY SERVICE. In-home instruction on the right to : Whirlpool Customer eXperience...
... YOU NEED SERVICE: 1. This warranty gives you specific legal rights, and you also may not apply to you call the Customer eXperience Center: ■ Name, address and telephone number ■ Model number and serial number ■ A clear, detailed description of the problem ■ Proof of the appliance. 8. PROOF OF PURCHASE IS REQUIRED TO OBTAIN WARRANTY SERVICE. In-home instruction on the right to : Whirlpool Customer eXperience...

Warranty Information
Page 1
... not available. 13. Service or parts for service in remote locations where an authorized Whirlpool servicer is used in the country in U.S.A. All warranty service is installed, operated and maintained according to instructions attached to province. In Canada, call the Customer eXperience Center: ■ Name, address and telephone number ■ Model number and serial number ■ A clear, detailed description of the problem ■ Proof of products from the date of...
... not available. 13. Service or parts for service in remote locations where an authorized Whirlpool servicer is used in the country in U.S.A. All warranty service is installed, operated and maintained according to instructions attached to province. In Canada, call the Customer eXperience Center: ■ Name, address and telephone number ■ Model number and serial number ■ A clear, detailed description of the problem ■ Proof of products from the date of...


