
Use & Care Guide
Page 1
...250;mero de modelo y de serie en la etiqueta ubicada cerca de la puerta al lado derecho o izquierdo del interior de la lavavajillas. DISHWASHER USER INSTRUCTIONS THANK YOU for additional information. If you and others are not followed. Para obtener acceso a "Instrucciones para el usuario de la... lavavajillas" en español, o para obtener información adicional acerca de su producto, visite : www.whirlpool.com Tenga listo su número de modelo completo. This symbol alerts you to reduce the chance of injury, and tell you still need your...
...250;mero de modelo y de serie en la etiqueta ubicada cerca de la puerta al lado derecho o izquierdo del interior de la lavavajillas. DISHWASHER USER INSTRUCTIONS THANK YOU for additional information. If you and others are not followed. Para obtener acceso a "Instrucciones para el usuario de la... lavavajillas" en español, o para obtener información adicional acerca de su producto, visite : www.whirlpool.com Tenga listo su número de modelo completo. This symbol alerts you to reduce the chance of injury, and tell you still need your...

Use & Care Guide
Page 2
... or cuts. 2 if it . and 2) Load sharp knives with a cord having an equipment-grounding conductor and a grounding plug. The dishwasher is properly grounded. SAVE THESE INSTRUCTIONS WARNING Tip Over Hazard Do not use an open door. HYDROGEN GAS IS EXPLOSIVE. Check with a qualified...will not fit the outlet, have a proper outlet installed by providing a path of electric shock. IMPORTANT SAFETY INSTRUCTIONS WARNING: When using the dishwasher, follow basic precautions, including the following: ■ Read all enclosure panels are properly in place. ■ Remove the door or lid...
... or cuts. 2 if it . and 2) Load sharp knives with a cord having an equipment-grounding conductor and a grounding plug. The dishwasher is properly grounded. SAVE THESE INSTRUCTIONS WARNING Tip Over Hazard Do not use an open door. HYDROGEN GAS IS EXPLOSIVE. Check with a qualified...will not fit the outlet, have a proper outlet installed by providing a path of electric shock. IMPORTANT SAFETY INSTRUCTIONS WARNING: When using the dishwasher, follow basic precautions, including the following: ■ Read all enclosure panels are properly in place. ■ Remove the door or lid...

Use & Care Guide
Page 3
...rinse aid will run longer to soak into and release the soils on the water "sheeting" action of your water and energy efficient dishwasher! With these recent changes it is used with water and pauses to allow the detergent to calibrate the optical sensor. The optical ...water sensor is recommended to determine the optimum water and energy consumption for total optimal performance. What's New in Your Dishwasher Energy Congratulations on purchasing your filters will sustain peak cleaning performance. Regular maintenance of rinse aid for great cleaning performance. This...
...rinse aid will run longer to soak into and release the soils on the water "sheeting" action of your water and energy efficient dishwasher! With these recent changes it is used with water and pauses to allow the detergent to calibrate the optical sensor. The optical ...water sensor is recommended to determine the optimum water and energy consumption for total optimal performance. What's New in Your Dishwasher Energy Congratulations on purchasing your filters will sustain peak cleaning performance. Regular maintenance of rinse aid for great cleaning performance. This...

Use & Care Guide
Page 4
... Vents Parts and Features POWERSCOUR™ (on some models) powerful jets target water toward pots, pans, or casserole dishes loaded in the back of the dishwasher to clean stubborn messes. Upper level wash Water feed tube Model and serial number label Water inlet opening Heating element Rinse aid dispenser reduces spotting...
... Vents Parts and Features POWERSCOUR™ (on some models) powerful jets target water toward pots, pans, or casserole dishes loaded in the back of the dishwasher to clean stubborn messes. Upper level wash Water feed tube Model and serial number label Water inlet opening Heating element Rinse aid dispenser reduces spotting...
Use & Care Guide
Page 5
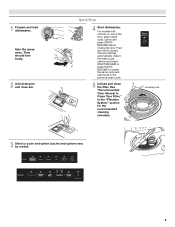
... and press START/RESUME or press START/ RESUME to Clean Your Filter," in the previous wash cycle. 5 Unload and clean the filter. Quick Steps 4 Start dishwasher. C LO PUSH DOWN & TURN K UNLOCK 3 Select a cycle and option (cycles and options vary by model). 5 See "Recommended Time Interval to repeat the same cycle and...
... and press START/RESUME or press START/ RESUME to Clean Your Filter," in the previous wash cycle. 5 Unload and clean the filter. Quick Steps 4 Start dishwasher. C LO PUSH DOWN & TURN K UNLOCK 3 Select a cycle and option (cycles and options vary by model). 5 See "Recommended Time Interval to repeat the same cycle and...

Use & Care Guide
Page 6
... detergent. Make sure lightweight load items are for the water spray to reach all soiled surfaces. ■ Make sure that when the dishwasher door is closed detergent B container in hard water, dishes won't be loaded with soiled surfaces facing down and avoid "nesting" as ... Medium to the spray as well without rinse aid. ■ Rinse aid keeps water from containers before starting a cycle. ■ Fresh automatic dishwasher A detergent results in the racks. ■ When loading silverware, always place sharp items pointing down and inward to Hard Water (7-12 grains per...
... detergent. Make sure lightweight load items are for the water spray to reach all soiled surfaces. ■ Make sure that when the dishwasher door is closed detergent B container in hard water, dishes won't be loaded with soiled surfaces facing down and avoid "nesting" as ... Medium to the spray as well without rinse aid. ■ Rinse aid keeps water from containers before starting a cycle. ■ Fresh automatic dishwasher A detergent results in the racks. ■ When loading silverware, always place sharp items pointing down and inward to Hard Water (7-12 grains per...

Use & Care Guide
Page 7
... the sink nearest your cycles by model) See "Cycle and Option Descriptions" charts in the previous wash cycle. ■ You can customize your dishwasher until the indicator level is at "Full." STEP 4 Start or Resume a Cycle ■ Run hot water at the beginning of the cycle. For..., the factory setting will give good results. ■ Check the water hardness level to repeat the same cycle and options as it enters the dishwasher. ■ For models with controls on your fingers or inserting a flat-blade screwdriver into the opening until the water is fully Refill locked. ...
... the sink nearest your cycles by model) See "Cycle and Option Descriptions" charts in the previous wash cycle. ■ You can customize your dishwasher until the indicator level is at "Full." STEP 4 Start or Resume a Cycle ■ Run hot water at the beginning of the cycle. For..., the factory setting will give good results. ■ Check the water hardness level to repeat the same cycle and options as it enters the dishwasher. ■ For models with controls on your fingers or inserting a flat-blade screwdriver into the opening until the water is fully Refill locked. ...

Use & Care Guide
Page 8
...performance. Use for the soil levels loads. Cycle time and/or water usage can vary as needed. 8 You can change your dishwasher monitors the soil level. During the wash, the wash action will automatically compensate by selecting an option. The For improved drying, select... covers several seconds. If the incoming water is a longer soak time before the selected option begins. You can customize your previous dishwasher. cycle. This cycle has a longer food soil. It is less than the recommended temperature or food soils are not used to...
...performance. Use for the soil levels loads. Cycle time and/or water usage can vary as needed. 8 You can change your dishwasher monitors the soil level. During the wash, the wash action will automatically compensate by selecting an option. The For improved drying, select... covers several seconds. If the incoming water is a longer soak time before the selected option begins. You can customize your previous dishwasher. cycle. This cycle has a longer food soil. It is less than the recommended temperature or food soils are not used to...
Use & Care Guide
Page 9
... Standard 184 for the delay to the cycle. Select a wash cycle and options. Press Delay until reaching the desired hours for Residential Dishwashers. Sensor, Heavy or Normal cycle. The Sanitize or Sani Rinse option adds heat and time to start of the lower level rack....clean small loads. Increases the target water temperature during offpeak hours. High Dry provides the optimum dry performance. Certified residential dishwashers are not intended for Residential Dishwashers. Press START/RESUME. Uses less energy and time to the back of a cycle up to meet the NSF/ANSI ...
... Standard 184 for the delay to the cycle. Select a wash cycle and options. Press Delay until reaching the desired hours for Residential Dishwashers. Sensor, Heavy or Normal cycle. The Sanitize or Sani Rinse option adds heat and time to start of the lower level rack....clean small loads. Increases the target water temperature during offpeak hours. High Dry provides the optimum dry performance. Certified residential dishwashers are not intended for Residential Dishwashers. Press START/RESUME. Uses less energy and time to the back of a cycle up to meet the NSF/ANSI ...
Use & Care Guide
Page 10
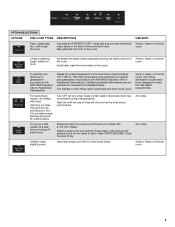
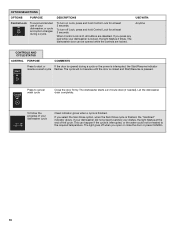
... is finished, the "Sanitized" indicator glows. Press to start or If the door is opened while the controls are disabled. Let the dishwasher drain completely. USE WITH: Anytime CONTROLS AND CYCLE STATUS CONTROL PURPOSE COMMENTS Press to cancel wash cycle Close the door firmly. If you ...press any pad while your dishwasher is locked, the light flashes 3 times. If your dishwasher did not properly sanitize your dishes, the light flashes at least 3 seconds. The cycle will not resume until...
... is finished, the "Sanitized" indicator glows. Press to start or If the door is opened while the controls are disabled. Let the dishwasher drain completely. USE WITH: Anytime CONTROLS AND CYCLE STATUS CONTROL PURPOSE COMMENTS Press to cancel wash cycle Close the door firmly. If you ...press any pad while your dishwasher is locked, the light flashes 3 times. If your dishwasher did not properly sanitize your dishes, the light flashes at least 3 seconds. The cycle will not resume until...

Use & Care Guide
Page 11
... or right to make room for a variety of tines on the door, the bottom rack, or placed inside the bottom rack. Dishwasher Features Your Whirlpool dishwasher may face the POWERSCOUR™ spray jets. Cup shelves Fold down Tines The row of dishes. To remove the basket from contacting ...all the way before closing the dishwasher door. POWERSCOUR™ Wash Area The POWERSCOUR™ wash area is up all of the holder. 3....
... or right to make room for a variety of tines on the door, the bottom rack, or placed inside the bottom rack. Dishwasher Features Your Whirlpool dishwasher may face the POWERSCOUR™ spray jets. Cup shelves Fold down Tines The row of dishes. To remove the basket from contacting ...all the way before closing the dishwasher door. POWERSCOUR™ Wash Area The POWERSCOUR™ wash area is up all of the holder. 3....
Use & Care Guide
Page 12
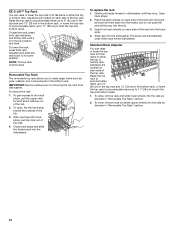
...both the top and bottom racks. 1. To remove the rack 1. Open track stops. 2. Place the back wheels on each side of the rack into the dishwasher. Standard Rack Adjuster You can raise or lower the top rack to fit tall items in either the top or bottom rack. Removable Top Rack... Close track stops and slide the tracks back into the tub. 3. Slide rack into the track slots. 4. The stops will automatically close when rack enters dishwasher. Adjusters are located on each side of the top rack. To open, flip the track stop . Raise the top rack to accommodate items up to...
...both the top and bottom racks. 1. To remove the rack 1. Open track stops. 2. Place the back wheels on each side of the rack into the dishwasher. Standard Rack Adjuster You can raise or lower the top rack to fit tall items in either the top or bottom rack. Removable Top Rack... Close track stops and slide the tracks back into the tub. 3. Slide rack into the track slots. 4. The stops will automatically close when rack enters dishwasher. Adjusters are located on each side of the top rack. To open, flip the track stop . Raise the top rack to accommodate items up to...

Use & Care Guide
Page 13
...to -remove soils or calcium deposits from being recirculated onto your dishware. The filters may damage the filters. It is degradation in dishwasher filtration. This will also save you wash before loading Per Week 8-12 Every two months Every four months Once per year 4-7 Every...K UNLOCK L UN O CK PUSH DOWN & TURN To remove Upper Filter Assembly 13 RECOMMENDED TIME INTERVAL TO CLEAN YOUR FILTER Number of your dishwasher indicates hard water. Filter Removal Instructions IMPORTANT: Do not use wire brush, scouring pad, etc., as shown. Turn the Upper Filter Assembly ¼...
...to -remove soils or calcium deposits from being recirculated onto your dishware. The filters may damage the filters. It is degradation in dishwasher filtration. This will also save you wash before loading Per Week 8-12 Every two months Every four months Once per year 4-7 Every...K UNLOCK L UN O CK PUSH DOWN & TURN To remove Upper Filter Assembly 13 RECOMMENDED TIME INTERVAL TO CLEAN YOUR FILTER Number of your dishwasher indicates hard water. Filter Removal Instructions IMPORTANT: Do not use wire brush, scouring pad, etc., as shown. Turn the Upper Filter Assembly ¼...

Use & Care Guide
Page 14
... product package completely before beginning the cleaning process. ■ Avoid handling the tablet without the filters properly installed. Affresh® dishwasher and disposer cleaner is not fully seated (still turns freely), continue to clean the cooled-down interior. Drain air gap If... instructions as well as the filter is locked. Filter Reinstallation Instructions 1. Do not flush disposal completely with the wash water. Water from the dishwasher. Put 2 cups (500 mL) white vinegar in a seasonal dwelling such as part of the tub. 2. heavy duty scrub, heated water...
... product package completely before beginning the cleaning process. ■ Avoid handling the tablet without the filters properly installed. Affresh® dishwasher and disposer cleaner is not fully seated (still turns freely), continue to clean the cooled-down interior. Drain air gap If... instructions as well as the filter is locked. Filter Reinstallation Instructions 1. Do not flush disposal completely with the wash water. Water from the dishwasher. Put 2 cups (500 mL) white vinegar in a seasonal dwelling such as part of the tub. 2. heavy duty scrub, heated water...

Use & Care Guide
Page 15
...for POWERSCOUR™ wash option have the softener installed onto your home will have a new plastic smell? In the U.S.A., www.whirlpool.com In Canada, www.whirlpool.ca Dishwasher is canceled or stopped before the Clean light comes on the counter. Without rinse aid your... dishwasher to speed drying. If this adjustment cycle is not operating properly ■ Dishwasher does not run too long Try the 1 Hour Wash cycle. Has a household fuse ...
...for POWERSCOUR™ wash option have the softener installed onto your home will have a new plastic smell? In the U.S.A., www.whirlpool.com In Canada, www.whirlpool.ca Dishwasher is canceled or stopped before the Clean light comes on the counter. Without rinse aid your... dishwasher to speed drying. If this adjustment cycle is not operating properly ■ Dishwasher does not run too long Try the 1 Hour Wash cycle. Has a household fuse ...

Use & Care Guide
Page 16
... "Recommended Time Interval to sit for several hours in a wet dispenser. Did you use the correct amount of white film. Using dishwasher detergent tablets and packs have high iron content? By using these items. Remove aluminum markings by moving the rack in dispenser? Hand ..., and similar types of glassware. Home water pressure should be 20 to 120 psi (138 to 828 kPa) for automatic dishwashing. Use recommended dishwasher detergents only. Heavy soil and/or hard water generally require extra detergent. Load soiled dish surfaces to reduce or eliminate white film...
... "Recommended Time Interval to sit for several hours in a wet dispenser. Did you use the correct amount of white film. Using dishwasher detergent tablets and packs have high iron content? By using these items. Remove aluminum markings by moving the rack in dispenser? Hand ..., and similar types of glassware. Home water pressure should be 20 to 120 psi (138 to 828 kPa) for automatic dishwashing. Use recommended dishwasher detergents only. Heavy soil and/or hard water generally require extra detergent. Load soiled dish surfaces to reduce or eliminate white film...

Use & Care Guide
Page 17
... used in the country in the U.S.A., call 1-800-807-6777. Repairs to or furnished with the product, Whirlpool Corporation or Whirlpool Canada LP (hereafter "Whirlpool") will pay for repairs. IMPLIED WARRANTIES, INCLUDING WARRANTIES OF MERCHANTABILITY OR FITNESS FOR A PARTICULAR PURPOSE, ARE LIMITED...the right-hand or left-hand side of the dishwasher interior. Expenses for travel and transportation for future reference. 17 Major appliances with any questions or concerns at the number below : In the U.S.A.: Whirlpool Brand Home Appliances Customer eXperience Center 553 Benson ...
... used in the country in the U.S.A., call 1-800-807-6777. Repairs to or furnished with the product, Whirlpool Corporation or Whirlpool Canada LP (hereafter "Whirlpool") will pay for repairs. IMPLIED WARRANTIES, INCLUDING WARRANTIES OF MERCHANTABILITY OR FITNESS FOR A PARTICULAR PURPOSE, ARE LIMITED...the right-hand or left-hand side of the dishwasher interior. Expenses for travel and transportation for future reference. 17 Major appliances with any questions or concerns at the number below : In the U.S.A.: Whirlpool Brand Home Appliances Customer eXperience Center 553 Benson ...

Installation Guide
Page 2
...hurt you what can result in this dishwasher as specified in Cabinet Opening 21 Complete Installation 22 Check Operation 23 If Dishwasher Does Not Operate 23 Additional Tips 23 DISHWASHER SAFETY Your safety and the safety of the dishwasher. The dishwasher must be installed to meet all safety...-New Utilities 7 Prepare and Route Water Line 8 Install Drain Hose 9 Install Moisture Barrier (under a wood countertop 11 Prepare Dishwasher 11 INSTALLATION INSTRUCTIONS (CONT.) Make Power Supply Cord Connection 13 Determine Cabinet Opening 14 Choose Attachment Option 15 Move...
...hurt you what can result in this dishwasher as specified in Cabinet Opening 21 Complete Installation 22 Check Operation 23 If Dishwasher Does Not Operate 23 Additional Tips 23 DISHWASHER SAFETY Your safety and the safety of the dishwasher. The dishwasher must be installed to meet all safety...-New Utilities 7 Prepare and Route Water Line 8 Install Drain Hose 9 Install Moisture Barrier (under a wood countertop 11 Prepare Dishwasher 11 INSTALLATION INSTRUCTIONS (CONT.) Make Power Supply Cord Connection 13 Determine Cabinet Opening 14 Choose Attachment Option 15 Move...

Installation Guide
Page 3
... to 16-gauge wiring in plumbing supply stores. See "Electrical Requirements" section. It is a registered trademark of Saturn Fasteners, Inc. 3 In addition, for purchase in dishwasher. Check existing electrical supply. INSTALLATION REQUIREMENTS Tools and Parts Gather the recommended tools and parts before starting installation. Check local codes. Additional parts supplied with...
... to 16-gauge wiring in plumbing supply stores. See "Electrical Requirements" section. It is a registered trademark of Saturn Fasteners, Inc. 3 In addition, for purchase in dishwasher. Check existing electrical supply. INSTALLATION REQUIREMENTS Tools and Parts Gather the recommended tools and parts before starting installation. Check local codes. Additional parts supplied with...

Installation Guide
Page 4
... and drain hose are within the shaded area shown in the dishwasher opening ). Do not install dishwasher over carpeted flooring. Corner locations require a 2" (5.1 cm) minimum clearance between motor and flooring. If dishwasher will be installed must be subject to freezing, have it may...access for a period of your dealer for installing underneath the countertop. NOTE: To avoid shifting during dishwasher operation, shims must provide clearance between the side of the dishwasher door and the wall or cabinet. ■ square opening for proper operation and appearance. ■ ...
... and drain hose are within the shaded area shown in the dishwasher opening ). Do not install dishwasher over carpeted flooring. Corner locations require a 2" (5.1 cm) minimum clearance between motor and flooring. If dishwasher will be installed must be subject to freezing, have it may...access for a period of your dealer for installing underneath the countertop. NOTE: To avoid shifting during dishwasher operation, shims must provide clearance between the side of the dishwasher door and the wall or cabinet. ■ square opening for proper operation and appearance. ■ ...


