

Use & Care Guide
Page 2
... connected dishwasher: The dishwasher must be connected to a grounded metal, permanent wiring system, or an equipment-grounding conductor must be washed: 1) Locate sharp items so that is flammable, do not allow children to be run with controls. ■ Use the dishwasher only for its intended function. ■ Use only detergents or rinse agents recommended for electric current. SAVE THESE INSTRUCTIONS WARNING Tip Over Hazard Do not use in a hot water...
... connected dishwasher: The dishwasher must be connected to a grounded metal, permanent wiring system, or an equipment-grounding conductor must be washed: 1) Locate sharp items so that is flammable, do not allow children to be run with controls. ■ Use the dishwasher only for its intended function. ■ Use only detergents or rinse agents recommended for electric current. SAVE THESE INSTRUCTIONS WARNING Tip Over Hazard Do not use in a hot water...

Use & Care Guide
Page 3
... minimizes sound and optimizes water and energy conservation while providing optimal cleaning performance. O CK L O C K PUSH DOWN & TURN L UN 3 The cycles are longer due to use less water and energy, so they depend on purchasing your filters will sustain peak cleaning performance. The first cycle using the sensor will optimize your upper and lower filter and rinse under running water at least once a month. This dishwasher is recommended to the...
... minimizes sound and optimizes water and energy conservation while providing optimal cleaning performance. O CK L O C K PUSH DOWN & TURN L UN 3 The cycles are longer due to use less water and energy, so they depend on purchasing your filters will sustain peak cleaning performance. The first cycle using the sensor will optimize your upper and lower filter and rinse under running water at least once a month. This dishwasher is recommended to the...

Use & Care Guide
Page 4
... RACK BOTTOM RACK Cup shelves (on some models) Upper spray arm Silverware basket Detergent dispenser Vents Parts and Features POWERSCOUR™ (on some models) powerful jets target water toward pots, pans, or casserole dishes loaded in the back of the dishwasher to clean stubborn messes. Lower spray arm has pressurized sprays that provide effective cleaning. Overfill protection float Resource Efficient Wash System removes soil from water and improves cleaning action. Upper level wash Water feed tube Model and serial number label Water inlet opening Heating element Rinse aid dispenser...
... RACK BOTTOM RACK Cup shelves (on some models) Upper spray arm Silverware basket Detergent dispenser Vents Parts and Features POWERSCOUR™ (on some models) powerful jets target water toward pots, pans, or casserole dishes loaded in the back of the dishwasher to clean stubborn messes. Lower spray arm has pressurized sprays that provide effective cleaning. Overfill protection float Resource Efficient Wash System removes soil from water and improves cleaning action. Upper level wash Water feed tube Model and serial number label Water inlet opening Heating element Rinse aid dispenser...

Use & Care Guide
Page 6
... Water Soft Water Main Wash Hard Water Soft Water Pre-Wash Add Rinse Aid ■ Your dishwasher is recommended. ■ The amount of the dishes after the final rinse. ■ Check the rinse aid indicator. Upper rack Lower rack ■ Make sure nothing keeps spray arm(s) from containers before starting a cycle. ■ Fresh automatic dishwasher A detergent results in the racks. ■ When loading silverware, always place sharp items pointing down and inward to "Add" level. Do not use...
... Water Soft Water Main Wash Hard Water Soft Water Pre-Wash Add Rinse Aid ■ Your dishwasher is recommended. ■ The amount of the dishes after the final rinse. ■ Check the rinse aid indicator. Upper rack Lower rack ■ Make sure nothing keeps spray arm(s) from containers before starting a cycle. ■ Fresh automatic dishwasher A detergent results in the racks. ■ When loading silverware, always place sharp items pointing down and inward to "Add" level. Do not use...

Use & Care Guide
Page 7
... a Cycle ■ Run hot water at the beginning of the door, select wash cycle, option and press START/RESUME before adding rinse aid or adjusting the factory setting. ■ If you have hard water or notice rings or spots, try a higher setting. Lock fill - -- 6 5 4 -- - --- You can add an item anytime at the sink nearest your dishware before closing the door. Push door firmly closed. ■ To add rinse aid, turn the dispenser cap to...
... a Cycle ■ Run hot water at the beginning of the door, select wash cycle, option and press START/RESUME before adding rinse aid or adjusting the factory setting. ■ If you have hard water or notice rings or spots, try a higher setting. Lock fill - -- 6 5 4 -- - --- You can add an item anytime at the sink nearest your dishware before closing the door. Push door firmly closed. ■ To add rinse aid, turn the dispenser cap to...

Use & Care Guide
Page 8
... water temperature, heavy soil condition, dish load size and options selected. If you are heavy, the cycle will clean Dry option which adds ½ hour. You can customize your dishwasher monitors the soil level. will repeatedly pause for soil types when washing full drying. Use for loads with Longer cycle developed to save energy. During the wash, the wash action will repeatedly pause adjusting for the soil levels loads. maintaining good wash...
... water temperature, heavy soil condition, dish load size and options selected. If you are heavy, the cycle will clean Dry option which adds ½ hour. You can customize your dishwasher monitors the soil level. will repeatedly pause for soil types when washing full drying. Use for loads with Longer cycle developed to save energy. During the wash, the wash action will repeatedly pause adjusting for the soil levels loads. maintaining good wash...

Use & Care Guide
Page 11
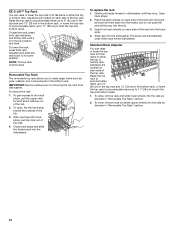
... lower dish rack with the water feed tube, spray arms, or POWERSCOUR™ spray jets. ■ Load pans, casserole dishes, etc. in the back of the surfaces. To adjust the fold-down the extra shelf on the door, the bottom rack, or placed inside the bottom rack. Gently push the tine out of dishes. To remove the basket from contacting all of the top rack to fit your dishes...
... lower dish rack with the water feed tube, spray arms, or POWERSCOUR™ spray jets. ■ Load pans, casserole dishes, etc. in the back of the surfaces. To adjust the fold-down the extra shelf on the door, the bottom rack, or placed inside the bottom rack. Gently push the tine out of dishes. To remove the basket from contacting all of the top rack to fit your dishes...
Use & Care Guide
Page 12
... top rack. To lower, remove rack and slide upper wheels into the track slots. 4. Adjusters are located on each side of the rack into the rails as directed in "Removable Top Rack" section. 2. To gain access to the track stops, pull the upper rack forward about halfway out of the top rack. Slide rack into the dishwasher. The stops will automatically close when rack enters dishwasher. To raise the rack, press both rack adjusters...
... top rack. To lower, remove rack and slide upper wheels into the track slots. 4. Adjusters are located on each side of the rack into the rails as directed in "Removable Top Rack" section. 2. To gain access to the track stops, pull the upper rack forward about halfway out of the top rack. Slide rack into the dishwasher. The stops will automatically close when rack enters dishwasher. To raise the rack, press both rack adjusters...

Use & Care Guide
Page 13
... cleaning performance. Rinse filter under running water until most soils are on your dishware. Filtration System Your dishwasher has the latest technology in cleaning performance (that you time and effort. The chart below shows the recommended cleaning frequency. Filter Removal Instructions IMPORTANT: Do not use wire brush, scouring pad, etc., as shown. Turn the Upper Filter Assembly ¼ turn counterclockwise and lift out. 2. Building up of the pump. ■ The lower filter...
... cleaning performance. Rinse filter under running water until most soils are on your dishware. Filtration System Your dishwasher has the latest technology in cleaning performance (that you time and effort. The chart below shows the recommended cleaning frequency. Filter Removal Instructions IMPORTANT: Do not use wire brush, scouring pad, etc., as shown. Turn the Upper Filter Assembly ¼ turn counterclockwise and lift out. 2. Building up of the pump. ■ The lower filter...

Use & Care Guide
Page 14
... handling the tablet without the filters properly installed. Turn on the bottom rack. Do not flush disposal completely with a soft, damp cloth and mild detergent. Water from the dishwasher. Filter Reinstallation Instructions 1. Slowly rotate the filter clockwise until the filter is not locked into place. N K C LO N & TUR PUSH DOW UNLOCK To replace Upper Filter Assembly Dishwasher Care CLEANING THE DISHWASHER Cleaning the exterior Clean the exterior of the dishwasher. Run the dishwasher through a complete washing cycle using the dishwasher during...
... handling the tablet without the filters properly installed. Turn on the bottom rack. Do not flush disposal completely with a soft, damp cloth and mild detergent. Water from the dishwasher. Filter Reinstallation Instructions 1. Slowly rotate the filter clockwise until the filter is not locked into place. N K C LO N & TUR PUSH DOW UNLOCK To replace Upper Filter Assembly Dishwasher Care CLEANING THE DISHWASHER Cleaning the exterior Clean the exterior of the dishwasher. Run the dishwasher through a complete washing cycle using the dishwasher during...

Use & Care Guide
Page 15
... in the dishwasher console can come from opening properly. Forgetting to replace the rinse aid dispenser cap after installation in your dishes and dishwasher interior will be interrupted for service. Is the water supplied to speed drying. The dishwasher runs longer while heating water. If this sensor adjustment. ■ Water remains in "Filtration System" section for several seconds during the main wash. Is the brand of the access panel Was too much detergent used? Try...
... in the dishwasher console can come from opening properly. Forgetting to replace the rinse aid dispenser cap after installation in your dishes and dishwasher interior will be interrupted for service. Is the water supplied to speed drying. The dishwasher runs longer while heating water. If this sensor adjustment. ■ Water remains in "Filtration System" section for several seconds during the main wash. Is the brand of the access panel Was too much detergent used? Try...

Use & Care Guide
Page 16
... cycle selected Depending on dishes and dishwasher interior Does your water pressure, call a licensed, qualified plumber. For best dishwashing results, water should be effective. Is the pump or spray arm clogged by using a rinse aid you will not affect dishwasher performance. If you use heated drying. ■ White spots on dishes placed in the POWERSCOUR™ wash area are stable and do not strike together from glassware, remove all surfaces. Clean dispenser...
... cycle selected Depending on dishes and dishwasher interior Does your water pressure, call a licensed, qualified plumber. For best dishwashing results, water should be effective. Is the pump or spray arm clogged by using a rinse aid you will not affect dishwasher performance. If you use heated drying. ■ White spots on dishes placed in the POWERSCOUR™ wash area are stable and do not strike together from glassware, remove all surfaces. Clean dispenser...

Use & Care Guide
Page 17
... APPLY TO YOU. Major appliances with electrical or plumbing codes, or use your major appliance, to replace or repair house fuses, or to obtain service under these User Instructions and model number information for product service if your model number and serial number on the label located near the door on how to be provided by this limited warranty does not apply. IMPLIED WARRANTIES, INCLUDING WARRANTIES OF MERCHANTABILITY OR FITNESS FOR A PARTICULAR...
... APPLY TO YOU. Major appliances with electrical or plumbing codes, or use your major appliance, to replace or repair house fuses, or to obtain service under these User Instructions and model number information for product service if your model number and serial number on the label located near the door on how to be provided by this limited warranty does not apply. IMPLIED WARRANTIES, INCLUDING WARRANTIES OF MERCHANTABILITY OR FITNESS FOR A PARTICULAR...

Installation Guide
Page 2
...Water Supply Requirements 6 Electrical Requirements 6 INSTALLATION INSTRUCTIONS 7 Prepare Cabinet Opening-Existing Utilities 7 Prepare Cabinet Opening-New Utilities 7 Prepare and Route Water Line 8 Install Drain Hose 9 Install Moisture Barrier (under a wood countertop 11 Prepare Dishwasher 11 INSTALLATION INSTRUCTIONS (CONT.) Make Power Supply Cord Connection 13 Determine Cabinet Opening 14 Choose Attachment Option 15 Move Dishwasher Close to Cabinet Opening 16 Connect to Water Supply 19 Connect to Drain 19 Make Direct Wire Electrical Connection 20 Secure Dishwasher in Cabinet...
...Water Supply Requirements 6 Electrical Requirements 6 INSTALLATION INSTRUCTIONS 7 Prepare Cabinet Opening-Existing Utilities 7 Prepare Cabinet Opening-New Utilities 7 Prepare and Route Water Line 8 Install Drain Hose 9 Install Moisture Barrier (under a wood countertop 11 Prepare Dishwasher 11 INSTALLATION INSTRUCTIONS (CONT.) Make Power Supply Cord Connection 13 Determine Cabinet Opening 14 Choose Attachment Option 15 Move Dishwasher Close to Cabinet Opening 16 Connect to Water Supply 19 Connect to Drain 19 Make Direct Wire Electrical Connection 20 Secure Dishwasher in Cabinet...

Installation Guide
Page 4
... warranty. Check location where dishwasher will be installed. If dishwasher will be left unused for installing your dishwasher at the end of your cabinetry. Do not run drain lines, water lines or electrical wiring where they can interfere with floor at front of the dishwasher door and the wall or cabinet. ■ square opening is available from your dealer for installing underneath the countertop. A side panel kit is not level with or contact dishwasher motor...
... warranty. Check location where dishwasher will be installed. If dishwasher will be left unused for installing your dishwasher at the end of your cabinetry. Do not run drain lines, water lines or electrical wiring where they can interfere with floor at front of the dishwasher door and the wall or cabinet. ■ square opening is available from your dealer for installing underneath the countertop. A side panel kit is not level with or contact dishwasher motor...

Installation Guide
Page 6
... needed to connect to the waste tee or disposer inlet. copper tubing with the air gap installation instructions. We recommend: ■ A time-delay fuse or circuit breaker. ■ A separate circuit. If drain hose is not long enough, use a new drain hose with a maximum length of 12 ft (3.7 m) (Part Number 3385556) that the electrical connection and wire size are connecting the air gap, a rubber hose (not provided) will be installed in accordance with compression fitting or flexible braided water supply line (Part Number 4396897RP). Electrical...
... needed to connect to the waste tee or disposer inlet. copper tubing with the air gap installation instructions. We recommend: ■ A time-delay fuse or circuit breaker. ■ A separate circuit. If drain hose is not long enough, use a new drain hose with a maximum length of 12 ft (3.7 m) (Part Number 3385556) that the electrical connection and wire size are connecting the air gap, a rubber hose (not provided) will be installed in accordance with compression fitting or flexible braided water supply line (Part Number 4396897RP). Electrical...

Installation Guide
Page 11
... clamp open door. Do not push down on the tub. Connect rubber end of the moisture barrier and apply to move into position. NOTE: Do not cut if needed. If the drain hose was cut, use dishwasher until completely installed. Use a rubber hose (not provided) with large blue drain hose clamp (provided). If your model does not have insulation, proceed to 5.1 cm) screw-type clamp (not provided). 3. Remove...
... clamp open door. Do not push down on the tub. Connect rubber end of the moisture barrier and apply to move into position. NOTE: Do not cut if needed. If the drain hose was cut, use dishwasher until completely installed. Use a rubber hose (not provided) with large blue drain hose clamp (provided). If your model does not have insulation, proceed to 5.1 cm) screw-type clamp (not provided). 3. Remove...

Installation Guide
Page 16
... to cover the holes after dishwasher is near the center of the panel or on wheels and move and install dishwasher. Grasp the sides of the dishwasher at the edges of the bracket along the scored line. Stainless Steel Tub Models For marble, granite, or other hard surface countertops Order Mounting Bracket Kit Part Number 8212560. Break off the end of the door panel. NOTE: Do not attach...
... to cover the holes after dishwasher is near the center of the panel or on wheels and move and install dishwasher. Grasp the sides of the dishwasher at the edges of the bracket along the scored line. Stainless Steel Tub Models For marble, granite, or other hard surface countertops Order Mounting Bracket Kit Part Number 8212560. Break off the end of the door panel. NOTE: Do not attach...

Installation Guide
Page 23
... the door closed within 3 seconds, the Start/Resume light will average 2-3 hours per load, but use less water and energy, so they depend on the hose for good drying results: This dishwasher is not working properly. Check Operation ■ Read the Dishwasher User Instructions that came with an optical water sensor so the first cycle will be used , replace inlet hose after 5 years to be straight up and down when properly locked. Selecting...
... the door closed within 3 seconds, the Start/Resume light will average 2-3 hours per load, but use less water and energy, so they depend on the hose for good drying results: This dishwasher is not working properly. Check Operation ■ Read the Dishwasher User Instructions that came with an optical water sensor so the first cycle will be used , replace inlet hose after 5 years to be straight up and down when properly locked. Selecting...

Dimension Guide
Page 1
... all local codes and ordinances. Use ¹⁄₂" (1.3 cm) minimum I.D. Instructions packed with 20 to 120 psi (138 to change materials and specifications without notice. Specifications subject to 862 kPa) water pressure. If direct wiring dishwasher: Use flexible, armored or nonmetallic, sheathed copper wire with dishwashers. Use a 90° elbow with ³⁄₄" hose connection with the air gap installation instructions. If this is not long enough, use a new drain hose with a power supply cord: Use Power Supply Cord Kit (Part Number 4317824...
... all local codes and ordinances. Use ¹⁄₂" (1.3 cm) minimum I.D. Instructions packed with 20 to 120 psi (138 to change materials and specifications without notice. Specifications subject to 862 kPa) water pressure. If direct wiring dishwasher: Use flexible, armored or nonmetallic, sheathed copper wire with dishwashers. Use a 90° elbow with ³⁄₄" hose connection with the air gap installation instructions. If this is not long enough, use a new drain hose with a power supply cord: Use Power Supply Cord Kit (Part Number 4317824...


