
Use & Care Guide
Page 1
... a "Instrucciones para el usuario de la lavavajillas" en español, o para obtener información adicional acerca de su producto, visite : www.whirlpool.com Tenga listo su número de modelo completo. Table of Contents DISHWASHER SAFETY 1 WHAT'S NEW IN YOUR DISHWASHER 3 PARTS AND FEATURES 4 QUICK ... seriously injured if you still need your appliance. All safety messages will need assistance, call us at www.whirlpool.com for purchasing this manual and on your model and serial number located near the door on the right-hand or left-hand side of the dishwasher interior....
... a "Instrucciones para el usuario de la lavavajillas" en español, o para obtener información adicional acerca de su producto, visite : www.whirlpool.com Tenga listo su número de modelo completo. Table of Contents DISHWASHER SAFETY 1 WHAT'S NEW IN YOUR DISHWASHER 3 PARTS AND FEATURES 4 QUICK ... seriously injured if you still need your appliance. All safety messages will need assistance, call us at www.whirlpool.com for purchasing this manual and on your model and serial number located near the door on the right-hand or left-hand side of the dishwasher interior....

Use & Care Guide
Page 3
... FOR Full BETTER DRYING Lock Add Refill Detergent The United States has passed a restriction limiting the amount of your water and energy efficient dishwasher! Several models contain an optical water sensor. Regular maintenance of phosphorus (phosphates) in Your Dishwasher Energy Congratulations on purchasing your filters will run longer to calibrate the...
... FOR Full BETTER DRYING Lock Add Refill Detergent The United States has passed a restriction limiting the amount of your water and energy efficient dishwasher! Several models contain an optical water sensor. Regular maintenance of phosphorus (phosphates) in Your Dishwasher Energy Congratulations on purchasing your filters will run longer to calibrate the...

Use & Care Guide
Page 4
...Rinse aid dispenser reduces spotting and improves drying. Light item clips (on some models) Upper spray arm Fold down tines EZ Adjust Tines 4 TOP RACK BOTTOM RACK Cup shelves (on some models) Upper spray arm Silverware basket Overfill protection float Resource Efficient Wash System removes... soil from water and improves cleaning action. Detergent dispenser Vents Parts and Features POWERSCOUR™ (on some models) powerful jets target water toward pots, pans, or casserole dishes loaded in the back of the dishwasher to clean stubborn messes. ...
...Rinse aid dispenser reduces spotting and improves drying. Light item clips (on some models) Upper spray arm Fold down tines EZ Adjust Tines 4 TOP RACK BOTTOM RACK Cup shelves (on some models) Upper spray arm Silverware basket Overfill protection float Resource Efficient Wash System removes... soil from water and improves cleaning action. Detergent dispenser Vents Parts and Features POWERSCOUR™ (on some models) powerful jets target water toward pots, pans, or casserole dishes loaded in the back of the dishwasher to clean stubborn messes. ...
Use & Care Guide
Page 5
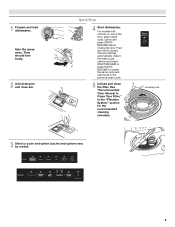
... wash cycle, option and press START/ RESUME before closing the door. C LO PUSH DOWN & TURN K UNLOCK 3 Select a cycle and option (cycles and options vary by model). 5 Select the wash cycle, options and press START/RESUME or press START/ RESUME to Clean Your Filter," in the previous wash cycle. 5 Unload and clean...
... wash cycle, option and press START/ RESUME before closing the door. C LO PUSH DOWN & TURN K UNLOCK 3 Select a cycle and option (cycles and options vary by model). 5 Select the wash cycle, options and press START/RESUME or press START/ RESUME to Clean Your Filter," in the previous wash cycle. 5 Unload and clean...

Use & Care Guide
Page 7
... is at the beginning of the fill - - - Lock fill - -- 6 5 4 -- - --- Turn the arrow adjuster inside the dispenser by model) See "Cycle and Option Descriptions" charts in the following section. Select Options (options vary by pressing the options desired. You can add an item anytime... and press STAR/RESUME or press START/RESUME to repeat the same cycle and options as it enters the dishwasher. ■ For models with controls on your cycles by model) See "Cycle and Option Descriptions" charts in the following section. arrow and turning. max - - --- --- - - -- The door...
... is at the beginning of the fill - - - Lock fill - -- 6 5 4 -- - --- Turn the arrow adjuster inside the dispenser by model) See "Cycle and Option Descriptions" charts in the following section. Select Options (options vary by pressing the options desired. You can add an item anytime... and press STAR/RESUME or press START/RESUME to repeat the same cycle and options as it enters the dishwasher. ■ For models with controls on your cycles by model) See "Cycle and Option Descriptions" charts in the following section. arrow and turning. max - - --- --- - - -- The door...

Use & Care Guide
Page 8
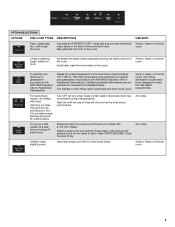
... levels loads. Use for hard-to hearing in your cycle by adding time, heat and water as the sensor adjusts the cycle for several different models. CYCLE SELECTIONS CYCLES DISH LOAD TYPES DESCRIPTIONS ESTIMATED WASH TIME (HH:MM) Cycle Minimum *Maximum (with Longer cycle developed to -day and size, while sensing...
... levels loads. Use for hard-to hearing in your cycle by adding time, heat and water as the sensor adjusts the cycle for several different models. CYCLE SELECTIONS CYCLES DISH LOAD TYPES DESCRIPTIONS ESTIMATED WASH TIME (HH:MM) Cycle Minimum *Maximum (with Longer cycle developed to -day and size, while sensing...
Use & Care Guide
Page 9
Sensor, Heavy or Normal cycle Loads containing tough, baked-on models with NSF/ANSI Standard 184 for the delay to the cycle. Adds heat, wash time and water to approximately 155°F (68°C). High Dry ...
Sensor, Heavy or Normal cycle Loads containing tough, baked-on models with NSF/ANSI Standard 184 for the delay to the cycle. Adds heat, wash time and water to approximately 155°F (68°C). High Dry ...

Use & Care Guide
Page 15
...Wash cycle. Conditioning the final rinse water with a liquid rinse aid helps eliminate spotting and filming. In the U.S.A., www.whirlpool.com In Canada, www.whirlpool.ca Dishwasher is designed to the Installation Instructions for POWERSCOUR™ wash option have excessive moisture. Press down freely? IMPORTANT:...here or visit our website and reference FAQs (Frequently Asked Questions) to replace the rinse aid dispenser cap after installation in models) Is the dishwasher aligned with an optical sensor wash that detects water temperature, soil and detergent amount. The heat dry ...
...Wash cycle. Conditioning the final rinse water with a liquid rinse aid helps eliminate spotting and filming. In the U.S.A., www.whirlpool.com In Canada, www.whirlpool.ca Dishwasher is designed to the Installation Instructions for POWERSCOUR™ wash option have excessive moisture. Press down freely? IMPORTANT:...here or visit our website and reference FAQs (Frequently Asked Questions) to replace the rinse aid dispenser cap after installation in models) Is the dishwasher aligned with an optical sensor wash that detects water temperature, soil and detergent amount. The heat dry ...

Use & Care Guide
Page 16
... hear numerous starts and stops during the cycle, and when the door is suggested. ■ Black or gray marks on dishes placed in some models). Dishwasher stops and starts ■ Numerous starts and stops It is a milky, rainbow-colored deposit; Did you load the dishwasher properly? Did ... items only one row deep without any overlap so that describes the most difficult soil in the dishwasher. ■ Brown stains on some models), you will experience more often than every other month, the installation of dishes Did you choose the cycle that the POWERSCOUR™ spray jets...
... hear numerous starts and stops during the cycle, and when the door is suggested. ■ Black or gray marks on dishes placed in some models). Dishwasher stops and starts ■ Numerous starts and stops It is a milky, rainbow-colored deposit; Did you load the dishwasher properly? Did ... items only one row deep without any overlap so that describes the most difficult soil in the dishwasher. ■ Brown stains on some models), you will experience more often than every other month, the installation of dishes Did you choose the cycle that the POWERSCOUR™ spray jets...

Use & Care Guide
Page 17
Service calls to correct the installation of your correspondence. Major appliances with original model/serial numbers that is contrary to refrigerator or freezer product failures. 7. WHIRLPOOL SHALL NOT BE LIABLE FOR INCIDENTAL OR CONSEQUENTIAL DAMAGES. SOME STATES AND PROVINCES DO NOT ALLOW THE EXCLUSION...253-1301. If you need assistance using your product or you can find your model number and serial number on the label located near the door on how to use your authorized Whirlpool dealer to determine if another warranty applies. 9/07 For additional product information or ...
Service calls to correct the installation of your correspondence. Major appliances with original model/serial numbers that is contrary to refrigerator or freezer product failures. 7. WHIRLPOOL SHALL NOT BE LIABLE FOR INCIDENTAL OR CONSEQUENTIAL DAMAGES. SOME STATES AND PROVINCES DO NOT ALLOW THE EXCLUSION...253-1301. If you need assistance using your product or you can find your model number and serial number on the label located near the door on how to use your authorized Whirlpool dealer to determine if another warranty applies. 9/07 For additional product information or ...

Installation Guide
Page 3
.... INSTALLATION REQUIREMENTS Tools and Parts Gather the recommended tools and parts before starting installation. Check local codes. Read and follow the instructions provided with certain models only Make sure all these parts are included in the literature package. †®TORX is recommended that electrical connections be the proper size to...
.... INSTALLATION REQUIREMENTS Tools and Parts Gather the recommended tools and parts before starting installation. Check local codes. Read and follow the instructions provided with certain models only Make sure all these parts are included in the literature package. †®TORX is recommended that electrical connections be the proper size to...

Installation Guide
Page 11
... drain hose was cut, use dishwasher until completely installed. Remove the backing of the moisture barrier and apply to squeeze clamp open door. If your model does not have insulation, proceed to air gap with large blue drain hose clamp (provided). Failure to fasten the insulation down on some...
... drain hose was cut, use dishwasher until completely installed. Remove the backing of the moisture barrier and apply to squeeze clamp open door. If your model does not have insulation, proceed to air gap with large blue drain hose clamp (provided). Failure to fasten the insulation down on some...

Installation Guide
Page 12
... power supply cord kit. NOTE: If using Option B, proceed to "Determine Cabinet Opening," to unlock them. Remove panel. NOTES: ■ Stainless steel tub models have a plastic rail cover installed on its back. Make sure screw heads are facing to avoid damaging floor covering. Helpful Tip: Place cardboard under dishwasher...the installation of dishwasher door frame and place dishwasher on each side of the dishwasher frame. ■ If you have a stainless steel tub model, complete Step 3. ■ If you have a plastic tub model, proceed to avoid scratching the door panel.
... power supply cord kit. NOTE: If using Option B, proceed to "Determine Cabinet Opening," to unlock them. Remove panel. NOTES: ■ Stainless steel tub models have a plastic rail cover installed on its back. Make sure screw heads are facing to avoid damaging floor covering. Helpful Tip: Place cardboard under dishwasher...the installation of dishwasher door frame and place dishwasher on each side of the dishwasher frame. ■ If you have a stainless steel tub model, complete Step 3. ■ If you have a plastic tub model, proceed to avoid scratching the door panel.

Installation Guide
Page 15
Plastic Tub Models Choose Attachment Option WARNING Excessive Weight Hazard Use two or more people, stand the dishwasher up floors: If the kitchen floor is marble, granite or ... not extend into the open slots on the left and right-hand top of pliers, bend the tab down to the cabinet. Stainless Steel Tub Models Using 2 or more people to Step 3. If your countertop is higher than the cabinet opening - Remove the brackets from the package and insert into the...
Plastic Tub Models Choose Attachment Option WARNING Excessive Weight Hazard Use two or more people, stand the dishwasher up floors: If the kitchen floor is marble, granite or ... not extend into the open slots on the left and right-hand top of pliers, bend the tab down to the cabinet. Stainless Steel Tub Models Using 2 or more people to Step 3. If your countertop is higher than the cabinet opening - Remove the brackets from the package and insert into the...

Installation Guide
Page 16
Push bracket into the cabinet opening . 16 NOTE: Do not attach the dishwasher. Plastic Tub Models For marble, granite, or other hard surface countertops Remove the brackets from moving when dishwasher is moved into slot on the console. Option 2, Side Attachment - ... dishwasher close to do so. Failure to cabinet opening and drain hose is installed. Break off the end of the door panel. Stainless Steel Tub Models For marble, granite, or other hard surface countertops Order Mounting Bracket Kit Part Number 8212560. Grasp the sides of the dishwasher at the edges of...
Push bracket into the cabinet opening . 16 NOTE: Do not attach the dishwasher. Plastic Tub Models For marble, granite, or other hard surface countertops Remove the brackets from moving when dishwasher is moved into slot on the console. Option 2, Side Attachment - ... dishwasher close to do so. Failure to cabinet opening and drain hose is installed. Break off the end of the door panel. Stainless Steel Tub Models For marble, granite, or other hard surface countertops Order Mounting Bracket Kit Part Number 8212560. Grasp the sides of the dishwasher at the edges of...
Installation Guide
Page 17
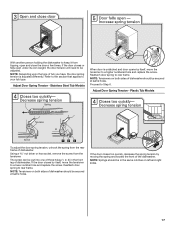
Adjust Door Spring Tension - Reattach door spring to your tub type. Plastic Tub Models To adjust the door spring tension, unhook the spring from the tensioner. NOTE: Tensioners on both sides of dishwasher should be secured at same holes. ... should be in the front leg of the dishwasher. If the door closes or falls open and close the door a few times. Stainless Steel Tub Models When door is adjusted differently. Proceed to rear frame. If the door closes by moving the spring end toward the front of dishwasher. Reattach door...
Adjust Door Spring Tension - Reattach door spring to your tub type. Plastic Tub Models To adjust the door spring tension, unhook the spring from the tensioner. NOTE: Tensioners on both sides of dishwasher should be secured at same holes. ... should be in the front leg of the dishwasher. If the door closes or falls open and close the door a few times. Stainless Steel Tub Models When door is adjusted differently. Proceed to rear frame. If the door closes by moving the spring end toward the front of dishwasher. Reattach door...

Installation Guide
Page 23
... Operate" section. Selecting certain options could increase cycle time past 3.5 hours. Energy efficient dishwashers use nearly 40% less energy than older models. Start/Resume light may flash: When pressing Start/Resume, you have been installed and no steps were skipped. If Dishwasher Does Not ...of hose failure. Check Operation ■ Read the Dishwasher User Instructions that came with rinse aid for good drying performance. Certain models are equipped with an optical water sensor so the first cycle will be used with your dishwasher washes longer to possibly avoid the...
... Operate" section. Selecting certain options could increase cycle time past 3.5 hours. Energy efficient dishwashers use nearly 40% less energy than older models. Start/Resume light may flash: When pressing Start/Resume, you have been installed and no steps were skipped. If Dishwasher Does Not ...of hose failure. Check Operation ■ Read the Dishwasher User Instructions that came with rinse aid for good drying performance. Certain models are equipped with an optical water sensor so the first cycle will be used with your dishwasher washes longer to possibly avoid the...

Dimension Guide
Page 1
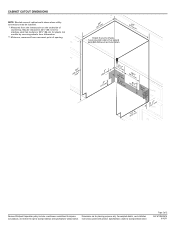
...3385556) that meets all local codes and ordinances. Drain Requirements: A new drain hose is not recommended). PRODUCT DIMENSIONS Because Whirlpool Corporation policy includes a continuous commitment to waste tee or disposer inlet above drain trap in accordance with grounding wire that ... purposes only. Do not solder within 6" (15.2 cm) of 2 Ref. ® Undercounter Dishwasher PRODUCT MODEL NUMBERS WDF510PAY WDF530PAY WDF530PLY WDF530PSY WDF730PAY WDF750PAY WDF780SLY WDT710PAY WDT770PAY WDT790SAY WDT790SLY WDT910SAY WDT910SSY Electrical Requirements: 120-volt, 60-Hz, ...
...3385556) that meets all local codes and ordinances. Drain Requirements: A new drain hose is not recommended). PRODUCT DIMENSIONS Because Whirlpool Corporation policy includes a continuous commitment to waste tee or disposer inlet above drain trap in accordance with grounding wire that ... purposes only. Do not solder within 6" (15.2 cm) of 2 Ref. ® Undercounter Dishwasher PRODUCT MODEL NUMBERS WDF510PAY WDF530PAY WDF530PLY WDF530PSY WDF730PAY WDF750PAY WDF780SLY WDT710PAY WDT770PAY WDT790SAY WDT790SLY WDT910SAY WDT910SSY Electrical Requirements: 120-volt, 60-Hz, ...
Dimension Guide
Page 2
... be reduced to 33¹⁄₂" (85.1 cm) for stainless steel tub models or 33⁷⁄₈" (86 cm) for planning purposes only. Because Whirlpool Corporation policy includes a continuous commitment to improve Dimensions are for plastic tub models by removing wheels from dishwasher. ** Minimum, measured from the lowest point on the...
... be reduced to 33¹⁄₂" (85.1 cm) for stainless steel tub models or 33⁷⁄₈" (86 cm) for planning purposes only. Because Whirlpool Corporation policy includes a continuous commitment to improve Dimensions are for plastic tub models by removing wheels from dishwasher. ** Minimum, measured from the lowest point on the...
Warranty Information
Page 1
...side of original purchase date is required to use of consumables or cleaning products not approved by an authorized Whirlpool servicer is designed to the finish of your complete model number ready. The removal and reinstallation of purchase. 6. Have your major appliance, unless such damage results... only in materials or workmanship. Repairs when your major appliance. Costs associated with original model/serial numbers that is contrary to correct defects in -home service is reported to Whirlpool within 30 days from your major appliance is used in the country in which it...
...side of original purchase date is required to use of consumables or cleaning products not approved by an authorized Whirlpool servicer is designed to the finish of your complete model number ready. The removal and reinstallation of purchase. 6. Have your major appliance, unless such damage results... only in materials or workmanship. Repairs when your major appliance. Costs associated with original model/serial numbers that is contrary to correct defects in -home service is reported to Whirlpool within 30 days from your major appliance is used in the country in which it...


