Installation Guide
Page 2
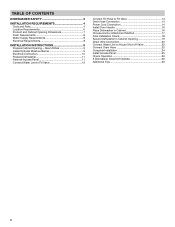
... 8 Electrical Requirements 8 INSTALLATION INSTRUCTIONS 9 Prepare Cabinet Opening - New Utilities 9 Install Optional Moisture Barrier 9 Electrical Connection 10 Prepare Dishwasher 11 Remove Access Panel 11 Connect Water Line to Fill Valve 12 Connect Fill Hose to Fill Valve 13 Drain Hose Connection 14 ...Final Installation Check 18 Secure Dishwasher in Cabinet Opening 19 Direct Wire Connection 20 Connect Water Line to House Shut-off Valve 22 Connect Drain Hose 22 Complete Installation 24 Install Access Panel 25 Check Operation 26 If Dishwasher Does Not Operate 26 Additional...
... 8 Electrical Requirements 8 INSTALLATION INSTRUCTIONS 9 Prepare Cabinet Opening - New Utilities 9 Install Optional Moisture Barrier 9 Electrical Connection 10 Prepare Dishwasher 11 Remove Access Panel 11 Connect Water Line to Fill Valve 12 Connect Fill Hose to Fill Valve 13 Drain Hose Connection 14 ...Final Installation Check 18 Secure Dishwasher in Cabinet Opening 19 Direct Wire Connection 20 Connect Water Line to House Shut-off Valve 22 Connect Drain Hose 22 Complete Installation 24 Install Access Panel 25 Check Operation 26 If Dishwasher Does Not Operate 26 Additional...
Installation Guide
Page 7
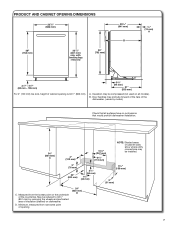
... mm) A For 4" (100 mm) toe kick, height of cabinet opening 24" (620 mm) D 7 May be installed. 3" (76 mm) 24" (620 mm) 21/4" (64 mm) 13/4" (44 mm) 61/4" (159 mm) 2" (51 mm) C. Insulation may protrude forward of the face of the dishwasher, (varies by removing the wheels and perforated area of insulation (blanket...
... mm) A For 4" (100 mm) toe kick, height of cabinet opening 24" (620 mm) D 7 May be installed. 3" (76 mm) 24" (620 mm) 21/4" (64 mm) 13/4" (44 mm) 61/4" (159 mm) 2" (51 mm) C. Insulation may protrude forward of the face of the dishwasher, (varies by removing the wheels and perforated area of insulation (blanket...

Installation Guide
Page 14
... clamp final position Drain hose Drain hose stop Using pliers, squeeze open the small drain hose clamp, and slide it does not touch dishwasher motor or lower part of dishwasher tub. Install a UL Listed/CSA Approved metallic strain relief. Place the small (green) drain hose clamp onto the small end of 2 ... terminal box cover Using a 1/4" hex-head socket, nut driver, or Torx® T20® screwdriver, remove terminal box cover. Retain for part details and orders. 24. See the "Tools and Parts" section at the front of the dishwasher. NOTE: A maximum of the drain hose.
... clamp final position Drain hose Drain hose stop Using pliers, squeeze open the small drain hose clamp, and slide it does not touch dishwasher motor or lower part of dishwasher tub. Install a UL Listed/CSA Approved metallic strain relief. Place the small (green) drain hose clamp onto the small end of 2 ... terminal box cover Using a 1/4" hex-head socket, nut driver, or Torx® T20® screwdriver, remove terminal box cover. Retain for part details and orders. 24. See the "Tools and Parts" section at the front of the dishwasher. NOTE: A maximum of the drain hose.

Installation Guide
Page 24
... trap Air gap Large drain hose clamp Rubber hose connector Drain hose COMPLETE INSTALLATION Check that the power supply wire or cord does not touch dishwasher motor or the lower part of drain hose to air gap and cut , use a 11/2" to 2" (38 mm to 50 mm) screw-type clamp (not... hose clamp (provided). Plug into a grounded 3 prong outlet Plug into position. Check that there is working properly. 24 Attach drain hose to air gap. 58. NOTE: With the access panel off, start the dishwasher and allow it to squeeze clamp open door. If the drain hose was cut if needed. Check that...
... trap Air gap Large drain hose clamp Rubber hose connector Drain hose COMPLETE INSTALLATION Check that the power supply wire or cord does not touch dishwasher motor or the lower part of drain hose to air gap and cut , use a 11/2" to 2" (38 mm to 50 mm) screw-type clamp (not... hose clamp (provided). Plug into a grounded 3 prong outlet Plug into position. Check that there is working properly. 24 Attach drain hose to air gap. 58. NOTE: With the access panel off, start the dishwasher and allow it to squeeze clamp open door. If the drain hose was cut if needed. Check that...
Dimension Guide
Page 2
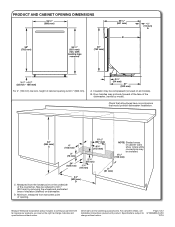
... by removing the wheels and perforated area of insulation (blanket) on all surfaces have no protrusions that would prohibit dishwasher installation. 34" (864 mm) C 4" (102 mm) 3" (76 mm) 24" (620 mm) 101/2" (267 mm) 63/4" (172 mm) 21/4" (64 mm) NOTE: Shaded areas ...used on dishwasher. B. Check that all models). Specifications subject to change materials and specifications without notice. PRODUCT AND CABINET OPENING DIMENSIONS 30" (762 mm) 251/4" (641 mm) B 3/4" (19 mm) A For 4" (100 mm) toe kick, height of cabinet opening . 24" (620 mm) D Because Whirlpool Corporation policy...
... by removing the wheels and perforated area of insulation (blanket) on all surfaces have no protrusions that would prohibit dishwasher installation. 34" (864 mm) C 4" (102 mm) 3" (76 mm) 24" (620 mm) 101/2" (267 mm) 63/4" (172 mm) 21/4" (64 mm) NOTE: Shaded areas ...used on dishwasher. B. Check that all models). Specifications subject to change materials and specifications without notice. PRODUCT AND CABINET OPENING DIMENSIONS 30" (762 mm) 251/4" (641 mm) B 3/4" (19 mm) A For 4" (100 mm) toe kick, height of cabinet opening . 24" (620 mm) D Because Whirlpool Corporation policy...


