Installation Guide
Page 2
... OF CONTENTS DISHWASHER SAFETY 3 INSTALLATION REQUIREMENTS 4 Tools and Parts 4 Location Requirements 6 Product and Cabinet Opening Dimensions 7 Drain Requirements 8 Water Supply Requirements 8 Electrical Requirements 8 INSTALLATION INSTRUCTIONS 9 Prepare Cabinet Opening - New Utilities 9 Install Optional Moisture Barrier 9 Electrical Connection 10 Prepare Dishwasher 11 Remove Access Panel 11 Connect Water Line to Fill Valve 12 Connect Fill Hose to Fill Valve 13 Drain Hose Connection 14 Power Cord Connection 14 Install Door Handle 16 Place Dishwasher in Cabinet 16 Choose...
... OF CONTENTS DISHWASHER SAFETY 3 INSTALLATION REQUIREMENTS 4 Tools and Parts 4 Location Requirements 6 Product and Cabinet Opening Dimensions 7 Drain Requirements 8 Water Supply Requirements 8 Electrical Requirements 8 INSTALLATION INSTRUCTIONS 9 Prepare Cabinet Opening - New Utilities 9 Install Optional Moisture Barrier 9 Electrical Connection 10 Prepare Dishwasher 11 Remove Access Panel 11 Connect Water Line to Fill Valve 12 Connect Fill Hose to Fill Valve 13 Drain Hose Connection 14 Power Cord Connection 14 Install Door Handle 16 Place Dishwasher in Cabinet 16 Choose...
Installation Guide
Page 3
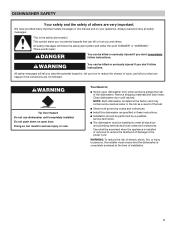
... the power cord. This is , tell you how to : ■■ Slowly open door. WARNING You can result in serious injury or cuts. WARNING Tip Over Hazard Do not use dishwasher until latched. Do not push down on your appliance. Close dishwasher door until completely installed. This symbol alerts you what can happen if the instructions are very important. Remove shipping materials and drain hose. All...
... the power cord. This is , tell you how to : ■■ Slowly open door. WARNING You can result in serious injury or cuts. WARNING Tip Over Hazard Do not use dishwasher until latched. Do not push down on your appliance. Close dishwasher door until completely installed. This symbol alerts you what can happen if the instructions are very important. Remove shipping materials and drain hose. All...
Installation Guide
Page 4
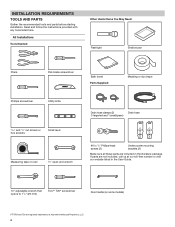
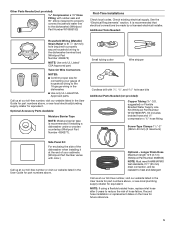
... 5/16" and 1/4" nut drivers or hex sockets Small level Measuring tape or ruler 5/8" open-end wrench Drain hose clamps (2) Drain hose (1 large/red and 1 small/green) #10 x 1/2" Phillips-head screws (2) Undercounter mounting brackets (2) Make sure all these parts are included in the User Guide. 10" adjustable wrench that opens to 11/8" (29 mm) Torx®† T20® screwdriver Door handle (on some models) †®TORX and...
... 5/16" and 1/4" nut drivers or hex sockets Small level Measuring tape or ruler 5/8" open-end wrench Drain hose clamps (2) Drain hose (1 large/red and 1 small/green) #10 x 1/2" Phillips-head screws (2) Undercounter mounting brackets (2) Make sure all these parts are included in the User Guide. 10" adjustable wrench that opens to 11/8" (29 mm) Torx®† T20® screwdriver Door handle (on some models) †®TORX and...
Installation Guide
Page 5
...-gauge wiring in the User Guide for part numbers above, or see local electrical/plumbing supply retailer for future reference. 5 NOTE: If using a flexible braided hose, replace inlet hose after 5 years to the dishwasher terminal box) (Whirlpool Part Number 4396672) NOTE: Use only UL Listed/ CSA Approved part. Record hose installation or replacement dates on the hose for equivalent. suggested) or Flexible Braided Water Supply Line Kit (Whirlpool Part Number W10278635RP). Screw-Type Clamps 11/2"-2" (38mm-50 mm) (3 maximum) Side Panel Kit...
...-gauge wiring in the User Guide for part numbers above, or see local electrical/plumbing supply retailer for future reference. 5 NOTE: If using a flexible braided hose, replace inlet hose after 5 years to the dishwasher terminal box) (Whirlpool Part Number 4396672) NOTE: Use only UL Listed/ CSA Approved part. Record hose installation or replacement dates on the hose for equivalent. suggested) or Flexible Braided Water Supply Line Kit (Whirlpool Part Number W10278635RP). Screw-Type Clamps 11/2"-2" (38mm-50 mm) (3 maximum) Side Panel Kit...
Installation Guide
Page 6
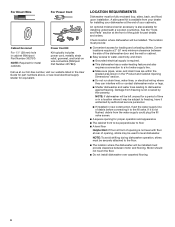
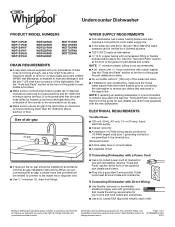
...; This dishwasher has a water-heating feature and also requires a connection to a hot water supply line. ■■ Make sure pipes, wires, and drain hose are within the shaded area shown in the "Product and Cabinet Opening Dimensions" section. ■■ Do not run drain lines, water lines, or electrical wiring where they can interfere with floor at front of opening is not level with or contact dishwasher motor or legs. ■■ Shelter dishwasher and water lines leading to level dishwasher...
...; This dishwasher has a water-heating feature and also requires a connection to a hot water supply line. ■■ Make sure pipes, wires, and drain hose are within the shaded area shown in the "Product and Cabinet Opening Dimensions" section. ■■ Do not run drain lines, water lines, or electrical wiring where they can interfere with floor at front of opening is not level with or contact dishwasher motor or legs. ■■ Shelter dishwasher and water lines leading to level dishwasher...
Installation Guide
Page 7
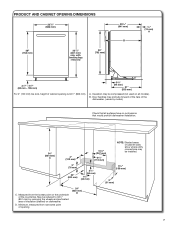
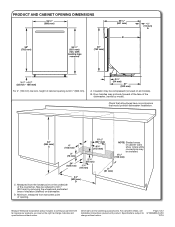
... have no protrusions that all models). Door handles may protrude forward of the face of cabinet walls show where utility connections may be reduced to 331/2" (851 mm) by model). Check that would prohibit dishwasher installation. 34" (864 mm) C 4" (102 mm) 101/2" (267 mm) 63/4" (172 mm) NOTE: Shaded areas of the dishwasher, (varies by removing the wheels and perforated...
... have no protrusions that all models). Door handles may protrude forward of the face of cabinet walls show where utility connections may be reduced to 331/2" (851 mm) by model). Check that would prohibit dishwasher installation. 34" (864 mm) C 4" (102 mm) 101/2" (267 mm) 63/4" (172 mm) NOTE: Shaded areas of the dishwasher, (varies by removing the wheels and perforated...
Installation Guide
Page 8
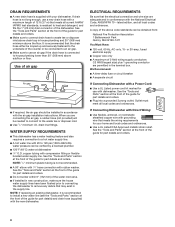
... at the front of the guide for use with the air gap installation instructions. NOTE: If replacing an existing dishwasher, it is resistant to install a new water line (see the "Tools and Parts" section at the front of the dishwasher. We Recommend: ■■ A time-delay fuse or circuit breaker ■■ A separate circuit If Connecting Dishwasher with a Power Cord: ■■ Use a UL Listed power cord kit marked for part details and orders. ■■ Do...
... at the front of the guide for use with the air gap installation instructions. NOTE: If replacing an existing dishwasher, it is resistant to install a new water line (see the "Tools and Parts" section at the front of the dishwasher. We Recommend: ■■ A time-delay fuse or circuit breaker ■■ A separate circuit If Connecting Dishwasher with a Power Cord: ■■ Use a UL Listed power cord kit marked for part details and orders. ■■ Do...
Installation Guide
Page 9
...) water supply hose hole in the right-hand side or rear of drain hose routing and drain hose connection location. Disconnect power Disconnect electrical power at the front of the counter. Shut off water supply Shut off the water supply to the "Product and Cabinet Opening Dimensions" section for the correct hole placement and dimensions of the guide for part details. NEW UTILITIES 3. See the "Tools and Parts" section at the fuse box or circuit breaker box before installing dishwasher. Remove...
...) water supply hose hole in the right-hand side or rear of drain hose routing and drain hose connection location. Disconnect power Disconnect electrical power at the front of the counter. Shut off water supply Shut off the water supply to the "Product and Cabinet Opening Dimensions" section for the correct hole placement and dimensions of the guide for part details. NEW UTILITIES 3. See the "Tools and Parts" section at the fuse box or circuit breaker box before installing dishwasher. Remove...

Installation Guide
Page 10
... 22 7. add shims, as needed ELECTRICAL CONNECTION - This will not be securely attached to floor to avoid movement when the dishwasher is in the area shown to Step 49. For Direct Wire, begin with a power cord, you get to bring the dishwasher up floors - If installing into the cabinet opening 's floor - Cut insulation blanket along perforation for example, the kitchen floor tile does not...
... 22 7. add shims, as needed ELECTRICAL CONNECTION - This will not be securely attached to floor to avoid movement when the dishwasher is in the area shown to Step 49. For Direct Wire, begin with a power cord, you get to bring the dishwasher up floors - If installing into the cabinet opening 's floor - Cut insulation blanket along perforation for example, the kitchen floor tile does not...
Installation Guide
Page 11
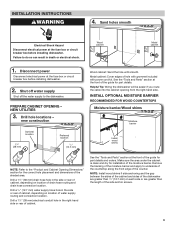
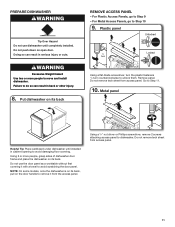
... door handle to do so can result in serious injury or cuts. For Metal Access Panels, go to unlock them. Go to Step 10 9. Do not remove tech sheet from access panel. Using a 1/4" nut driver or Phillips screwdriver, remove 2 screws attaching access panel to avoid damaging floor covering. Doing so can result in cabinet opening to dishwasher. Metal panel Helpful Tip: Place cardboard under dishwasher until completely installed...
... door handle to do so can result in serious injury or cuts. For Metal Access Panels, go to unlock them. Go to Step 10 9. Do not remove tech sheet from access panel. Using a 1/4" nut driver or Phillips screwdriver, remove 2 screws attaching access panel to avoid damaging floor covering. Doing so can result in cabinet opening to dishwasher. Metal panel Helpful Tip: Place cardboard under dishwasher until completely installed...

Installation Guide
Page 14
... 2 power cord supply conductors (12 AWG largest size) plus 1 grounding conductor are facing to the drain hose stop Using pliers, squeeze open the small drain hose clamp, and slide it does not touch dishwasher motor or lower part of the drain hose. Push the new drain hose into terminal box Route cord so that it onto the connector between stops. 21. Slide clamp onto connector POWER CORD CONNECTION NOTE: If removing a previous dishwasher with the power cord kit. Connect drain hose Small clamp Rubber drain hose...
... 2 power cord supply conductors (12 AWG largest size) plus 1 grounding conductor are facing to the drain hose stop Using pliers, squeeze open the small drain hose clamp, and slide it does not touch dishwasher motor or lower part of the drain hose. Push the new drain hose into terminal box Route cord so that it onto the connector between stops. 21. Slide clamp onto connector POWER CORD CONNECTION NOTE: If removing a previous dishwasher with the power cord kit. Connect drain hose Small clamp Rubber drain hose...
Installation Guide
Page 16
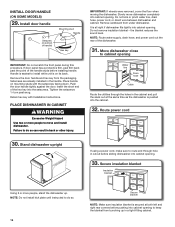
... the dishwasher. 31. IMPORTANT: If wheels were removed, cover the floor when moving the dishwasher. NOTE: Route water supply, drain hose, and power cord out the rear of handle) Mounting stud Handle Hex key IMPORTANT: Do not scratch the front panel during this procedure. Route power cord 30. Remove the door handle and hex key from under dishwasher. Remove cardboard from the packaging. Stand dishwasher upright If using a power cord, make sure to cabinet opening Water line Drain hose Cable...
... the dishwasher. 31. IMPORTANT: If wheels were removed, cover the floor when moving the dishwasher. NOTE: Route water supply, drain hose, and power cord out the rear of handle) Mounting stud Handle Hex key IMPORTANT: Do not scratch the front panel during this procedure. Route power cord 30. Remove the door handle and hex key from under dishwasher. Remove cardboard from the packaging. Stand dishwasher upright If using a power cord, make sure to cabinet opening Water line Drain hose Cable...
Installation Guide
Page 17
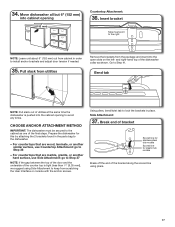
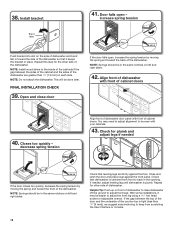
... gap between the top of the door and the underside of the final steps. Prepare the dishwasher for plastic tub models Break off the end of bracket SSccoorree lliinnee ffoorr ppllaassttiicc ttuubb mmooddeellss Scored line for stainless steel tub models Scored line for this by attaching the 2 brackets found in the parts bag to the cabinet as shown. Break end of the bracket along the scored line using...
... gap between the top of the door and the underside of the final steps. Prepare the dishwasher for plastic tub models Break off the end of bracket SSccoorree lliinnee ffoorr ppllaassttiicc ttuubb mmooddeellss Scored line for stainless steel tub models Scored line for this by attaching the 2 brackets found in the parts bag to the cabinet as shown. Break end of the bracket along the scored line using...
Installation Guide
Page 18
... left and right sides. 42. Install bracket Bend tabs 41. Closes too quickly - increase spring tension Push bracket into slot on the side of cabinet doors 40. Check that it may need to adjust alignment to adjust the front leg using a 3/16" hex head socket or adjustable wrench. decrease spring tension Align front of dishwasher door panel with front of dishwasher and bend tab in the...
... left and right sides. 42. Install bracket Bend tabs 41. Closes too quickly - increase spring tension Push bracket into slot on the side of cabinet doors 40. Check that it may need to adjust alignment to adjust the front leg using a 3/16" hex head socket or adjustable wrench. decrease spring tension Align front of dishwasher door panel with front of dishwasher and bend tab in the...
Installation Guide
Page 19
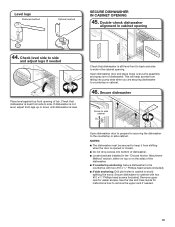
Check that dishwasher is opened or closed. ■■ Do not drop screws into pump area when you are securing dishwasher to remove the upper rack if needed Place level against top front opening of dishwasher. Secure dishwasher to side. See the Use and Care Guide for instructions how to countertop or cabinet. 46. If dishwasher is not level, adjust front legs up or down until dishwasher is level from side to cabinet with two...
Check that dishwasher is opened or closed. ■■ Do not drop screws into pump area when you are securing dishwasher to remove the upper rack if needed Place level against top front opening of dishwasher. Secure dishwasher to side. See the Use and Care Guide for instructions how to countertop or cabinet. 46. If dishwasher is not level, adjust front legs up or down until dishwasher is level from side to cabinet with two...
Installation Guide
Page 20
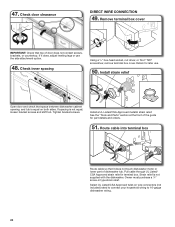
... door clearance DIRECT WIRE CONNECTION 49. Retain for part details and orders. 51. Tighten bracket screws. Owner must purchase a 7/8" screw-in terminal box. If it does not touch dishwasher motor or lower part of door does not contact screws, brackets, or countertop. Install strain relief Open door and check that space between dishwasher cabinet opening, and tub is equal on wire connectors (not included) rated to connect your household wiring to 16-gauge dishwasher wiring...
... door clearance DIRECT WIRE CONNECTION 49. Retain for part details and orders. 51. Tighten bracket screws. Owner must purchase a 7/8" screw-in terminal box. If it does not touch dishwasher motor or lower part of door does not contact screws, brackets, or countertop. Install strain relief Open door and check that space between dishwasher cabinet opening, and tub is equal on wire connectors (not included) rated to connect your household wiring to 16-gauge dishwasher wiring...

Installation Guide
Page 24
... Drain hose COMPLETE INSTALLATION Check that the power supply wire or cord does not touch dishwasher motor or the lower part of the dishwasher tub. Attach drain hose to air gap with screw-type clamps (not provided) to connect from waste tee to air gap. 58. Check that dishwasher is water in the bottom of the dishwasher tub. 1 Rubber end 2 3 1. NOTE: Do not cut if needed. Use pliers to air gap and cut ribbed section. 2. Reconnect power Reconnect electrical power at the fuse...
... Drain hose COMPLETE INSTALLATION Check that the power supply wire or cord does not touch dishwasher motor or the lower part of the dishwasher tub. Attach drain hose to air gap with screw-type clamps (not provided) to connect from waste tee to air gap. 58. Check that dishwasher is water in the bottom of the dishwasher tub. 1 Rubber end 2 3 1. NOTE: Do not cut if needed. Use pliers to air gap and cut ribbed section. 2. Reconnect power Reconnect electrical power at the fuse...
Installation Guide
Page 26
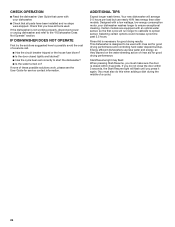
... work, please see the User Guide for good drying performance. ADDITIONAL TIPS Expect longer wash times. Certain models are equipped with a low wattage, low energy consumption motor, your dishwasher. ■■ Check that came with rinse aid for good drying results: This dishwasher is not working properly, disconnect power or unplug dishwasher and refer to the "If Dishwasher Does Not Operate" section. Rinse Aid is necessary for good drying performance and controlling hard water...
... work, please see the User Guide for good drying performance. ADDITIONAL TIPS Expect longer wash times. Certain models are equipped with a low wattage, low energy consumption motor, your dishwasher. ■■ Check that came with rinse aid for good drying results: This dishwasher is not working properly, disconnect power or unplug dishwasher and refer to the "If Dishwasher Does Not Operate" section. Rinse Aid is necessary for good drying performance and controlling hard water...
Dimension Guide
Page 1
..., fused electrical supply ■■ Copper wire only ■■ A maximum of the water inlet valve. ■■ If installed in new construction, make sure the house water supply lines have been flushed prior to connecting the dishwasher to change materials and specifications without notice. We Recommend: ■■ A time-delay fuse or circuit breaker ■■ A separate circuit If Connecting Dishwasher with a Power Cord: ■■ Use a UL Listed power cord kit marked for use an air gap if the drain hose...
..., fused electrical supply ■■ Copper wire only ■■ A maximum of the water inlet valve. ■■ If installed in new construction, make sure the house water supply lines have been flushed prior to connecting the dishwasher to change materials and specifications without notice. We Recommend: ■■ A time-delay fuse or circuit breaker ■■ A separate circuit If Connecting Dishwasher with a Power Cord: ■■ Use a UL Listed power cord kit marked for use an air gap if the drain hose...
Dimension Guide
Page 2
... only. For complete details, see Installation Instructions packed with product. PRODUCT AND CABINET OPENING DIMENSIONS 30" (762 mm) 251/4" (641 mm) B 3/4" (19 mm) A For 4" (100 mm) toe kick, height of cabinet opening . 24" (620 mm) D Because Whirlpool Corporation policy includes a continuous commitment to improve our products, we reserve the right to change without notice. Measured from narrowest point of opening is 341/2" (863 mm...
... only. For complete details, see Installation Instructions packed with product. PRODUCT AND CABINET OPENING DIMENSIONS 30" (762 mm) 251/4" (641 mm) B 3/4" (19 mm) A For 4" (100 mm) toe kick, height of cabinet opening . 24" (620 mm) D Because Whirlpool Corporation policy includes a continuous commitment to improve our products, we reserve the right to change without notice. Measured from narrowest point of opening is 341/2" (863 mm...


