
Quick Start Guide
Page 1
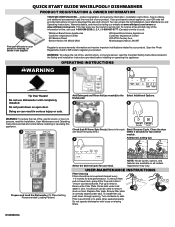
... Load the Dishwasher (13 Place Setting Recommended Loading Pattern) Select the desired Cycle for top control models. NOTE: Not all cycles, options, and features are available on open door. Appearance may save you purchased a smart appliance, your product's serial tag, as needed) to person, read the Installation, User Maintenance and Operating Instructions printed and online before installing or operating this appliance. 1 Third Level Rack with loose or missing filters. USER-MAINTENANCE INSTRUCTIONS L O CK PUSH DOWN & TURN UNL Filter Cleaning Filters...
... Load the Dishwasher (13 Place Setting Recommended Loading Pattern) Select the desired Cycle for top control models. NOTE: Not all cycles, options, and features are available on open door. Appearance may save you purchased a smart appliance, your product's serial tag, as needed) to person, read the Installation, User Maintenance and Operating Instructions printed and online before installing or operating this appliance. 1 Third Level Rack with loose or missing filters. USER-MAINTENANCE INSTRUCTIONS L O CK PUSH DOWN & TURN UNL Filter Cleaning Filters...
Owners Manual
Page 2
... dishwasher turn on the dishwasher. Under certain conditions, hydrogen gas may be plugged into an appropriate outlet that has not been used for several minutes. Remove the door or lid to the equipment-grounding terminal or lead on all instructions before using the dishwasher. Do not touch the heating element during this time. HYDROGEN GAS IS EXPLOSIVE. WARNING: Improper connection of the dishwasher. I For a grounded, cord-connected dishwasher...
... dishwasher turn on the dishwasher. Under certain conditions, hydrogen gas may be plugged into an appropriate outlet that has not been used for several minutes. Remove the door or lid to the equipment-grounding terminal or lead on all instructions before using the dishwasher. Do not touch the heating element during this time. HYDROGEN GAS IS EXPLOSIVE. WARNING: Improper connection of the dishwasher. I For a grounded, cord-connected dishwasher...

Owners Manual
Page 3
... tightly closed detergent container in better cleaning. Refer to the Quick Start Guide or brand website for licensed food establishments. Cycle Selection and Energy Efficient dishwashers run longer to save water and energy, just as driving a car slower saves on usage. This cycle senses the soil amount, and toughness of soil, to adjust the cycle for customers who use dishwasher until completely installed. The Pre-Wash indicator on the dispenser lid is specifically designed...
... tightly closed detergent container in better cleaning. Refer to the Quick Start Guide or brand website for licensed food establishments. Cycle Selection and Energy Efficient dishwashers run longer to save water and energy, just as driving a car slower saves on usage. This cycle senses the soil amount, and toughness of soil, to adjust the cycle for customers who use dishwasher until completely installed. The Pre-Wash indicator on the dispenser lid is specifically designed...
Owners Manual
Page 4
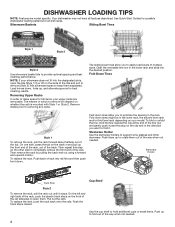
... 3 Style 2 Use silverware basket lids to removing any racks. Fold down , forks up to open the lids (Style 1/3) or lift on your upper racks are model specific. On the left and right side of the way when not needed . Removing Upper Racks In order to keep them . Your dishwasher may not have all dish racks. Mix silverware types to make space for all features described. DISHWASHER LOADING TIPS...
... 3 Style 2 Use silverware basket lids to removing any racks. Fold down , forks up to open the lids (Style 1/3) or lift on your upper racks are model specific. On the left and right side of the way when not needed . Removing Upper Racks In order to keep them . Your dishwasher may not have all dish racks. Mix silverware types to make space for all features described. DISHWASHER LOADING TIPS...
Owners Manual
Page 5
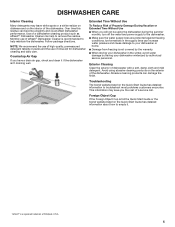
... help to the dishwasher. ■ Make sure the water supply lines are protected against freezing conditions. Troubleshooting The brand website listed on the Quick Start Guide has detailed information about how to troubleshoot most problems customers encounter. DISHWASHER CARE Interior Cleaning Many detergents may save you the cost of a service call. Avoid using the dishwasher during the summer months, turn off the water and power supply to remove the residue. Monthly use of dishwasher with a soft, damp...
... help to the dishwasher. ■ Make sure the water supply lines are protected against freezing conditions. Troubleshooting The brand website listed on the Quick Start Guide has detailed information about how to troubleshoot most problems customers encounter. DISHWASHER CARE Interior Cleaning Many detergents may save you the cost of a service call. Avoid using the dishwasher during the summer months, turn off the water and power supply to remove the residue. Monthly use of dishwasher with a soft, damp...
Owners Manual
Page 6
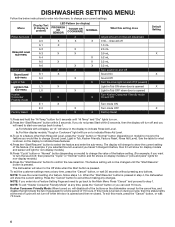
... to indicate Rinse Aid Level. 3. The feature setting will turn the sound off (if present) Light in Tub ON when door is opened Light in Tub OFF when door is present) A A 0 A 1 A 2 A 3 A 4 A 5 A 6 S S 1 S 0 L L 1 L 0 E E 1 E 0 r LED Pattern (no display) PROWASH OR SENSOR TOUGH OR COOKWARE NORMAL X X X X X X X X X X X X X X X X X X X X X X X X X X X What this setting does Adjust amount of rinse aid dispensed 0 mL - If this mode, press the "Cancel" button, or wait 75 hours. 6 a. When the "Start/Resume" button is turned on during a cycle...
... to indicate Rinse Aid Level. 3. The feature setting will turn the sound off (if present) Light in Tub ON when door is opened Light in Tub OFF when door is present) A A 0 A 1 A 2 A 3 A 4 A 5 A 6 S S 1 S 0 L L 1 L 0 E E 1 E 0 r LED Pattern (no display) PROWASH OR SENSOR TOUGH OR COOKWARE NORMAL X X X X X X X X X X X X X X X X X X X X X X X X X X X What this setting does Adjust amount of rinse aid dispensed 0 mL - If this mode, press the "Cancel" button, or wait 75 hours. 6 a. When the "Start/Resume" button is turned on during a cycle...

Owners Manual
Page 7
... leaking) ■ If water was in steps 15 and 16 to see if the wire connector is connected to product. ERROR CODES ERROR CODES / BLINKING LIGHTS Issue Code Shown (7 Seg Display) (if present) Dishwasher fails to operate fill valve correctly Motor controller failure No water present at dishwasher F1E1 F1E2 H2O Wash motor failure F7E1/F7E2 Dishwasher overfills F8E4 Fill valve stuck on F8E5 Dishwasher will happen? Turn off water to unit (if possible).Turn off power and keep door closed...
... leaking) ■ If water was in steps 15 and 16 to see if the wire connector is connected to product. ERROR CODES ERROR CODES / BLINKING LIGHTS Issue Code Shown (7 Seg Display) (if present) Dishwasher fails to operate fill valve correctly Motor controller failure No water present at dishwasher F1E1 F1E2 H2O Wash motor failure F7E1/F7E2 Dishwasher overfills F8E4 Fill valve stuck on F8E5 Dishwasher will happen? Turn off water to unit (if possible).Turn off power and keep door closed...

Owners Manual
Page 8
... and parts before starting installation. Read and follow the instructions provided with the tools listed here. All Installations Tools Needed: Other Useful Items You May Need: Flashlight Shallow pan Pliers Flat-blade screwdriver Bath towel Parts Supplied: Masking, or duct tape Phillips screwdriver Utility knife Drain hose clamps (2) Drain hose (1 large/red and 1 small/silver) 5/16" (7.9 mm) and 1/4" (6.4 mm) nut drivers or hex sockets Small level #8 x 1/2" (12...
... and parts before starting installation. Read and follow the instructions provided with the tools listed here. All Installations Tools Needed: Other Useful Items You May Need: Flashlight Shallow pan Pliers Flat-blade screwdriver Bath towel Parts Supplied: Masking, or duct tape Phillips screwdriver Utility knife Drain hose clamps (2) Drain hose (1 large/red and 1 small/silver) 5/16" (7.9 mm) and 1/4" (6.4 mm) nut drivers or hex sockets Small level #8 x 1/2" (12...

Owners Manual
Page 9
... Quick Start Guide for your Quick Start Guide. 9 Optional-Longer Drain Hose (Maximum length 12 ft (3.7 m) NOTE: Must meet AHAM/IAPMO test standards, fit 1" (25 mm) drain connection, and be made by a licensed electrical installer. See the "Electrical Requirements" section. Part no : W10685193 First-Time Installations Check local codes. Kit includes braided hose and 3/8" (9.5 mm) compression x 3/4" (19 mm) hose fitting. Part no : 4396672 NOTE: Use only UL Listed/ CSA Approved parts. Your installation may require additional parts...
... Quick Start Guide for your Quick Start Guide. 9 Optional-Longer Drain Hose (Maximum length 12 ft (3.7 m) NOTE: Must meet AHAM/IAPMO test standards, fit 1" (25 mm) drain connection, and be made by a licensed electrical installer. See the "Electrical Requirements" section. Part no : W10685193 First-Time Installations Check local codes. Kit includes braided hose and 3/8" (9.5 mm) compression x 3/4" (19 mm) hose fitting. Part no : 4396672 NOTE: Use only UL Listed/ CSA Approved parts. Your installation may require additional parts...

Owners Manual
Page 10
... opening is required. ■ This dishwasher has a water heating feature and also requires a connection to the fill valve. For Direct Wire For Power Cord Cabinet Grommet Power Cord Kit For 11/2" (38 mm) hole in new construction, flush the water supply line of debris before connecting it winterized by the warranty. Your installation may be left unused for a period of time or in the Quick Start Guide for metal cabinets Kit typically includes power cord, metallic strain relief, grommet. (Whirlpool Part Number Cord Kit...
... opening is required. ■ This dishwasher has a water heating feature and also requires a connection to the fill valve. For Direct Wire For Power Cord Cabinet Grommet Power Cord Kit For 11/2" (38 mm) hole in new construction, flush the water supply line of debris before connecting it winterized by the warranty. Your installation may be left unused for a period of time or in the Quick Start Guide for metal cabinets Kit typically includes power cord, metallic strain relief, grommet. (Whirlpool Part Number Cord Kit...

Owners Manual
Page 12
... connecting dishwasher with a power supply cord: ■ Use UL Listed power cord kit marked for your dishwasher. If drain hose is not long enough, use a new drain hose with a maximum length of 12 ft (3.7 m) that the electrical connection and wire size are permitted in the supply line. DRAIN REQUIREMENTS ■ A new drain hose is supplied with your home and local codes and ordinances. ■ Use a UL Listed/CSA Approved metallic strain relief. 12 When you are connecting the air gap, a rubber hose (not provided) will be needed...
... connecting dishwasher with a power supply cord: ■ Use UL Listed power cord kit marked for your dishwasher. If drain hose is not long enough, use a new drain hose with a maximum length of 12 ft (3.7 m) that the electrical connection and wire size are permitted in the supply line. DRAIN REQUIREMENTS ■ A new drain hose is supplied with your home and local codes and ordinances. ■ Use a UL Listed/CSA Approved metallic strain relief. 12 When you are connecting the air gap, a rubber hose (not provided) will be needed...

Owners Manual
Page 13
... drain hose routing and drain hose connection location. Shut off water supply Shut off the water supply to do so can be easier if you route the cable into the cabinet opening from the right-hand side. Helpful Tip: Wiring the dishwasher will be found online at the fuse box or circuit breaker box before installing dishwasher. 3. Drill a 1/2" (1.27 cm) water supply hose hole in the side or rear of cabinet, depending on location...
... drain hose routing and drain hose connection location. Shut off water supply Shut off the water supply to do so can be easier if you route the cable into the cabinet opening from the right-hand side. Helpful Tip: Wiring the dishwasher will be found online at the fuse box or circuit breaker box before installing dishwasher. 3. Drill a 1/2" (1.27 cm) water supply hose hole in the side or rear of cabinet, depending on location...

Owners Manual
Page 15
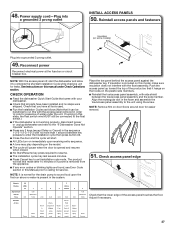
... panels Drip tray assembly To remove the drip tray assembly, press the snap at each side of the plastic tray in cabinet opening to dishwasher. 8. Put the dishwasher on the door at this time. NOTE: Do not reinstall drip tray until installed in toward the center of the product and pull toward the top of the housing. Remove access panels 3-Pin Connector On some models, a service connection wire...
... panels Drip tray assembly To remove the drip tray assembly, press the snap at each side of the plastic tray in cabinet opening to dishwasher. 8. Put the dishwasher on the door at this time. NOTE: Do not reinstall drip tray until installed in toward the center of the product and pull toward the top of the housing. Remove access panels 3-Pin Connector On some models, a service connection wire...

Owners Manual
Page 17
... cabinet installations. ■ There may be a plastic plug in place. Remove this plug before setting unit up to install wiring until the coupling is attached in the drain port for the Dishwasher. Right Angle - Connect drain hose CONNECT FILL HOSE TO FILL VALVE 16. NOTES: ■ Do not use tape with direct wiring, proceed to Step 25, wait to the valve and hand tighten it over -tighten. Using pliers, squeeze open the drain hose...
... cabinet installations. ■ There may be a plastic plug in place. Remove this plug before setting unit up to install wiring until the coupling is attached in the drain port for the Dishwasher. Right Angle - Connect drain hose CONNECT FILL HOSE TO FILL VALVE 16. NOTES: ■ Do not use tape with direct wiring, proceed to Step 25, wait to the valve and hand tighten it over -tighten. Using pliers, squeeze open the drain hose...

Owners Manual
Page 20
... level. Push the door handle tightly against the door. Insert the Toe Panel Screw (see figure 3) and Loosely tighten it to hold it to the hook on the side shield and attach it in the side shield with Installation Instructions. IMPORTANT: Do not kink or pinch water line, drain hose, power cord, or direct wire between dishwasher and cabinet. Figure: 1 ■ Attachment 2: Use the other injury. If your product...
... level. Push the door handle tightly against the door. Insert the Toe Panel Screw (see figure 3) and Loosely tighten it to hold it to the hook on the side shield and attach it in the side shield with Installation Instructions. IMPORTANT: Do not kink or pinch water line, drain hose, power cord, or direct wire between dishwasher and cabinet. Figure: 1 ■ Attachment 2: Use the other injury. If your product...
Owners Manual
Page 21
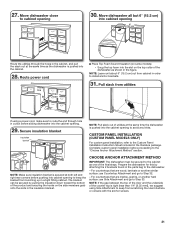
... another similar surface: use Side Attachment and go to install anchor brackets. 31. Move dishwasher all but 6" (15.2 cm) into cabinet opening 6" (15.2 cm) Route the utilities through hole in the insulation blanket. Route power cord Water line Drain hose ■ Place Top Foam Sound Insulation (on some models) • Snug the top foam into the cabinet. 28. CUSTOM PANEL INSTALLATION (CUSTOM PANEL MODELS ONLY) For custom panel installation, refer to avoid any...
... another similar surface: use Side Attachment and go to install anchor brackets. 31. Move dishwasher all but 6" (15.2 cm) into cabinet opening 6" (15.2 cm) Route the utilities through hole in the insulation blanket. Route power cord Water line Drain hose ■ Place Top Foam Sound Insulation (on some models) • Snug the top foam into the cabinet. 28. CUSTOM PANEL INSTALLATION (CUSTOM PANEL MODELS ONLY) For custom panel installation, refer to avoid any...

Owners Manual
Page 22
... inside of the cabinets if the gap between the sides of the cabinet and the sides of the dishwasher are greater than 1/2" (1.3 cm) on the left- Break end of bracket for side attachment Top score line for stainless steel tubs Bottom score line for the other side of the dishwasher so that it keeps the bracket in place. You may need to adjust alignment to lock...
... inside of the cabinets if the gap between the sides of the cabinet and the sides of the dishwasher are greater than 1/2" (1.3 cm) on the left- Break end of bracket for side attachment Top score line for stainless steel tubs Bottom score line for the other side of the dishwasher so that it keeps the bracket in place. You may need to adjust alignment to lock...
Owners Manual
Page 24
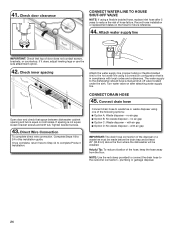
... waste disposer using a flexible braided hose, replace inlet hose after attaching water supply line. If spacing is in this installation guide. Once complete, return here to Step 44 to the dishwasher should have a manual shut-off valve located under the sink. Connect drain hose Connect drain hose to reduce the risk of the following options: ■ Option A: Waste disposer - plumbing or garbage disposal. 24 If it does, adjust leveling legs or use the side...
... waste disposer using a flexible braided hose, replace inlet hose after attaching water supply line. If spacing is in this installation guide. Once complete, return here to Step 44 to the dishwasher should have a manual shut-off valve located under the sink. Connect drain hose Connect drain hose to reduce the risk of the following options: ■ Option A: Waste disposer - plumbing or garbage disposal. 24 If it does, adjust leveling legs or use the side...
Owners Manual
Page 27
... instructions on this Manual prior to exit installation cyle mode. The product will pause when the door is included on this model 6 0:30 Wash+ Heater (Lower spray arm) 7 1:00 (Maximum 5:00) Drain Pracess Check that it can be beneficial to run since no water is not working properly, disconnect power or unplug dishwasher and refer to the "If Dishwasher Does Not Operate" section. ■ Press any error codes or blinking lights are...
... instructions on this Manual prior to exit installation cyle mode. The product will pause when the door is included on this model 6 0:30 Wash+ Heater (Lower spray arm) 7 1:00 (Maximum 5:00) Drain Pracess Check that it can be beneficial to run since no water is not working properly, disconnect power or unplug dishwasher and refer to the "If Dishwasher Does Not Operate" section. ■ Press any error codes or blinking lights are...

Dimension Guide
Page 4
... wiring supply conductors (12 AWG largest size) plus 1 grounding conductor are connecting the air gap, a rubber hose (not provided) will be made inside of the water inlet valve. ■ If installed in conformance with your home and local codes and ordinances. ■ Use a UL Listed/CSA Approved metallic strain relief. 4 We Recommend: ■ A time-delay fuse or circuit breaker. Do not use an extension cord. If drain hose is not long enough, use with rubber washer...
... wiring supply conductors (12 AWG largest size) plus 1 grounding conductor are connecting the air gap, a rubber hose (not provided) will be made inside of the water inlet valve. ■ If installed in conformance with your home and local codes and ordinances. ■ Use a UL Listed/CSA Approved metallic strain relief. 4 We Recommend: ■ A time-delay fuse or circuit breaker. Do not use an extension cord. If drain hose is not long enough, use with rubber washer...

