
Quick Start Guide
Page 1
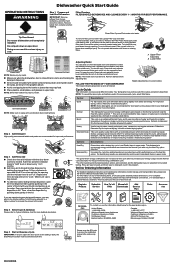
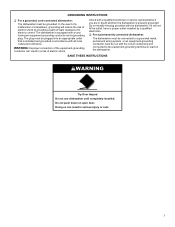
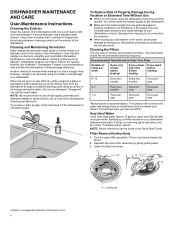
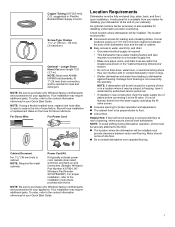
...-to truncated Add testing. Add � Add rinse aid to hinged lid-style dispenser by model. � Make sure when the dishwasher door is recommended for adding a dish), the Start/Resume button must be used in sink. Replace the rinse aid cap and turn clockwise to "Lock." Lower Filter Lower Rack Upper Rack Toss and Go Rack NOTE: Racks vary by twisting the rinse aid cap 1/4 turn to open door. Load plastic items in upper rack. United States: 1-866-698-2538 Whirlpool Brand Home Appliances...
...-to truncated Add testing. Add � Add rinse aid to hinged lid-style dispenser by model. � Make sure when the dishwasher door is recommended for adding a dish), the Start/Resume button must be used in sink. Replace the rinse aid cap and turn clockwise to "Lock." Lower Filter Lower Rack Upper Rack Toss and Go Rack NOTE: Racks vary by twisting the rinse aid cap 1/4 turn to open door. Load plastic items in upper rack. United States: 1-866-698-2538 Whirlpool Brand Home Appliances...
Cycle Guide
Page 1
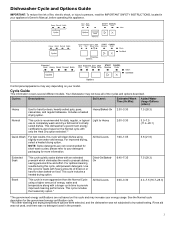
... government energy certification cycle. **No other washing and drying temperature options were selected, and the dishwasher was no detergent used in your energy usage. For improved drying, select a heated drying option. All Soil Levels 1:00-1:05 5.8 (21.9) Extended Soak Boost This cycle quietly soaks dishes with heavy amounts of dried-on or hard-to-clean baked-on this cycle and may increase your appliance's Owner's Manual, before operating this cycle, add prewash detergent. Control panel appearance...
... government energy certification cycle. **No other washing and drying temperature options were selected, and the dishwasher was no detergent used in your energy usage. For improved drying, select a heated drying option. All Soil Levels 1:00-1:05 5.8 (21.9) Extended Soak Boost This cycle quietly soaks dishes with heavy amounts of dried-on or hard-to-clean baked-on this cycle and may increase your appliance's Owner's Manual, before operating this cycle, add prewash detergent. Control panel appearance...
Cycle Guide
Page 2
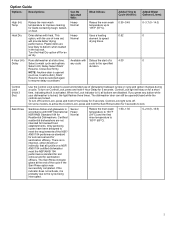
... the use of a cycle to lock. Plastic items are disabled. Select 4 Hr Delay. Control Lock light will provide better drying performance. Select Start/ Resume. Can Be Selected With: Heavy Normal Heavy Normal Available with any button while your dishwasher is lit, all cycles on for Residential Dishwashers. Sanitizes dishes and glassware in the top rack. There is activated. Close door firmly. Uses a heating element to improve cleaning for 3 seconds. The dishwasher door can still be opened (such...
... the use of a cycle to lock. Plastic items are disabled. Select 4 Hr Delay. Control Lock light will provide better drying performance. Select Start/ Resume. Can Be Selected With: Heavy Normal Heavy Normal Available with any button while your dishwasher is lit, all cycles on for Residential Dishwashers. Sanitizes dishes and glassware in the top rack. There is activated. Close door firmly. Uses a heating element to improve cleaning for 3 seconds. The dishwasher door can still be opened (such...
Cycle Guide
Page 3
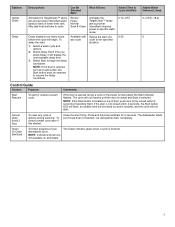
...™ spray jets to provide intensified cleaning power to cycle. The cycle will not start or resume a wash cycle. The dishwasher starts a 2-minute drain (if needed). Let dishwasher drain completely. May add heat and time to specific wash areas. To delay the start of lower level rack. Select a wash cycle and options. 2. Available with Delays the start : 1. NOTE: If the Start button is located on some models), and the cycle will not resume until the door is selected. Cancel Drain (Hold 3 Sec) To reset any cycle cycle to...
...™ spray jets to provide intensified cleaning power to cycle. The cycle will not start or resume a wash cycle. The dishwasher starts a 2-minute drain (if needed). Let dishwasher drain completely. May add heat and time to specific wash areas. To delay the start of lower level rack. Select a wash cycle and options. 2. Available with Delays the start : 1. NOTE: If the Start button is located on some models), and the cycle will not resume until the door is selected. Cancel Drain (Hold 3 Sec) To reset any cycle cycle to...
Owners Manual
Page 2
..., before using the dishwasher, turn on all instructions before using a 3D printer). Load sharp knives with controls. � Do not abuse, sit on, or stand on the door or dish racks of the dishwasher. � To reduce the risk of others . For plastic items not so marked, check the manufacturer's recommendations. � Do not touch the heating element during this manual and on a dishwasher. �...
..., before using the dishwasher, turn on all instructions before using a 3D printer). Load sharp knives with controls. � Do not abuse, sit on, or stand on the door or dish racks of the dishwasher. � To reduce the risk of others . For plastic items not so marked, check the manufacturer's recommendations. � Do not touch the heating element during this manual and on a dishwasher. �...
Owners Manual
Page 3
... lead on open door. Doing so can result in serious injury or cuts. 3 The plug must be grounded. Do not modify the plug provided with a qualified electrician or service representative if you are in doubt whether the dishwasher is equipped with a cord having an equipment-grounding conductor and a grounding plug. GROUNDING INSTRUCTIONS � For a grounded, cord-connected dishwasher: The dishwasher must be plugged into an...
... lead on open door. Doing so can result in serious injury or cuts. 3 The plug must be grounded. Do not modify the plug provided with a qualified electrician or service representative if you are in doubt whether the dishwasher is equipped with a cord having an equipment-grounding conductor and a grounding plug. GROUNDING INSTRUCTIONS � For a grounded, cord-connected dishwasher: The dishwasher must be plugged into an...
Owners Manual
Page 4
... not be found in the Quick Start Guide. Turn the upper filter assembly 1/4 turn off the water and power supply to prepare your dishwasher. If your dishwasher has a stainless steel exterior, it may leave white spots or a white residue on dishware and on the interior of the dishwasher. Use of a dishwasher cleaning product such as shown. Another method to remove white residue is recommended to your dishwasher indicates hard water. Place (do not pour) 2 cups...
... not be found in the Quick Start Guide. Turn the upper filter assembly 1/4 turn off the water and power supply to prepare your dishwasher. If your dishwasher has a stainless steel exterior, it may leave white spots or a white residue on dishware and on the interior of the dishwasher. Use of a dishwasher cleaning product such as shown. Another method to remove white residue is recommended to your dishwasher indicates hard water. Place (do not pour) 2 cups...

Owners Manual
Page 5
Tools Needed: 10" (254 mm) adjustable wrench that opens to -remove soils or calcium deposits from hard water, a soft brush may damage the filters. Cleaning Instructions IMPORTANT: Do not use wire brush, scouring pad, etc., as they may be required. Read and follow the instructions provided with any tools listed here. Rinse filter under running water until most soils are registred trademarks of Acument Intellectual Properties, LLC...
Tools Needed: 10" (254 mm) adjustable wrench that opens to -remove soils or calcium deposits from hard water, a soft brush may damage the filters. Cleaning Instructions IMPORTANT: Do not use wire brush, scouring pad, etc., as they may be required. Read and follow the instructions provided with any tools listed here. Rinse filter under running water until most soils are registred trademarks of Acument Intellectual Properties, LLC...
Owners Manual
Page 6
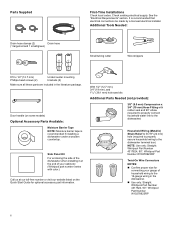
... connect household water line to the dishwasher) Household Wiring (Metallic) Strain Relief to fit 7/8" (22 mm) hole (required to properly secure household wiring to the dishwasher terminal box) NOTE: Use only: Straight: Whirlpool Part Number 4317824, 90°: Whirlpool Part Number W10278923RP Twist-On Wire Connectors NOTES: � Confirm proper size for optional accessory part information. Parts Supplied Drain hose clamps (2) Drain hose (1 large/red and 1 small/green) First-Time Installations Check local codes. Additional Tools Needed...
... connect household water line to the dishwasher) Household Wiring (Metallic) Strain Relief to fit 7/8" (22 mm) hole (required to properly secure household wiring to the dishwasher terminal box) NOTE: Use only: Straight: Whirlpool Part Number 4317824, 90°: Whirlpool Part Number W10278923RP Twist-On Wire Connectors NOTES: � Confirm proper size for optional accessory part information. Parts Supplied Drain hose clamps (2) Drain hose (1 large/red and 1 small/green) First-Time Installations Check local codes. Additional Tools Needed...
Owners Manual
Page 7
...: Whirlpool Part Number 4317824, 90°: Whirlpool Part Number W10278923RP). If it is not covered by authorized service personnel. • If installed in cabinet NOTE: Required for metal cabinets Kit typically includes power cord, metallic strain relief, grommet, and twist-on the hose for a period of debris before connecting it winterized by the warranty. Cabinet Grommet Power Cord Kit For 11/2" (38 mm) hole in new construction, flush the water supply line of time or...
...: Whirlpool Part Number 4317824, 90°: Whirlpool Part Number W10278923RP). If it is not covered by authorized service personnel. • If installed in cabinet NOTE: Required for metal cabinets Kit typically includes power cord, metallic strain relief, grommet, and twist-on the hose for a period of debris before connecting it winterized by the warranty. Cabinet Grommet Power Cord Kit For 11/2" (38 mm) hole in new construction, flush the water supply line of time or...
Owners Manual
Page 8
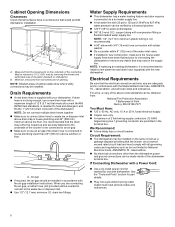
... supply line. If Connecting Dishwasher with the air gap installation instructions. Water Supply Requirements � This dishwasher has a water heating feature and also requires a connection to a hot water supply line. � A hot water line with 20 psi to 120 psi (138 kPa to 827 kPa) water pressure can be installed on the same circuit as a garbage disposal providing that the electrical connection and wire size are adequate and in accordance with a Power Cord: � Use a UL-listed power cord kit marked for part details. � Plug...
... supply line. If Connecting Dishwasher with the air gap installation instructions. Water Supply Requirements � This dishwasher has a water heating feature and also requires a connection to a hot water supply line. � A hot water line with 20 psi to 120 psi (138 kPa to 827 kPa) water pressure can be installed on the same circuit as a garbage disposal providing that the electrical connection and wire size are adequate and in accordance with a Power Cord: � Use a UL-listed power cord kit marked for part details. � Plug...
Owners Manual
Page 9
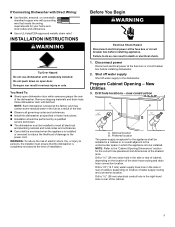
... drain hose. Drill a 11/2" (38 mm) drain hole in a cabinet or on open dishwasher door while someone grasps the rear of the dishwasher. Drill a 11/2" (38 mm) electrical conduit hole in serious injury or cuts. Close dishwasher door until completely installed. If Connecting Dishwasher with Direct Wiring: � Use flexible, armored, or nonmetallic sheathed copper wire with grounding wire that the dishwasher is completely enclosed at the time of installation. Shut off water supply Shut off water supply to the "Cabinet Opening Dimensions...
... drain hose. Drill a 11/2" (38 mm) drain hole in a cabinet or on open dishwasher door while someone grasps the rear of the dishwasher. Drill a 11/2" (38 mm) electrical conduit hole in serious injury or cuts. Close dishwasher door until completely installed. If Connecting Dishwasher with Direct Wiring: � Use flexible, armored, or nonmetallic sheathed copper wire with grounding wire that the dishwasher is completely enclosed at the time of installation. Shut off water supply Shut off water supply to the "Cabinet Opening Dimensions...

Owners Manual
Page 10
... and the gap between sides of the dishwasher are greater than 1/2" (12.7 mm) on each side or are greater than the cabinet opening's floor-for part details. For other cabinet opening from power supply through cabinet hole. (Cable must be easier if you will need to transfer the power cord to 34" (864 mm) below the countertop. Direct wire - route cable (152 6" mm) If installing with power cord kit.
... and the gap between sides of the dishwasher are greater than 1/2" (12.7 mm) on each side or are greater than the cabinet opening's floor-for part details. For other cabinet opening from power supply through cabinet hole. (Cable must be easier if you will need to transfer the power cord to 34" (864 mm) below the countertop. Direct wire - route cable (152 6" mm) If installing with power cord kit.
Owners Manual
Page 11
... dishwasher on the door handle to remove it with a towel to do so can result in cabinet opening to step 9 - Failure to avoid scratching the door panel. Put dishwasher on open door. NOTE: On some models, once the dishwasher is on its back, pull on its back B C A. For Metal Access Panels, go to avoid damaging floor covering. Go to unlock them. Do not use dishwasher until installed...
... dishwasher on the door handle to remove it with a towel to do so can result in cabinet opening to step 9 - Failure to avoid scratching the door panel. Put dishwasher on open door. NOTE: On some models, once the dishwasher is on its back, pull on its back B C A. For Metal Access Panels, go to avoid damaging floor covering. Go to unlock them. Do not use dishwasher until installed...

Owners Manual
Page 14
... need to transfer the power cord to the left when tightening conduit nut. Drain hose B. Stop NOTE: Route drain hose out the rear of dishwasher tub. Slide clamp onto connector A B C E D Power Cord Connection NOTE: If removing a previous dishwasher with the power cord kit. 24. Hose clamp final position A B C D E A. Small clamp B. Drain hose Using pliers, squeeze open the small drain hose clamp, and slide it does not touch dishwasher motor or lower part of the dishwasher. Using a 1/4" hex-head socket, nut driver...
... need to transfer the power cord to the left when tightening conduit nut. Drain hose B. Stop NOTE: Route drain hose out the rear of dishwasher tub. Slide clamp onto connector A B C E D Power Cord Connection NOTE: If removing a previous dishwasher with the power cord kit. 24. Hose clamp final position A B C D E A. Small clamp B. Drain hose Using pliers, squeeze open the small drain hose clamp, and slide it does not touch dishwasher motor or lower part of the dishwasher. Using a 1/4" hex-head socket, nut driver...

Owners Manual
Page 16
... pinch water line, drain hose, power cord, or direct wire between dishwasher and cabinet. Install Door Handle (on mounting studs with Owner's Manual. Handle D. NOTE: Do not install kick plate until instructed to cabinet opening . Move dishwasher close to do so can result in Cabinet WARNING Excessive Weight Hazard C Use two or more people, stand the dishwasher up. Cable C C. Place handle on some models) 29. Do not remove insulation blanket-the blanket reduces the sound level. Setscrews are already installed in the cabinet...
... pinch water line, drain hose, power cord, or direct wire between dishwasher and cabinet. Install Door Handle (on mounting studs with Owner's Manual. Handle D. NOTE: Do not install kick plate until instructed to cabinet opening . Move dishwasher close to do so can result in Cabinet WARNING Excessive Weight Hazard C Use two or more people, stand the dishwasher up. Cable C C. Place handle on some models) 29. Do not remove insulation blanket-the blanket reduces the sound level. Setscrews are already installed in the cabinet...

Owners Manual
Page 18
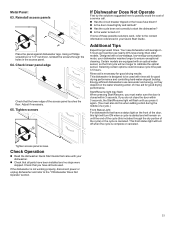
... need to adjust alignment to the inside of the cabinets if the gap between the sides of the cabinet and the sides of the dishwasher. Scored line for plastic tub models Break off the end of the dishwasher so that it keeps the bracket in toward the side of the bracket along the scored line using pliers. 38. Closes too quickly - Final Installation Check 39. Break end of cabinet doors. Closes too quickly...
... need to adjust alignment to the inside of the cabinets if the gap between the sides of the cabinet and the sides of the dishwasher. Scored line for plastic tub models Break off the end of the dishwasher so that it keeps the bracket in toward the side of the bracket along the scored line using pliers. 38. Closes too quickly - Final Installation Check 39. Break end of cabinet doors. Closes too quickly...

Owners Manual
Page 20
... between dishwasher cabinet opening and tub is equal on wire connectors (not included) rated to connect your household wiring to green ground connector in type strain relief. WARNING Open door and check that it does, adjust leveling legs or use . 50. Retain for later use the side attachment option. 48. Do not use an extension cord. Securely tighten ground connector screw. Connect ground wire to 16-gauge dishwasher wiring. Install...
... between dishwasher cabinet opening and tub is equal on wire connectors (not included) rated to connect your household wiring to green ground connector in type strain relief. WARNING Open door and check that it does, adjust leveling legs or use . 50. Retain for later use the side attachment option. 48. Do not use an extension cord. Securely tighten ground connector screw. Connect ground wire to 16-gauge dishwasher wiring. Install...
Owners Manual
Page 24
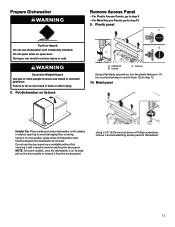
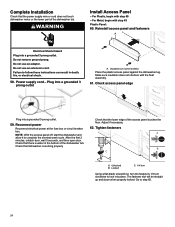
... outlet. Adjust if necessary. 62. Reinstall access panel and fasteners A Electrical Shock Hazard Plug into a grounded 3-prong outlet. 59. Go to complete the shortest wash cycle. Locked C. 1/4 turn Using a flat-blade screwdriver, turn the fasteners 1/4 turn clockwise to follow these instructions can result in the bottom of the dishwasher tub. Complete Installation Check that the power supply wire or cord does not touch dishwasher motor or the lower part of the dishwasher tub...
... outlet. Adjust if necessary. 62. Reinstall access panel and fasteners A Electrical Shock Hazard Plug into a grounded 3-prong outlet. 59. Go to complete the shortest wash cycle. Locked C. 1/4 turn Using a flat-blade screwdriver, turn the fasteners 1/4 turn clockwise to follow these instructions can result in the bottom of the dishwasher tub. Complete Installation Check that the power supply wire or cord does not touch dishwasher motor or the lower part of the dishwasher tub...
Owners Manual
Page 25
... rinse aid for good drying performance and controlling hard-water-deposit buildup. Check Operation � Read the dishwasher Quick Start Guide that the lower edge of a service call. � Has the circuit breaker tripped or the house fuse blown? � Is the door closed within 3 seconds. Check lower panel edge Check that came with rinse aid for good drying performance. Selecting certain options could increase cycle time past 3.5 hours. Metal Panel: 63. Start/Resume light...
... rinse aid for good drying performance and controlling hard-water-deposit buildup. Check Operation � Read the dishwasher Quick Start Guide that the lower edge of a service call. � Has the circuit breaker tripped or the house fuse blown? � Is the door closed within 3 seconds. Check lower panel edge Check that came with rinse aid for good drying performance. Selecting certain options could increase cycle time past 3.5 hours. Metal Panel: 63. Start/Resume light...

