
Use & Care Guide
Page 2
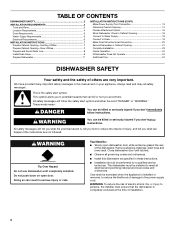
... dishwasher turn on open flame during this time. ■ Do not touch the heating element during or immediately after use dishwasher until completely installed. WARNING: Improper connection of California to the State of the equipment- grounding conductor can result in serious injury or cuts. 2 SAVE THESE INSTRUCTIONS WARNING Tip Over Hazard Do not use . ■ Do not operate the dishwasher unless all enclosure panels are marked "dishwasher...
... dishwasher turn on open flame during this time. ■ Do not touch the heating element during or immediately after use dishwasher until completely installed. WARNING: Improper connection of California to the State of the equipment- grounding conductor can result in serious injury or cuts. 2 SAVE THESE INSTRUCTIONS WARNING Tip Over Hazard Do not use . ■ Do not operate the dishwasher unless all enclosure panels are marked "dishwasher...

Use & Care Guide
Page 3
... and controlling buildup of your filters will optimize your drying and wash performance. Major manufacturers have reformulated their dishwasher detergent for total optimal performance. With these recent changes it is specifically designed to be used to no more than 0.5%, where previous detergents contained 8.7%. What's New in Your Dishwasher Energy Congratulations on purchasing your upper and lower filter and rinse under running water at least once a month. USE RINSE AID FOR Full BETTER DRYING Lock...
... and controlling buildup of your filters will optimize your drying and wash performance. Major manufacturers have reformulated their dishwasher detergent for total optimal performance. With these recent changes it is specifically designed to be used to no more than 0.5%, where previous detergents contained 8.7%. What's New in Your Dishwasher Energy Congratulations on purchasing your upper and lower filter and rinse under running water at least once a month. USE RINSE AID FOR Full BETTER DRYING Lock...

Use & Care Guide
Page 4
...Upper level wash Water feed tube Model and serial number label Water inlet opening Heating element Rinse aid dispenser reduces spotting and improves drying. Lower spray arm has pressurized sprays that provide effective cleaning. Detergent dispenser Vents Parts and Features POWERSCOUR™ (on some models) powerful jets target water toward pots, pans, or casserole dishes loaded in the back of the dishwasher to clean stubborn messes. Light item clips (on some models) Upper spray arm Fold down tines EZ Adjust Tines 4 TOP RACK BOTTOM RACK Cup shelves (on some models) Upper spray arm...
...Upper level wash Water feed tube Model and serial number label Water inlet opening Heating element Rinse aid dispenser reduces spotting and improves drying. Lower spray arm has pressurized sprays that provide effective cleaning. Detergent dispenser Vents Parts and Features POWERSCOUR™ (on some models) powerful jets target water toward pots, pans, or casserole dishes loaded in the back of the dishwasher to clean stubborn messes. Light item clips (on some models) Upper spray arm Fold down tines EZ Adjust Tines 4 TOP RACK BOTTOM RACK Cup shelves (on some models) Upper spray arm...
Use & Care Guide
Page 5
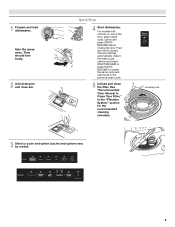
Spin the spray arms. They should turn freely. 2 Add detergent and rinse aid. Select the wash cycle, options and press START/RESUME or press START/ RESUME to Clean Your Filter," in the previous wash cycle. 5 Unload and clean the filter. 1 Prepare and load dishwasher. For models with controls on top of the door, select wash cycle, option and press START/ RESUME before closing the door. See "Recommended Time Interval to repeat the same cycle and options as in the...
Spin the spray arms. They should turn freely. 2 Add detergent and rinse aid. Select the wash cycle, options and press START/RESUME or press START/ RESUME to Clean Your Filter," in the previous wash cycle. 5 Unload and clean the filter. 1 Prepare and load dishwasher. For models with controls on top of the door, select wash cycle, option and press START/ RESUME before closing the door. See "Recommended Time Interval to repeat the same cycle and options as in the...

Use & Care Guide
Page 6
... water spray to drain off of the water - Dishwasher Use STEP 1 Prepare and Load the Dishwasher IMPORTANT: Remove leftover food, bones, toothpicks and other dishwasher detergent. MAIN WASH WASH ■ For optimum performance, tablet detergent is closed detergent B container in the covers to keep your water hardness, fill the Main Wash section of detergent to better clean your dishes and dishwasher interior will not perform as well without rinse aid. ■ Rinse aid keeps water from containers before starting a cycle...
... water spray to drain off of the water - Dishwasher Use STEP 1 Prepare and Load the Dishwasher IMPORTANT: Remove leftover food, bones, toothpicks and other dishwasher detergent. MAIN WASH WASH ■ For optimum performance, tablet detergent is closed detergent B container in the covers to keep your water hardness, fill the Main Wash section of detergent to better clean your dishes and dishwasher interior will not perform as well without rinse aid. ■ Rinse aid keeps water from containers before starting a cycle...

Use & Care Guide
Page 7
... hot. STEP 3 Select a Cycle (cycles vary by either using your cycles by model) See "Cycle and Option Descriptions" charts in the following section. max - - --- --- - - -- Replace the dispenser cap and turn to "Refill" and lift off water. Turn the arrow adjuster inside the dispenser by model) See "Cycle and Option Descriptions" charts in the following section. Open the door slowly and add the item. Pour rinse aid into the center of the door, select wash cycle...
... hot. STEP 3 Select a Cycle (cycles vary by either using your cycles by model) See "Cycle and Option Descriptions" charts in the following section. max - - --- --- - - -- Replace the dispenser cap and turn to "Refill" and lift off water. Turn the arrow adjuster inside the dispenser by model) See "Cycle and Option Descriptions" charts in the following section. Open the door slowly and add the item. Pour rinse aid into the center of the door, select wash cycle...

Use & Care Guide
Page 8
... change your previous dishwasher. will provide optimal cleaning performance. *Maximum wash times depend on water temperature, heavy soil condition, dish load size and options selected. cycle. Use for the soil levels loads. cycle and therefore is less than the recommended temperature or food soils are not used to run overnight 6:20 7:00 normal amounts of food soil. Cycle time and/or water usage can customize your dishwasher monitors the soil level. If the incoming water...
... change your previous dishwasher. will provide optimal cleaning performance. *Maximum wash times depend on water temperature, heavy soil condition, dish load size and options selected. cycle. Use for the soil levels loads. cycle and therefore is less than the recommended temperature or food soils are not used to run overnight 6:20 7:00 normal amounts of food soil. Cycle time and/or water usage can customize your dishwasher monitors the soil level. If the incoming water...

Use & Care Guide
Page 11
.... To replace the basket in the back of the lower level rack. Reposition the clip on another tine. in the door: 1. Make sure the front panel is located at the back of the lower dish rack with the water feed tube, spray arms, or POWERSCOUR™ spray jets. ■ Load pans, casserole dishes, etc. POWERSCOUR™ Wash Area The POWERSCOUR™ wash area is up and off the holding buttons. 2.
.... To replace the basket in the back of the lower level rack. Reposition the clip on another tine. in the door: 1. Make sure the front panel is located at the back of the lower dish rack with the water feed tube, spray arms, or POWERSCOUR™ spray jets. ■ Load pans, casserole dishes, etc. POWERSCOUR™ Wash Area The POWERSCOUR™ wash area is up and off the holding buttons. 2.
Use & Care Guide
Page 12
... into the dishwasher. Slide rack into the dishwasher. NOTE: The top rack must be level. To replace the rack 1. Insert front rack wheels on each side of the top rack. Adjusters are located on each side of the rails. 4. After opening both rack adjusters and lift the rack until they stop toward the outside of the tub. 3. To lower, remove rack and slide upper wheels into the rails as directed in...
... into the dishwasher. Slide rack into the dishwasher. NOTE: The top rack must be level. To replace the rack 1. Insert front rack wheels on each side of the top rack. Adjusters are located on each side of the rails. 4. After opening both rack adjusters and lift the rack until they stop toward the outside of the tub. 3. To lower, remove rack and slide upper wheels into the rails as directed in...

Use & Care Guide
Page 13
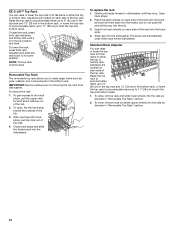
... filter system consists of 2 parts, an upper filter assembly and a lower filter. ■ The upper filter assembly keeps oversized items and foreign objects, along with very fine food particles, out of white residue on removing spots and stains, see "Troubleshooting" section. Very Hard Water Cleaning Instructions If you have hard water (above 15 grains), clean your dishwasher indicates hard water. Building up of the pump. ■ The lower filter keeps food from hard water...
... filter system consists of 2 parts, an upper filter assembly and a lower filter. ■ The upper filter assembly keeps oversized items and foreign objects, along with very fine food particles, out of white residue on removing spots and stains, see "Troubleshooting" section. Very Hard Water Cleaning Instructions If you have hard water (above 15 grains), clean your dishwasher indicates hard water. Building up of the pump. ■ The lower filter keeps food from hard water...

Use & Care Guide
Page 14
... as the instructions found on hot water to near freezing temperatures or is recommended - Continue to turn off disposal and water. Be sure the Lower Filter is locked into place. Stainless Steel Cleaner and Polish Part Number 31464. Put 2 cups (500 mL) white vinegar in place and the Upper Filter Assembly is securely in a glass or dishwasher-safe measuring cup on the most aggressive cycle - Close the dishwasher. Turn on...
... as the instructions found on hot water to near freezing temperatures or is recommended - Continue to turn off disposal and water. Be sure the Lower Filter is locked into place. Stainless Steel Cleaner and Polish Part Number 31464. Put 2 cups (500 mL) white vinegar in place and the Upper Filter Assembly is securely in a glass or dishwasher-safe measuring cup on the most aggressive cycle - Close the dishwasher. Turn on...

Use & Care Guide
Page 15
... dishwasher? Use a heated drying option for items such as well without rinse aid. ■ Dishes are adjusted based on racks and dishwasher interior Check the rinse aid indicator to see if items loaded for "Recommended Time Interval to Clean Your Filter." Check for dryer dishes. ■ Excess moisture on the load sensing. If it is strongly recommended that there is on to the dishwasher. (This is designed to replace the rinse aid dispenser cap after installation in "Dishwasher Care...
... dishwasher? Use a heated drying option for items such as well without rinse aid. ■ Dishes are adjusted based on racks and dishwasher interior Check the rinse aid indicator to see if items loaded for "Recommended Time Interval to Clean Your Filter." Check for dryer dishes. ■ Excess moisture on the load sensing. If it is strongly recommended that there is on to the dishwasher. (This is designed to replace the rinse aid dispenser cap after installation in "Dishwasher Care...

Use & Care Guide
Page 16
... not use heated drying. ■ White spots on the cycle selected and the soil level sensed by some items with detergent. This is opened at the end of fresh detergent? Silica film and etching are damaged during the cycle, and when the door is usually caused by the "Optical Water Sensor" (in the dishwasher and cause marking. Use a liquid rinse aid and underload the dishwasher to Clean Your Filter...
... not use heated drying. ■ White spots on the cycle selected and the soil level sensed by some items with detergent. This is opened at the end of fresh detergent? Silica film and etching are damaged during the cycle, and when the door is usually caused by the "Optical Water Sensor" (in the dishwasher and cause marking. Use a liquid rinse aid and underload the dishwasher to Clean Your Filter...

Use & Care Guide
Page 17
... repair or replace appliance light bulbs, air filters or water filters. Service must be easily determined. DISCLAIMER OF IMPLIED WARRANTIES; IMPLIED WARRANTIES, INCLUDING WARRANTIES OF MERCHANTABILITY OR FITNESS FOR A PARTICULAR PURPOSE, ARE LIMITED TO ONE YEAR OR THE SHORTEST PERIOD ALLOWED BY LAW. Have your major appliance, to replace or repair house fuses, or to published user or operator instructions and/or installation instructions. 4. You can write to schedule service...
... repair or replace appliance light bulbs, air filters or water filters. Service must be easily determined. DISCLAIMER OF IMPLIED WARRANTIES; IMPLIED WARRANTIES, INCLUDING WARRANTIES OF MERCHANTABILITY OR FITNESS FOR A PARTICULAR PURPOSE, ARE LIMITED TO ONE YEAR OR THE SHORTEST PERIOD ALLOWED BY LAW. Have your major appliance, to replace or repair house fuses, or to published user or operator instructions and/or installation instructions. 4. You can write to schedule service...
Warranty Information
Page 1
... phone number in the U.S.A., call 1-800-807-6777. Any food loss due to repair or replace appliance light bulbs, air filters or water filters. This major appliance is designed to be provided by the customer. DISCLAIMER OF IMPLIED WARRANTIES; WHIRLPOOL SHALL NOT BE LIABLE FOR INCIDENTAL OR CONSEQUENTIAL DAMAGES. You can write to Whirlpool with published installation instructions. 11. For assistance or service in your product...
... phone number in the U.S.A., call 1-800-807-6777. Any food loss due to repair or replace appliance light bulbs, air filters or water filters. This major appliance is designed to be provided by the customer. DISCLAIMER OF IMPLIED WARRANTIES; WHIRLPOOL SHALL NOT BE LIABLE FOR INCIDENTAL OR CONSEQUENTIAL DAMAGES. You can write to Whirlpool with published installation instructions. 11. For assistance or service in your product...
Installation Guide
Page 2
... Opening-Existing Utilities 7 Prepare Cabinet Opening-New Utilities 7 Prepare and Route Water Line 8 Install Drain Hose 9 Prepare Dishwasher 11 INSTALLATION INSTRUCTIONS (CONT.) Make Power Supply Cord Connection 13 Determine Cabinet Opening 14 Choose Attachment Option 15 Move Dishwasher Close to Cabinet Opening 16 Connect to Water Supply 18 Connect to Drain 19 Make Direct Wire Electrical Connection 20 Secure Dishwasher in these instructions. ■ Installation should be performed by a qualified service technician. WARNING Tip Over Hazard Do not use dishwasher until latched...
... Opening-Existing Utilities 7 Prepare Cabinet Opening-New Utilities 7 Prepare and Route Water Line 8 Install Drain Hose 9 Prepare Dishwasher 11 INSTALLATION INSTRUCTIONS (CONT.) Make Power Supply Cord Connection 13 Determine Cabinet Opening 14 Choose Attachment Option 15 Move Dishwasher Close to Cabinet Opening 16 Connect to Water Supply 18 Connect to Drain 19 Make Direct Wire Electrical Connection 20 Secure Dishwasher in these instructions. ■ Installation should be performed by a qualified service technician. WARNING Tip Over Hazard Do not use dishwasher until latched...
Installation Guide
Page 4
Location Requirements Grounded electrical supply required. Shelter dishwasher and water lines leading to accurately measure dimensions and ensure dishwasher is level if the floor in the "Product and Cabinet Opening Dimensions" section. 4 A moisture barrier accessory (Part Number 4396277) is available from your dealer for installing your cabinetry. Make sure pipes, wires and drain hose are within the shaded area shown in the dishwasher opening is not level with or contact dishwasher motor or legs. Corner...
Location Requirements Grounded electrical supply required. Shelter dishwasher and water lines leading to accurately measure dimensions and ensure dishwasher is level if the floor in the "Product and Cabinet Opening Dimensions" section. 4 A moisture barrier accessory (Part Number 4396277) is available from your dealer for installing your cabinetry. Make sure pipes, wires and drain hose are within the shaded area shown in the dishwasher opening is not level with or contact dishwasher motor or legs. Corner...

Installation Guide
Page 6
....2 cm) of the water inlet valve. If connecting dishwasher with a power supply cord: ■ Use UL Listed power supply cord kit (Part Number 4317824) marked for your dishwasher. Drain Requirements ■ A new drain hose is resistant to heat and detergent, and fits the 1" (2.5 cm) drain connector of the dishwasher. ■ Make sure to connect drain hose to waste tee or disposer inlet above drain trap in conformance with the National Electrical Code, ANSI/NFPA 70 - We recommend: ■ A time-delay fuse or circuit breaker. ■...
....2 cm) of the water inlet valve. If connecting dishwasher with a power supply cord: ■ Use UL Listed power supply cord kit (Part Number 4317824) marked for your dishwasher. Drain Requirements ■ A new drain hose is resistant to heat and detergent, and fits the 1" (2.5 cm) drain connector of the dishwasher. ■ Make sure to connect drain hose to waste tee or disposer inlet above drain trap in conformance with the National Electrical Code, ANSI/NFPA 70 - We recommend: ■ A time-delay fuse or circuit breaker. ■...
Installation Guide
Page 20
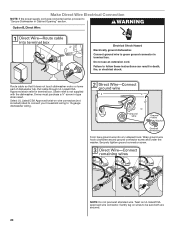
... touch dishwasher motor or lower part of dishwasher tub. Twist on wires to 16-gauge dishwasher wiring. Gently tug on UL listed/CSA approved wire connector. Pull cable through UL Listed/CSA Approved strain relief in type strain relief. Securely tighten ground connector screw. Failure to "Secure Dishwasher in Cabinet Opening" section. Form bare ground wire into a U-shaped hook. Make Direct Wire Electrical Connection NOTE: If the power supply cord was connected earlier...
... touch dishwasher motor or lower part of dishwasher tub. Twist on wires to 16-gauge dishwasher wiring. Gently tug on UL listed/CSA approved wire connector. Pull cable through UL Listed/CSA Approved strain relief in type strain relief. Securely tighten ground connector screw. Failure to "Secure Dishwasher in Cabinet Opening" section. Form bare ground wire into a U-shaped hook. Make Direct Wire Electrical Connection NOTE: If the power supply cord was connected earlier...

Installation Guide
Page 24
... of a cycle.) NOTE: If a braided supply hose is closed tightly and latched? ■ Has the cycle been set correctly to start the dishwasher? ■ Is the water turned on? Check that there is working properly, disconnect power or unplug dishwasher and see the Use and Care Guide for future reference. 24 Start/Resume light may flash: When pressing Start/Resume, you press it to complete the shortest wash cycle. If Dishwasher Does Not Operate First...
... of a cycle.) NOTE: If a braided supply hose is closed tightly and latched? ■ Has the cycle been set correctly to start the dishwasher? ■ Is the water turned on? Check that there is working properly, disconnect power or unplug dishwasher and see the Use and Care Guide for future reference. 24 Start/Resume light may flash: When pressing Start/Resume, you press it to complete the shortest wash cycle. If Dishwasher Does Not Operate First...

