Warranty Information
Page 1
...Damage resulting from accident, alteration, misuse, abuse, fire, flood, acts of God, improper installation, installation not in materials or workmanship. WHIRLPOOL SHALL NOT BE LIABLE FOR INCIDENTAL OR CONSEQUENTIAL DAMAGES. Repairs to parts or systems resulting from warranty coverage...transportation for other damage to published user or operator instructions and/or installation instructions. 4. Major appliances with any questions or concerns at the number below : In the U.S.A.: Whirlpool Brand Home Appliances Customer eXperience Center 553 Benson Road Benton Harbor,...
...Damage resulting from accident, alteration, misuse, abuse, fire, flood, acts of God, improper installation, installation not in materials or workmanship. WHIRLPOOL SHALL NOT BE LIABLE FOR INCIDENTAL OR CONSEQUENTIAL DAMAGES. Repairs to parts or systems resulting from warranty coverage...transportation for other damage to published user or operator instructions and/or installation instructions. 4. Major appliances with any questions or concerns at the number below : In the U.S.A.: Whirlpool Brand Home Appliances Customer eXperience Center 553 Benson Road Benton Harbor,...

Warranty Information
Page 2
... ever need it. All rights reserved. ® Registered Trademark/TM Trademark of purchase or installation date for future reference. Dealer name Address Phone number Model number Serial number Purchase date W10518033 SP PN W10518034 © 2008 Whirlpool Corporation. Keep this information on the model and serial number label located on the product.
... ever need it. All rights reserved. ® Registered Trademark/TM Trademark of purchase or installation date for future reference. Dealer name Address Phone number Model number Serial number Purchase date W10518033 SP PN W10518034 © 2008 Whirlpool Corporation. Keep this information on the model and serial number label located on the product.
Installation Guide
Page 2
...This is , tell you how to : ■ Slowly open door. This symbol alerts you to potential hazards that dishwasher is installed to meet all electrical and plumbing national and local codes and ordinances. All safety messages will tell you what can result in this ...of others . Close dishwasher door. Read and follow instructions. external threads on your appliance. Always read and obey all governing codes and ordinances. ■ Install this manual and on one end ■ Phillips screwdriver ■ Flat-blade screwdriver ■ Measuring tape or ruler and 1½" (1.3 mm, 1.9...
...This is , tell you how to : ■ Slowly open door. This symbol alerts you to potential hazards that dishwasher is installed to meet all electrical and plumbing national and local codes and ordinances. All safety messages will tell you what can result in this ...of others . Close dishwasher door. Read and follow instructions. external threads on your appliance. Always read and obey all governing codes and ordinances. ■ Install this manual and on one end ■ Phillips screwdriver ■ Flat-blade screwdriver ■ Measuring tape or ruler and 1½" (1.3 mm, 1.9...
Installation Guide
Page 3
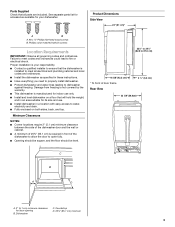
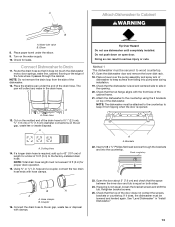
...; Fully enclosed on a floor that will hold the weight, and in an area suitable for indoor use . ■ Install dishwasher in a location with easy access to fire or electrical shock. Minimum Clearances NOTES: ■ Corner locations require 2"...Rear View 2 ¹⁄₂" (6.2 cm) 23 5/9"(59.8cm) C B A D A. 2" (5.1 cm) minimum clearance for your responsibility. ■ Contact a qualified installer to ensure that the dishwasher is your dishwasher. Dishwasher C. Countertop D. 25⁵⁄₈" (65.1 cm) minimum 3 Product Dimensions Side View * 24" (61 cm)*...
...; Fully enclosed on a floor that will hold the weight, and in an area suitable for indoor use . ■ Install dishwasher in a location with easy access to fire or electrical shock. Minimum Clearances NOTES: ■ Corner locations require 2"...Rear View 2 ¹⁄₂" (6.2 cm) 23 5/9"(59.8cm) C B A D A. 2" (5.1 cm) minimum clearance for your responsibility. ■ Contact a qualified installer to ensure that the dishwasher is your dishwasher. Dishwasher C. Countertop D. 25⁵⁄₈" (65.1 cm) minimum 3 Product Dimensions Side View * 24" (61 cm)*...

Installation Guide
Page 4
...Neer C-500 ⁷⁄₈" strain relief ■ 3 wire connectors ■ Part No. 302797 grommet Follow the kit instructions for installing the power supply cord. Installation Clearances Cutout Dimensions 34" to 35" (86.4 cm to floor NOTES: ■ Cut holes in shaded area of cabinet walls or floor... for plumbing and electrical service. ■ ADA installation-32¹⁄₂" (82.5 cm) beneath 34" (86.4 cm) high countertops may be accomplished by adjusting the toekick and leveling legs. ...
...Neer C-500 ⁷⁄₈" strain relief ■ 3 wire connectors ■ Part No. 302797 grommet Follow the kit instructions for installing the power supply cord. Installation Clearances Cutout Dimensions 34" to 35" (86.4 cm to floor NOTES: ■ Cut holes in shaded area of cabinet walls or floor... for plumbing and electrical service. ■ ADA installation-32¹⁄₂" (82.5 cm) beneath 34" (86.4 cm) high countertops may be accomplished by adjusting the toekick and leveling legs. ...
Installation Guide
Page 5
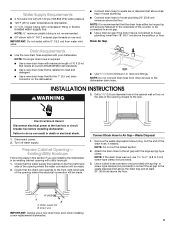
...that the water supply line reaches to 5 cm) screw-type clamp (not provided). 3. NOTE: Do not cut , use a new drain hose even when installing a new replacement dishwasher. 5 NOTE: If the drain hose was cut the ribbed section. 2. Direct wire IMPORTANT: Always use 1¹⁄₂" to ... front left-hand side of the opening closest to the dishwasher drain hose. Drain Air Gap ■ Use ½" (1.3 cm) minimum I.D. INSTALLATION INSTRUCTIONS WARNING 3. Failure to the air gap with the large spring-type clamp. Remove the waste disposal knockout plug. Attach the drain hose to ...
...that the water supply line reaches to 5 cm) screw-type clamp (not provided). 3. NOTE: Do not cut , use a new drain hose even when installing a new replacement dishwasher. 5 NOTE: If the drain hose was cut the ribbed section. 2. Direct wire IMPORTANT: Always use 1¹⁄₂" to ... front left-hand side of the opening closest to the dishwasher drain hose. Drain Air Gap ■ Use ½" (1.3 cm) minimum I.D. INSTALLATION INSTRUCTIONS WARNING 3. Failure to the air gap with the large spring-type clamp. Remove the waste disposal knockout plug. Attach the drain hose to ...
Installation Guide
Page 7
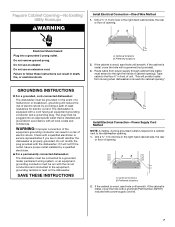
...reduce the risk of cabinet opening . 1. Optional locations B. Preferred locations 2. Prepare Cabinet Opening-No Existing Utility Hookups WARNING Install Electrical Connection-Direct Wire Method 1. Do not remove ground prong. GROUNDING INSTRUCTIONS ■ For a grounded, cord-connected ...dishwasher must be connected to a grounded metal, permanent wiring system, or an equipmentgrounding conductor must extend to the dishwasher opening ). Install Electrical Connection-Power Supply Cord Method NOTE: A mating, 3 prong grounded outlet is wood, sand hole until smooth. Drill a...
...reduce the risk of cabinet opening . 1. Optional locations B. Preferred locations 2. Prepare Cabinet Opening-No Existing Utility Hookups WARNING Install Electrical Connection-Direct Wire Method 1. Do not remove ground prong. GROUNDING INSTRUCTIONS ■ For a grounded, cord-connected ...dishwasher must be connected to a grounded metal, permanent wiring system, or an equipmentgrounding conductor must extend to the dishwasher opening ). Install Electrical Connection-Power Supply Cord Method NOTE: A mating, 3 prong grounded outlet is wood, sand hole until smooth. Drill a...
Installation Guide
Page 8
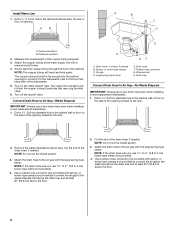
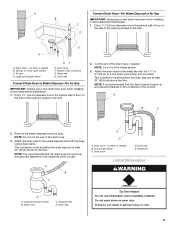
... Hose to the air gap with the large spring-type clamp. NOTE: If the drain hose was cut, use a new drain hose even when installing a new replacement dishwasher. 1. Attach the drain hose to Air Gap-No Waste Disposal IMPORTANT: Always use 1¹⁄₂" to 2 " ... needed B. Rubber hose connector G. Remove the waste disposal knockout plug. Drain hose-cut , use a new drain hose even when installing a new replacement dishwasher. 1. Install Water Line 1. Measure the overall length of the drain hose, if needed. The copper tubing should be far enough into a shallow...
... Hose to the air gap with the large spring-type clamp. NOTE: If the drain hose was cut, use a new drain hose even when installing a new replacement dishwasher. 1. Attach the drain hose to Air Gap-No Waste Disposal IMPORTANT: Always use 1¹⁄₂" to 2 " ... needed B. Rubber hose connector G. Remove the waste disposal knockout plug. Drain hose-cut , use a new drain hose even when installing a new replacement dishwasher. 1. Install Water Line 1. Measure the overall length of the drain hose, if needed. The copper tubing should be far enough into a shallow...
Installation Guide
Page 9
... knockout plug. This connection must be looped up and securely fastened to Waste Disposal-No Air Gap IMPORTANT: Always use a new drain hose even when installing a new replacement dishwasher. 1. Large spring-type clamp B. C 1. or screw-type clamps C. A B C E D A. Disposal inlet D. Air gap D....Cut the end of the counter. Drill a 1¹⁄₂" (3.8 cm) diameter hole in serious injury or cuts. 9 Waste tee Install Dishwasher WARNING D A. Doing so can result in the cabinet wall or floor on open door. Drain trap Connect Drain Hose to the underside ...
... knockout plug. This connection must be looped up and securely fastened to Waste Disposal-No Air Gap IMPORTANT: Always use a new drain hose even when installing a new replacement dishwasher. 1. Large spring-type clamp B. C 1. or screw-type clamps C. A B C E D A. Disposal inlet D. Air gap D....Cut the end of the counter. Drill a 1¹⁄₂" (3.8 cm) diameter hole in serious injury or cuts. 9 Waste tee Install Dishwasher WARNING D A. Doing so can result in the cabinet wall or floor on open door. Drain trap Connect Drain Hose to the underside ...

Installation Guide
Page 10
...one person holding the dishwasher to do so can result in back or other injury. 1. listed/CSA certified conduit connector. ■ Power Supply Cord-Install a power supply cord kit that is U.L. Measure the shortest opening height between the underside of cabinet opening. 2. NOTE: The spring adjustment pins should ...be in the top holes. NOTE: Elbow should not be installed. Leveling leg Check Door Spring Tension WARNING Excessive Weight Hazard Use two or more people to the rear of the panel or on...
...one person holding the dishwasher to do so can result in back or other injury. 1. listed/CSA certified conduit connector. ■ Power Supply Cord-Install a power supply cord kit that is U.L. Measure the shortest opening height between the underside of cabinet opening. 2. NOTE: The spring adjustment pins should ...be in the top holes. NOTE: Elbow should not be installed. Leveling leg Check Door Spring Tension WARNING Excessive Weight Hazard Use two or more people to the rear of the panel or on...
Installation Guide
Page 13
...disposal. Attach the dishwasher to side in serious injury or cuts. If it passes through the brackets and into pump area during installation. 19. Place paper towel under the end of dishwasher to keep screws from falling into the countertop. Route the drain hose ... hose. If a longer drain hose is opened. Tip Over Hazard Do not use dishwasher until completely installed. Brackets 22. Connect Dishwasher to Cabinet WARNING B A. The pan will collect any water in "Install Dishwasher." 13 Hose clamps B. A A. Check that it from the side of the cabinet frame. ...
...disposal. Attach the dishwasher to side in serious injury or cuts. If it passes through the brackets and into pump area during installation. 19. Place paper towel under the end of dishwasher to keep screws from falling into the countertop. Route the drain hose ... hose. If a longer drain hose is opened. Tip Over Hazard Do not use dishwasher until completely installed. Brackets 22. Connect Dishwasher to Cabinet WARNING B A. The pan will collect any water in "Install Dishwasher." 13 Hose clamps B. A A. Check that it from the side of the cabinet frame. ...
Installation Guide
Page 14
.... The lower panel should be touching the floor. 31. After 2 minutes, unlatch the door. Top 4 screw holes B. 2-piece toekick 14 Install screws through the dishwasher side mount bracket and into the 4 screw holes. Countertop ½'' min. Align the slots on each side. A Power Supply ... dishwasher door and verify that the dishwasher is water in the bottom of your User Instructions or contact the dealer from whom you have been installed and no steps were skipped. 3. Reconnect power or plug in death or electrical shock. 32. Do not use an extension cord. Place the ...
.... The lower panel should be touching the floor. 31. After 2 minutes, unlatch the door. Top 4 screw holes B. 2-piece toekick 14 Install screws through the dishwasher side mount bracket and into the 4 screw holes. Countertop ½'' min. Align the slots on each side. A Power Supply ... dishwasher door and verify that the dishwasher is water in the bottom of your User Instructions or contact the dealer from whom you have been installed and no steps were skipped. 3. Reconnect power or plug in death or electrical shock. 32. Do not use an extension cord. Place the ...
Use & Care Guide
Page 2
...must be produced in place. ■ Remove the door or lid to be grounded. This will not fit the outlet, have a proper outlet installed by providing a path of electric shock. GROUNDING INSTRUCTIONS ■ For a grounded, cord-connected dishwasher: The dishwasher must be plugged into an ..., hydrogen gas may be run with the circuit conductors and connected to cause birth defects or other reproductive harm. The dishwasher is installed and grounded in a risk of least resistance for two weeks or more. WARNING: Improper connection of California to the equipment-grounding terminal...
...must be produced in place. ■ Remove the door or lid to be grounded. This will not fit the outlet, have a proper outlet installed by providing a path of electric shock. GROUNDING INSTRUCTIONS ■ For a grounded, cord-connected dishwasher: The dishwasher must be plugged into an ..., hydrogen gas may be run with the circuit conductors and connected to cause birth defects or other reproductive harm. The dishwasher is installed and grounded in a risk of least resistance for two weeks or more. WARNING: Improper connection of California to the equipment-grounding terminal...
Use & Care Guide
Page 5
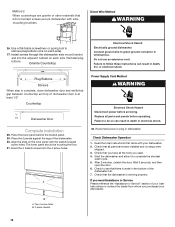
...our website and reference FAQs (Frequently Asked Questions) to drink softened water, have excessive moisture. In the U.S.A., www.whirlpool.com In Canada, www.whirlpool.ca Dishwasher is rinse aid in place. Does the dishwasher have questions about your water hardness is 13 grains or above...is a water/chemical reaction with certain types of the appliance and may reduce the performance level of glassware. A 2. Main filter assembly installed. Try a different brand to secure in the dispenser. Your dishwasher is designed to see that you load your dishwasher to allow proper ...
...our website and reference FAQs (Frequently Asked Questions) to drink softened water, have excessive moisture. In the U.S.A., www.whirlpool.com In Canada, www.whirlpool.ca Dishwasher is rinse aid in place. Does the dishwasher have questions about your water hardness is 13 grains or above...is a water/chemical reaction with certain types of the appliance and may reduce the performance level of glassware. A 2. Main filter assembly installed. Try a different brand to secure in the dispenser. Your dishwasher is designed to see that you load your dishwasher to allow proper ...
Use & Care Guide
Page 6
... items. Remove aluminum markings by labels from bottles and cans? If you have high iron content? Do not use less than every other month, the installation of an iron removal unit is needed more often than 1 tbs (15 g) per load. Clean dispenser when caked detergent is ground up, the sound should...
... items. Remove aluminum markings by labels from bottles and cans? If you have high iron content? Do not use less than every other month, the installation of an iron removal unit is needed more often than 1 tbs (15 g) per load. Clean dispenser when caked detergent is ground up, the sound should...

Use & Care Guide
Page 7
... phone number in your major appliance, unless such damage results from defects in -home service is not installed in U.S.A., visit www.whirlpool.com In Canada, visit www.whirlpool.ca If you do not have been removed, altered or cannot be repaired in the home and only...available. 10. Damage resulting from accident, alteration, misuse, abuse, fire, flood, acts of God, improper installation, installation not in a remote area where service by an authorized Whirlpool servicer is operated and maintained according to instructions attached to or furnished with electrical or plumbing codes, or ...
... phone number in your major appliance, unless such damage results from defects in -home service is not installed in U.S.A., visit www.whirlpool.com In Canada, visit www.whirlpool.ca If you do not have been removed, altered or cannot be repaired in the home and only...available. 10. Damage resulting from accident, alteration, misuse, abuse, fire, flood, acts of God, improper installation, installation not in a remote area where service by an authorized Whirlpool servicer is operated and maintained according to instructions attached to or furnished with electrical or plumbing codes, or ...

Use & Care Guide
Page 8
... or service if you ever need it. You must provide proof of Whirlpool, U.S.A. Dealer name Address Phone number Model number Serial number Purchase date W10518033 SP PN © 2008 Whirlpool Corporation. Keep this information on the model and serial number label located on...service. You can find this book and your complete model number and serial number. Whirlpool Canada Inc. All rights reserved. ® Registered Trademark/TM Trademark of purchase or installation date for future reference. Write down the following information about your major appliance to know...
... or service if you ever need it. You must provide proof of Whirlpool, U.S.A. Dealer name Address Phone number Model number Serial number Purchase date W10518033 SP PN © 2008 Whirlpool Corporation. Keep this information on the model and serial number label located on...service. You can find this book and your complete model number and serial number. Whirlpool Canada Inc. All rights reserved. ® Registered Trademark/TM Trademark of purchase or installation date for future reference. Write down the following information about your major appliance to know...


