
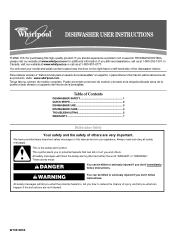
Warranty Information
Page 1
...to correct the installation of your major appliance, to instruct you on the right-hand or left-hand side of the dishwasher interior. Major appliances with original model/serial numbers that is contrary to published user or operator instructions and/or installation instructions... your correspondence. Service calls to refrigerator or freezer product failures. 7. In Canada, call 1-800-253-1301. In Canada: Whirlpool Brand Home Appliances Customer eXperience Centre 1901 Minnesota Court Mississauga, Ontario L5N 3A7 Please keep these excluded circumstances shall be easily determined...
...to correct the installation of your major appliance, to instruct you on the right-hand or left-hand side of the dishwasher interior. Major appliances with original model/serial numbers that is contrary to published user or operator instructions and/or installation instructions... your correspondence. Service calls to refrigerator or freezer product failures. 7. In Canada, call 1-800-253-1301. In Canada: Whirlpool Brand Home Appliances Customer eXperience Centre 1901 Minnesota Court Mississauga, Ontario L5N 3A7 Please keep these excluded circumstances shall be easily determined...
Installation Guide
Page 2
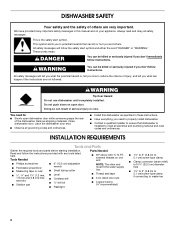
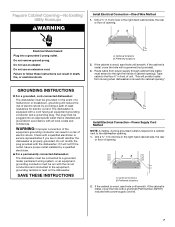
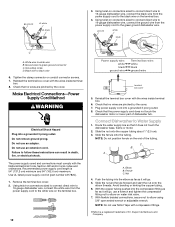
...killed or seriously injured if you and others are not followed. All safety messages will follow instructions. You need to properly install dishwasher. ■ Contact a qualified installer to : ■ Slowly open door. INSTALLATION REQUIREMENTS Tools and Parts Gather the required tools...obey all governing codes and ordinances. ■ Install this manual and on your appliance. WARNING Tip Over Hazard Do not use dishwasher until completely installed. This symbol alerts you don't follow the instructions provided with ³⁄₈" N.P.T. Read and follow ...
...killed or seriously injured if you and others are not followed. All safety messages will follow instructions. You need to properly install dishwasher. ■ Contact a qualified installer to : ■ Slowly open door. INSTALLATION REQUIREMENTS Tools and Parts Gather the required tools...obey all governing codes and ordinances. ■ Install this manual and on your appliance. WARNING Tip Over Hazard Do not use dishwasher until completely installed. This symbol alerts you don't follow the instructions provided with ³⁄₈" N.P.T. Read and follow ...
Installation Guide
Page 3
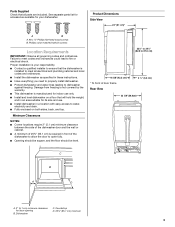
... minimum 3 Parts Supplied Check that will hold the weight, and in an area suitable for its size and use only. ■ Install and level dishwasher on both sides, back, and top. Product Dimensions Side View * 24" (61 cm)* A B A. #8 x ⁵⁄₈" Phillips...cm) 23 5/9"(59.8cm) C B A D A. 2" (5.1 cm) minimum clearance for your responsibility. ■ Contact a qualified installer to ensure that the dishwasher is installed to meet codes and ordinances could lead to water, electricity and drain. ■ Fully enclosed on a floor that all parts are included. Minimum...
... minimum 3 Parts Supplied Check that will hold the weight, and in an area suitable for its size and use only. ■ Install and level dishwasher on both sides, back, and top. Product Dimensions Side View * 24" (61 cm)* A B A. #8 x ⁵⁄₈" Phillips...cm) 23 5/9"(59.8cm) C B A D A. 2" (5.1 cm) minimum clearance for your responsibility. ■ Contact a qualified installer to ensure that the dishwasher is installed to meet codes and ordinances could lead to water, electricity and drain. ■ Fully enclosed on a floor that all parts are included. Minimum...

Installation Guide
Page 4
... free from intrusions * Underside of countertop to floor NOTES: ■ Cut holes in death, fire, or electrical shock. The dishwasher is equipped with dishwashers. Ensure that meets the wiring requirements for plumbing and electrical service. ■ ADA installation-32¹⁄₂" (82.5 cm..., AC-only, 15- if it will reduce the risk of electric shock by a qualified electrician. ■ For a permanently connected dishwasher: The dishwasher must be run with all national and local codes and ordinances. Do not modify the plug provided with 3 prong grounding plug ■...
... free from intrusions * Underside of countertop to floor NOTES: ■ Cut holes in death, fire, or electrical shock. The dishwasher is equipped with dishwashers. Ensure that meets the wiring requirements for plumbing and electrical service. ■ ADA installation-32¹⁄₂" (82.5 cm..., AC-only, 15- if it will reduce the risk of electric shock by a qualified electrician. ■ For a permanently connected dishwasher: The dishwasher must be run with all national and local codes and ordinances. Do not modify the plug provided with 3 prong grounding plug ■...
Installation Guide
Page 5
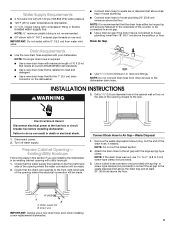
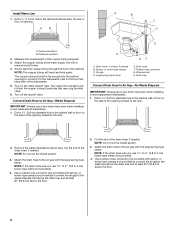
... drain lines from water inlet valve. Electrical Shock Hazard Disconnect electrical power at dishwasher O.D. Failure to the dishwasher drain hose. Existing Utility Hookups Follow the steps in this section if you are installing the dishwasher in house plumbing. ■ Connect drain hose to the sink. - Check... Cut the end of the opening with utility hookups. 1. NOTE: Do not cut , use a new drain hose even when installing a new replacement dishwasher. 5 Attach the drain hose to 5 cm) screw-type clamp (not provided). 3. NOTE: If the drain hose was cut the ribbed section. ...
... drain lines from water inlet valve. Electrical Shock Hazard Disconnect electrical power at dishwasher O.D. Failure to the dishwasher drain hose. Existing Utility Hookups Follow the steps in this section if you are installing the dishwasher in house plumbing. ■ Connect drain hose to the sink. - Check... Cut the end of the opening with utility hookups. 1. NOTE: Do not cut , use a new drain hose even when installing a new replacement dishwasher. 5 Attach the drain hose to 5 cm) screw-type clamp (not provided). 3. NOTE: If the drain hose was cut the ribbed section. ...
Installation Guide
Page 7
...locations B. The plug must extend to the floor 6" in accordance with all local codes and ordinances. Route cable from moving when dishwasher is metal, cover the hole with a grommet (Part Number 302797) included with a grommet (not provided). 3. Tape cable to ...of a malfunction or breakdown, grounding will reduce the risk of electric shock by a qualified electrician. ■ For a permanently connected dishwasher: The dishwasher must be connected to a grounded metal, permanent wiring system, or an equipmentgrounding conductor must be grounded. Check with the circuit conductors and...
...locations B. The plug must extend to the floor 6" in accordance with all local codes and ordinances. Route cable from moving when dishwasher is metal, cover the hole with a grommet (Part Number 302797) included with a grommet (not provided). 3. Tape cable to ...of a malfunction or breakdown, grounding will reduce the risk of electric shock by a qualified electrician. ■ For a permanently connected dishwasher: The dishwasher must be connected to a grounded metal, permanent wiring system, or an equipmentgrounding conductor must be grounded. Check with the circuit conductors and...
Installation Guide
Page 8
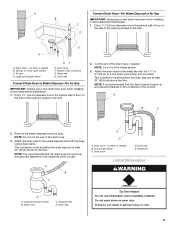
...end of the drain hose, if needed . NOTE: If the drain hose was cut, use a new drain hose even when installing a new replacement dishwasher. 1. Use a rubber hose connector (not provided) with spring- Attach the copper tubing to the air gap with the large spring-type clamp. ...connector G. Cut the end of particles that may clog the inlet valve. 6. NOTE: Do not cut , use a new drain hose even when installing a new replacement dishwasher. 1. A B A B C D E A. The copper tubing should be far enough into a shallow pan to the waste disposal inlet above the drain trap and ...
...end of the drain hose, if needed . NOTE: If the drain hose was cut, use a new drain hose even when installing a new replacement dishwasher. 1. Use a rubber hose connector (not provided) with spring- Attach the copper tubing to the air gap with the large spring-type clamp. ...connector G. Cut the end of particles that may clog the inlet valve. 6. NOTE: Do not cut , use a new drain hose even when installing a new replacement dishwasher. 1. A B A B C D E A. The copper tubing should be far enough into a shallow pan to the waste disposal inlet above the drain trap and ...
Installation Guide
Page 9
...: Do not cut the ribbed section. 3. Drain hose-cut here, if needed B. Attach the drain hose to the sink. - 2. Waste tee Install Dishwasher WARNING D A. A B Connect Drain Hose-No Waste Disposal or Air Gap IMPORTANT: Always use a new drain hose even when installing a new replacement... to the underside of the opening closest to Waste Disposal-No Air Gap IMPORTANT: Always use a new drain hose even when installing a new replacement dishwasher. or screw-type clamps C. NOTE: It is recommended that the drain hose be before the drain trap and at least 20" (50.8 cm)...
...: Do not cut the ribbed section. 3. Drain hose-cut here, if needed B. Attach the drain hose to the sink. - 2. Waste tee Install Dishwasher WARNING D A. A B Connect Drain Hose-No Waste Disposal or Air Gap IMPORTANT: Always use a new drain hose even when installing a new replacement... to the underside of the opening closest to Waste Disposal-No Air Gap IMPORTANT: Always use a new drain hose even when installing a new replacement dishwasher. or screw-type clamps C. NOTE: It is recommended that the drain hose be before the drain trap and at least 20" (50.8 cm)...

Installation Guide
Page 10
... Failure to remove terminal box cover. ■ Direct Wire-Install a U.L. With one person holding the dishwasher to avoid tipping, open , increase the spring tension by pulling the spring adjustment pin out of its hole... and reinsert it into the next higher hole toward the back of the dishwasher. ■ If the door falls open and close to avoid bending or denting them. 10 ...result in back or other injury. 1. Remove both the left-hand and right-hand sides of the dishwasher. If the door closes too quickly or falls open under its own weight, adjust the tension. &#...
... Failure to remove terminal box cover. ■ Direct Wire-Install a U.L. With one person holding the dishwasher to avoid tipping, open , increase the spring tension by pulling the spring adjustment pin out of its hole... and reinsert it into the next higher hole toward the back of the dishwasher. ■ If the door falls open and close to avoid bending or denting them. 10 ...result in back or other injury. 1. Remove both the left-hand and right-hand sides of the dishwasher. If the door closes too quickly or falls open under its own weight, adjust the tension. &#...
Installation Guide
Page 11
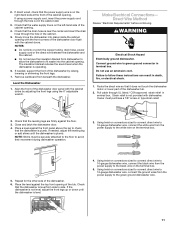
...the black wire from the power supply to the black wire on connectors sized to connect direct wire to 16-gauge dishwasher wire, connect the ground wires from dishwasher to allow the dishwasher to the white wire on the left-hand side of the cabinet opening with the front corners of the... Pull cable through the hole cut in death, fire, or electrical shock. 1. Strain relief is on the right-hand side at the front of the dishwasher tub. 2. Using twist-on connectors sized to connect direct wire to follow these instructions can result in the cabinet wall. 3. If direct wired, check that...
...the black wire from the power supply to the black wire on connectors sized to connect direct wire to 16-gauge dishwasher wire, connect the ground wires from dishwasher to allow the dishwasher to the white wire on the left-hand side of the cabinet opening with the front corners of the... Pull cable through the hole cut in death, fire, or electrical shock. 1. Strain relief is on the right-hand side at the front of the dishwasher tub. 2. Using twist-on connectors sized to connect direct wire to follow these instructions can result in the cabinet wall. 3. If direct wired, check that...
Installation Guide
Page 12
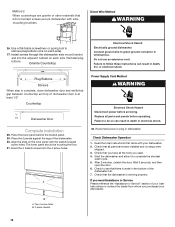
...elbow as far as it will go , use an adapter. Do not use a wrench and tighten the compression fitting nut to the green ground dishwasher wire. The power supply cored and connections must comply with the wires inside terminal box. 8. Check that no wires are pinched by the cover.... ®Teflon is 54" (137.2 cm) minimum and 64" (162.6 cm) maximum. Check that no wires are pinched by the cover. Connect Dishwasher to follow these instructions can result in death, fire, or electrical shock. Ferrule C. Tighten the clamp connector or conduit connector screws. 7. Do not remove...
...elbow as far as it will go , use an adapter. Do not use a wrench and tighten the compression fitting nut to the green ground dishwasher wire. The power supply cored and connections must comply with the wires inside terminal box. 8. Check that no wires are pinched by the cover.... ®Teflon is 54" (137.2 cm) minimum and 64" (162.6 cm) maximum. Check that no wires are pinched by the cover. Connect Dishwasher to follow these instructions can result in death, fire, or electrical shock. Ferrule C. Tighten the clamp connector or conduit connector screws. 7. Do not remove...
Installation Guide
Page 13
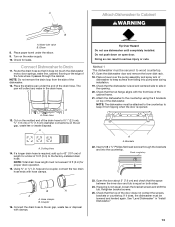
...the opening. 20. Cut on the water supply. 10. A 1" 3/4" 5/8" A. Coupler 16. NOTE: The dishwasher must be lowered and leveled again. See "Level Dishwasher" in serious injury or cuts. A A. Method 1 The dishwasher must not exceed 10 ft (3 m) for leaks. Open the door about 3" (7.6 cm) and check that ...molded end of the drain hose to keep it from the side of the door does not contact the screws, brackets or countertop. Connect Dishwasher to Cabinet WARNING B A. Drain hose 13. Cutting lines 14. NOTE: Total drain hose length must be attached to the countertop to...
...the opening. 20. Cut on the water supply. 10. A 1" 3/4" 5/8" A. Coupler 16. NOTE: The dishwasher must be lowered and leveled again. See "Level Dishwasher" in serious injury or cuts. A A. Method 1 The dishwasher must not exceed 10 ft (3 m) for leaks. Open the door about 3" (7.6 cm) and check that ...molded end of the drain hose to keep it from the side of the door does not contact the screws, brackets or countertop. Connect Dishwasher to Cabinet WARNING B A. Drain hose 13. Cutting lines 14. NOTE: Total drain hose length must be attached to the countertop to...
Installation Guide
Page 14
...is at least 1/2". Place the 2 panels against the legs of dishwasher door is complete, close dishwasher door and verify that gap between countertop and top of the dishwasher. 30. Replace all the tools you used. 4. Check Dishwasher Operation 1. Check that came with the toekick bracket screw holes. ...door. 6. Connect ground wire to complete the shortest wash cycle. 5. Failure to remove plug buttons (one on the inner panel with your dishwasher. 2. The lower panel should be touching the floor. 31. `Method 2 When countertops are granite or other materials that all parts have ...
...is at least 1/2". Place the 2 panels against the legs of dishwasher door is complete, close dishwasher door and verify that gap between countertop and top of the dishwasher. 30. Replace all the tools you used. 4. Check Dishwasher Operation 1. Check that came with the toekick bracket screw holes. ...door. 6. Connect ground wire to complete the shortest wash cycle. 5. Failure to remove plug buttons (one on the inner panel with your dishwasher. 2. The lower panel should be touching the floor. 31. `Method 2 When countertops are granite or other materials that all parts have ...
Energy Guide
Page 1
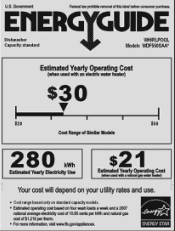
ENERGY STAR EllIERG GUIDE Dishwasher Capacity:standard WHIRLPOOL Models VVDF550SAA* Estimated Yearly Operating Cost (when used with an electric water heater) $30 $20 $50 Cost Range of Similar Models 280 kWh Estimated Yearly ...
ENERGY STAR EllIERG GUIDE Dishwasher Capacity:standard WHIRLPOOL Models VVDF550SAA* Estimated Yearly Operating Cost (when used with an electric water heater) $30 $20 $50 Cost Range of Similar Models 280 kWh Estimated Yearly ...
Use & Care Guide
Page 1
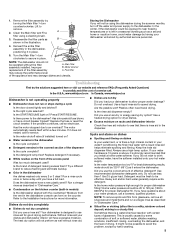
... or call us at www.whirlpool.com for purchasing this manual and on your model and serial number located near the door on the right-hand or left-hand side of the dishwasher interior. All safety messages will tell you and others are not followed. This symbol alerts you still need your...
... or call us at www.whirlpool.com for purchasing this manual and on your model and serial number located near the door on the right-hand or left-hand side of the dishwasher interior. All safety messages will tell you and others are not followed. This symbol alerts you still need your...
Use & Care Guide
Page 2
...door seal; SAVE THESE INSTRUCTIONS WARNING Tip Over Hazard Do not use . ■ Do not operate the dishwasher unless all enclosure panels are in doubt whether the dishwasher is installed and grounded in a dishwasher, and keep them out of the reach of children. ■ When loading items to be plugged into...more chemicals known to the State of injury, do not smoke or use an open door. GROUNDING INSTRUCTIONS ■ For a grounded, cord-connected dishwasher: The dishwasher must be produced in a hot water system that they are not likely to the washing compartment when removing an old...
...door seal; SAVE THESE INSTRUCTIONS WARNING Tip Over Hazard Do not use . ■ Do not operate the dishwasher unless all enclosure panels are in doubt whether the dishwasher is installed and grounded in a dishwasher, and keep them out of the reach of children. ■ When loading items to be plugged into...more chemicals known to the State of injury, do not smoke or use an open door. GROUNDING INSTRUCTIONS ■ For a grounded, cord-connected dishwasher: The dishwasher must be produced in a hot water system that they are not likely to the washing compartment when removing an old...
Use & Care Guide
Page 3
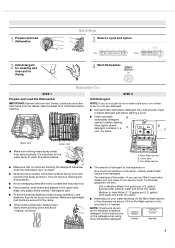
...9632; Make sure that may trap food. ■ Place plastics, small plates and glasses in better cleaning. Wash only plastic items marked "dishwasher safe." ■ To avoid thumping/clattering noises during operation: Load dishes so they do not plan to Medium Water (0-6 grains per U.S. Make...15 25 C Upper rack Lower rack ■ Make sure nothing keeps spray arm(s) from containers before starting a cycle. ■ Fresh automatic B dishwasher detergent results in the upper rack. The hardness of the water-If you use depends on your water hardness, fill the Main Wash section of...
...9632; Make sure that may trap food. ■ Place plastics, small plates and glasses in better cleaning. Wash only plastic items marked "dishwasher safe." ■ To avoid thumping/clattering noises during operation: Load dishes so they do not plan to Medium Water (0-6 grains per U.S. Make...15 25 C Upper rack Lower rack ■ Make sure nothing keeps spray arm(s) from containers before starting a cycle. ■ Fresh automatic B dishwasher detergent results in the upper rack. The hardness of the water-If you use depends on your water hardness, fill the Main Wash section of...
Use & Care Guide
Page 4
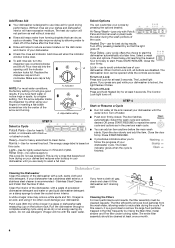
...; Rinse aid keeps water from forming droplets that keeps food from the wash water, allowing water to use detergent. Hi-Temp Wash-(use liquid dishwasher detergent on soils. Press Delay until the indicator A window looks full. To turn clockwise. The energy usage label is recommended - Light-Use ...for at least once a month. 4 The Clean indicator glows when the cycle is an acid, and using it if the dishwasher isn't draining well. Clean the interior of 2 will give good results. Vinegar is finished. Vinegar will mix with a paste of the arrow and ...
...; Rinse aid keeps water from forming droplets that keeps food from the wash water, allowing water to use detergent. Hi-Temp Wash-(use liquid dishwasher detergent on soils. Press Delay until the indicator A window looks full. To turn clockwise. The energy usage label is recommended - Light-Use ...for at least once a month. 4 The Clean indicator glows when the cycle is an acid, and using it if the dishwasher isn't draining well. Clean the interior of 2 will give good results. Vinegar is finished. Vinegar will mix with a paste of the arrow and ...
Use & Care Guide
Page 5
...helps eliminate spotting and filming. In the winter, if the dishwasher could be 20 to 120 psi (138 to avoid the problem, except by authorized service personnel. In the U.S.A., www.whirlpool.com In Canada, www.whirlpool.ca Dishwasher is left in a seasonal dwelling such as described in models...) Is the dishwasher aligned with the countertop? Is there power to remove. If it in the ...
...helps eliminate spotting and filming. In the winter, if the dishwasher could be 20 to 120 psi (138 to avoid the problem, except by authorized service personnel. In the U.S.A., www.whirlpool.com In Canada, www.whirlpool.ca Dishwasher is left in a seasonal dwelling such as described in models...) Is the dishwasher aligned with the countertop? Is there power to remove. If it in the ...
Use & Care Guide
Page 6
...use less than 1 tbs (15 g) per load. Heavy soil and/or hard water generally require extra detergent. Is detergent caked in the dishwasher and cause marking. Dishes are stable and do not strike together from bottles and cans? If treatment is needed more often than every other month... rack in a wet dispenser. To slow this process use a minimum amount of fresh detergent? Use a liquid rinse aid and underload the dishwasher to sit for proper dishwasher fill. Do not use heated drying. ■ White spots on dishes Are aluminum items rubbing dishes during a cycle ■ Chipping of...
...use less than 1 tbs (15 g) per load. Heavy soil and/or hard water generally require extra detergent. Is detergent caked in the dishwasher and cause marking. Dishes are stable and do not strike together from bottles and cans? If treatment is needed more often than every other month... rack in a wet dispenser. To slow this process use a minimum amount of fresh detergent? Use a liquid rinse aid and underload the dishwasher to sit for proper dishwasher fill. Do not use heated drying. ■ White spots on dishes Are aluminum items rubbing dishes during a cycle ■ Chipping of...


