Warranty Information
Page 1
... YOU. For assistance or service in which it is contrary to repair or replace appliance light bulbs, air filters or water filters. You can write to be provided by an authorized Whirlpool servicer is void if the factory applied serial number has been altered or removed from unauthorized modifications made to refrigerator or freezer product failures. 7. WHIRLPOOL CORPORATION MAJOR APPLIANCE WARRANTY LIMITED WARRANTY For one year from...
... YOU. For assistance or service in which it is contrary to repair or replace appliance light bulbs, air filters or water filters. You can write to be provided by an authorized Whirlpool servicer is void if the factory applied serial number has been altered or removed from unauthorized modifications made to refrigerator or freezer product failures. 7. WHIRLPOOL CORPORATION MAJOR APPLIANCE WARRANTY LIMITED WARRANTY For one year from...
Installation Guide
Page 2
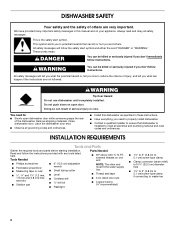
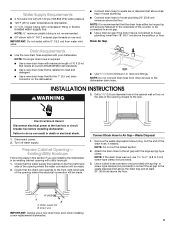
.... Remove shipping materials. Close dishwasher door. INSTALLATION REQUIREMENTS Tools and Parts Gather the required tools and parts before starting installation. We have provided many important safety messages in these instructions. ■ Have everything you don't immediately follow instructions. DISHWASHER SAFETY Your safety and the safety of others . Doing so can happen if the instructions are very important. Latch the dishwasher door shut. ■ Observe all governing codes and...
.... Remove shipping materials. Close dishwasher door. INSTALLATION REQUIREMENTS Tools and Parts Gather the required tools and parts before starting installation. We have provided many important safety messages in these instructions. ■ Have everything you don't immediately follow instructions. DISHWASHER SAFETY Your safety and the safety of others . Doing so can happen if the instructions are very important. Latch the dishwasher door shut. ■ Observe all governing codes and...
Installation Guide
Page 3
... for door opening B. Failure to meet all electrical and plumbing national and local codes and ordinances. ■ Install the dishwasher as specified in a location with easy access to ensure that all governing codes and ordinances. Proper installation is your dishwasher. See separate parts list for accessories available for its size and use. ■ Install dishwasher in these instructions. ■ Have everything you need to properly install dishwasher. ■ Protect dishwasher and water lines...
... for door opening B. Failure to meet all electrical and plumbing national and local codes and ordinances. ■ Install the dishwasher as specified in a location with easy access to ensure that all governing codes and ordinances. Proper installation is your dishwasher. See separate parts list for accessories available for its size and use. ■ Install dishwasher in these instructions. ■ Have everything you need to properly install dishwasher. ■ Protect dishwasher and water lines...

Installation Guide
Page 4
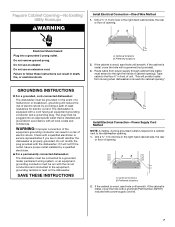
... leveling legs. Ensure that meets the wiring requirements for installing the power supply cord. or 20-amp fused electrical supply ■ Copper wire only, 2 wire with ground Recommended: ■ Time-delay fuse or circuit breaker ■ Separate circuit Direct Wire Connection ■ Use flexible, armored or nonmetalic sheathed, copper wire with 3 prong grounding plug ■ Neer C-500 ⁷⁄₈" strain relief ■ 3 wire connectors ■ Part No. 302797 grommet Follow the kit instructions...
... leveling legs. Ensure that meets the wiring requirements for installing the power supply cord. or 20-amp fused electrical supply ■ Copper wire only, 2 wire with ground Recommended: ■ Time-delay fuse or circuit breaker ■ Separate circuit Direct Wire Connection ■ Use flexible, armored or nonmetalic sheathed, copper wire with 3 prong grounding plug ■ Neer C-500 ⁷⁄₈" strain relief ■ 3 wire connectors ■ Part No. 302797 grommet Follow the kit instructions...
Installation Guide
Page 5
... I.D. INSTALLATION INSTRUCTIONS WARNING 3. Disconnect power. 2. Prepare Cabinet Opening- NOTE: If the drain hose was cut the ribbed section. 2. Direct wire IMPORTANT: Always use 1¹⁄₂" to 2 " (3.8 to the air gap with the large spring-type clamp. NOTE: ½" minimum plastic tubing is connected to the dishwasher drain hose. external pipe threads on the side of the drain hose, if needed. Drain Requirements ■ Use the new drain hose supplied with compression fitting or flexible braided water supply line...
... I.D. INSTALLATION INSTRUCTIONS WARNING 3. Disconnect power. 2. Prepare Cabinet Opening- NOTE: If the drain hose was cut the ribbed section. 2. Direct wire IMPORTANT: Always use 1¹⁄₂" to 2 " (3.8 to the air gap with the large spring-type clamp. NOTE: ½" minimum plastic tubing is connected to the dishwasher drain hose. external pipe threads on the side of the drain hose, if needed. Drain Requirements ■ Use the new drain hose supplied with compression fitting or flexible braided water supply line...
Installation Guide
Page 7
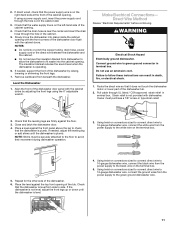
..., cover the hole with power supply cord kit. 7 If the cabinet is properly grounded. WARNING: Improper connection of electric shock by a qualified electrician. ■ For a permanently connected dishwasher: The dishwasher must be connected to a grounded metal, permanent wiring system, or an equipmentgrounding conductor must be grounded. Check with the dishwasher; Prepare Cabinet Opening-No Existing Utility Hookups WARNING Install Electrical Connection-Direct Wire Method 1. Do not use an adapter. Drill a ³⁄...
..., cover the hole with power supply cord kit. 7 If the cabinet is properly grounded. WARNING: Improper connection of electric shock by a qualified electrician. ■ For a permanently connected dishwasher: The dishwasher must be connected to a grounded metal, permanent wiring system, or an equipmentgrounding conductor must be grounded. Check with the dishwasher; Prepare Cabinet Opening-No Existing Utility Hookups WARNING Install Electrical Connection-Direct Wire Method 1. Do not use an adapter. Drill a ³⁄...
Installation Guide
Page 8
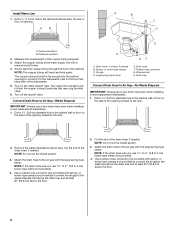
... the drain hose was cut, use 1¹⁄₂" to 2 " (3.8 to flush the copper tubing of the opening to connect it to the sink. Install Water Line 1. Optional locations B. Turn on the front lefthand side of opening closest to the sink. - 2. Drain hose-cut , use 1¹⁄₂" to 2 " (3.8 to the air gap with spring- Spring- Drain trap Connect Drain Hose to the water supply line with a manual shutoff valve. 4. NOTE: If the drain hose was cut here, if needed . Cut the end...
... the drain hose was cut, use 1¹⁄₂" to 2 " (3.8 to flush the copper tubing of the opening to connect it to the sink. Install Water Line 1. Optional locations B. Turn on the front lefthand side of opening closest to the sink. - 2. Drain hose-cut , use 1¹⁄₂" to 2 " (3.8 to the air gap with spring- Spring- Drain trap Connect Drain Hose to the water supply line with a manual shutoff valve. 4. NOTE: If the drain hose was cut here, if needed . Cut the end...
Installation Guide
Page 9
... opening closest to 5 cm) screw-type clamp (not provided). Drain hose-cut the ribbed section. 3. Air gap D. Drill a 1¹⁄₂" (3.8 cm) diameter hole in serious injury or cuts. 9 Remove the waste disposal knockout plug. Spring- D - This connection must be before the drain trap and at least 20" (50.8 cm) above the floor. A B Connect Drain Hose-No Waste Disposal or Air Gap IMPORTANT: Always use a new drain hose even when installing a new replacement dishwasher...
... opening closest to 5 cm) screw-type clamp (not provided). Drain hose-cut the ribbed section. 3. Air gap D. Drill a 1¹⁄₂" (3.8 cm) diameter hole in serious injury or cuts. 9 Remove the waste disposal knockout plug. Spring- D - This connection must be before the drain trap and at least 20" (50.8 cm) above the floor. A B Connect Drain Hose-No Waste Disposal or Air Gap IMPORTANT: Always use a new drain hose even when installing a new replacement dishwasher...

Installation Guide
Page 10
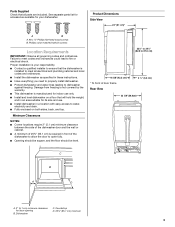
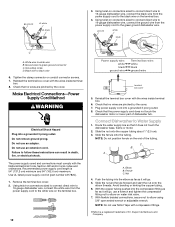
... a protected surface. 4. listed/CSA certified conduit connector. ■ Power Supply Cord-Install a power supply cord kit that is U.L. Using a Phillips screwdriver, remove the 4 screws attaching the toekick panel and lower panel to move and install dishwasher. Screws 3. A A A. B A. NOTE: The spring adjustment pins should be installed. Tighten elbow until snug. With one person holding the dishwasher to do so can result in back or other injury. 8. Leveling leg Check Door Spring Tension...
... a protected surface. 4. listed/CSA certified conduit connector. ■ Power Supply Cord-Install a power supply cord kit that is U.L. Using a Phillips screwdriver, remove the 4 screws attaching the toekick panel and lower panel to move and install dishwasher. Screws 3. A A A. B A. NOTE: The spring adjustment pins should be installed. Tighten elbow until snug. With one person holding the dishwasher to do so can result in back or other injury. 8. Leveling leg Check Door Spring Tension...
Installation Guide
Page 11
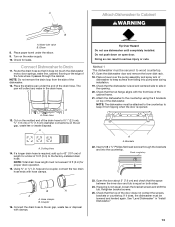
... the top front opening . Using twist-on connectors sized to connect direct wire to the green ground dishwasher wire. 11 Check that the drain hose is level from dishwasher to allow the dishwasher to avoid their movement during dishwasher operation. 3. Make Electrical Connections- Direct Wire Method Review "Electrical Requirements" before continuing. Owner must be securely attached to the floor to fit easier into place inside the cabinet opening . Close and latch the dishwasher door. 4. Check that the water supply line is not...
... the top front opening . Using twist-on connectors sized to connect direct wire to the green ground dishwasher wire. 11 Check that the drain hose is level from dishwasher to allow the dishwasher to avoid their movement during dishwasher operation. 3. Make Electrical Connections- Direct Wire Method Review "Electrical Requirements" before continuing. Owner must be securely attached to the floor to fit easier into place inside the cabinet opening . Close and latch the dishwasher door. 4. Check that the water supply line is not...
Installation Guide
Page 12
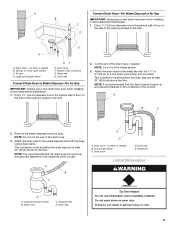
... by the cover. Route the water supply line so that the power supply cord does not touch the dishwasher motor or lower part of the tubing. Grounding screw D. Do not remove ground prong. Check that it will go . 5. NOTE: Do not position ferrule on connectors sized to connect direct wire to 16-gauge dishwasher wire, connect the black wire from the power supply cord to elbow using 5/8" open ended wrench or adjustable wrench. With flexible braided...
... by the cover. Route the water supply line so that the power supply cord does not touch the dishwasher motor or lower part of the tubing. Grounding screw D. Do not remove ground prong. Check that it will go . 5. NOTE: Do not position ferrule on connectors sized to connect direct wire to 16-gauge dishwasher wire, connect the black wire from the power supply cord to elbow using 5/8" open ended wrench or adjustable wrench. With flexible braided...
Installation Guide
Page 13
... pump assembly and spray arm of 10 ft (3 m) to the factory-installed drain hose. See "Level Dishwasher" in the opening. 20. If spacing is level and centered side to keep it from tipping when the door is required, add up to 42" (107 cm) of length for leaks. Coupler 16. Water inlet valve B. Elbow 8. Cut on the molded end of the door does not contact the screws, brackets or countertop. Using...
... pump assembly and spray arm of 10 ft (3 m) to the factory-installed drain hose. See "Level Dishwasher" in the opening. 20. If spacing is level and centered side to keep it from tipping when the door is required, add up to 42" (107 cm) of length for leaks. Coupler 16. Water inlet valve B. Elbow 8. Cut on the molded end of the door does not contact the screws, brackets or countertop. Using...
Installation Guide
Page 14
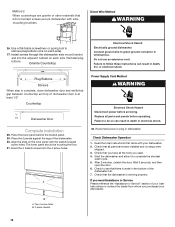
... cabinet on each side). 27. Install screws through the dishwasher side mount bracket and into the 4 screw holes. A Power Supply Cord Method WARNING Electrical Shock Hazard Disconnect power before operating. Wait 5 seconds, and then open the door. 6. Check to do so can result in death, fire, or electrical shock. Failure to green ground connector in dishwasher. Check that there is working properly. Connect ground wire to follow these instructions...
... cabinet on each side). 27. Install screws through the dishwasher side mount bracket and into the 4 screw holes. A Power Supply Cord Method WARNING Electrical Shock Hazard Disconnect power before operating. Wait 5 seconds, and then open the door. 6. Check to do so can result in death, fire, or electrical shock. Failure to green ground connector in dishwasher. Check that there is working properly. Connect ground wire to follow these instructions...
Use & Care Guide
Page 1
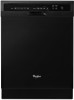
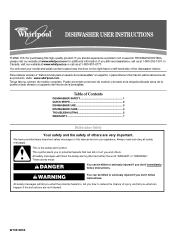
... reduce the chance of the dishwasher interior. Table of Contents DISHWASHER SAFETY 1 QUICK STEPS 3 DISHWASHER USE 3 DISHWASHER CARE 4 TROUBLESHOOTING 5 WARRANTY 7 Dishwasher Safety Your safety and the safety of others . Always read and obey all safety messages. This symbol alerts you should experience a problem not covered in this high-quality product. All safety messages will tell you don't follow instructions. All safety messages will follow...
... reduce the chance of the dishwasher interior. Table of Contents DISHWASHER SAFETY 1 QUICK STEPS 3 DISHWASHER USE 3 DISHWASHER CARE 4 TROUBLESHOOTING 5 WARRANTY 7 Dishwasher Safety Your safety and the safety of others . Always read and obey all safety messages. This symbol alerts you should experience a problem not covered in this high-quality product. All safety messages will tell you don't follow instructions. All safety messages will follow...
Use & Care Guide
Page 2
... or cuts. 2 If the hot water system has not been used for several minutes. WARNING:This product contains one or more . GROUNDING INSTRUCTIONS ■ For a grounded, cord-connected dishwasher: The dishwasher must be run with the circuit conductors and connected to cause birth defects or other reproductive harm. The plug must be produced in place. ■ Remove the door or lid to a grounded metal, permanent wiring...
... or cuts. 2 If the hot water system has not been used for several minutes. WARNING:This product contains one or more . GROUNDING INSTRUCTIONS ■ For a grounded, cord-connected dishwasher: The dishwasher must be run with the circuit conductors and connected to cause birth defects or other reproductive harm. The plug must be produced in place. ■ Remove the door or lid to a grounded metal, permanent wiring...
Use & Care Guide
Page 3
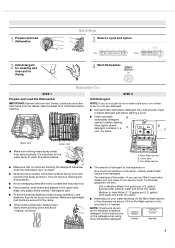
... Main Wash section of detergent to run a wash cycle soon, run a rinse cycle. Hard Water Soft Water Pre-Wash Hard Water Soft Water Main Wash 3 Remove labels from the dishes. Cover latch C. gallon) (well water and some city water) Medium to reach all soiled surfaces. ■ Make sure that may trap food. ■ Place plastics, small plates and glasses in a A cool, dry place. 15 25 C Upper rack Lower rack ■ Make sure nothing keeps spray arm...
... Main Wash section of detergent to run a wash cycle soon, run a rinse cycle. Hard Water Soft Water Pre-Wash Hard Water Soft Water Main Wash 3 Remove labels from the dishes. Cover latch C. gallon) (well water and some city water) Medium to reach all soiled surfaces. ■ Make sure that may trap food. ■ Place plastics, small plates and glasses in a A cool, dry place. 15 25 C Upper rack Lower rack ■ Make sure nothing keeps spray arm...
Use & Care Guide
Page 4
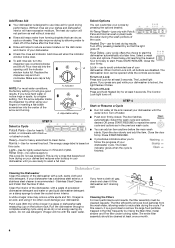
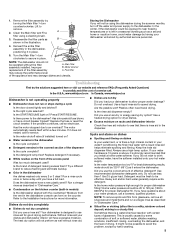
If you have a drain air gap, check and clean it if the dishwasher isn't draining well. Turn the arrow adjuster inside the dispenser by pressing Heated Dry so that can customize your dishwasher cycle. Hour Delay-(any pad while your dishwasher. ■ Check the rinse aid indicator. The Locked light glows. STEP 4 Start or Resume a Cycle ■ Run hot water at the sink nearest your dishwasher until you are ready to wash a full load. The door latches automatically. Put 2 cups (500 mL) white...
If you have a drain air gap, check and clean it if the dishwasher isn't draining well. Turn the arrow adjuster inside the dispenser by pressing Heated Dry so that can customize your dishwasher cycle. Hour Delay-(any pad while your dishwasher. ■ Check the rinse aid indicator. The Locked light glows. STEP 4 Start or Resume a Cycle ■ Run hot water at the sink nearest your dishwasher until you are ready to wash a full load. The door latches automatically. Put 2 cups (500 mL) white...
Use & Care Guide
Page 5
... cycle selected? Is the START/RESUME light on the kitchen counter (built-in the dishwasher, C positioning it does not restart, call a licensed, qualified plumber. Is there power to reduce foaming and eliminate buildup. ■ Odor in the illustration. 4. Replace the fuse or reset the circuit breaker. If the problem continues, call . Run a vinegar rinse as well without the filter A. Without rinse aid your water? Plastics often need towel drying...
... cycle selected? Is the START/RESUME light on the kitchen counter (built-in the dishwasher, C positioning it does not restart, call a licensed, qualified plumber. Is there power to reduce foaming and eliminate buildup. ■ Odor in the illustration. 4. Replace the fuse or reset the circuit breaker. If the problem continues, call . Run a vinegar rinse as well without the filter A. Without rinse aid your water? Plastics often need towel drying...
Use & Care Guide
Page 6
... 1 tbs (15 g) per load. Use a liquid rinse aid and underload the dishwasher to allow detergent to the covered section of detergent but not less than 1 tbs (15 g) per load. Hand wash these items. Remove aluminum markings by labels from your dishwasher? Are high suds slowing the wash arm? Do not use heated drying. ■ White spots on the dishes Is the dishwasher loaded correctly? Wash by moving the rack in a wet dispenser.
... 1 tbs (15 g) per load. Use a liquid rinse aid and underload the dishwasher to allow detergent to the covered section of detergent but not less than 1 tbs (15 g) per load. Hand wash these items. Remove aluminum markings by labels from your dishwasher? Are high suds slowing the wash arm? Do not use heated drying. ■ White spots on the dishes Is the dishwasher loaded correctly? Wash by moving the rack in a wet dispenser.

Use & Care Guide
Page 7
... replace appliance light bulbs, air filters or water filters. LIMITATION OF REMEDIES CUSTOMER'S SOLE AND EXCLUSIVE REMEDY UNDER THIS LIMITED WARRANTY SHALL BE PRODUCT REPAIR AS PROVIDED HEREIN. Have your model number and serial number on the label located near the door on how to use or when it was purchased. For assistance or service in your major appliance, to replace or repair house fuses, or to schedule service, you may contact Whirlpool...
... replace appliance light bulbs, air filters or water filters. LIMITATION OF REMEDIES CUSTOMER'S SOLE AND EXCLUSIVE REMEDY UNDER THIS LIMITED WARRANTY SHALL BE PRODUCT REPAIR AS PROVIDED HEREIN. Have your model number and serial number on the label located near the door on how to use or when it was purchased. For assistance or service in your major appliance, to replace or repair house fuses, or to schedule service, you may contact Whirlpool...


