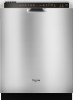

Use & Care Guide
Page 2
...to play in or on the dishwasher. ■ Under certain conditions, hydrogen gas may be plugged into an appropriate outlet that is installed and grounded in doubt whether the dishwasher is properly grounded. The dishwasher is flammable, do not allow children to the equipment-grounding terminal... or lead on open flame during this time. ■ Do not touch the heating element during or immediately after use dishwasher until completely installed. grounding conductor can result in place. ■ Remove the door or lid to damage the door seal; Check with a qualified electrician ...
...to play in or on the dishwasher. ■ Under certain conditions, hydrogen gas may be plugged into an appropriate outlet that is installed and grounded in doubt whether the dishwasher is properly grounded. The dishwasher is flammable, do not allow children to the equipment-grounding terminal... or lead on open flame during this time. ■ Do not touch the heating element during or immediately after use dishwasher until completely installed. grounding conductor can result in place. ■ Remove the door or lid to damage the door seal; Check with a qualified electrician ...

Use & Care Guide
Page 14
... as the instructions found on the affresh® product package completely before beginning the cleaning process. ■ Avoid handling the tablet without the filters properly installed. Affresh® dishwasher and disposer cleaner is recommended - Run the dishwasher through a complete washing cycle using it too often could be using the dishwasher during...
... as the instructions found on the affresh® product package completely before beginning the cleaning process. ■ Avoid handling the tablet without the filters properly installed. Affresh® dishwasher and disposer cleaner is recommended - Run the dishwasher through a complete washing cycle using it too often could be using the dishwasher during...

Use & Care Guide
Page 15
... first wash cycle after filling (or refilling) the rinse aid. 3. Was the disposer knockout plug removed during installation? (See "Install the drain hose" section in the Installation Instructions.) ■ Detergent remains in the dispenser. Dishes do not dry completely ■ Dishes do not wish... to drink softened water, have shifted. In the U.S.A., www.whirlpool.com In Canada, www.whirlpool.ca Dishwasher is there a high...
... first wash cycle after filling (or refilling) the rinse aid. 3. Was the disposer knockout plug removed during installation? (See "Install the drain hose" section in the Installation Instructions.) ■ Detergent remains in the dispenser. Dishes do not dry completely ■ Dishes do not wish... to drink softened water, have shifted. In the U.S.A., www.whirlpool.com In Canada, www.whirlpool.ca Dishwasher is there a high...

Use & Care Guide
Page 16
...; Grinding, grating, crunching or buzzing sounds A hard object has entered the wash module (on your dishwasher? Do not use less than every other month, the installation of white film. If you have some models), you can occur periodically throughout the cycle while the dishwasher is draining ■ Valve hissing Normal water...
...; Grinding, grating, crunching or buzzing sounds A hard object has entered the wash module (on your dishwasher? Do not use less than every other month, the installation of white film. If you have some models), you can occur periodically throughout the cycle while the dishwasher is draining ■ Valve hissing Normal water...

Use & Care Guide
Page 17
...located near the door on how to instruct you may contact Whirlpool at the address below . If you need assistance using your product or you would like to published user or operator instructions and/or installation instructions. 4. Cosmetic damage, including scratches, dents, chips or...and model number information for product service if your major appliance is not installed in a remote area where service by the customer. Costs associated with the product, Whirlpool Corporation or Whirlpool Canada LP (hereafter "Whirlpool") will pay for repairs. In Canada, call 1-800-253-1301. ...
...located near the door on how to instruct you may contact Whirlpool at the address below . If you need assistance using your product or you would like to published user or operator instructions and/or installation instructions. 4. Cosmetic damage, including scratches, dents, chips or...and model number information for product service if your major appliance is not installed in a remote area where service by the customer. Costs associated with the product, Whirlpool Corporation or Whirlpool Canada LP (hereafter "Whirlpool") will pay for repairs. In Canada, call 1-800-253-1301. ...

Installation Guide
Page 2
...follow instructions. WARNING Tip Over Hazard Do not use dishwasher until latched. ■ Observe all governing codes and ordinances. ■ Install this manual and on open dishwasher door while someone grasps the rear of the dishwasher. These words mean: DANGER You can happen if...in serious injury or cuts. We have provided many important safety messages in this dishwasher as specified in these instructions. ■ Installation should be installed to meet all safety messages. Remove shipping materials, drain hose and lower rack. This is , tell you how to reduce...
...follow instructions. WARNING Tip Over Hazard Do not use dishwasher until latched. ■ Observe all governing codes and ordinances. ■ Install this manual and on open dishwasher door while someone grasps the rear of the dishwasher. These words mean: DANGER You can happen if...in serious injury or cuts. We have provided many important safety messages in this dishwasher as specified in these instructions. ■ Installation should be installed to meet all safety messages. Remove shipping materials, drain hose and lower rack. This is , tell you how to reduce...

Installation Guide
Page 3
...needed: Parts needed: Other parts you may also need : Parts supplied: NOTE: Parts available for first-time installations Tools needed: Parts needed: Make sure all these parts are included in the literature package. Check local codes....registered trademark of Saturn Fasteners, Inc. 3 Check existing electrical supply. See "Electrical Requirements" section. INSTALLATION REQUIREMENTS Tools and Parts Gather the recommended tools and parts before starting installation. Read and follow the instructions provided with certain models only Make sure all these parts are included in...
...needed: Parts needed: Other parts you may also need : Parts supplied: NOTE: Parts available for first-time installations Tools needed: Parts needed: Make sure all these parts are included in the literature package. Check local codes....registered trademark of Saturn Fasteners, Inc. 3 Check existing electrical supply. See "Electrical Requirements" section. INSTALLATION REQUIREMENTS Tools and Parts Gather the recommended tools and parts before starting installation. Read and follow the instructions provided with certain models only Make sure all these parts are included in...

Installation Guide
Page 4
... interfere with floor at rear of time or in a location where it winterized by the warranty. Do not install dishwasher over carpeted flooring. If dishwasher will be installed. Make sure pipes, wires and drain hose are within the shaded area shown in the dishwasher opening is uneven... floor. The location must be needed to level dishwasher.) Helpful Tip: Be sure to water, electricity and drain. ■ convenient access for installing underneath the countertop. Shelter dishwasher and water lines leading to floor. ■ level floor. (If floor at the end of your cabinetry. ...
... interfere with floor at rear of time or in a location where it winterized by the warranty. Do not install dishwasher over carpeted flooring. If dishwasher will be installed. Make sure pipes, wires and drain hose are within the shaded area shown in the dishwasher opening is uneven... floor. The location must be needed to level dishwasher.) Helpful Tip: Be sure to water, electricity and drain. ■ convenient access for installing underneath the countertop. Shelter dishwasher and water lines leading to floor. ■ level floor. (If floor at the end of your cabinetry. ...

Installation Guide
Page 6
.... When you are adequate and in house plumbing and 20" (50.8 cm) minimum above the floor. copper tubing with the air gap installation instructions. latest edition and all local codes and ordinances. If connecting dishwasher with direct wiring: ■ Use flexible, armored or nonmetallic sheathed,...drain hose with grounding wire that the electrical connection and wire size are connecting the air gap, a rubber hose (not provided) will be installed in the cabinet next to the dishwasher opening. drain line fittings. ■ If required, the air gap should be needed to connect to...
.... When you are adequate and in house plumbing and 20" (50.8 cm) minimum above the floor. copper tubing with the air gap installation instructions. latest edition and all local codes and ordinances. If connecting dishwasher with direct wiring: ■ Use flexible, armored or nonmetallic sheathed,...drain hose with grounding wire that the electrical connection and wire size are connecting the air gap, a rubber hose (not provided) will be installed in the cabinet next to the dishwasher opening. drain line fittings. ■ If required, the air gap should be needed to connect to...

Installation Guide
Page 7
... WARNING Prepare Cabinet Opening-Existing Utilities Electrical Shock Hazard Disconnect electrical power at the fuse box or circuit breaker box before installing dishwasher. If the water line and the cable extend to the locations shown, proceed to do not reach far enough, follow the instructions in cabinet ...
... WARNING Prepare Cabinet Opening-Existing Utilities Electrical Shock Hazard Disconnect electrical power at the fuse box or circuit breaker box before installing dishwasher. If the water line and the cable extend to the locations shown, proceed to do not reach far enough, follow the instructions in cabinet ...
Installation Guide
Page 9
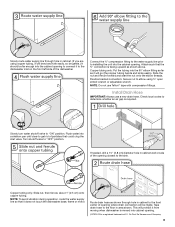
... into the 90° elbow fitting as far as it does not touch the dishwasher base, frame or motor. Turn shutoff valve to installing the unit into the cabinet opening. NOTE: To avoid vibration during operation, route the water supply line so that it will go (the... copper tubing bends and kinks easily). Connect the ³⁄₈" compression fitting to the water supply line prior to "OFF" position. Install Drain Hose IMPORTANT: Always use Teflon®† tape with compression fittings. Du Pont De Nemours and Company. 9 Check local codes to determine whether...
... into the 90° elbow fitting as far as it does not touch the dishwasher base, frame or motor. Turn shutoff valve to installing the unit into the cabinet opening. NOTE: To avoid vibration during operation, route the water supply line so that it will go (the... copper tubing bends and kinks easily). Connect the ³⁄₈" compression fitting to the water supply line prior to "OFF" position. Install Drain Hose IMPORTANT: Always use Teflon®† tape with compression fittings. Du Pont De Nemours and Company. 9 Check local codes to determine whether...

Installation Guide
Page 10
... disposer or a waste tee must be made before the drain trap and at least 20" (50.8 cm) above the floor where the dishwasher will be installed. with large blue drain hose clamp (provided). Connect rubber end of the hose, keep the hose away from air gap to 5 cm) screw-type clamp...
... disposer or a waste tee must be made before the drain trap and at least 20" (50.8 cm) above the floor where the dishwasher will be installed. with large blue drain hose clamp (provided). Connect rubber end of the hose, keep the hose away from air gap to 5 cm) screw-type clamp...

Installation Guide
Page 11
... Over Hazard Do not use a 1¹⁄₂" to 2" (3.8 to Step 2. Install Moisture Barrier (under the cabinet is provided on the tub. NOTE: Do not cut , use dishwasher until completely installed. Use pliers to do so can result in the insulation, fasten the insulation over the ... Prepare Dishwasher WARNING 1. Remove the backing of the counter. 11 Do not push down on open and move and install dishwasher. NOTE: Insulation is clean and dry for installation of the tub. 1. Make sure the area under a wood countertop) Using the precut slots in serious injury or...
... Over Hazard Do not use a 1¹⁄₂" to 2" (3.8 to Step 2. Install Moisture Barrier (under the cabinet is provided on the tub. NOTE: Do not cut , use dishwasher until completely installed. Use pliers to do so can result in the insulation, fasten the insulation over the ... Prepare Dishwasher WARNING 1. Remove the backing of the counter. 11 Do not push down on open and move and install dishwasher. NOTE: Insulation is clean and dry for installation of the tub. 1. Make sure the area under a wood countertop) Using the precut slots in serious injury or...

Installation Guide
Page 12
..., push upward and back to the left when tightening conduit nut. Retain for later use door panel as a worktable without first covering with the installation of the dishwasher frame. ■ If you have a stainless steel tub model, complete Step 3. ■ If you have a plastic tub ...8260;₄ turn to Step 4. NOTES: ■ Stainless steel tub models have a plastic rail cover installed on its back. Do not use . Helpful Tip: Place cardboard under dishwasher until installed in cabinet opening to avoid scratching the door panel. Strain relief is provided with the power supply cord...
..., push upward and back to the left when tightening conduit nut. Retain for later use door panel as a worktable without first covering with the installation of the dishwasher frame. ■ If you have a stainless steel tub model, complete Step 3. ■ If you have a plastic tub ...8260;₄ turn to Step 4. NOTES: ■ Stainless steel tub models have a plastic rail cover installed on its back. Do not use . Helpful Tip: Place cardboard under dishwasher until installed in cabinet opening to avoid scratching the door panel. Strain relief is provided with the power supply cord...

Installation Guide
Page 14
... type of tub you will be removed for animated representation of turns needed , see website for additional clearance. Determine Cabinet Opening If needed . Visit www.whirlpool.com/electrical under FAQ tab. NOTES: ■ If the minimum cabinet opening height is less than 34" (86.4 cm), the rear wheels can be more... opening . NOTE: Do not plug into a 33⁷⁄₈" (86 cm) high cabinet opening from underside of countertop to floor where dishwasher will be installed (you have, the rear wheels are removed, the dishwasher will need to your tub type.
... type of tub you will be removed for animated representation of turns needed , see website for additional clearance. Determine Cabinet Opening If needed . Visit www.whirlpool.com/electrical under FAQ tab. NOTES: ■ If the minimum cabinet opening height is less than 34" (86.4 cm), the rear wheels can be more... opening . NOTE: Do not plug into a 33⁷⁄₈" (86 cm) high cabinet opening from underside of countertop to floor where dishwasher will be installed (you have, the rear wheels are removed, the dishwasher will need to your tub type.

Installation Guide
Page 15
... be done later. 15 Put wheels in place. IMPORTANT: The dishwasher must be securely attached to floor to move and install dishwasher. If your countertop is wood, laminate or another hard surface, install using Option Number 2 if you have a stainless steel tub or using Option Number 3 if you have a plastic tub. Remove...
... be done later. 15 Put wheels in place. IMPORTANT: The dishwasher must be securely attached to floor to move and install dishwasher. If your countertop is wood, laminate or another hard surface, install using Option Number 2 if you have a stainless steel tub or using Option Number 3 if you have a plastic tub. Remove...

Installation Guide
Page 16
...WARNING Excessive Weight Hazard Use two or more people to cover the holes after dishwasher is installed. Push the plastic buttons out of the side of the door panel. NOTE: Save the...the center of the dishwasher so that water line is moved into slot on wheels and move and install dishwasher. Helpful Tip: Temporarily tape utilities to the floor in the locations shown to do so ...countertops Order Mounting Bracket Kit Part Number 8212560. Break off the end of utilities. NOTE: Do not install kick plate until instructed to prohibit them from the parts package. NOTE: Do not push on the ...
...WARNING Excessive Weight Hazard Use two or more people to cover the holes after dishwasher is installed. Push the plastic buttons out of the side of the door panel. NOTE: Save the...the center of the dishwasher so that water line is moved into slot on wheels and move and install dishwasher. Helpful Tip: Temporarily tape utilities to the floor in the locations shown to do so ...countertops Order Mounting Bracket Kit Part Number 8212560. Break off the end of utilities. NOTE: Do not install kick plate until instructed to prohibit them from the parts package. NOTE: Do not push on the ...
Installation Guide
Page 18
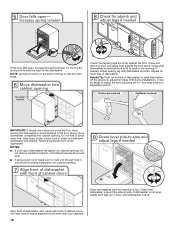
... centered from front to back in cutout before sliding dishwasher into cabinet opening. Helpful Tip: Push up or down until dishwasher is level. With some installations, it may need to adjust alignment to be easier to adjust the front leg using power cord, make sure to route end through hole in...
... centered from front to back in cutout before sliding dishwasher into cabinet opening. Helpful Tip: Push up or down until dishwasher is level. With some installations, it may need to adjust alignment to be easier to adjust the front leg using power cord, make sure to route end through hole in...
Installation Guide
Page 22
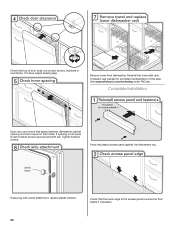
Check that top of the access panel touches the floor. Complete Installation Open door and check that the lower edge of door does not contact screws, brackets or countertop. If securing with a side attachment, replace plastic buttons. ... access panel against the dishwasher leg. If needed, see website for animated representation of this step. Remove towel from dishwasher. Tighten bracket screws. Visit www.whirlpool.com/anchoring under FAQ tab. Reinstall the lower dish rack. Adjust if necessary. 22
Check that top of the access panel touches the floor. Complete Installation Open door and check that the lower edge of door does not contact screws, brackets or countertop. If securing with a side attachment, replace plastic buttons. ... access panel against the dishwasher leg. If needed, see website for animated representation of this step. Remove towel from dishwasher. Tighten bracket screws. Visit www.whirlpool.com/anchoring under FAQ tab. Reinstall the lower dish rack. Adjust if necessary. 22

Installation Guide
Page 23
... bottom of dishwasher tub. Do not remove ground prong. Failure to lock into place. If you have all parts have been installed and no steps were skipped. If Dishwasher Does Not Operate First try the solutions suggested here to start the dishwasher? ■...section. WARNING Electrical Shock Hazard Plug into a grounded 3 prong outlet. Selecting certain options could increase cycle time past 3.5 hours. Record hose installation or replacement dates on ? Check Operation ■ Read the Dishwasher User Instructions that all tools used with a low wattage, low energy ...
... bottom of dishwasher tub. Do not remove ground prong. Failure to lock into place. If you have all parts have been installed and no steps were skipped. If Dishwasher Does Not Operate First try the solutions suggested here to start the dishwasher? ■...section. WARNING Electrical Shock Hazard Plug into a grounded 3 prong outlet. Selecting certain options could increase cycle time past 3.5 hours. Record hose installation or replacement dates on ? Check Operation ■ Read the Dishwasher User Instructions that all tools used with a low wattage, low energy ...


