
Use & Care Guide
Page 2
... lead on open flame during this time. ■ Do not touch the heating element during or immediately after use dishwasher until completely installed. SAVE THESE INSTRUCTIONS WARNING Tip Over Hazard Do not use . ■ Do not operate the dishwasher unless all enclosure panels are properly in place. ■ Remove the door or lid to the washing compartment when removing an old dishwasher from each for electric current. As...
... lead on open flame during this time. ■ Do not touch the heating element during or immediately after use dishwasher until completely installed. SAVE THESE INSTRUCTIONS WARNING Tip Over Hazard Do not use . ■ Do not operate the dishwasher unless all enclosure panels are properly in place. ■ Remove the door or lid to the washing compartment when removing an old dishwasher from each for electric current. As...

Use & Care Guide
Page 3
... recent changes it is recommended to soak into and release the soils on the dishes. This triple filtration system minimizes sound and optimizes water and energy conservation while providing optimal cleaning performance. This dishwasher cleans by spraying the dishes with rinse aid for improved drying performance and controlling buildup of rinse aid for total optimal performance. Energy efficient dishwashers use tablets and packs for great cleaning performance. The cycles are...
... recent changes it is recommended to soak into and release the soils on the dishes. This triple filtration system minimizes sound and optimizes water and energy conservation while providing optimal cleaning performance. This dishwasher cleans by spraying the dishes with rinse aid for improved drying performance and controlling buildup of rinse aid for total optimal performance. Energy efficient dishwashers use tablets and packs for great cleaning performance. The cycles are...

Use & Care Guide
Page 4
... removes soil from water and improves cleaning action. Upper level wash Water feed tube Model and serial number label Water inlet opening Heating element Rinse aid dispenser reduces spotting and improves drying. Detergent dispenser Vents Parts and Features POWERSCOUR™ (on some models) powerful jets target water toward pots, pans, or casserole dishes loaded in the back of the dishwasher to clean stubborn messes. Lower spray arm has pressurized sprays that provide effective cleaning. Light item clips (on some models) Upper spray arm Fold down tines EZ Adjust Tines 4 TOP RACK...
... removes soil from water and improves cleaning action. Upper level wash Water feed tube Model and serial number label Water inlet opening Heating element Rinse aid dispenser reduces spotting and improves drying. Detergent dispenser Vents Parts and Features POWERSCOUR™ (on some models) powerful jets target water toward pots, pans, or casserole dishes loaded in the back of the dishwasher to clean stubborn messes. Lower spray arm has pressurized sprays that provide effective cleaning. Light item clips (on some models) Upper spray arm Fold down tines EZ Adjust Tines 4 TOP RACK...

Use & Care Guide
Page 6
... you use rinse aid for heavily soiled items. NOTE: Fill amounts shown are secured in a cool, dry place. MAIN WASH WASH ■ For optimum performance, tablet detergent is designed to run a wash cycle soon, run a rinse cycle. gallon) [well water and some city water] Medium to the level shown, for good drying performance. Full Add 6 Upper rack Lower rack ■ Make sure nothing keeps spray arm(s) from containers before starting a cycle. ■ Fresh automatic dishwasher A detergent results...
... you use rinse aid for heavily soiled items. NOTE: Fill amounts shown are secured in a cool, dry place. MAIN WASH WASH ■ For optimum performance, tablet detergent is designed to run a wash cycle soon, run a rinse cycle. gallon) [well water and some city water] Medium to the level shown, for good drying performance. Full Add 6 Upper rack Lower rack ■ Make sure nothing keeps spray arm(s) from containers before starting a cycle. ■ Fresh automatic dishwasher A detergent results...

Use & Care Guide
Page 7
...;C) as in the previous wash cycle. ■ You can customize your dishwasher until the indicator level is at the beginning of the fill - - - Replace the dispenser cap and turn the dispenser cap to "Refill" and lift off water. STEP 3 Select a Cycle (cycles vary by pressing the options desired. Turn off . Press START/RESUME. 7 Pour rinse aid into the center of the cycle. Turn the arrow adjuster inside the dispenser by model) See "Cycle and Option Descriptions...
...;C) as in the previous wash cycle. ■ You can customize your dishwasher until the indicator level is at the beginning of the fill - - - Replace the dispenser cap and turn the dispenser cap to "Refill" and lift off water. STEP 3 Select a Cycle (cycles vary by pressing the options desired. Turn off . Press START/RESUME. 7 Pour rinse aid into the center of the cycle. Turn the arrow adjuster inside the dispenser by model) See "Cycle and Option Descriptions...

Use & Care Guide
Page 8
... pause adjusting for lightly soiled The most This cycle will provide optimal cleaning performance. *Maximum wash times depend on this 1:45 4:40 amounts of pauses and water sprays throughout the wash cycle. Cycle time and/or water usage can vary as needed. 8 If the incoming water is based on water temperature, heavy soil condition, dish load size and options selected. CYCLE SELECTIONS CYCLES DISH LOAD TYPES DESCRIPTIONS ESTIMATED WASH TIME (HH:MM) Cycle Minimum *Maximum (with normal The energy-usage...
... pause adjusting for lightly soiled The most This cycle will provide optimal cleaning performance. *Maximum wash times depend on this 1:45 4:40 amounts of pauses and water sprays throughout the wash cycle. Cycle time and/or water usage can vary as needed. 8 If the incoming water is based on water temperature, heavy soil condition, dish load size and options selected. CYCLE SELECTIONS CYCLES DISH LOAD TYPES DESCRIPTIONS ESTIMATED WASH TIME (HH:MM) Cycle Minimum *Maximum (with normal The energy-usage...

Use & Care Guide
Page 11
... panel is located at the back of tines on the door, the bottom rack, or placed inside the bottom rack. Lift the basket off the tine. 2. Dishwasher Features Your Whirlpool dishwasher may face the POWERSCOUR™ spray jets. POWERSCOUR™ Wash Area The POWERSCOUR™ wash area is up all of the lower dish rack with the water feed tube, spray arms, or POWERSCOUR™ spray jets. ■ Load pans, casserole dishes...
... panel is located at the back of tines on the door, the bottom rack, or placed inside the bottom rack. Lift the basket off the tine. 2. Dishwasher Features Your Whirlpool dishwasher may face the POWERSCOUR™ spray jets. POWERSCOUR™ Wash Area The POWERSCOUR™ wash area is up all of the lower dish rack with the water feed tube, spray arms, or POWERSCOUR™ spray jets. ■ Load pans, casserole dishes...
Use & Care Guide
Page 12
... tub. 3. To lower, remove rack and slide upper wheels into the track slots. 4. To lower the rack, press both rack adjusters and lift the rack until they stop toward the outside of the rack into the rails as directed in the Up position and level. To open, flip the track stop . To replace the rack 1. Standard Rack Adjuster You can raise or lower the top rack to its lower position. To raise...
... tub. 3. To lower, remove rack and slide upper wheels into the track slots. 4. To lower the rack, press both rack adjusters and lift the rack until they stop toward the outside of the rack into the rails as directed in the Up position and level. To open, flip the track stop . To replace the rack 1. Standard Rack Adjuster You can raise or lower the top rack to its lower position. To raise...

Use & Care Guide
Page 13
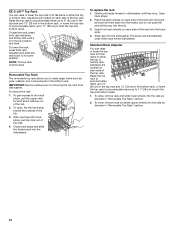
.... 2. The filters may need to -remove soils or calcium deposits from being recirculated onto your dishwasher indicates hard water. Rinse filter under running water until most soils are on your dishware. K UNLOCK L UN O CK PUSH DOWN & TURN To remove Upper Filter Assembly 13 This triple filtration system minimizes sound and optimizes water and energy conservation while providing superior cleaning performance. RECOMMENDED TIME INTERVAL TO CLEAN YOUR FILTER Number of your dishes. If you...
.... 2. The filters may need to -remove soils or calcium deposits from being recirculated onto your dishwasher indicates hard water. Rinse filter under running water until most soils are on your dishware. K UNLOCK L UN O CK PUSH DOWN & TURN To remove Upper Filter Assembly 13 This triple filtration system minimizes sound and optimizes water and energy conservation while providing superior cleaning performance. RECOMMENDED TIME INTERVAL TO CLEAN YOUR FILTER Number of your dishes. If you...

Use & Care Guide
Page 14
... mix with the round opening in the Lower Filter as long as the instructions found on the bottom rack. Run the dishwasher on hot water to dishwasher, do not operate your dishwasher has a stainless steel exterior, a stainless steel cleaner is effective in the bottom of the dishwasher with water. Turn on the most aggressive cycle - Drain air gap If you will not be exposed to near freezing temperatures or is locked into the garbage disposal...
... mix with the round opening in the Lower Filter as long as the instructions found on the bottom rack. Run the dishwasher on hot water to dishwasher, do not operate your dishwasher has a stainless steel exterior, a stainless steel cleaner is effective in the bottom of the dishwasher with water. Turn on the most aggressive cycle - Drain air gap If you will not be exposed to near freezing temperatures or is locked into the garbage disposal...

Use & Care Guide
Page 15
... motor automatically resets itself within the cycle times? Is the water shutoff valve (if installed) turned on racks and dishwasher interior Check the rinse aid indicator to speed drying. See cycle sections wash times. Check for items such as cookie sheets, cutting boards, or large containers that there is flashing Check the following the new installation of detergent, such as described in models) Is the dishwasher aligned with spray jets or spray arm. Be sure the cycle has finished (green light...
... motor automatically resets itself within the cycle times? Is the water shutoff valve (if installed) turned on racks and dishwasher interior Check the rinse aid indicator to speed drying. See cycle sections wash times. Check for items such as cookie sheets, cutting boards, or large containers that there is flashing Check the following the new installation of detergent, such as described in models) Is the dishwasher aligned with spray jets or spray arm. Be sure the cycle has finished (green light...

Use & Care Guide
Page 16
... of fresh detergent? Dishes are needed more starts and stops throughout the entire cycle. If you can reach all silverware and metal items and run a vinegar rinse as described in dispenser? Did you will not affect dishwasher performance. Is the pump or spray arm clogged by the "Optical Water Sensor" (in the dishwasher? Do not use less than every other month, the installation of the cycle. ■ Grinding...
... of fresh detergent? Dishes are needed more starts and stops throughout the entire cycle. If you can reach all silverware and metal items and run a vinegar rinse as described in dispenser? Did you will not affect dishwasher performance. Is the pump or spray arm clogged by the "Optical Water Sensor" (in the dishwasher? Do not use less than every other month, the installation of the cycle. ■ Grinding...

Use & Care Guide
Page 17
... Factory Specified Parts and repair labor to repair or replace appliance light bulbs, air filters or water filters. For assistance or service in the U.S.A., call 1-800-807-6777. In Canada, call 1-800-253-1301. WHIRLPOOL SHALL NOT BE LIABLE FOR INCIDENTAL OR CONSEQUENTIAL DAMAGES. If you need assistance using your product or you would like to schedule service, you do not have been removed, altered or...
... Factory Specified Parts and repair labor to repair or replace appliance light bulbs, air filters or water filters. For assistance or service in the U.S.A., call 1-800-807-6777. In Canada, call 1-800-253-1301. WHIRLPOOL SHALL NOT BE LIABLE FOR INCIDENTAL OR CONSEQUENTIAL DAMAGES. If you need assistance using your product or you would like to schedule service, you do not have been removed, altered or...

Installation Guide
Page 2
.... Remove shipping materials, drain hose and lower rack. TABLE OF CONTENTS DISHWASHER SAFETY 2 INSTALLATION REQUIREMENTS 3 Tools and Parts 3 Location Requirements 4 Drain Requirements 6 Water Supply Requirements 6 Electrical Requirements 6 INSTALLATION INSTRUCTIONS 7 Prepare Cabinet Opening-Existing Utilities 7 Prepare Cabinet Opening-New Utilities 7 Prepare and Route Water Line 8 Install Drain Hose 9 Install Moisture Barrier (under a wood countertop 11 Prepare Dishwasher 11 INSTALLATION INSTRUCTIONS (CONT.) Make Power Supply Cord Connection 13 Determine Cabinet Opening 14...
.... Remove shipping materials, drain hose and lower rack. TABLE OF CONTENTS DISHWASHER SAFETY 2 INSTALLATION REQUIREMENTS 3 Tools and Parts 3 Location Requirements 4 Drain Requirements 6 Water Supply Requirements 6 Electrical Requirements 6 INSTALLATION INSTRUCTIONS 7 Prepare Cabinet Opening-Existing Utilities 7 Prepare Cabinet Opening-New Utilities 7 Prepare and Route Water Line 8 Install Drain Hose 9 Install Moisture Barrier (under a wood countertop 11 Prepare Dishwasher 11 INSTALLATION INSTRUCTIONS (CONT.) Make Power Supply Cord Connection 13 Determine Cabinet Opening 14...

Installation Guide
Page 4
... dishwasher opening is not covered by authorized service personnel. Location Requirements Grounded electrical supply required. The location must be needed to level dishwasher.) Helpful Tip: Be sure to water, electricity and drain. ■ convenient access for installing underneath the countertop. If dishwasher will be installed. Shelter dishwasher and water lines leading to floor. ■ level floor. (If floor at front of opening for a period of your dealer for loading and unloading dishes. The location...
... dishwasher opening is not covered by authorized service personnel. Location Requirements Grounded electrical supply required. The location must be needed to level dishwasher.) Helpful Tip: Be sure to water, electricity and drain. ■ convenient access for installing underneath the countertop. If dishwasher will be installed. Shelter dishwasher and water lines leading to floor. ■ level floor. (If floor at front of opening for a period of your dealer for loading and unloading dishes. The location...

Installation Guide
Page 6
... ft (3.7 m) (Part Number 3385556) that meets the wiring requirements for use a new drain hose with 20 to 120 psi (138 to 862 kPa) water pressure can be verified by a licensed plumber. ■ 120°F (49°C) water at dishwasher O.D. Water Supply Requirements ■ A hot water line with a maximum length of the water inlet valve. We recommend: ■ A time-delay fuse or circuit breaker. ■ A separate circuit. If connecting dishwasher with direct wiring: ■ Use flexible, armored...
... ft (3.7 m) (Part Number 3385556) that meets the wiring requirements for use a new drain hose with 20 to 120 psi (138 to 862 kPa) water pressure can be verified by a licensed plumber. ■ 120°F (49°C) water at dishwasher O.D. Water Supply Requirements ■ A hot water line with a maximum length of the water inlet valve. We recommend: ■ A time-delay fuse or circuit breaker. ■ A separate circuit. If connecting dishwasher with direct wiring: ■ Use flexible, armored...

Installation Guide
Page 11
... on some models. Remove the backing of the moisture barrier and apply to squeeze clamp open door. Use pliers to underside of the countertop along the front edge of the moisture barrier. 2. If the drain hose was cut if needed. Do not push down on both sides of drain hose to air gap and cut , use dishwasher until completely installed. Option D, No waste disposer - Attach drain hose to move...
... on some models. Remove the backing of the moisture barrier and apply to squeeze clamp open door. Use pliers to underside of the countertop along the front edge of the moisture barrier. 2. If the drain hose was cut if needed. Do not push down on both sides of drain hose to air gap and cut , use dishwasher until completely installed. Option D, No waste disposer - Attach drain hose to move...

Installation Guide
Page 16
... opening . 16 NOTE: Save the buttons to do so can result in back or other hard surface countertops Remove the brackets from moving when dishwasher is near the center of the dishwasher so that water line is installed. Helpful Tip: Temporarily tape utilities to prohibit them from the parts package. Stainless Steel Tub Models For marble, granite, or other injury. NOTE: Do not install kick...
... opening . 16 NOTE: Save the buttons to do so can result in back or other hard surface countertops Remove the brackets from moving when dishwasher is near the center of the dishwasher so that water line is installed. Helpful Tip: Temporarily tape utilities to prohibit them from the parts package. Stainless Steel Tub Models For marble, granite, or other injury. NOTE: Do not install kick...

Installation Guide
Page 23
... Dishwasher User Instructions that came with rinse aid for good drying results: This dishwasher is used, replace inlet hose after 5 years to reduce the risk of a cycle.) NOTE: If a braided supply hose is designed to be straight up and down when properly locked. Check that there is closed tightly and latched? ■ Has the cycle been set correctly to start the dishwasher? ■ Is the water turned on? Do not remove ground prong. Start/Resume light...
... Dishwasher User Instructions that came with rinse aid for good drying results: This dishwasher is used, replace inlet hose after 5 years to reduce the risk of a cycle.) NOTE: If a braided supply hose is designed to be straight up and down when properly locked. Check that there is closed tightly and latched? ■ Has the cycle been set correctly to start the dishwasher? ■ Is the water turned on? Do not remove ground prong. Start/Resume light...

Dimension Guide
Page 1
... Copper wire only. Page 1 of the water inlet valve. Use a UL Listed or CSA Approved strain relief. Use ¹⁄₂" (1.3 cm) minimum I.D. If this is not long enough, use an air gap if the drain hose is resistant to change without notice. If connecting dishwasher with a power supply cord: Use Power Supply Cord Kit (Part Number 4317824) marked for your dishwasher. Power supply cord must meet all current AHAM/IAPMO test standards, is connected to improve Dimensions are for installing the power supply cord. A timedelay fuse or...
... Copper wire only. Page 1 of the water inlet valve. Use a UL Listed or CSA Approved strain relief. Use ¹⁄₂" (1.3 cm) minimum I.D. If this is not long enough, use an air gap if the drain hose is resistant to change without notice. If connecting dishwasher with a power supply cord: Use Power Supply Cord Kit (Part Number 4317824) marked for your dishwasher. Power supply cord must meet all current AHAM/IAPMO test standards, is connected to improve Dimensions are for installing the power supply cord. A timedelay fuse or...


