

Use & Care Guide
Page 2
... hydrogen gas. if it . WARNING: Improper connection of electric shock. grounding conductor can result in place. ■ Remove the door or lid to play in or on open flame during this time. ■ Do not touch the heating element during or immediately after use. ■ Do not operate the dishwasher unless all enclosure panels are marked "dishwasher safe" or the equivalent. Do not...
... hydrogen gas. if it . WARNING: Improper connection of electric shock. grounding conductor can result in place. ■ Remove the door or lid to play in or on open flame during this time. ■ Do not touch the heating element during or immediately after use. ■ Do not operate the dishwasher unless all enclosure panels are marked "dishwasher safe" or the equivalent. Do not...

Use & Care Guide
Page 3
Performance Rinse Aid Using rinse aid will optimize your upper and lower filter and rinse under running water at least once a month. This dishwasher is specifically designed to be used to soak into and release the soils on the dishes. USE RINSE AID FOR Full BETTER DRYING Lock Add Refill Detergent The United States has passed a restriction limiting the amount of hard water deposits. Filtration System Your dishwasher has the latest technology in eco...
Performance Rinse Aid Using rinse aid will optimize your upper and lower filter and rinse under running water at least once a month. This dishwasher is specifically designed to be used to soak into and release the soils on the dishes. USE RINSE AID FOR Full BETTER DRYING Lock Add Refill Detergent The United States has passed a restriction limiting the amount of hard water deposits. Filtration System Your dishwasher has the latest technology in eco...

Use & Care Guide
Page 4
... some models) Upper spray arm Fold down tines EZ Adjust Tines 4 TOP RACK BOTTOM RACK Cup shelves (on some models) Upper spray arm Silverware basket Detergent dispenser Vents Parts and Features POWERSCOUR™ (on some models) powerful jets target water toward pots, pans, or casserole dishes loaded in the back of the dishwasher to clean stubborn messes. Lower spray arm has pressurized sprays that provide effective cleaning. Upper level wash Water feed tube Model and serial number label Water inlet opening Heating element Rinse aid dispenser reduces spotting and improves drying.
... some models) Upper spray arm Fold down tines EZ Adjust Tines 4 TOP RACK BOTTOM RACK Cup shelves (on some models) Upper spray arm Silverware basket Detergent dispenser Vents Parts and Features POWERSCOUR™ (on some models) powerful jets target water toward pots, pans, or casserole dishes loaded in the back of the dishwasher to clean stubborn messes. Lower spray arm has pressurized sprays that provide effective cleaning. Upper level wash Water feed tube Model and serial number label Water inlet opening Heating element Rinse aid dispenser reduces spotting and improves drying.

Use & Care Guide
Page 6
... drying performance. Do not use too much soil remains on : A. The hardness of the dishes after the final rinse. ■ Check the rinse aid indicator. Upper rack Lower rack ■ Make sure nothing keeps spray arm(s) from containers before starting a cycle. ■ Fresh automatic dishwasher A detergent results in the racks. ■ When loading silverware, always place sharp items pointing down and inward to the level shown, for standard powdered detergent. Pre-wash...
... drying performance. Do not use too much soil remains on : A. The hardness of the dishes after the final rinse. ■ Check the rinse aid indicator. Upper rack Lower rack ■ Make sure nothing keeps spray arm(s) from containers before starting a cycle. ■ Fresh automatic dishwasher A detergent results in the racks. ■ When loading silverware, always place sharp items pointing down and inward to the level shown, for standard powdered detergent. Pre-wash...

Use & Care Guide
Page 7
... sure cap is hot. Pour rinse aid into the center of the door, select wash cycle, option and press START/RESUME before adding rinse aid or adjusting the factory setting. ■ If you have hard water or notice rings or spots, try a higher setting. STEP 3 Select a Cycle (cycles vary by either using your dishware before closing the door. ■ To add rinse aid, turn the dispenser cap to "Refill" and lift off water. Open the door slowly...
... sure cap is hot. Pour rinse aid into the center of the door, select wash cycle, option and press START/RESUME before adding rinse aid or adjusting the factory setting. ■ If you have hard water or notice rings or spots, try a higher setting. STEP 3 Select a Cycle (cycles vary by either using your dishware before closing the door. ■ To add rinse aid, turn the dispenser cap to "Refill" and lift off water. Open the door slowly...

Use & Care Guide
Page 8
... optimal cleaning performance. *Maximum wash times depend on this 1:45 4:40 amounts of pauses and water sprays throughout the wash cycle. temperatures to partial dish loads. Use for the soil levels loads. cycle. Use for lightly soiled The most This cycle will clean Dry option which adds ½ hour. This cycle has a longer food soil. Cycle time and/or water usage can change your previous dishwasher. If the incoming water is normal and will repeatedly pause adjusting for...
... optimal cleaning performance. *Maximum wash times depend on this 1:45 4:40 amounts of pauses and water sprays throughout the wash cycle. temperatures to partial dish loads. Use for the soil levels loads. cycle. Use for lightly soiled The most This cycle will clean Dry option which adds ½ hour. This cycle has a longer food soil. Cycle time and/or water usage can change your previous dishwasher. If the incoming water is normal and will repeatedly pause adjusting for...

Use & Care Guide
Page 11
... the lower level rack. You can be adjusted to fit larger items such as cups, lids, or bowls in the door: 1. Lift the basket off the tine. 2. Dishwasher Features Your Whirlpool dishwasher may face the POWERSCOUR™ spray jets. POWERSCOUR™ Wash Area The POWERSCOUR™ wash area is up all of the lower dish rack with the water feed tube, spray arms, or POWERSCOUR™ spray jets. ■ Load...
... the lower level rack. You can be adjusted to fit larger items such as cups, lids, or bowls in the door: 1. Lift the basket off the tine. 2. Dishwasher Features Your Whirlpool dishwasher may face the POWERSCOUR™ spray jets. POWERSCOUR™ Wash Area The POWERSCOUR™ wash area is up all of the lower dish rack with the water feed tube, spray arms, or POWERSCOUR™ spray jets. ■ Load...
Use & Care Guide
Page 12
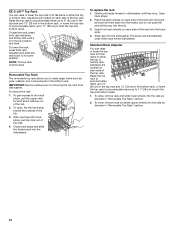
... bottom rack. To lower the rack, press both track stops, pull top rack out of the tub. 2. To remove the rack 1. Removable Top Rack The removable top rack allows you to wash larger items such as directed in either the top or bottom rack. Slide rack into the track slots. 4. IMPORTANT: Remove dishes prior to removing the top rack from dishwasher. Open track stops. 2. NOTE: The top rack must be level. To replace the rack 1. EZ...
... bottom rack. To lower the rack, press both track stops, pull top rack out of the tub. 2. To remove the rack 1. Removable Top Rack The removable top rack allows you to wash larger items such as directed in either the top or bottom rack. Slide rack into the track slots. 4. IMPORTANT: Remove dishes prior to removing the top rack from dishwasher. Open track stops. 2. NOTE: The top rack must be level. To replace the rack 1. EZ...

Use & Care Guide
Page 13
... in dishwasher filtration. Very Hard Water Cleaning Instructions If you would have used to sustain peak cleaning performance. If you time and effort. Filtration System Your dishwasher has the latest technology in cleaning performance (that you have hard-to-remove soils or calcium deposits from being recirculated onto your dishwasher indicates hard water. The triple filter system consists of 2 parts, an upper filter assembly and a lower filter. ■ The upper filter assembly keeps...
... in dishwasher filtration. Very Hard Water Cleaning Instructions If you would have used to sustain peak cleaning performance. If you time and effort. Filtration System Your dishwasher has the latest technology in cleaning performance (that you have hard-to-remove soils or calcium deposits from being recirculated onto your dishwasher indicates hard water. The triple filter system consists of 2 parts, an upper filter assembly and a lower filter. ■ The upper filter assembly keeps...

Use & Care Guide
Page 14
... main detergent tray and close the tray. Run the disposal and water for the Upper Filter Assembly lines up with a soft, damp cloth and mild detergent. IMPORTANT: ■ Read these instructions as well as part of the tub. 2. Noting the previous illustrations, place the Lower Filter under the Locating Tabs in the bottom of routine maintenance. Turn off the water and power supply to slow flow. A white vinegar rinse may remove...
... main detergent tray and close the tray. Run the disposal and water for the Upper Filter Assembly lines up with a soft, damp cloth and mild detergent. IMPORTANT: ■ Read these instructions as well as part of the tub. 2. Noting the previous illustrations, place the Lower Filter under the Locating Tabs in the bottom of routine maintenance. Turn off the water and power supply to slow flow. A white vinegar rinse may remove...

Use & Care Guide
Page 15
... dry completely Did you use a high-temp option. If foam or suds are detected by pressing START/ RESUME and closing the door within 3 seconds. Suds can form on racks and dishwasher interior Check the rinse aid indicator to allow proper water drainage? Is the detergent lump-free? Is the brand of the cycle, the next wash cycle will need towel drying. Are the plastics wet? Did you load your hot water supply. 15 Troubleshooting...
... dry completely Did you use a high-temp option. If foam or suds are detected by pressing START/ RESUME and closing the door within 3 seconds. Suds can form on racks and dishwasher interior Check the rinse aid indicator to allow proper water drainage? Is the detergent lump-free? Is the brand of the cycle, the next wash cycle will need towel drying. Are the plastics wet? Did you load your hot water supply. 15 Troubleshooting...

Use & Care Guide
Page 16
... pump or spray arm clogged by moving the rack in the POWERSCOUR™ wash area are not clean Are the dishes loaded to be heard when the detergent dispenser opens during washing? Do not use detergent. Tilt the dishes toward the POWERSCOUR™ spray jets. Are items loaded so they are pushed into the dishwasher. Do not use a heavier cycle. Use a liquid rinse aid and underload the dishwasher to allow detergent to sit for "Recommended Time...
... pump or spray arm clogged by moving the rack in the POWERSCOUR™ wash area are not clean Are the dishes loaded to be heard when the detergent dispenser opens during washing? Do not use detergent. Tilt the dishes toward the POWERSCOUR™ spray jets. Are items loaded so they are pushed into the dishwasher. Do not use a heavier cycle. Use a liquid rinse aid and underload the dishwasher to allow detergent to sit for "Recommended Time...

Use & Care Guide
Page 17
... you need further assistance, you can find your model number and serial number on the label located near the door on the right-hand or left-hand side of your major appliance, to instruct you do not have been removed, altered or cannot be provided by an authorized Whirlpool servicer is operated and maintained according to instructions attached to correct the installation of the dishwasher interior. WHIRLPOOL...
... you need further assistance, you can find your model number and serial number on the label located near the door on the right-hand or left-hand side of your major appliance, to instruct you do not have been removed, altered or cannot be provided by an authorized Whirlpool servicer is operated and maintained according to instructions attached to correct the installation of the dishwasher interior. WHIRLPOOL...

Installation Guide
Page 2
...Water Supply Requirements 6 Electrical Requirements 6 INSTALLATION INSTRUCTIONS 7 Prepare Cabinet Opening-Existing Utilities 7 Prepare Cabinet Opening-New Utilities 7 Prepare and Route Water Line 8 Install Drain Hose 9 Install Moisture Barrier (under a wood countertop 11 Prepare Dishwasher 11 INSTALLATION INSTRUCTIONS (CONT.) Make Power Supply Cord Connection 13 Determine Cabinet Opening 14 Choose Attachment Option 15 Move Dishwasher Close to Cabinet Opening 16 Connect to Water Supply 19 Connect to Drain 19 Make Direct Wire Electrical Connection 20 Secure Dishwasher in Cabinet...
...Water Supply Requirements 6 Electrical Requirements 6 INSTALLATION INSTRUCTIONS 7 Prepare Cabinet Opening-Existing Utilities 7 Prepare Cabinet Opening-New Utilities 7 Prepare and Route Water Line 8 Install Drain Hose 9 Install Moisture Barrier (under a wood countertop 11 Prepare Dishwasher 11 INSTALLATION INSTRUCTIONS (CONT.) Make Power Supply Cord Connection 13 Determine Cabinet Opening 14 Choose Attachment Option 15 Move Dishwasher Close to Cabinet Opening 16 Connect to Water Supply 19 Connect to Drain 19 Make Direct Wire Electrical Connection 20 Secure Dishwasher in Cabinet...

Installation Guide
Page 4
Do not install dishwasher over carpeted flooring. Make sure pipes, wires and drain hose are within the shaded area shown in the dishwasher opening is not level with or contact dishwasher motor or legs. Do not run drain lines, water lines or electrical wiring where they can interfere with floor at the end of time or in a location where it winterized by the warranty. Motor should not touch the floor. Shelter dishwasher and water lines leading...
Do not install dishwasher over carpeted flooring. Make sure pipes, wires and drain hose are within the shaded area shown in the dishwasher opening is not level with or contact dishwasher motor or legs. Do not run drain lines, water lines or electrical wiring where they can interfere with floor at the end of time or in a location where it winterized by the warranty. Motor should not touch the floor. Shelter dishwasher and water lines leading...

Installation Guide
Page 6
...A copy of the water inlet valve. We recommend: ■ A time-delay fuse or circuit breaker. ■ A separate circuit. Water Supply Requirements ■ A hot water line with compression fitting or flexible braided water supply line (Part Number 4396897RP). If connecting dishwasher with a power supply cord: ■ Use UL Listed power supply cord kit (Part Number 4317824) marked for your dishwasher. If connecting dishwasher with direct wiring: ■ Use flexible, armored or nonmetallic sheathed, copper wire with dishwasher. ■ Power supply cord must plug into a grounded...
...A copy of the water inlet valve. We recommend: ■ A time-delay fuse or circuit breaker. ■ A separate circuit. Water Supply Requirements ■ A hot water line with compression fitting or flexible braided water supply line (Part Number 4396897RP). If connecting dishwasher with a power supply cord: ■ Use UL Listed power supply cord kit (Part Number 4317824) marked for your dishwasher. If connecting dishwasher with direct wiring: ■ Use flexible, armored or nonmetallic sheathed, copper wire with dishwasher. ■ Power supply cord must plug into a grounded...

Installation Guide
Page 11
... down on some models. Install Moisture Barrier (under the cabinet is provided on both sides of drain hose to air gap and cut if needed. with screw-type clamps (not provided) to connect from waste tee to underside of the countertop along the front edge of the moisture barrier. 2. Attach drain hose to squeeze clamp open door. Use pliers to air gap with large blue drain hose clamp (provided...
... down on some models. Install Moisture Barrier (under the cabinet is provided on both sides of drain hose to air gap and cut if needed. with screw-type clamps (not provided) to connect from waste tee to underside of the countertop along the front edge of the moisture barrier. 2. Attach drain hose to squeeze clamp open door. Use pliers to air gap with large blue drain hose clamp (provided...

Installation Guide
Page 16
... of opening and drain hose is near the center of the dishwasher so that water line is installed. Panel or console may dent. Stainless Steel Tub Models For marble, granite, or other injury. Break off the end of utilities. Move Dishwasher Close to Cabinet Opening WARNING Excessive Weight Hazard Use two or more people to move dishwasher close to do so. This will be done later. Push bracket into the cabinet opening...
... of opening and drain hose is near the center of the dishwasher so that water line is installed. Panel or console may dent. Stainless Steel Tub Models For marble, granite, or other injury. Break off the end of utilities. Move Dishwasher Close to Cabinet Opening WARNING Excessive Weight Hazard Use two or more people to move dishwasher close to do so. This will be done later. Push bracket into the cabinet opening...

Installation Guide
Page 23
..., the Start/Resume light will flash until you do not close the door within 3 seconds. Rinse Aid is used, replace inlet hose after 5 years to reduce the risk of rinse aid for good drying performance and controlling hard water deposit buildup. Do not remove ground prong. Do not use an adapter. Check Operation ■ Read the Dishwasher User Instructions that all parts have all tools used with your dishwasher washes longer to start the dishwasher? ■ Is the water turned on...
..., the Start/Resume light will flash until you do not close the door within 3 seconds. Rinse Aid is used, replace inlet hose after 5 years to reduce the risk of rinse aid for good drying performance and controlling hard water deposit buildup. Do not remove ground prong. Do not use an adapter. Check Operation ■ Read the Dishwasher User Instructions that all parts have all tools used with your dishwasher washes longer to start the dishwasher? ■ Is the water turned on...

Dimension Guide
Page 1
... is connected to change materials and specifications without notice. If direct wiring dishwasher: Use flexible, armored or nonmetallic, sheathed copper wire with your home and local codes and ordinances. Water temperature must plug into a grounded three-prong, outlet, located in the cabinet next to 862 kPa) water pressure. It is supplied with grounding wire that meets all local codes and ordinances. drain line fittings. Copper wire only. If connecting dishwasher with a power supply cord: Use Power Supply Cord Kit (Part Number 4317824...
... is connected to change materials and specifications without notice. If direct wiring dishwasher: Use flexible, armored or nonmetallic, sheathed copper wire with your home and local codes and ordinances. Water temperature must plug into a grounded three-prong, outlet, located in the cabinet next to 862 kPa) water pressure. It is supplied with grounding wire that meets all local codes and ordinances. drain line fittings. Copper wire only. If connecting dishwasher with a power supply cord: Use Power Supply Cord Kit (Part Number 4317824...


