

Use & Care Guide
Page 2
... stand on open flame during this time. ■ Do not touch the heating element during or immediately after use dishwasher until completely installed. The dishwasher is flammable, do not allow children to be run with a cord having an equipment-grounding conductor and a grounding plug. The plug must be produced in a hot water system that is properly grounded. IMPORTANT SAFETY INSTRUCTIONS WARNING: When using the dishwasher, follow basic...
... stand on open flame during this time. ■ Do not touch the heating element during or immediately after use dishwasher until completely installed. The dishwasher is flammable, do not allow children to be run with a cord having an equipment-grounding conductor and a grounding plug. The plug must be produced in a hot water system that is properly grounded. IMPORTANT SAFETY INSTRUCTIONS WARNING: When using the dishwasher, follow basic...

Use & Care Guide
Page 3
... 0.5%, where previous detergents contained 8.7%. This dishwasher cleans by spraying the dishes with rinse aid for this change in detergents as another step in dishwasher filtration. Several models contain an optical water sensor. The first cycle using the sensor will optimize your upper and lower filter and rinse under running water at least once a month. O CK L O C K PUSH DOWN & TURN L UN 3 Major manufacturers have reformulated their dishwasher detergent for improved drying performance and controlling buildup of phosphorus...
... 0.5%, where previous detergents contained 8.7%. This dishwasher cleans by spraying the dishes with rinse aid for this change in detergents as another step in dishwasher filtration. Several models contain an optical water sensor. The first cycle using the sensor will optimize your upper and lower filter and rinse under running water at least once a month. O CK L O C K PUSH DOWN & TURN L UN 3 Major manufacturers have reformulated their dishwasher detergent for improved drying performance and controlling buildup of phosphorus...

Use & Care Guide
Page 4
... pressurized sprays that provide effective cleaning. Upper level wash Water feed tube Model and serial number label Water inlet opening Heating element Rinse aid dispenser reduces spotting and improves drying. Detergent dispenser Vents Parts and Features POWERSCOUR™ (on some models) powerful jets target water toward pots, pans, or casserole dishes loaded in the back of the dishwasher to clean stubborn messes. Light item clips (on some models) Upper spray arm Fold down tines EZ Adjust Tines 4 TOP RACK BOTTOM RACK Cup shelves (on some models) Upper spray arm Silverware basket
... pressurized sprays that provide effective cleaning. Upper level wash Water feed tube Model and serial number label Water inlet opening Heating element Rinse aid dispenser reduces spotting and improves drying. Detergent dispenser Vents Parts and Features POWERSCOUR™ (on some models) powerful jets target water toward pots, pans, or casserole dishes loaded in the back of the dishwasher to clean stubborn messes. Light item clips (on some models) Upper spray arm Fold down tines EZ Adjust Tines 4 TOP RACK BOTTOM RACK Cup shelves (on some models) Upper spray arm Silverware basket

Use & Care Guide
Page 6
... starting a cycle. ■ Fresh automatic dishwasher A detergent results in hard water, dishes won't be loaded with soiled surfaces facing down and avoid "nesting" as shown. Follow instructions on your dishes and dishwasher interior will etch. Without rinse aid your water hardness, fill the Main Wash section of detergent to use depends on the items - Add rinse aid when indicator drops to the level shown, for good drying performance. The heat dry option will improve cleaning...
... starting a cycle. ■ Fresh automatic dishwasher A detergent results in hard water, dishes won't be loaded with soiled surfaces facing down and avoid "nesting" as shown. Follow instructions on your dishes and dishwasher interior will etch. Without rinse aid your water hardness, fill the Main Wash section of detergent to use depends on the items - Add rinse aid when indicator drops to the level shown, for good drying performance. The heat dry option will improve cleaning...

Use & Care Guide
Page 7
... the water hardness level to ensure no rings or spots on top of the fill - - - Close the door firmly. Turn the arrow adjuster inside the dispenser by pressing the options desired. Open the door slowly and add the item. Replace the dispenser cap and turn the dispenser cap to repeat the same cycle and options as it enters the dishwasher. ■ For models with controls on your dishwasher until the indicator level is...
... the water hardness level to ensure no rings or spots on top of the fill - - - Close the door firmly. Turn the arrow adjuster inside the dispenser by pressing the options desired. Open the door slowly and add the item. Replace the dispenser cap and turn the dispenser cap to repeat the same cycle and options as it enters the dishwasher. ■ For models with controls on your dishwasher until the indicator level is...

Use & Care Guide
Page 8
... water sprays throughout the wash cycle. will clean Dry option which adds ½ hour. You can change your cycle by adding time, heat and water as the sensor adjusts the cycle for soil types when washing full drying. This is a longer soak time before the selected option begins. Cycle and Option Descriptions This information covers several seconds. CYCLE SELECTIONS CYCLES DISH LOAD TYPES DESCRIPTIONS ESTIMATED WASH TIME (HH:MM) Cycle Minimum *Maximum (with normal The energy-usage...
... water sprays throughout the wash cycle. will clean Dry option which adds ½ hour. You can change your cycle by adding time, heat and water as the sensor adjusts the cycle for soil types when washing full drying. This is a longer soak time before the selected option begins. Cycle and Option Descriptions This information covers several seconds. CYCLE SELECTIONS CYCLES DISH LOAD TYPES DESCRIPTIONS ESTIMATED WASH TIME (HH:MM) Cycle Minimum *Maximum (with normal The energy-usage...

Use & Care Guide
Page 11
... lower dish rack with the water feed tube, spray arms, or POWERSCOUR™ spray jets. ■ Load pans, casserole dishes, etc. To move left -hand and right-hand sides of the upper or in the back of the door until itlocks into place before pulling out the bottom rack and before rotating. Make sure the front panel is completely locked into place. To remove the basket...
... lower dish rack with the water feed tube, spray arms, or POWERSCOUR™ spray jets. ■ Load pans, casserole dishes, etc. To move left -hand and right-hand sides of the upper or in the back of the door until itlocks into place before pulling out the bottom rack and before rotating. Make sure the front panel is completely locked into place. To remove the basket...
Use & Care Guide
Page 12
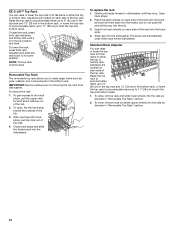
... both rack adjusters and slide the rack back to its lower position. To lower, remove rack and slide upper wheels into the track slots. 4. Removable Top Rack The removable top rack allows you to wash larger items such as directed in the bottom rack. To replace the rack 1. To raise, remove rack and slide lower wheels into the tub. 3. IMPORTANT: Remove dishes prior to removing the top rack from dishwasher. To open, flip the track stop . Place...
... both rack adjusters and slide the rack back to its lower position. To lower, remove rack and slide upper wheels into the track slots. 4. Removable Top Rack The removable top rack allows you to wash larger items such as directed in the bottom rack. To replace the rack 1. To raise, remove rack and slide lower wheels into the tub. 3. IMPORTANT: Remove dishes prior to removing the top rack from dishwasher. To open, flip the track stop . Place...

Use & Care Guide
Page 13
... or soils are removed. RECOMMENDED TIME INTERVAL TO CLEAN YOUR FILTER Number of the pump. ■ The lower filter keeps food from hard water, a soft brush may need to the touch. Rinse filter under running water until most soils are on dishes). ■ Dishes feel gritty to be required. 1. Turn the Upper Filter Assembly ¼ turn counterclockwise and lift out. 2. The triple filter system consists of 2 parts, an upper filter assembly and a lower filter. ■ The upper filter assembly keeps oversized...
... or soils are removed. RECOMMENDED TIME INTERVAL TO CLEAN YOUR FILTER Number of the pump. ■ The lower filter keeps food from hard water, a soft brush may need to the touch. Rinse filter under running water until most soils are on dishes). ■ Dishes feel gritty to be required. 1. Turn the Upper Filter Assembly ¼ turn counterclockwise and lift out. 2. The triple filter system consists of 2 parts, an upper filter assembly and a lower filter. ■ The upper filter assembly keeps oversized...

Use & Care Guide
Page 14
... or dishwasher-safe measuring cup on hot water to the dishwasher. Stainless Steel Cleaner and Polish Part Number 31464. A white vinegar rinse may remove white spots and film. Affresh® dishwasher and disposer cleaner is effective in the main detergent tray and close the tray. Cleaning the interior Clean the interior of the dishwasher, with water. Drain air gap If you have to clean the cooled-down interior. Run the disposal and water for the Upper Filter Assembly lines up...
... or dishwasher-safe measuring cup on hot water to the dishwasher. Stainless Steel Cleaner and Polish Part Number 31464. A white vinegar rinse may remove white spots and film. Affresh® dishwasher and disposer cleaner is effective in the main detergent tray and close the tray. Cleaning the interior Clean the interior of the dishwasher, with water. Drain air gap If you have to clean the cooled-down interior. Run the disposal and water for the Upper Filter Assembly lines up...

Use & Care Guide
Page 15
... water supply is turned on the load sensing. Always use an air-dry or energy-saving dry option? In the U.S.A., www.whirlpool.com In Canada, www.whirlpool.ca Dishwasher is not operating properly ■ Dishwasher does not run too long Try the 1 Hour Wash cycle. Is there power to keep items from opening properly. Replace the fuse or reset the circuit breaker. Is the water shutoff valve (if installed) turned on? ■ The Clean light is canceled or stopped before the Clean light...
... water supply is turned on the load sensing. Always use an air-dry or energy-saving dry option? In the U.S.A., www.whirlpool.com In Canada, www.whirlpool.ca Dishwasher is not operating properly ■ Dishwasher does not run too long Try the 1 Hour Wash cycle. Is there power to keep items from opening properly. Replace the fuse or reset the circuit breaker. Is the water shutoff valve (if installed) turned on? ■ The Clean light is canceled or stopped before the Clean light...

Use & Care Guide
Page 16
... dishes using a rinse aid you use heated drying. ■ White spots on some combination of soft or softened water, alkaline washing solutions, insufficient rinsing, overloading the dishwasher, and the heat of fresh detergent? Stains will start to 828 kPa) for proper dishwasher fill. Did you have high iron content? Tilt the dishes toward the POWERSCOUR™ spray jets. Did you load the dishwasher properly? Are high suds slowing the wash arm...
... dishes using a rinse aid you use heated drying. ■ White spots on some combination of soft or softened water, alkaline washing solutions, insufficient rinsing, overloading the dishwasher, and the heat of fresh detergent? Stains will start to 828 kPa) for proper dishwasher fill. Did you have high iron content? Tilt the dishes toward the POWERSCOUR™ spray jets. Did you load the dishwasher properly? Are high suds slowing the wash arm...

Use & Care Guide
Page 17
... purchase date is operated and maintained according to instructions attached to or furnished with the product, Whirlpool Corporation or Whirlpool Canada LP (hereafter "Whirlpool") will pay for Factory Specified Parts and repair labor to obtain service under these User Instructions and model number information for product service if your major appliance is located in your home of the dishwasher interior. DISCLAIMER OF IMPLIED WARRANTIES; THIS WARRANTY GIVES YOU SPECIFIC LEGAL RIGHTS...
... purchase date is operated and maintained according to instructions attached to or furnished with the product, Whirlpool Corporation or Whirlpool Canada LP (hereafter "Whirlpool") will pay for Factory Specified Parts and repair labor to obtain service under these User Instructions and model number information for product service if your major appliance is located in your home of the dishwasher interior. DISCLAIMER OF IMPLIED WARRANTIES; THIS WARRANTY GIVES YOU SPECIFIC LEGAL RIGHTS...

Installation Guide
Page 2
...Remove shipping materials, drain hose and lower rack. TABLE OF CONTENTS DISHWASHER SAFETY 2 INSTALLATION REQUIREMENTS 3 Tools and Parts 3 Location Requirements 4 Drain Requirements 6 Water Supply Requirements 6 Electrical Requirements 6 INSTALLATION INSTRUCTIONS 7 Prepare Cabinet Opening-Existing Utilities 7 Prepare Cabinet Opening-New Utilities 7 Prepare and Route Water Line 8 Install Drain Hose 9 Install Moisture Barrier (under a wood countertop 11 Prepare Dishwasher 11 INSTALLATION INSTRUCTIONS (CONT.) Make Power Supply Cord Connection 13 Determine Cabinet Opening...
...Remove shipping materials, drain hose and lower rack. TABLE OF CONTENTS DISHWASHER SAFETY 2 INSTALLATION REQUIREMENTS 3 Tools and Parts 3 Location Requirements 4 Drain Requirements 6 Water Supply Requirements 6 Electrical Requirements 6 INSTALLATION INSTRUCTIONS 7 Prepare Cabinet Opening-Existing Utilities 7 Prepare Cabinet Opening-New Utilities 7 Prepare and Route Water Line 8 Install Drain Hose 9 Install Moisture Barrier (under a wood countertop 11 Prepare Dishwasher 11 INSTALLATION INSTRUCTIONS (CONT.) Make Power Supply Cord Connection 13 Determine Cabinet Opening...

Installation Guide
Page 4
... dishwasher motor or legs. NOTE: To avoid shifting during dishwasher operation, shims must provide: ■ easy access to dishwasher against freezing. The location must be installed. Do not run drain lines, water lines or electrical wiring where they can interfere with floor at the end of opening ). Make sure pipes, wires and drain hose are within the shaded area shown in a location where it winterized by the warranty. Location Requirements Grounded electrical supply required. Motor...
... dishwasher motor or legs. NOTE: To avoid shifting during dishwasher operation, shims must provide: ■ easy access to dishwasher against freezing. The location must be installed. Do not run drain lines, water lines or electrical wiring where they can interfere with floor at the end of opening ). Make sure pipes, wires and drain hose are within the shaded area shown in a location where it winterized by the warranty. Location Requirements Grounded electrical supply required. Motor...

Installation Guide
Page 6
... (3.7 m) (Part Number 3385556) that meets the wiring requirements for use with dishwasher. ■ Power supply cord must have: ■ 120-volt, 60 Hz, AC-only, 15- When you are adequate and in accordance with the air gap installation instructions. If connecting dishwasher with a power supply cord: ■ Use UL Listed power supply cord kit (Part Number 4317824) marked for your dishwasher. If drain hose is resistant to heat and detergent, and fits the 1" (2.5 cm) drain connector of the water inlet valve. Drain Requirements ■ A new drain hose is...
... (3.7 m) (Part Number 3385556) that meets the wiring requirements for use with dishwasher. ■ Power supply cord must have: ■ 120-volt, 60 Hz, AC-only, 15- When you are adequate and in accordance with the air gap installation instructions. If connecting dishwasher with a power supply cord: ■ Use UL Listed power supply cord kit (Part Number 4317824) marked for your dishwasher. If drain hose is resistant to heat and detergent, and fits the 1" (2.5 cm) drain connector of the water inlet valve. Drain Requirements ■ A new drain hose is...

Installation Guide
Page 11
... to 5.1 cm) screw-type clamp (not provided). 3. Connect rubber end of the counter. 11 If your model does not have insulation, proceed to air gap and cut ribbed section. 2. Use a rubber hose (not provided) with large blue drain hose clamp (provided). with air gap Prepare Dishwasher WARNING 1. NOTE: Do not cut if needed. If the drain hose was cut, use dishwasher until completely installed. Remove the backing of the moisture barrier and...
... to 5.1 cm) screw-type clamp (not provided). 3. Connect rubber end of the counter. 11 If your model does not have insulation, proceed to air gap and cut ribbed section. 2. Use a rubber hose (not provided) with large blue drain hose clamp (provided). with air gap Prepare Dishwasher WARNING 1. NOTE: Do not cut if needed. If the drain hose was cut, use dishwasher until completely installed. Remove the backing of the moisture barrier and...

Installation Guide
Page 16
... to cabinet opening . 16 Break off the end of the door panel. Tilt dishwasher backward on the left side of opening and drain hose is near the center of the tub. Option 2, Side Attachment - NOTE: Do not install kick plate until instructed to prohibit them from the parts package. Push bracket into the cabinet opening. Plastic Tub Models For marble, granite, or other hard surface countertops Remove the brackets...
... to cabinet opening . 16 Break off the end of the door panel. Tilt dishwasher backward on the left side of opening and drain hose is near the center of the tub. Option 2, Side Attachment - NOTE: Do not install kick plate until instructed to prohibit them from the parts package. Push bracket into the cabinet opening. Plastic Tub Models For marble, granite, or other hard surface countertops Remove the brackets...

Installation Guide
Page 23
... controlling hard water deposit buildup. Additional Tips Expect longer wash times. Designed with your dishwasher washes longer to complete the shortest wash cycle. Record hose installation or replacement dates on ? Check Operation ■ Read the Dishwasher User Instructions that came with a low wattage, low energy consumption motor, your dishwasher. ■ Check that there is not working properly. Certain models are equipped with rinse aid for good drying performance. Energy efficient dishwashers use an extension cord. Start/Resume light may flash...
... controlling hard water deposit buildup. Additional Tips Expect longer wash times. Designed with your dishwasher washes longer to complete the shortest wash cycle. Record hose installation or replacement dates on ? Check Operation ■ Read the Dishwasher User Instructions that came with a low wattage, low energy consumption motor, your dishwasher. ■ Check that there is not working properly. Certain models are equipped with rinse aid for good drying performance. Energy efficient dishwashers use an extension cord. Start/Resume light may flash...

Dimension Guide
Page 1
.... Drain Requirements: A new drain hose is connected to change without notice. air gap Make sure to change materials and specifications without notice. When connecting the air gap a rubber hose (not provided) will be installed in the cabinet next to improve Dimensions are for installing the power supply cord. Specifications subject to use a new drain hose with compression fitting or flexible braided water supply line (Part Number 4396897RP minimum plastic tubing is recommended. Page 1 of the water inlet valve. ® Undercounter Dishwasher PRODUCT MODEL NUMBERS...
.... Drain Requirements: A new drain hose is connected to change without notice. air gap Make sure to change materials and specifications without notice. When connecting the air gap a rubber hose (not provided) will be installed in the cabinet next to improve Dimensions are for installing the power supply cord. Specifications subject to use a new drain hose with compression fitting or flexible braided water supply line (Part Number 4396897RP minimum plastic tubing is recommended. Page 1 of the water inlet valve. ® Undercounter Dishwasher PRODUCT MODEL NUMBERS...


