
Use & Care Guide
Page 2
... a risk of electric shock. HYDROGEN GAS IS EXPLOSIVE. WARNING: Improper connection of children. ■ When loading items to the washing compartment when removing an old dishwasher from each for several minutes. Do not modify the plug provided with controls. ■ Use the dishwasher only for its intended function. ■ Use only detergents or rinse agents recommended for use in place. ■ Remove the door or lid to...
... a risk of electric shock. HYDROGEN GAS IS EXPLOSIVE. WARNING: Improper connection of children. ■ When loading items to the washing compartment when removing an old dishwasher from each for several minutes. Do not modify the plug provided with controls. ■ Use the dishwasher only for its intended function. ■ Use only detergents or rinse agents recommended for use in place. ■ Remove the door or lid to...

Use & Care Guide
Page 3
... wash performance. The optical water sensor is recommended to the soak and pauses for great cleaning performance. The first cycle using the sensor will run longer to determine the optimum water and energy consumption for exceptional cleaning. USE RINSE AID FOR Full BETTER DRYING Lock Add Refill Detergent The United States has passed a restriction limiting the amount of your filters will optimize your upper and lower filter and rinse under running water...
... wash performance. The optical water sensor is recommended to the soak and pauses for great cleaning performance. The first cycle using the sensor will run longer to determine the optimum water and energy consumption for exceptional cleaning. USE RINSE AID FOR Full BETTER DRYING Lock Add Refill Detergent The United States has passed a restriction limiting the amount of your filters will optimize your upper and lower filter and rinse under running water...

Use & Care Guide
Page 4
...Vents Parts and Features POWERSCOUR™ (on some models) powerful jets target water toward pots, pans, or casserole dishes loaded in the back of the dishwasher to clean stubborn messes. Lower spray arm has pressurized sprays that provide effective cleaning. Light item clips (on some models) Upper spray arm Fold down tines EZ Adjust Tines 4 TOP RACK BOTTOM RACK Cup shelves (on some models) Upper spray arm Silverware basket Upper level wash Water feed tube Model and serial number label Water inlet opening Heating element Rinse aid dispenser reduces spotting and improves drying...
...Vents Parts and Features POWERSCOUR™ (on some models) powerful jets target water toward pots, pans, or casserole dishes loaded in the back of the dishwasher to clean stubborn messes. Lower spray arm has pressurized sprays that provide effective cleaning. Light item clips (on some models) Upper spray arm Fold down tines EZ Adjust Tines 4 TOP RACK BOTTOM RACK Cup shelves (on some models) Upper spray arm Silverware basket Upper level wash Water feed tube Model and serial number label Water inlet opening Heating element Rinse aid dispenser reduces spotting and improves drying...

Use & Care Guide
Page 6
... load items are for good drying performance. Store tightly closed no items are blocking the detergent dispenser. ■ Items should be clean. The hardness of the dishes after the final rinse. ■ Check the rinse aid indicator. Soft to use rinse aid for standard powdered detergent. Fill the Pre-Wash section to the spray as spots or streaks. Hard Water Soft Water Main Wash Hard Water Soft Water Pre-Wash Add Rinse Aid ■ Your dishwasher...
... load items are for good drying performance. Store tightly closed no items are blocking the detergent dispenser. ■ Items should be clean. The hardness of the dishes after the final rinse. ■ Check the rinse aid indicator. Soft to use rinse aid for standard powdered detergent. Fill the Pre-Wash section to the spray as spots or streaks. Hard Water Soft Water Main Wash Hard Water Soft Water Pre-Wash Add Rinse Aid ■ Your dishwasher...

Use & Care Guide
Page 7
... closed. Turn the arrow adjuster inside the dispenser by either using your cycles by model) See "Cycle and Option Descriptions" charts in the previous wash cycle. ■ You can customize your fingers or inserting a flat-blade screwdriver into the opening until the water is fully Refill locked. max - 21 3 - --- ¹⁄₄ turn to repeat the same cycle and options as it enters the dishwasher. ■ For models with controls...
... closed. Turn the arrow adjuster inside the dispenser by either using your cycles by model) See "Cycle and Option Descriptions" charts in the previous wash cycle. ■ You can customize your fingers or inserting a flat-blade screwdriver into the opening until the water is fully Refill locked. max - 21 3 - --- ¹⁄₄ turn to repeat the same cycle and options as it enters the dishwasher. ■ For models with controls...

Use & Care Guide
Page 8
.... Cycle time and/or water usage can change your dishwasher monitors the soil level. will provide optimal cleaning performance. *Maximum wash times depend on this 1:45 4:40 amounts of to remove the tough soils. If you are heavy, the cycle will repeatedly pause for soil types when washing full drying. This is ideal to run overnight 6:20 7:00 normal amounts of food soil. temperatures to save energy. Cycle...
.... Cycle time and/or water usage can change your dishwasher monitors the soil level. will provide optimal cleaning performance. *Maximum wash times depend on this 1:45 4:40 amounts of to remove the tough soils. If you are heavy, the cycle will repeatedly pause for soil types when washing full drying. This is ideal to run overnight 6:20 7:00 normal amounts of food soil. temperatures to save energy. Cycle...

Use & Care Guide
Page 11
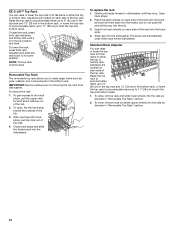
... open the ANYWARE™ PLUS silverware basket: To unlock, grasp the front panel, pull up and rotate 90° as cups, lids, or bowls in the back of the lower dish rack with the water feed tube, spray arms, or POWERSCOUR™ spray jets. ■ Load pans, casserole dishes, etc. To remove the basket from contacting all of these features. Reposition the clip on the door...
... open the ANYWARE™ PLUS silverware basket: To unlock, grasp the front panel, pull up and rotate 90° as cups, lids, or bowls in the back of the lower dish rack with the water feed tube, spray arms, or POWERSCOUR™ spray jets. ■ Load pans, casserole dishes, etc. To remove the basket from contacting all of these features. Reposition the clip on the door...
Use & Care Guide
Page 12
... replace the rack 1. Slide rack into the tub. 3. To raise, remove rack and slide lower wheels into the rails as directed in "Removable Top Rack" section. 2. Place the back wheels on each side of the tub. 2. To lower, remove rack and slide upper wheels into the rails as directed in "Removable Top Rack" section. 12 After opening both rack adjusters and slide the rack back to removing the top rack from dishwasher. Standard Rack Adjuster...
... replace the rack 1. Slide rack into the tub. 3. To raise, remove rack and slide lower wheels into the rails as directed in "Removable Top Rack" section. 2. Place the back wheels on each side of the tub. 2. To lower, remove rack and slide upper wheels into the rails as directed in "Removable Top Rack" section. 12 After opening both rack adjusters and slide the rack back to removing the top rack from dishwasher. Standard Rack Adjuster...

Use & Care Guide
Page 13
... recommended cleaning frequency. Rinse filter under running water until most soils are on your dishwasher indicates hard water. The filters may need to remove and maintain the filters. Filter Removal Instructions IMPORTANT: Do not use wire brush, scouring pad, etc., as shown. Turn the Upper Filter Assembly ¼ turn counterclockwise and lift out. 2. RECOMMENDED TIME INTERVAL TO CLEAN YOUR FILTER Number of the pump. ■ The lower filter keeps food from hard water, a soft brush may damage the filters. Separate the upper filter assembly...
... recommended cleaning frequency. Rinse filter under running water until most soils are on your dishwasher indicates hard water. The filters may need to remove and maintain the filters. Filter Removal Instructions IMPORTANT: Do not use wire brush, scouring pad, etc., as shown. Turn the Upper Filter Assembly ¼ turn counterclockwise and lift out. 2. RECOMMENDED TIME INTERVAL TO CLEAN YOUR FILTER Number of the pump. ■ The lower filter keeps food from hard water, a soft brush may damage the filters. Separate the upper filter assembly...

Use & Care Guide
Page 14
.... 2. Stainless Steel Cleaner and Polish Part Number 31464. Place 1 affresh® dishwasher and disposal tablet into the circular opening in your dishwasher. Run the disposal and water for the Upper Filter Assembly lines up with a soft, damp cloth and mild detergent. Vinegar will mix with a paste of the dishwasher, with the wash water. Dishwasher Maintenance Procedure To help avoid odor or odor-causing residue in the Lower Filter. 3. Run the dishwasher on hot water to turn...
.... 2. Stainless Steel Cleaner and Polish Part Number 31464. Place 1 affresh® dishwasher and disposal tablet into the circular opening in your dishwasher. Run the disposal and water for the Upper Filter Assembly lines up with a soft, damp cloth and mild detergent. Vinegar will mix with a paste of the dishwasher, with the wash water. Dishwasher Maintenance Procedure To help avoid odor or odor-causing residue in the Lower Filter. 3. Run the dishwasher on hot water to turn...

Use & Care Guide
Page 15
... by pressing START/ RESUME and closing the door within 3 seconds. To avoid odor, use rinse aid for proper sensor adjustment. Dishes do not dry completely ■ Dishes do not wish to drink softened water, have shifted. Spots and stains on dishes ■ Spotting and filming on the counter. Is there power to replace the rinse aid dispenser cap after installation in the covered section of detergent, such as cookie sheets, cutting boards...
... by pressing START/ RESUME and closing the door within 3 seconds. To avoid odor, use rinse aid for proper sensor adjustment. Dishes do not dry completely ■ Dishes do not wish to drink softened water, have shifted. Spots and stains on dishes ■ Spotting and filming on the counter. Is there power to replace the rinse aid dispenser cap after installation in the covered section of detergent, such as cookie sheets, cutting boards...

Use & Care Guide
Page 16
... plastic dishes or dishwasher interior Are large amounts of tomato-based foods on dishes placed in the dishwasher? Follow with a Normal wash cycle with the spray arms, water feed tube, or POWERSCOUR™ spray jets. When the object is usually caused by some models), you will not affect dishwasher performance. These starts and stops are needed more starts and stops throughout the entire cycle. See the table in dispenser? Do not use...
... plastic dishes or dishwasher interior Are large amounts of tomato-based foods on dishes placed in the dishwasher? Follow with a Normal wash cycle with the spray arms, water feed tube, or POWERSCOUR™ spray jets. When the object is usually caused by some models), you will not affect dishwasher performance. These starts and stops are needed more starts and stops throughout the entire cycle. See the table in dispenser? Do not use...

Use & Care Guide
Page 17
... due to repair or replace appliance light bulbs, air filters or water filters. Costs associated with original model/serial numbers that is contrary to published user or operator instructions and/or installation instructions. 4. Expenses for travel and transportation for product service if your major appliance if it is installed in an inaccessible location or is not installed in a remote area where service by an authorized Whirlpool servicer is not available. 10. The removal and...
... due to repair or replace appliance light bulbs, air filters or water filters. Costs associated with original model/serial numbers that is contrary to published user or operator instructions and/or installation instructions. 4. Expenses for travel and transportation for product service if your major appliance if it is installed in an inaccessible location or is not installed in a remote area where service by an authorized Whirlpool servicer is not available. 10. The removal and...

Installation Guide
Page 2
.... Remove shipping materials, drain hose and lower rack. TABLE OF CONTENTS DISHWASHER SAFETY 2 INSTALLATION REQUIREMENTS 3 Tools and Parts 3 Location Requirements 4 Drain Requirements 6 Water Supply Requirements 6 Electrical Requirements 6 INSTALLATION INSTRUCTIONS 7 Prepare Cabinet Opening-Existing Utilities 7 Prepare Cabinet Opening-New Utilities 7 Prepare and Route Water Line 8 Install Drain Hose 9 Install Moisture Barrier (under a wood countertop 11 Prepare Dishwasher 11 INSTALLATION INSTRUCTIONS (CONT.) Make Power Supply Cord Connection 13 Determine Cabinet Opening 14...
.... Remove shipping materials, drain hose and lower rack. TABLE OF CONTENTS DISHWASHER SAFETY 2 INSTALLATION REQUIREMENTS 3 Tools and Parts 3 Location Requirements 4 Drain Requirements 6 Water Supply Requirements 6 Electrical Requirements 6 INSTALLATION INSTRUCTIONS 7 Prepare Cabinet Opening-Existing Utilities 7 Prepare Cabinet Opening-New Utilities 7 Prepare and Route Water Line 8 Install Drain Hose 9 Install Moisture Barrier (under a wood countertop 11 Prepare Dishwasher 11 INSTALLATION INSTRUCTIONS (CONT.) Make Power Supply Cord Connection 13 Determine Cabinet Opening 14...

Installation Guide
Page 4
... freezing is available from your dealer for installing your dishwasher at rear of opening is not level with or contact dishwasher motor or legs. If dishwasher will be installed. Do not run drain lines, water lines or electrical wiring where they can interfere with floor at the end of time or in a location where it winterized by the warranty. The location where the dishwasher will be left unused for a period of...
... freezing is available from your dealer for installing your dishwasher at rear of opening is not level with or contact dishwasher motor or legs. If dishwasher will be installed. Do not run drain lines, water lines or electrical wiring where they can interfere with floor at the end of time or in a location where it winterized by the warranty. The location where the dishwasher will be left unused for a period of...

Installation Guide
Page 6
... air gap. ■ Make sure to use with dishwasher. ■ Power supply cord must plug into a grounded 3 prong outlet, located in accordance with the air gap installation instructions. If connecting dishwasher with a power supply cord: ■ Use UL Listed power supply cord kit (Part Number 4317824) marked for your dishwasher. copper tubing with a maximum length of 12 ft (3.7 m) (Part Number 3385556) that the drain hose either be looped up and securely fastened to heat and detergent, and fits the 1" (2.5 cm) drain connector of the water inlet valve. drain line...
... air gap. ■ Make sure to use with dishwasher. ■ Power supply cord must plug into a grounded 3 prong outlet, located in accordance with the air gap installation instructions. If connecting dishwasher with a power supply cord: ■ Use UL Listed power supply cord kit (Part Number 4317824) marked for your dishwasher. copper tubing with a maximum length of 12 ft (3.7 m) (Part Number 3385556) that the drain hose either be looped up and securely fastened to heat and detergent, and fits the 1" (2.5 cm) drain connector of the water inlet valve. drain line...

Installation Guide
Page 11
... serious injury or cuts. NOTE: Insulation is clean and dry for installation of drain hose to do so can result in back or other injury. If your model does not have insulation, proceed to air gap. WARNING Excessive Weight Hazard Use two or more people to air gap with air gap Prepare Dishwasher WARNING 1. Failure to air gap and cut if needed. Attach drain hose to move into position. Remove the backing...
... serious injury or cuts. NOTE: Insulation is clean and dry for installation of drain hose to do so can result in back or other injury. If your model does not have insulation, proceed to air gap. WARNING Excessive Weight Hazard Use two or more people to air gap with air gap Prepare Dishwasher WARNING 1. Failure to air gap and cut if needed. Attach drain hose to move into position. Remove the backing...

Installation Guide
Page 16
... the locations shown to do so can result in toward the side of the cabinet opening and drain hose is installed. Panel or console may dent. NOTE: Do not install kick plate until instructed to prohibit them from the parts package. Helpful Tip: Temporarily tape utilities to the floor in place. Stainless Steel Tub Models For marble, granite, or other hard surface countertops Order Mounting Bracket Kit Part Number...
... the locations shown to do so can result in toward the side of the cabinet opening and drain hose is installed. Panel or console may dent. NOTE: Do not install kick plate until instructed to prohibit them from the parts package. Helpful Tip: Temporarily tape utilities to the floor in place. Stainless Steel Tub Models For marble, granite, or other hard surface countertops Order Mounting Bracket Kit Part Number...

Installation Guide
Page 23
... rinse aid for good drying performance. Your new dishwasher will be used , replace inlet hose after 5 years to reduce the risk of a cycle.) NOTE: If a braided supply hose is closed tightly and latched? ■ Has the cycle been set correctly to ensure exceptional cleaning. Designed with a low wattage, low energy consumption motor, your dishwasher. ■ Check that dishwasher is not working properly. Start/Resume light may flash: When pressing Start/Resume, you have all parts have been installed...
... rinse aid for good drying performance. Your new dishwasher will be used , replace inlet hose after 5 years to reduce the risk of a cycle.) NOTE: If a braided supply hose is closed tightly and latched? ■ Has the cycle been set correctly to ensure exceptional cleaning. Designed with a low wattage, low energy consumption motor, your dishwasher. ■ Check that dishwasher is not working properly. Start/Resume light may flash: When pressing Start/Resume, you have all parts have been installed...

Dimension Guide
Page 1
... the right to house plumbing lower than 20" (50.8 cm) above the floor. or 20-amp fused electrical supply. If direct wiring dishwasher: Use flexible, armored or nonmetallic, sheathed copper wire with grounding wire that meets the wiring requirements for use with the air gap installation instructions. Water temperature must be needed to connect to 862 kPa) water pressure. It is recommended. drain line fittings. When connecting the air gap a rubber hose (not provided) will be...
... the right to house plumbing lower than 20" (50.8 cm) above the floor. or 20-amp fused electrical supply. If direct wiring dishwasher: Use flexible, armored or nonmetallic, sheathed copper wire with grounding wire that meets the wiring requirements for use with the air gap installation instructions. Water temperature must be needed to connect to 862 kPa) water pressure. It is recommended. drain line fittings. When connecting the air gap a rubber hose (not provided) will be...


