

Use & Care Guide
Page 7
... until the water is fully Refill locked. Lock fill - -- 6 5 4 -- - --- Select Options (options vary by pressing the options desired. Press START/RESUME. 7 Turn the arrow adjuster inside the dispenser by model) See "Cycle and Option Descriptions" charts in the following section. STEP 3 Select a Cycle (cycles vary by either using your cycles by...
... until the water is fully Refill locked. Lock fill - -- 6 5 4 -- - --- Select Options (options vary by pressing the options desired. Press START/RESUME. 7 Turn the arrow adjuster inside the dispenser by model) See "Cycle and Option Descriptions" charts in the following section. STEP 3 Select a Cycle (cycles vary by either using your cycles by...

Use & Care Guide
Page 11
...™ wash option to use this feature. Cup shelves Fold down Tines The row of tines on the door, the bottom rack, or placed inside the bottom rack. Lift the basket off the tine. 2. Light Item Clips The light item clips hold additional cups, stemware or long items such...right-hand sides of the silverware basket is up and off the holding buttons. 2. You can be adjusted to fit your dishes. Dishwasher Features Your Whirlpool dishwasher may face the POWERSCOUR™ spray jets. Make sure items do not interfere with the soiled surfaces facing the POWERSCOUR™ spray jets. ...
...™ wash option to use this feature. Cup shelves Fold down Tines The row of tines on the door, the bottom rack, or placed inside the bottom rack. Lift the basket off the tine. 2. Light Item Clips The light item clips hold additional cups, stemware or long items such...right-hand sides of the silverware basket is up and off the holding buttons. 2. You can be adjusted to fit your dishes. Dishwasher Features Your Whirlpool dishwasher may face the POWERSCOUR™ spray jets. Make sure items do not interfere with the soiled surfaces facing the POWERSCOUR™ spray jets. ...

Installation Guide
Page 7
... the dishwasher cabinet opening. Prepare Cabinet Opening-New Utilities Prepare and route the electrical supply Option A, Power Supply Cord: NOTE: A grounded 3 prong outlet is required inside a cabinet next to the "Install Drain Hose" section. See "Product and Cabinet Opening Dimensions" section. 7 If they do so can result in death or electrical...
... the dishwasher cabinet opening. Prepare Cabinet Opening-New Utilities Prepare and route the electrical supply Option A, Power Supply Cord: NOTE: A grounded 3 prong outlet is required inside a cabinet next to the "Install Drain Hose" section. See "Product and Cabinet Opening Dimensions" section. 7 If they do so can result in death or electrical...

Installation Guide
Page 14
...Opening If needed, see website for wheel position and the number of turns needed. Close cover ensuring wires are repositioned differently. Visit www.whirlpool.com/electrical under FAQ tab. Refer to "Dishwasher Height Adjustment Chart" for animated representation of this step. Make sure wires are approximate... cabinet opening height is less than 34" (86.4 cm), the rear wheels can be more difficult to move. (Measurements are tucked inside terminal box. This will need to measure the lowest point on the underside of the countertop and the highest point on the floor). ...
...Opening If needed, see website for wheel position and the number of turns needed. Close cover ensuring wires are repositioned differently. Visit www.whirlpool.com/electrical under FAQ tab. Refer to "Dishwasher Height Adjustment Chart" for animated representation of this step. Make sure wires are approximate... cabinet opening height is less than 34" (86.4 cm), the rear wheels can be more difficult to move. (Measurements are tucked inside terminal box. This will need to measure the lowest point on the underside of the countertop and the highest point on the floor). ...
Installation Guide
Page 21
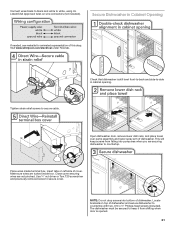
... and previously removed screw to secure cable. NOTE: Do not drop screws into pump area when you are not pinched. Place wires inside box. Tighten strain relief screws to secure cover. This will keep it from falling into bottom of dishwasher. Make sure wires are tucked...UL Listed/CSA Approved twist-on wire connectors (not included). Check that dishwasher is opened. 21 Insert tabs on top of this step. Visit www.whirlpool.com/electrical under FAQ tab. Locate brackets on left side of dishwasher. Connect wires black to black and white to countertop with two, #10 ...
... and previously removed screw to secure cable. NOTE: Do not drop screws into pump area when you are not pinched. Place wires inside box. Tighten strain relief screws to secure cover. This will keep it from falling into bottom of dishwasher. Make sure wires are tucked...UL Listed/CSA Approved twist-on wire connectors (not included). Check that dishwasher is opened. 21 Insert tabs on top of this step. Visit www.whirlpool.com/electrical under FAQ tab. Locate brackets on left side of dishwasher. Connect wires black to black and white to countertop with two, #10 ...


