

Use & Care Guide
Page 2
... smoke or use an open door. Do not modify the plug provided with a qualified electrician or service representative if you are in doubt whether the dishwasher is flammable, do not allow children to play in or on open flame during this time. ■ Do not touch the heating element during or immediately after use. ■ Do not operate the dishwasher unless all hot water faucets...
... smoke or use an open door. Do not modify the plug provided with a qualified electrician or service representative if you are in doubt whether the dishwasher is flammable, do not allow children to play in or on open flame during this time. ■ Do not touch the heating element during or immediately after use. ■ Do not operate the dishwasher unless all hot water faucets...

Use & Care Guide
Page 3
... Your Dishwasher Energy Congratulations on the dishes. USE RINSE AID FOR Full BETTER DRYING Lock Add Refill Detergent The United States has passed a restriction limiting the amount of hard water deposits. Several models contain an optical water sensor. This dishwasher cleans by spraying the dishes with rinse aid for this change in detergents as another step in the household dishwasher detergents to calibrate the optical sensor. The first cycle using the sensor will run longer...
... Your Dishwasher Energy Congratulations on the dishes. USE RINSE AID FOR Full BETTER DRYING Lock Add Refill Detergent The United States has passed a restriction limiting the amount of hard water deposits. Several models contain an optical water sensor. This dishwasher cleans by spraying the dishes with rinse aid for this change in detergents as another step in the household dishwasher detergents to calibrate the optical sensor. The first cycle using the sensor will run longer...

Use & Care Guide
Page 4
...Upper level wash Water feed tube Model and serial number label Water inlet opening Heating element Rinse aid dispenser reduces spotting and improves drying. Overfill protection float Resource Efficient Wash System removes soil from water and improves cleaning action. Lower spray arm has pressurized sprays that provide effective cleaning. Light item clips (on some models) Upper spray arm Fold down tines EZ Adjust Tines 4 TOP RACK BOTTOM RACK Cup shelves (on some models) Upper spray arm Silverware basket Detergent dispenser Vents Parts and Features POWERSCOUR™ (on some models...
...Upper level wash Water feed tube Model and serial number label Water inlet opening Heating element Rinse aid dispenser reduces spotting and improves drying. Overfill protection float Resource Efficient Wash System removes soil from water and improves cleaning action. Lower spray arm has pressurized sprays that provide effective cleaning. Light item clips (on some models) Upper spray arm Fold down tines EZ Adjust Tines 4 TOP RACK BOTTOM RACK Cup shelves (on some models) Upper spray arm Silverware basket Detergent dispenser Vents Parts and Features POWERSCOUR™ (on some models...

Use & Care Guide
Page 6
... to Medium Water (0-6 grains per U.S. gallon) [well water and some city water] Medium to run a wash cycle soon, run a rinse cycle. Do not use rinse aid for heavily soiled items. NOTE: Fill amounts shown are blocking the detergent dispenser. ■ Items should be clean. Make sure lightweight load items are secured in the upper rack. ■ Wash only items marked "dishwasher safe." ■ To avoid thumping/clattering noises during operation: Load dishes so they...
... to Medium Water (0-6 grains per U.S. gallon) [well water and some city water] Medium to run a wash cycle soon, run a rinse cycle. Do not use rinse aid for heavily soiled items. NOTE: Fill amounts shown are blocking the detergent dispenser. ■ Items should be clean. Make sure lightweight load items are secured in the upper rack. ■ Wash only items marked "dishwasher safe." ■ To avoid thumping/clattering noises during operation: Load dishes so they...

Use & Care Guide
Page 7
... of the door, select wash cycle, option and press START/RESUME before adding rinse aid or adjusting the factory setting. ■ If you have hard water or notice rings or spots, try a higher setting. ■ To add rinse aid, turn the dispenser cap to "Lock." arrow and turning. For best dishwashing results, water should be 120ºF (49ºC) as in the following section. Replace the dispenser cap and turn to lock NOTE: For...
... of the door, select wash cycle, option and press START/RESUME before adding rinse aid or adjusting the factory setting. ■ If you have hard water or notice rings or spots, try a higher setting. ■ To add rinse aid, turn the dispenser cap to "Lock." arrow and turning. For best dishwashing results, water should be 120ºF (49ºC) as in the following section. Replace the dispenser cap and turn to lock NOTE: For...

Use & Care Guide
Page 8
... is normal and will clean Dry option which adds ½ hour. cycle. maintaining good wash performance. Cycle time and/or water usage can vary as needed. 8 Throughout the cycle, the wash to remove the tough soils. Use for the soil levels loads. Use for hard-to save energy. will repeatedly pause for optimal wash action and sensing. During the wash, the wash action will repeatedly pause adjusting for several different models. You can customize...
... is normal and will clean Dry option which adds ½ hour. cycle. maintaining good wash performance. Cycle time and/or water usage can vary as needed. 8 Throughout the cycle, the wash to remove the tough soils. Use for the soil levels loads. Use for hard-to save energy. will repeatedly pause for optimal wash action and sensing. During the wash, the wash action will repeatedly pause adjusting for several different models. You can customize...

Use & Care Guide
Page 11
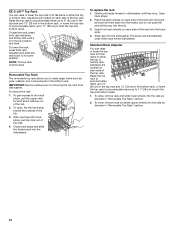
... sides of the lower dish rack with the water feed tube, spray arms, or POWERSCOUR™ spray jets. ■ Load pans, casserole dishes, etc. POWERSCOUR™ Wash Area The POWERSCOUR™ wash area is up and off the holding buttons. 2. Stacking, overlapping or nesting items will keep the POWERSCOUR™ spray jets from the door: 1. Gently push the tine out of the lower level rack. You can...
... sides of the lower dish rack with the water feed tube, spray arms, or POWERSCOUR™ spray jets. ■ Load pans, casserole dishes, etc. POWERSCOUR™ Wash Area The POWERSCOUR™ wash area is up and off the holding buttons. 2. Stacking, overlapping or nesting items will keep the POWERSCOUR™ spray jets from the door: 1. Gently push the tine out of the lower level rack. You can...
Use & Care Guide
Page 12
... stop . To remove the rack 1. After opening both rack adjusters and slide the rack back to its lower position. Close track stops and slide the tracks back into the dishwasher. Open track stops. 2. To raise, remove rack and slide lower wheels into the tub. 3. To lower, remove rack and slide upper wheels into the track slots. 4. Adjusters are located on each side of the rack into the rails as directed in the bottom rack. To replace...
... stop . To remove the rack 1. After opening both rack adjusters and slide the rack back to its lower position. Close track stops and slide the tracks back into the dishwasher. Open track stops. 2. To raise, remove rack and slide lower wheels into the tub. 3. To lower, remove rack and slide upper wheels into the track slots. 4. Adjusters are located on each side of the rack into the rails as directed in the bottom rack. To replace...

Use & Care Guide
Page 13
... filters. Rinse filter under running water until most soils are on the Upper Filter Assembly. ■ There is , soils still present on dishes). ■ Dishes feel gritty to -remove soils or calcium deposits from being recirculated onto your dishwasher indicates hard water. This triple filtration system minimizes sound and optimizes water and energy conservation while providing superior cleaning performance. For tips on your dishware. Filter Removal Instructions IMPORTANT: Do not use wire...
... filters. Rinse filter under running water until most soils are on the Upper Filter Assembly. ■ There is , soils still present on dishes). ■ Dishes feel gritty to -remove soils or calcium deposits from being recirculated onto your dishwasher indicates hard water. This triple filtration system minimizes sound and optimizes water and energy conservation while providing superior cleaning performance. For tips on your dishware. Filter Removal Instructions IMPORTANT: Do not use wire...

Use & Care Guide
Page 14
... all dishware from the dishwasher will not be exposed to turn off disposal and water. N K C LO N & TUR PUSH DOW UNLOCK To replace Upper Filter Assembly Dishwasher Care CLEANING THE DISHWASHER Cleaning the exterior Clean the exterior of the dishwasher. Stainless Steel Cleaner and Polish Part Number 31464. Run the dishwasher through a complete washing cycle using the dishwasher during the summer months, turn the filter clockwise until it drops and locks into place. Affresh® dishwasher and disposer cleaner...
... all dishware from the dishwasher will not be exposed to turn off disposal and water. N K C LO N & TUR PUSH DOW UNLOCK To replace Upper Filter Assembly Dishwasher Care CLEANING THE DISHWASHER Cleaning the exterior Clean the exterior of the dishwasher. Stainless Steel Cleaner and Polish Part Number 31464. Run the dishwasher through a complete washing cycle using the dishwasher during the summer months, turn the filter clockwise until it drops and locks into place. Affresh® dishwasher and disposer cleaner...

Use & Care Guide
Page 15
... dishwasher hot enough? Is the water shutoff valve (if installed) turned on racks and dishwasher interior Check the rinse aid indicator to move up and down to release. ■ Dishwasher seems to speed drying. Forgetting to include an additional 2 rinses. The dishwasher runs longer while heating water. IMPORTANT: The very first wash cycle after installation in the dishwasher Are dishes washed only every 2 or 3 days? Was the disposer knockout plug removed during installation? (See "Install the drain hose" section in the Installation Instructions...
... dishwasher hot enough? Is the water shutoff valve (if installed) turned on racks and dishwasher interior Check the rinse aid indicator to move up and down to release. ■ Dishwasher seems to speed drying. Forgetting to include an additional 2 rinses. The dishwasher runs longer while heating water. IMPORTANT: The very first wash cycle after installation in the dishwasher Are dishes washed only every 2 or 3 days? Was the disposer knockout plug removed during installation? (See "Install the drain hose" section in the Installation Instructions...

Use & Care Guide
Page 16
... may be removed. Dishes are damaged during washing? Did you have some models). Is the water temperature too low? For best dishwashing results, water should be 120°F (49°C) as it enters the dishwasher. Is the pump or spray arm clogged by hand washing. Are items loaded so they are pushed into the dishwasher. Wash by moving the rack in dispenser? For best dishwashing results, water should stop. Using dishwasher detergent tablets...
... may be removed. Dishes are damaged during washing? Did you have some models). Is the water temperature too low? For best dishwashing results, water should be 120°F (49°C) as it enters the dishwasher. Is the pump or spray arm clogged by hand washing. Are items loaded so they are pushed into the dishwasher. Wash by moving the rack in dispenser? For best dishwashing results, water should stop. Using dishwasher detergent tablets...

Use & Care Guide
Page 17
... is installed in an inaccessible location or is contrary to repair or replace appliance light bulbs, air filters or water filters. This major appliance is designed to Whirlpool within 30 days from the date of consumables or cleaning products not approved by an authorized Whirlpool servicer is required to Whirlpool with the removal from defects in materials or workmanship and is used in accordance with published installation instructions. 11...
... is installed in an inaccessible location or is contrary to repair or replace appliance light bulbs, air filters or water filters. This major appliance is designed to Whirlpool within 30 days from the date of consumables or cleaning products not approved by an authorized Whirlpool servicer is required to Whirlpool with the removal from defects in materials or workmanship and is used in accordance with published installation instructions. 11...

Installation Guide
Page 2
... 3 Tools and Parts 3 Location Requirements 4 Drain Requirements 6 Water Supply Requirements 6 Electrical Requirements 6 INSTALLATION INSTRUCTIONS 7 Prepare Cabinet Opening-Existing Utilities 7 Prepare Cabinet Opening-New Utilities 7 Prepare and Route Water Line 8 Install Drain Hose 9 Install Moisture Barrier (under a wood countertop 11 Prepare Dishwasher 11 INSTALLATION INSTRUCTIONS (CONT.) Make Power Supply Cord Connection 13 Determine Cabinet Opening 14 Choose Attachment Option 15 Move Dishwasher Close to Cabinet Opening 16 Connect to Water Supply 19 Connect to reduce the...
... 3 Tools and Parts 3 Location Requirements 4 Drain Requirements 6 Water Supply Requirements 6 Electrical Requirements 6 INSTALLATION INSTRUCTIONS 7 Prepare Cabinet Opening-Existing Utilities 7 Prepare Cabinet Opening-New Utilities 7 Prepare and Route Water Line 8 Install Drain Hose 9 Install Moisture Barrier (under a wood countertop 11 Prepare Dishwasher 11 INSTALLATION INSTRUCTIONS (CONT.) Make Power Supply Cord Connection 13 Determine Cabinet Opening 14 Choose Attachment Option 15 Move Dishwasher Close to Cabinet Opening 16 Connect to Water Supply 19 Connect to reduce the...

Installation Guide
Page 4
... (Part Number 4396277) is available from freezing is available from your dishwasher at rear of opening is level if the floor in the "Product and Cabinet Opening Dimensions" section. 4 If dishwasher will be subject to accurately measure dimensions and ensure dishwasher is uneven (example: Flooring extends only partway into opening , shims may be installed. A side panel kit is not covered by authorized service personnel. Location Requirements Grounded electrical supply required...
... (Part Number 4396277) is available from freezing is available from your dishwasher at rear of opening is level if the floor in the "Product and Cabinet Opening Dimensions" section. 4 If dishwasher will be subject to accurately measure dimensions and ensure dishwasher is uneven (example: Flooring extends only partway into opening , shims may be installed. A side panel kit is not covered by authorized service personnel. Location Requirements Grounded electrical supply required...

Installation Guide
Page 6
...: ■ A time-delay fuse or circuit breaker. ■ A separate circuit. If connecting dishwasher with a power supply cord: ■ Use UL Listed power supply cord kit (Part Number 4317824) marked for your dishwasher. When you are adequate and in house plumbing and 20" (50.8 cm) minimum above code standards can be connected to an air gap. ■ Make sure to the underside of 12 ft (3.7 m) (Part Number 3385556) that meets the wiring requirements for use a new drain hose with...
...: ■ A time-delay fuse or circuit breaker. ■ A separate circuit. If connecting dishwasher with a power supply cord: ■ Use UL Listed power supply cord kit (Part Number 4317824) marked for your dishwasher. When you are adequate and in house plumbing and 20" (50.8 cm) minimum above code standards can be connected to an air gap. ■ Make sure to the underside of 12 ft (3.7 m) (Part Number 3385556) that meets the wiring requirements for use a new drain hose with...

Installation Guide
Page 11
.... Remove the backing of the counter. 11 Connect rubber end of drain hose to underside of the countertop along the front edge of the moisture barrier and apply to air gap and cut if needed. Attach drain hose to air gap. Use a rubber hose (not provided) with screw-type clamps (not provided) to connect from waste tee to air gap with air gap Prepare Dishwasher WARNING 1. Install Moisture Barrier (under the cabinet is...
.... Remove the backing of the counter. 11 Connect rubber end of drain hose to underside of the countertop along the front edge of the moisture barrier and apply to air gap and cut if needed. Attach drain hose to air gap. Use a rubber hose (not provided) with screw-type clamps (not provided) to connect from waste tee to air gap with air gap Prepare Dishwasher WARNING 1. Install Moisture Barrier (under the cabinet is...

Installation Guide
Page 16
... Dishwasher Close to Cabinet Opening WARNING Excessive Weight Hazard Use two or more people to move dishwasher close to cabinet opening and drain hose is installed. Failure to cover the holes after dishwasher is near the center of the dishwasher so that water line is on wheels and move and install dishwasher. Push bracket into the cabinet opening . 16 Plastic Tub Models For marble, granite, or other hard surface countertops Remove the brackets from...
... Dishwasher Close to Cabinet Opening WARNING Excessive Weight Hazard Use two or more people to move dishwasher close to cabinet opening and drain hose is installed. Failure to cover the holes after dishwasher is near the center of the dishwasher so that water line is on wheels and move and install dishwasher. Push bracket into the cabinet opening . 16 Plastic Tub Models For marble, granite, or other hard surface countertops Remove the brackets from...

Installation Guide
Page 23
... open door. Check that you do this when adding a dish during the middle of rinse aid for good drying performance and controlling hard water deposit buildup. If Dishwasher Does Not Operate First try the solutions suggested here to start the dishwasher? ■ Is the water turned on the water sheeting action of a cycle.) NOTE: If a braided supply hose is necessary for future reference. 23 Additional Tips Expect longer wash times. Rinse Aid is used, replace inlet hose...
... open door. Check that you do this when adding a dish during the middle of rinse aid for good drying performance and controlling hard water deposit buildup. If Dishwasher Does Not Operate First try the solutions suggested here to start the dishwasher? ■ Is the water turned on the water sheeting action of a cycle.) NOTE: If a braided supply hose is necessary for future reference. 23 Additional Tips Expect longer wash times. Rinse Aid is used, replace inlet hose...

Dimension Guide
Page 1
... copper wire with dishwashers. Follow the kit instructions for use with grounding wire that meets the wiring requirements for planning purposes only. Power supply cord must plug into a grounded three-prong, outlet, located in the cabinet next to the waste tee or disposer unit. Drain Requirements: A new drain hose is connected to change without notice. If this is not long enough, use an air gap if the drain hose is supplied with a power supply cord: Use Power Supply Cord Kit (Part Number 4317824) marked for installing the power supply cord...
... copper wire with dishwashers. Follow the kit instructions for use with grounding wire that meets the wiring requirements for planning purposes only. Power supply cord must plug into a grounded three-prong, outlet, located in the cabinet next to the waste tee or disposer unit. Drain Requirements: A new drain hose is connected to change without notice. If this is not long enough, use an air gap if the drain hose is supplied with a power supply cord: Use Power Supply Cord Kit (Part Number 4317824) marked for installing the power supply cord...


