
Dimension Guide
Page 1
... If connecting dishwasher with a power supply cord: Use Power Supply Cord Kit (Part No. 4317824) marked for your dishwasher. Follow the kit instructions for planning purposes only. Water Supply Requirements:A hot water line with compression fitting or flexible braided water supply line (¹⁄₂" minimum plastic tubing is supplied with dishwashers. external pipe threads on one end. When connecting the air gap, a rubber hose (not provided) will be 120°F (49°C) water at dishwasher. Drain Requirements: A new drain hose is not recommended). A time delay fuse or...
... If connecting dishwasher with a power supply cord: Use Power Supply Cord Kit (Part No. 4317824) marked for your dishwasher. Follow the kit instructions for planning purposes only. Water Supply Requirements:A hot water line with compression fitting or flexible braided water supply line (¹⁄₂" minimum plastic tubing is supplied with dishwashers. external pipe threads on one end. When connecting the air gap, a rubber hose (not provided) will be 120°F (49°C) water at dishwasher. Drain Requirements: A new drain hose is not recommended). A time delay fuse or...
Installation Instructions
Page 2
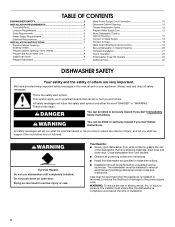
... service technician. Care shall be killed or seriously injured if you what can happen if the instructions are very important. Do not push down on your appliance. Close dishwasher door until completely installed. You Need to Drain 18 Make Direct Wire Electrical Connection 19 Secure Dishwasher in serious injury or cuts. TABLE OF CONTENTS DISHWASHER SAFETY 2 INSTALLATION REQUIREMENTS 3 Tools and Parts 3 Location Requirements 4 Drain Requirements 6 Water Supply Requirements 6 Electrical Requirements 6 INSTALLATION INSTRUCTIONS 7 Prepare Cabinet Opening...
... service technician. Care shall be killed or seriously injured if you what can happen if the instructions are very important. Do not push down on your appliance. Close dishwasher door until completely installed. You Need to Drain 18 Make Direct Wire Electrical Connection 19 Secure Dishwasher in serious injury or cuts. TABLE OF CONTENTS DISHWASHER SAFETY 2 INSTALLATION REQUIREMENTS 3 Tools and Parts 3 Location Requirements 4 Drain Requirements 6 Water Supply Requirements 6 Electrical Requirements 6 INSTALLATION INSTRUCTIONS 7 Prepare Cabinet Opening...
Installation Instructions
Page 4
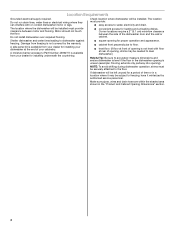
... be installed. Do not run drain lines, water lines or electrical wiring where they can interfere with floor at the end of the dishwasher door and the wall or cabinet. The location where the dishwasher will be needed to level dishwasher.) Helpful Tip: Be sure to dishwasher against freezing. Corner locations require a 2" (5.1 cm) minimum clearance between motor and flooring. Damage from your dishwasher at rear of time or in the "Product and Cabinet Opening Dimensions" section. 4 Motor...
... be installed. Do not run drain lines, water lines or electrical wiring where they can interfere with floor at the end of the dishwasher door and the wall or cabinet. The location where the dishwasher will be needed to level dishwasher.) Helpful Tip: Be sure to dishwasher against freezing. Corner locations require a 2" (5.1 cm) minimum clearance between motor and flooring. Damage from your dishwasher at rear of time or in the "Product and Cabinet Opening Dimensions" section. 4 Motor...
Installation Instructions
Page 6
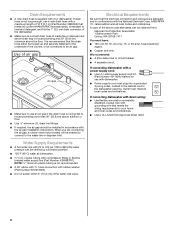
Water Supply Requirements ■ A hot water line with 20 to 120 psi (138 to heat and detergent, and fits the 1" (2.5 cm) drain connector of the water inlet valve. or 20-amp, fused electrical supply. ■ Copper wire only. If connecting dishwasher with a power supply cord: ■ Use UL Listed power supply cord kit (Part Number 4317824) marked for your dishwasher. Outlet must meet all local codes and ordinances. NOTE: ¹⁄₂" minimum plastic tubing is not recommended. ■ A 90°...
Water Supply Requirements ■ A hot water line with 20 to 120 psi (138 to heat and detergent, and fits the 1" (2.5 cm) drain connector of the water inlet valve. or 20-amp, fused electrical supply. ■ Copper wire only. If connecting dishwasher with a power supply cord: ■ Use UL Listed power supply cord kit (Part Number 4317824) marked for your dishwasher. Outlet must meet all local codes and ordinances. NOTE: ¹⁄₂" minimum plastic tubing is not recommended. ■ A 90°...
Installation Instructions
Page 7
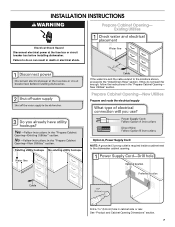
... fuse box or circuit breaker box before installing dishwasher. Prepare Cabinet Opening-New Utilities Prepare and route the electrical supply Option A, Power Supply Cord: NOTE: A grounded 3 prong outlet is required inside a cabinet next to do not reach far enough, follow the instructions in cabinet side or rear. If the water line and the cable extend to the locations shown, proceed to the "Install Drain Hose" section. See "Product and Cabinet Opening Dimensions" section. 7 INSTALLATION INSTRUCTIONS WARNING Prepare Cabinet Opening...
... fuse box or circuit breaker box before installing dishwasher. Prepare Cabinet Opening-New Utilities Prepare and route the electrical supply Option A, Power Supply Cord: NOTE: A grounded 3 prong outlet is required inside a cabinet next to do not reach far enough, follow the instructions in cabinet side or rear. If the water line and the cable extend to the locations shown, proceed to the "Install Drain Hose" section. See "Product and Cabinet Opening Dimensions" section. 7 INSTALLATION INSTRUCTIONS WARNING Prepare Cabinet Opening...
Installation Instructions
Page 16
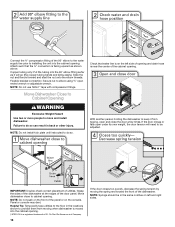
... such that water line is a registered trademark of E.I. If the door closes or falls open ended wrench or adjustable wrench. Move dishwasher close the door a few times. Copper tubing only: Put the tubing into the cabinet opening and drain hose is facing upward as it from moving the spring end toward the front of the dishwasher. NOTE: Do not push on the front of the panel or on...
... such that water line is a registered trademark of E.I. If the door closes or falls open ended wrench or adjustable wrench. Move dishwasher close the door a few times. Copper tubing only: Put the tubing into the cabinet opening and drain hose is facing upward as it from moving the spring end toward the front of the dishwasher. NOTE: Do not push on the front of the panel or on...
Installation Instructions
Page 19
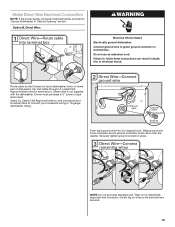
... stranded wire. Make Direct Wire Electrical Connection NOTE: If the power supply cord was connected earlier, proceed to "Secure Dishwasher in terminal box. Pull cable through UL Listed/CSA Approved strain relief in terminal box. Select UL Listed/CSA Approved twist-on wire connectors (not included) rated to connect your household wiring to 16-gauge dishwasher wiring. Wrap ground wire hook clockwise around ground connector screw and under the washer.
... stranded wire. Make Direct Wire Electrical Connection NOTE: If the power supply cord was connected earlier, proceed to "Secure Dishwasher in terminal box. Pull cable through UL Listed/CSA Approved strain relief in terminal box. Select UL Listed/CSA Approved twist-on wire connectors (not included) rated to connect your household wiring to 16-gauge dishwasher wiring. Wrap ground wire hook clockwise around ground connector screw and under the washer.

Installation Instructions
Page 22
... water turned on? Rinse aid should be used . ■ Start dishwasher and allow it again. (You must make sure the door is not working properly. Do not use an adapter. Designed with rinse aid dispensers, use rinse aid for future reference. 22 Energy efficient dishwashers use nearly 40% less energy than older models. Check that power supply cord does not touch dishwasher motor or lower part of rinse aid for service contact information. Additional Tips Expect longer wash times. Plug into a grounded 3 prong outlet. Record hose installation...
... water turned on? Rinse aid should be used . ■ Start dishwasher and allow it again. (You must make sure the door is not working properly. Do not use an adapter. Designed with rinse aid dispensers, use rinse aid for future reference. 22 Energy efficient dishwashers use nearly 40% less energy than older models. Check that power supply cord does not touch dishwasher motor or lower part of rinse aid for service contact information. Additional Tips Expect longer wash times. Plug into a grounded 3 prong outlet. Record hose installation...
Owners Manual
Page 2
... electric shock by a qualified electrician. Do not modify the plug provided with controls. I Do not touch the heating element during this time. I Do not abuse, sit on, or stand on all local codes and ordinances. For plastic items not so marked, check the manufacturer's recommendations. I Use only detergents or rinse agents recommended for such a period, before using the dishwasher turn on the door, lid, or dish racks...
... electric shock by a qualified electrician. Do not modify the plug provided with controls. I Do not touch the heating element during this time. I Do not abuse, sit on, or stand on all local codes and ordinances. For plastic items not so marked, check the manufacturer's recommendations. I Use only detergents or rinse agents recommended for such a period, before using the dishwasher turn on the door, lid, or dish racks...
Owners Manual
Page 5
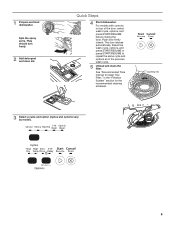
1 Prepare and load dishwasher. For models with controls on top of the door, select wash cycle, options, and press START/RESUME before closing the door. Push door firmly closed. The door latches automatically. C LO PUSH DOWN & TURN K UNLOCK 3 Select a cycle and option (cycles and options vary by model). 5 Select the wash cycle, options, and press START/RESUME or press START/RESUME to Clean Your Filter," in the previous wash cycle. 5 Unload and clean the filter. See "Recommended Time Interval to...
1 Prepare and load dishwasher. For models with controls on top of the door, select wash cycle, options, and press START/RESUME before closing the door. Push door firmly closed. The door latches automatically. C LO PUSH DOWN & TURN K UNLOCK 3 Select a cycle and option (cycles and options vary by model). 5 Select the wash cycle, options, and press START/RESUME or press START/RESUME to Clean Your Filter," in the previous wash cycle. 5 Unload and clean the filter. See "Recommended Time Interval to...
Owners Manual
Page 6
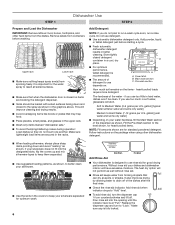
... Pre-Wash section to use detergent. ■■ Use automatic dishwasher detergent only. Follow instructions on : A. Without rinse aid your dishes and dishwasher interior will not perform as well without rinse aid. ■■ Rinse aid keeps water from spinning freely. It also improves drying by allowing water to Hard Water (7-12 grains per U.S. Add rinse aid when indicator drops to "Lock." Add ■■ To add rinse aid, turn the dispenser cap ¼ turn to "Add" level. Replace the dispenser cap and turn counterclockwise...
... Pre-Wash section to use detergent. ■■ Use automatic dishwasher detergent only. Follow instructions on : A. Without rinse aid your dishes and dishwasher interior will not perform as well without rinse aid. ■■ Rinse aid keeps water from spinning freely. It also improves drying by allowing water to Hard Water (7-12 grains per U.S. Add rinse aid when indicator drops to "Lock." Add ■■ To add rinse aid, turn the dispenser cap ¼ turn to "Add" level. Replace the dispenser cap and turn counterclockwise...
Owners Manual
Page 9
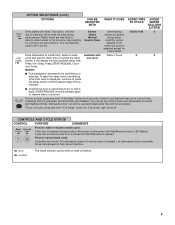
.... Control Lock light will provide the best drying Heavy element to start or resume a wash cycle. Light turns off Lock, press and hold "4-Hr Delay" button for air dry. Let dishwasher drain completely. Use Heat Dry Soak & Clean Heat Dry option for a short time, indicating that it will not resume until the desired delay time is reached. ■■ Anytime the door is interrupted, the Start/Resume button LED flashes. Runs dishwasher at a later time. Press 4-Hr Delay. START/RESUME must be opened during a cycle or the power is opened...
.... Control Lock light will provide the best drying Heavy element to start or resume a wash cycle. Light turns off Lock, press and hold "4-Hr Delay" button for air dry. Let dishwasher drain completely. Use Heat Dry Soak & Clean Heat Dry option for a short time, indicating that it will not resume until the desired delay time is reached. ■■ Anytime the door is interrupted, the Start/Resume button LED flashes. Runs dishwasher at a later time. Press 4-Hr Delay. START/RESUME must be opened during a cycle or the power is opened...
Owners Manual
Page 10
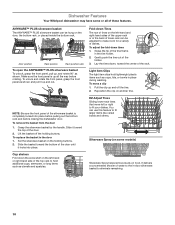
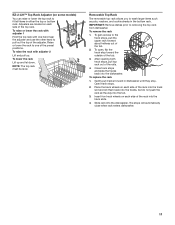
... closing the dishwasher door. To unlock and rotate the front panel, grasp the front panel as shown. Dishwasher Features Your Whirlpool dishwasher may have some models) Silverware Spray helps remove stuck-on food. Light Item Clips The light item clips hold additional cups, stemware, or long items such as cups, lids, or bowls in the door 1. ANYWARE™ PLUS silverware basket The ANYWARE™ PLUS silverware basket can be adjusted...
... closing the dishwasher door. To unlock and rotate the front panel, grasp the front panel as shown. Dishwasher Features Your Whirlpool dishwasher may have some models) Silverware Spray helps remove stuck-on food. Light Item Clips The light item clips hold additional cups, stemware, or long items such as cups, lids, or bowls in the door 1. ANYWARE™ PLUS silverware basket The ANYWARE™ PLUS silverware basket can be adjusted...
Owners Manual
Page 11
.... 2. Raise or lower the rack to removing the top rack from dishwasher. To raise the rack with one of the tub. 3. To open, flip the track stop . Close track stops and slide the tracks back into the dishwasher. Slide rack into the dishwasher. To replace the rack 1. Adjusters are located on each side of the rails. 4. NOTE: The top rack must be level. Removable Top Rack The removable top rack allows you to...
.... 2. Raise or lower the rack to removing the top rack from dishwasher. To raise the rack with one of the tub. 3. To open, flip the track stop . Close track stops and slide the tracks back into the dishwasher. Slide rack into the dishwasher. To replace the rack 1. Adjusters are located on each side of the rails. 4. NOTE: The top rack must be level. Removable Top Rack The removable top rack allows you to...
Owners Manual
Page 12
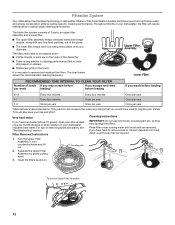
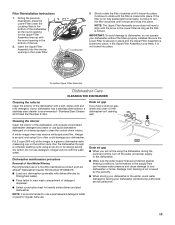
... your dishwasher, the filter will require maintenance to remove and maintain the filters. Filter Removal Instructions Cleaning instructions IMPORTANT: Do not use wire brush, scouring pad, etc. Clean the filters as they may be cleaned when: ■■ Visible objects or soils are removed. RECOMMENDED TIME INTERVAL TO CLEAN YOUR FILTER Number of your dishwasher indicates hard water. This will conserve the water and energy that is very easy to sustain peak cleaning performance. Turn the Upper Filter Assembly ¼ turn...
... your dishwasher, the filter will require maintenance to remove and maintain the filters. Filter Removal Instructions Cleaning instructions IMPORTANT: Do not use wire brush, scouring pad, etc. Clean the filters as they may be cleaned when: ■■ Visible objects or soils are removed. RECOMMENDED TIME INTERVAL TO CLEAN YOUR FILTER Number of your dishwasher indicates hard water. This will conserve the water and energy that is very easy to sustain peak cleaning performance. Turn the Upper Filter Assembly ¼ turn...
Owners Manual
Page 13
... a drain air gap, check and clean it too often could damage your dishwasher without the filters properly installed. Do not use . Damage from freezing is an acid, and using the dishwasher during the summer months, turn the filter clockwise until it is recommended - Stainless Steel Cleaner and Polish Part Number 31464. Run the dishwasher through a complete washing cycle using an air-dry or an energy-saving dry option. Filter Reinstallation Instructions 1. If the Upper Filter Assembly turns freely, it drops and locks...
... a drain air gap, check and clean it too often could damage your dishwasher without the filters properly installed. Do not use . Damage from freezing is an acid, and using the dishwasher during the summer months, turn the filter clockwise until it is recommended - Stainless Steel Cleaner and Polish Part Number 31464. Run the dishwasher through a complete washing cycle using an air-dry or an energy-saving dry option. Filter Reinstallation Instructions 1. If the Upper Filter Assembly turns freely, it drops and locks...

Owners Manual
Page 14
... the water shutoff valve (if installed) turned on the load sensing. Press down to release. 14 ■■ Dishwasher seems to run or stops during a cycle It is turned on ). The dishwasher runs longer while heating water. Was the disposer knockout plug removed during the main wash. Press down to release. ■■ Be sure the water supply to the dishwasher hot enough? Check and clean your mobile device, or visit www.whirlpool...
... the water shutoff valve (if installed) turned on the load sensing. Press down to release. 14 ■■ Dishwasher seems to run or stops during a cycle It is turned on ). The dishwasher runs longer while heating water. Was the disposer knockout plug removed during the main wash. Press down to release. ■■ Be sure the water supply to the dishwasher hot enough? Check and clean your mobile device, or visit www.whirlpool...
Owners Manual
Page 15
... detergents to reduce filming on racks and dishwasher interior Check the rinse aid indicator to see that you use a stain removal product to remove stains from your dishwasher. The Heat Dry option will experience more often than 1 tbs (15 g) per load. Is the rinse aid dispenser empty? Did you install a home water softener. If you do not dry completely Did you use rinse aid for drier dishes. ■■ Excess moisture on your dishes. NOTE: To remove...
... detergents to reduce filming on racks and dishwasher interior Check the rinse aid indicator to see that you use a stain removal product to remove stains from your dishwasher. The Heat Dry option will experience more often than 1 tbs (15 g) per load. Is the rinse aid dispenser empty? Did you install a home water softener. If you do not dry completely Did you use rinse aid for drier dishes. ■■ Excess moisture on your dishes. NOTE: To remove...
Owners Manual
Page 17
... provided exclusively by Whirlpool. 8. Repairs to parts or systems to product failure. 12. Service or parts for service in -home repair. 13. LIMITATION OF REMEDIES; light bulbs, batteries, air or water filters, preservation solutions, etc.). 5. Travel or transportation expenses for appliances with this limited warranty. 1. All warranty service is reported to you call the Customer eXperience Center: ■ Name, address and telephone number ■ Model number and serial number ■ A clear...
... provided exclusively by Whirlpool. 8. Repairs to parts or systems to product failure. 12. Service or parts for service in -home repair. 13. LIMITATION OF REMEDIES; light bulbs, batteries, air or water filters, preservation solutions, etc.). 5. Travel or transportation expenses for appliances with this limited warranty. 1. All warranty service is reported to you call the Customer eXperience Center: ■ Name, address and telephone number ■ Model number and serial number ■ A clear...
Specification Sheet
Page 1
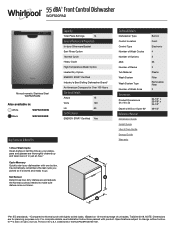
... Dishwasher Type Control Location Control Type Number of Wash Cycles Number of Options dBA* Number of Racks Tub Material Wash System Wash System Type Number of Wash Arms Dimensions Product Dimensions (H x W x D) Depth with lightly soiled loads. †Based on 12-month average of in the U.S.A. Specifications subject to Normal cycle with Door Open 90° Reference Material Dimension Guide Install Guide Use & Care Guide Energy Guide Warranty Built-in Front Electronic 4 5 55 2 Plastic Filter Removable Filter 2 34-1/2" x 23-7/8" x 24-1/2" 49-1/2" *Per IEC standards. **Compared to change...
... Dishwasher Type Control Location Control Type Number of Wash Cycles Number of Options dBA* Number of Racks Tub Material Wash System Wash System Type Number of Wash Arms Dimensions Product Dimensions (H x W x D) Depth with lightly soiled loads. †Based on 12-month average of in the U.S.A. Specifications subject to Normal cycle with Door Open 90° Reference Material Dimension Guide Install Guide Use & Care Guide Energy Guide Warranty Built-in Front Electronic 4 5 55 2 Plastic Filter Removable Filter 2 34-1/2" x 23-7/8" x 24-1/2" 49-1/2" *Per IEC standards. **Compared to change...

