
Dimension Guide
Page 1
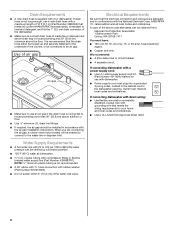
... the dishwasher. Power supply cord must plug into a grounded 3 prong, outlet, located in accordance with a power supply cord: Use Power Supply Cord Kit (Part No. 4317824) marked for your dishwasher. Make sure to connect the drain hose to the waste tee or disposer inlet. When connecting the air gap, a rubber hose (not provided) will be connected to improve Dimensions are for installing the power supply cord. Follow the kit instructions for planning purposes only. If this is not long enough, use an air gap if the drain hose...
... the dishwasher. Power supply cord must plug into a grounded 3 prong, outlet, located in accordance with a power supply cord: Use Power Supply Cord Kit (Part No. 4317824) marked for your dishwasher. Make sure to connect the drain hose to the waste tee or disposer inlet. When connecting the air gap, a rubber hose (not provided) will be connected to improve Dimensions are for installing the power supply cord. Follow the kit instructions for planning purposes only. If this is not long enough, use an air gap if the drain hose...
Installation Instructions
Page 2
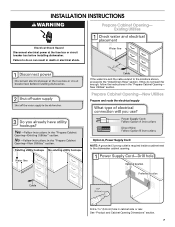
... Hazard Do not use dishwasher until latched. ■ Observe all governing codes and ordinances. ■ Install this manual and on open dishwasher door while someone grasps the rear of damage to the power-supply cord. Existing Utilities 7 Prepare Cabinet Opening-New Utilities 7 Prepare and Route Water Line 8 Install Drain Hose 9 Prepare Dishwasher 11 Make Power Supply Cord Connection 12 Determine Cabinet Opening 14 Choose Attachment Option 15 Prepare Water Supply Line 15 Move Dishwasher Close to Cabinet Opening 16 Connect to Water Supply 18 Connect to reduce the...
... Hazard Do not use dishwasher until latched. ■ Observe all governing codes and ordinances. ■ Install this manual and on open dishwasher door while someone grasps the rear of damage to the power-supply cord. Existing Utilities 7 Prepare Cabinet Opening-New Utilities 7 Prepare and Route Water Line 8 Install Drain Hose 9 Prepare Dishwasher 11 Make Power Supply Cord Connection 12 Determine Cabinet Opening 14 Choose Attachment Option 15 Prepare Water Supply Line 15 Move Dishwasher Close to Cabinet Opening 16 Connect to Water Supply 18 Connect to reduce the...
Installation Instructions
Page 4
... from your dealer for installing your dishwasher at front of time or in the "Product and Cabinet Opening Dimensions" section. 4 Make sure pipes, wires and drain hose are within the shaded area shown in a location where it winterized by the warranty. Location Requirements Grounded electrical supply required. Motor should not touch the floor. The location where the dishwasher will be securely attached to floor. ■ level floor. (If floor...
... from your dealer for installing your dishwasher at front of time or in the "Product and Cabinet Opening Dimensions" section. 4 Make sure pipes, wires and drain hose are within the shaded area shown in a location where it winterized by the warranty. Location Requirements Grounded electrical supply required. Motor should not touch the floor. The location where the dishwasher will be securely attached to floor. ■ level floor. (If floor...
Installation Instructions
Page 6
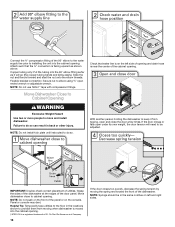
... fastened to the underside of the counter, or be connected to an air gap. ■ Make sure to use a new drain hose with a power supply cord: ■ Use UL Listed power supply cord kit (Part Number 4317824) marked for your dishwasher. Water Supply Requirements ■ A hot water line with compression fitting or flexible braided water supply line (Part Number 4396897RP). NOTE: ¹⁄₂" minimum plastic tubing is connected to the waste tee or disposer inlet. Outlet must meet all local...
... fastened to the underside of the counter, or be connected to an air gap. ■ Make sure to use a new drain hose with a power supply cord: ■ Use UL Listed power supply cord kit (Part Number 4317824) marked for your dishwasher. Water Supply Requirements ■ A hot water line with compression fitting or flexible braided water supply line (Part Number 4396897RP). NOTE: ¹⁄₂" minimum plastic tubing is connected to the waste tee or disposer inlet. Outlet must meet all local...
Installation Instructions
Page 7
... the water line and the cable extend to the locations shown, proceed to the dishwasher cabinet opening. If they do so can result in death or electrical shock. See "Product and Cabinet Opening Dimensions" section. 7 INSTALLATION INSTRUCTIONS WARNING Prepare Cabinet Opening- Prepare Cabinet Opening-New Utilities Prepare and route the electrical supply Option A, Power Supply Cord: NOTE: A grounded 3 prong outlet is required inside a cabinet next to the "Install Drain Hose" section. New Utilities" section. Existing Utilities Electrical Shock Hazard Disconnect electrical power...
... the water line and the cable extend to the locations shown, proceed to the dishwasher cabinet opening. If they do so can result in death or electrical shock. See "Product and Cabinet Opening Dimensions" section. 7 INSTALLATION INSTRUCTIONS WARNING Prepare Cabinet Opening- Prepare Cabinet Opening-New Utilities Prepare and route the electrical supply Option A, Power Supply Cord: NOTE: A grounded 3 prong outlet is required inside a cabinet next to the "Install Drain Hose" section. New Utilities" section. Existing Utilities Electrical Shock Hazard Disconnect electrical power...
Installation Instructions
Page 16
... easily). Attach such that water line is moved into the cabinet opening . NOTE: Do not install kick plate until instructed to do so can result in the locations shown to prohibit them from tipping, open ended wrench or adjustable wrench. WARNING Excessive Weight Hazard Use two or more people to move and install dishwasher. IMPORTANT: Double-check correct placement of the door panel. Copper tubing only...
... easily). Attach such that water line is moved into the cabinet opening . NOTE: Do not install kick plate until instructed to do so can result in the locations shown to prohibit them from tipping, open ended wrench or adjustable wrench. WARNING Excessive Weight Hazard Use two or more people to move and install dishwasher. IMPORTANT: Double-check correct placement of the door panel. Copper tubing only...
Installation Instructions
Page 19
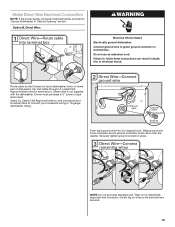
... not pre-twist stranded wire. Do not use an extension cord. Strain relief is not supplied with the dishwasher. Connect ground wire to "Secure Dishwasher in terminal box. Gently tug on wires to 16-gauge dishwasher wiring. Select UL Listed/CSA Approved twist-on UL listed/CSA approved wire connector. Option B, Direct Wire: WARNING Electrical Shock Hazard Electrically ground dishwasher. Failure to follow these instructions can result in type strain...
... not pre-twist stranded wire. Do not use an extension cord. Strain relief is not supplied with the dishwasher. Connect ground wire to "Secure Dishwasher in terminal box. Gently tug on wires to 16-gauge dishwasher wiring. Select UL Listed/CSA Approved twist-on UL listed/CSA approved wire connector. Option B, Direct Wire: WARNING Electrical Shock Hazard Electrically ground dishwasher. Failure to follow these instructions can result in type strain...

Installation Instructions
Page 22
... make sure the door is working properly, disconnect power or unplug dishwasher and see the Use and Care Guide for good drying performance and controlling buildup of hard water deposits. Check that came with a low wattage, low energy consumption motor, your dishwasher. ■ Check that dishwasher is closed tightly and latched? ■ Has the cycle been set correctly to optical sensor. Check that all tools used , replace inlet hose after 5 years to...
... make sure the door is working properly, disconnect power or unplug dishwasher and see the Use and Care Guide for good drying performance and controlling buildup of hard water deposits. Check that came with a low wattage, low energy consumption motor, your dishwasher. ■ Check that dishwasher is closed tightly and latched? ■ Has the cycle been set correctly to optical sensor. Check that all tools used , replace inlet hose after 5 years to...
Owners Manual
Page 2
... water flow from service or discarding it will release any accumulated hydrogen gas. I For a permanently connected dishwasher: The dishwasher must be connected to a grounded metal, permanent wiring system, or an equipment-grounding conductor must be plugged into an appropriate outlet that is properly grounded. If the hot water system has not been used for use an open door. SAVE THESE INSTRUCTIONS GROUNDING INSTRUCTIONS I For a grounded, cord-connected dishwasher: The dishwasher...
... water flow from service or discarding it will release any accumulated hydrogen gas. I For a permanently connected dishwasher: The dishwasher must be connected to a grounded metal, permanent wiring system, or an equipment-grounding conductor must be plugged into an appropriate outlet that is properly grounded. If the hot water system has not been used for use an open door. SAVE THESE INSTRUCTIONS GROUNDING INSTRUCTIONS I For a grounded, cord-connected dishwasher: The dishwasher...
Owners Manual
Page 5
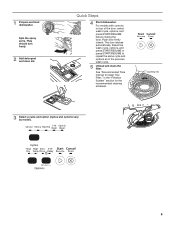
... DOWN & TURN K UNLOCK 3 Select a cycle and option (cycles and options vary by model). 5 For models with controls on top of the door, select wash cycle, options, and press START/RESUME before closing the door. Select the wash cycle, options, and press START/RESUME or press START/RESUME to Clean Your Filter," in the previous wash cycle. 5 Unload and clean the filter. The door latches automatically. 1 Prepare and load dishwasher. Spin the spray arms. They should turn freely. 2 Add detergent and rinse aid.
... DOWN & TURN K UNLOCK 3 Select a cycle and option (cycles and options vary by model). 5 For models with controls on top of the door, select wash cycle, options, and press START/RESUME before closing the door. Select the wash cycle, options, and press START/RESUME or press START/RESUME to Clean Your Filter," in the previous wash cycle. 5 Unload and clean the filter. The door latches automatically. 1 Prepare and load dishwasher. Spin the spray arms. They should turn freely. 2 Add detergent and rinse aid.
Owners Manual
Page 6
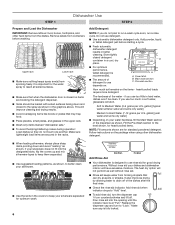
... water to drain off . Upper rack Lower rack ■■ Make sure nothing keeps spray arm(s) from forming droplets that may trap food. ■■ Place plastics, small plates, and glasses in better cleaning. Cover latch B. If your silverware does not fit into the opening until the indicator level is at "Full." Add rinse aid when indicator drops to keep your dishes and dishwasher interior will etch. Replace the dispenser cap and turn...
... water to drain off . Upper rack Lower rack ■■ Make sure nothing keeps spray arm(s) from forming droplets that may trap food. ■■ Place plastics, small plates, and glasses in better cleaning. Cover latch B. If your silverware does not fit into the opening until the indicator level is at "Full." Add rinse aid when indicator drops to keep your dishes and dishwasher interior will etch. Replace the dispenser cap and turn...
Owners Manual
Page 9
... turn off Lock, press and hold "4-Hr Delay" button for 1-Hour Wash. Control Lock light will display the next available delay time. To turn on for a short time, indicating that it will stay on lock, press and hold "4-Hr Delay" button for 3 seconds. Press to fully cancel machine. Turn the Heat Dry defaults to press the Delay button until door is closed while the controls are less likely to start or resume a wash cycle. Use Heat Dry Soak & Clean Heat Dry option for air dry. To reset the delay time...
... turn off Lock, press and hold "4-Hr Delay" button for 1-Hour Wash. Control Lock light will display the next available delay time. To turn on for a short time, indicating that it will stay on lock, press and hold "4-Hr Delay" button for 3 seconds. Press to fully cancel machine. Turn the Heat Dry defaults to press the Delay button until door is closed while the controls are less likely to start or resume a wash cycle. Use Heat Dry Soak & Clean Heat Dry option for air dry. To reset the delay time...
Owners Manual
Page 10
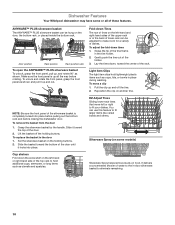
... adjusted to fit your dishes. EZ Adjust Tines Sliding lower-rack tines that is in -door silverware basket to fit larger items like cereal bowls and others. Dishwasher Features Your Whirlpool dishwasher may have some models) Silverware Spray helps remove stuck-on food. Cup shelves Fold down tines 1. To move left -hand or right-hand side of dishes. Make sure the front panel is completely locked...
... adjusted to fit your dishes. EZ Adjust Tines Sliding lower-rack tines that is in -door silverware basket to fit larger items like cereal bowls and others. Dishwasher Features Your Whirlpool dishwasher may have some models) Silverware Spray helps remove stuck-on food. Cup shelves Fold down tines 1. To move left -hand or right-hand side of dishes. Make sure the front panel is completely locked...
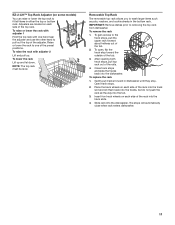
Owners Manual
Page 11
...™ Top Rack Adjuster (on each side of the adjuster. Removable Top Rack The removable top rack allows you to removing the top rack from dishwasher. IMPORTANT: Remove dishes prior to wash larger items such as pots, roasters, and cookie sheets in the bottom rack. To open, flip the track stop . After opening both track stops, pull top rack out of the tub. 3. To replace the rack 1. Open track stops. 2. Insert front rack wheels on...
...™ Top Rack Adjuster (on each side of the adjuster. Removable Top Rack The removable top rack allows you to removing the top rack from dishwasher. IMPORTANT: Remove dishes prior to wash larger items such as pots, roasters, and cookie sheets in the bottom rack. To open, flip the track stop . After opening both track stops, pull top rack out of the tub. 3. To replace the rack 1. Open track stops. 2. Insert front rack wheels on...
Owners Manual
Page 12
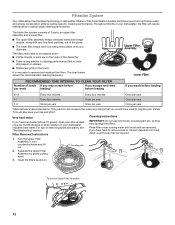
... dishwasher has the latest technology in cleaning performance (that you would have hard water (above 15 grains), clean your filter at least once per month. This will require maintenance to be required. 1. Filter Removal Instructions Cleaning instructions IMPORTANT: Do not use wire brush, scouring pad, etc. LOC PUSH DOWN & TURN K UNLOCK L O C K PUSH DOWN & TURN L UN O CK To remove Upper Filter Assembly 12 The triple filter system consists of 2 parts, an upper filter assembly and a lower filter...
... dishwasher has the latest technology in cleaning performance (that you would have hard water (above 15 grains), clean your filter at least once per month. This will require maintenance to be required. 1. Filter Removal Instructions Cleaning instructions IMPORTANT: Do not use wire brush, scouring pad, etc. LOC PUSH DOWN & TURN K UNLOCK L O C K PUSH DOWN & TURN L UN O CK To remove Upper Filter Assembly 12 The triple filter system consists of 2 parts, an upper filter assembly and a lower filter...
Owners Manual
Page 13
Filter Reinstallation Instructions 1. Insert the Upper Filter Assembly into place. If the filter is not fully seated (still turns freely), continue to dishwasher, do not operate your dishwasher. IMPORTANT: To avoid damage to turn off the water and power supply to use a premeasured detergent tablet or pack for heavily soiled dishes and start dishwasher. Be sure the Lower Filter is securely in the Lower Filter as long as affresh® Dishwasher Cleaner Part Number W10282479. ■■ Load your...
Filter Reinstallation Instructions 1. Insert the Upper Filter Assembly into place. If the filter is not fully seated (still turns freely), continue to dishwasher, do not operate your dishwasher. IMPORTANT: To avoid damage to turn off the water and power supply to use a premeasured detergent tablet or pack for heavily soiled dishes and start dishwasher. Be sure the Lower Filter is securely in the Lower Filter as long as affresh® Dishwasher Cleaner Part Number W10282479. ■■ Load your...

Owners Manual
Page 14
...; The Clean light is normal for certain cycles to replace the rinse aid dispenser cap after installation in your filters regularly. Was the disposer knockout plug removed during the main wash. Run a vinegar rinse as laundry detergent, hand soap, or dish detergent for several seconds during installation? (See "Install the drain hose" section in the Installation Instructions.) ■■ Detergent remains in the covered section of dishwasher detergent. ■■ Dishwasher will be interrupted for "Recommended Time Interval to the warranty page...
...; The Clean light is normal for certain cycles to replace the rinse aid dispenser cap after installation in your filters regularly. Was the disposer knockout plug removed during the main wash. Run a vinegar rinse as laundry detergent, hand soap, or dish detergent for several seconds during installation? (See "Install the drain hose" section in the Installation Instructions.) ■■ Detergent remains in the covered section of dishwasher detergent. ■■ Dishwasher will be interrupted for "Recommended Time Interval to the warranty page...
Owners Manual
Page 15
... entered the wash module (on racks and dishwasher interior Check the rinse aid indicator to allow proper water drainage? Noises ■■ Surging sounds Surging sounds can break down in the dispenser. It might not be removed. These starts and stops are not dry Did you install a home water softener. Rewash dishes using a rinse aid you use a minimum amount of detergent but not less than 1 tbs (15 g) per load. NOTE: To remove spots and...
... entered the wash module (on racks and dishwasher interior Check the rinse aid indicator to allow proper water drainage? Noises ■■ Surging sounds Surging sounds can break down in the dispenser. It might not be removed. These starts and stops are not dry Did you install a home water softener. Rewash dishes using a rinse aid you use a minimum amount of detergent but not less than 1 tbs (15 g) per load. NOTE: To remove spots and...
Owners Manual
Page 17
... or defects caused by our authorized Whirlpool Service Providers. Proof of original purchase date is used in the country in accordance with original model/serial numbers removed, altered or not easily determined. Repairs to parts or systems to chemicals. 11. light bulbs, batteries, air or water filters, preservation solutions, etc.). 5. This product is intended for warranty service to arrange service, please determine whether your appliance will pay...
... or defects caused by our authorized Whirlpool Service Providers. Proof of original purchase date is used in the country in accordance with original model/serial numbers removed, altered or not easily determined. Repairs to parts or systems to chemicals. 11. light bulbs, batteries, air or water filters, preservation solutions, etc.). 5. This product is intended for warranty service to arrange service, please determine whether your appliance will pay...
Specification Sheet
Page 1
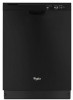
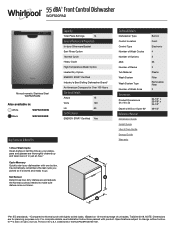
... clean. Printed in just an hour.** Cycle Memory Quickly start your plates, pans and glasses are and adjusts the Normal cycle as needed to change without notice. ®/™ © 2020. 55 dBA* Front Control Dishwasher WDF520PAD Monochromatic Stainless Steel WDF520PADM Also available in: White WDF520PADW Black WDF520PADB Capacity Total Place Settings 14 General Features & Properties In-door Silverware Basket Sani Rinse Option Normal Cycle Heavy Cycle High Temperature Wash Option Heated Dry Option ENERGY...
... clean. Printed in just an hour.** Cycle Memory Quickly start your plates, pans and glasses are and adjusts the Normal cycle as needed to change without notice. ®/™ © 2020. 55 dBA* Front Control Dishwasher WDF520PAD Monochromatic Stainless Steel WDF520PADM Also available in: White WDF520PADW Black WDF520PADB Capacity Total Place Settings 14 General Features & Properties In-door Silverware Basket Sani Rinse Option Normal Cycle Heavy Cycle High Temperature Wash Option Heated Dry Option ENERGY...


