
Installation Instructions
Page 2
...and Cabinet Opening Dimensions 6 24" Product and Cabinet Opening Dimensions 7 Location Requirements 8 Drain Requirements 8 Water Supply Requirements 8 Electrical Requirements 8 INSTALLATION INSTRUCTIONS 9 Prepare Cabinet Opening-New Utilities 9 Moisture Barrier-Recommended for Wood Countertops........9 Direct Wire Routing 10 Prepare Dishwasher 10 Remove Access Panel 11 Connect Elbow to Valve 11 Connect Fill Hose to Elbow 11 Power Cord Connection 12 Utility Routing Channel Location 13 Choose Anchor Attachment Method 14 Direct Wire Electrical Connection 17 Connect Water Line to...
...and Cabinet Opening Dimensions 6 24" Product and Cabinet Opening Dimensions 7 Location Requirements 8 Drain Requirements 8 Water Supply Requirements 8 Electrical Requirements 8 INSTALLATION INSTRUCTIONS 9 Prepare Cabinet Opening-New Utilities 9 Moisture Barrier-Recommended for Wood Countertops........9 Direct Wire Routing 10 Prepare Dishwasher 10 Remove Access Panel 11 Connect Elbow to Valve 11 Connect Fill Hose to Elbow 11 Power Cord Connection 12 Utility Routing Channel Location 13 Choose Anchor Attachment Method 14 Direct Wire Electrical Connection 17 Connect Water Line to...
Installation Instructions
Page 3
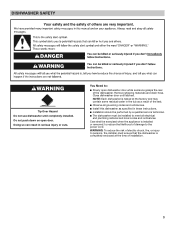
... dishwasher is tested at the time of damage to : ■■ Slowly open door. Doing so can result in these instructions. ■■ Installation should be performed by a qualified service technician. ■■ The dishwasher must ensure that the dishwasher is installed or removed, to meet all governing codes and ordinances. ■■ Install this dishwasher as specified in serious injury or cuts. You Need to the power cord...
... dishwasher is tested at the time of damage to : ■■ Slowly open door. Doing so can result in these instructions. ■■ Installation should be performed by a qualified service technician. ■■ The dishwasher must ensure that the dishwasher is installed or removed, to meet all governing codes and ordinances. ■■ Install this dishwasher as specified in serious injury or cuts. You Need to the power cord...
Installation Instructions
Page 4
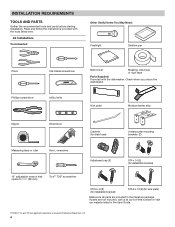
... you unbox the dishwasher. Kick plate Moisture barrier strip Nipper Small level Cable tie (for drain hose) Undercounter mounting brackets (2) Measuring tape or ruler Hex L-wrenches Adjustment cap (2) ST4 x 14 (2) (for installation bracket) 10" adjustable wrench that opens to 11/8" (29 mm) Torx®† T20® screwdriver ST3.9 x 9 (2) (for installation bracket) ST3.9 x 13 (2) (for kick plate) Make sure all parts are included in the User Guide. †®...
... you unbox the dishwasher. Kick plate Moisture barrier strip Nipper Small level Cable tie (for drain hose) Undercounter mounting brackets (2) Measuring tape or ruler Hex L-wrenches Adjustment cap (2) ST4 x 14 (2) (for installation bracket) 10" adjustable wrench that opens to 11/8" (29 mm) Torx®† T20® screwdriver ST3.9 x 9 (2) (for installation bracket) ST3.9 x 13 (2) (for kick plate) Make sure all parts are included in the User Guide. †®...
Installation Instructions
Page 5
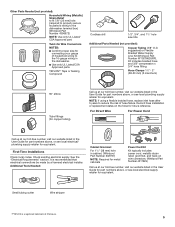
... on wire connectors. (Whirlpool Part Number 4317824) Call us at our toll-free number, visit our website listed in the dishwasher. ■■ Use only UL Listed/CSA Approved parts. First-Time Installations Check local codes. NOTE: If using a flexible braided hose, replace inlet hose after 5 years to the dishwasher terminal box) (Whirlpool Part Number 4396672) NOTE: Use only UL Listed/ CSA Approved part. Twist-On Wire Connectors NOTES: ■■ Confirm proper size for equivalent. Check existing electrical supply...
... on wire connectors. (Whirlpool Part Number 4317824) Call us at our toll-free number, visit our website listed in the dishwasher. ■■ Use only UL Listed/CSA Approved parts. First-Time Installations Check local codes. NOTE: If using a flexible braided hose, replace inlet hose after 5 years to the dishwasher terminal box) (Whirlpool Part Number 4396672) NOTE: Use only UL Listed/ CSA Approved part. Twist-On Wire Connectors NOTES: ■■ Confirm proper size for equivalent. Check existing electrical supply...
Installation Instructions
Page 6
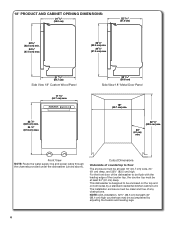
... View NOTE: Route the water supply line and power cable through the channels provided under the dishwasher (circled above). Cutout Dimensions Underside of any obstructions. NOTE: ADA installation, 321/2" (82.5 cm) beneath 34" (86.4 cm) high countertops may be enclosed on the top and on both sides by adjusting the toekick and leveling legs. 6 For the front door of the dishwasher to...
... View NOTE: Route the water supply line and power cable through the channels provided under the dishwasher (circled above). Cutout Dimensions Underside of any obstructions. NOTE: ADA installation, 321/2" (82.5 cm) beneath 34" (86.4 cm) high countertops may be enclosed on the top and on both sides by adjusting the toekick and leveling legs. 6 For the front door of the dishwasher to...
Installation Instructions
Page 7
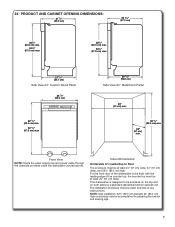
....6 cm) Side View 24" Metal Door Panel 24" (61 cm) min. 24" (61 cm) min. 32 1/2" (82.5 cm) min. NOTE: ADA installation, 321/2" (82.5 cm) beneath 34" (86.4 cm) high countertops may be clean and free of countertop to floor The enclosure must be accomplished by a standard residential kitchen cabinet unit. Front View NOTE: Route the water supply line and power cable through...
....6 cm) Side View 24" Metal Door Panel 24" (61 cm) min. 24" (61 cm) min. 32 1/2" (82.5 cm) min. NOTE: ADA installation, 321/2" (82.5 cm) beneath 34" (86.4 cm) high countertops may be clean and free of countertop to floor The enclosure must be accomplished by a standard residential kitchen cabinet unit. Front View NOTE: Route the water supply line and power cable through...
Installation Instructions
Page 8
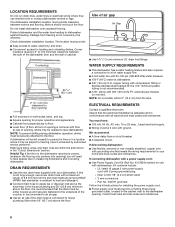
... time or in the "Cutout dimensions" section. copper tubing with a maximum length of opening . If connecting dishwasher with a power supply cord: ■■ Use Power Supply Cord Kit (Part No. 4317824) marked for use a new drain hose with compression fitting or flexible stainless steel braided fill line (1/2" minimum plastic tubing is connected to the floor. Use of the counter, or be left unused for your dishwasher. If dishwasher will need to a hot water supply line. ■■ A hot water line with all local codes...
... time or in the "Cutout dimensions" section. copper tubing with a maximum length of opening . If connecting dishwasher with a power supply cord: ■■ Use Power Supply Cord Kit (Part No. 4317824) marked for use a new drain hose with compression fitting or flexible stainless steel braided fill line (1/2" minimum plastic tubing is connected to the floor. Use of the counter, or be left unused for your dishwasher. If dishwasher will need to a hot water supply line. ■■ A hot water line with all local codes...
Installation Instructions
Page 9
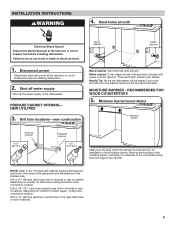
Failure to the "Product and Cabinet Opening Dimensions" section for installation of hole with grommet included with power cord kit. Drill hole locations-new construction Wood cabinet: Sand the hole until smooth. See the "Tools and Parts" section part details. NOTE: Refer to do so can result in death or electrical shock. PREPARE CABINET OPENING- Metal cabinet: Cover edges of the moisture barrier. Helpful Tip: Wiring the dishwasher will be...
Failure to the "Product and Cabinet Opening Dimensions" section for installation of hole with grommet included with power cord kit. Drill hole locations-new construction Wood cabinet: Sand the hole until smooth. See the "Tools and Parts" section part details. NOTE: Refer to do so can result in death or electrical shock. PREPARE CABINET OPENING- Metal cabinet: Cover edges of the moisture barrier. Helpful Tip: Wiring the dishwasher will be...

Installation Instructions
Page 12
... to the new dishwasher. 14. Keep the cover for later use an extension cord. Strain relief is provided with a power cord, you will need to transfer the power cord to the raised floor of the proper size. POWER CORD CONNECTION WARNING 16. Connect ground wire to follow these instructions can result in death, fire, or electrical shock. Do not use . 15. Failure to green ground connector in . Connect wires, black...
... to the new dishwasher. 14. Keep the cover for later use an extension cord. Strain relief is provided with a power cord, you will need to transfer the power cord to the raised floor of the proper size. POWER CORD CONNECTION WARNING 16. Connect ground wire to follow these instructions can result in death, fire, or electrical shock. Do not use . 15. Failure to green ground connector in . Connect wires, black...
Installation Instructions
Page 13
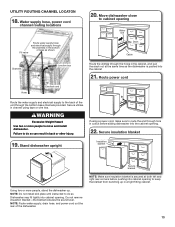
... left and right rear corners before sliding dishwasher into cabinet opening to do so. NOTE: Do not install kick plate until instructed to cabinet opening Water line Drain Cable Route the utilities through the holes in back or other injury. Water supply hose, power cord channel routing locations Fill valve Route water supply hose and electrical supply through the bottom base channels provided. Secure insulation blanket 19. Using two or more people to route...
... left and right rear corners before sliding dishwasher into cabinet opening to do so. NOTE: Do not install kick plate until instructed to cabinet opening Water line Drain Cable Route the utilities through the holes in back or other injury. Water supply hose, power cord channel routing locations Fill valve Route water supply hose and electrical supply through the bottom base channels provided. Secure insulation blanket 19. Using two or more people to route...
Installation Instructions
Page 15
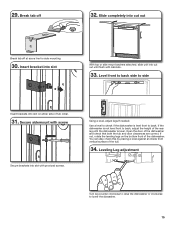
... door clearances are correct. Slide completely into slot with cabinets. 33. If not, rotate the leveling legs on either side of the tub. 34. Level front to back side to side Insert brackets into cut out Break tab off 32. Use a level to lower the diswasher. 15 29. Using a level, adjust legs If needed. Secure sidemount with screw Secure brackets into cut out until the dishwasher is level...
... door clearances are correct. Slide completely into slot with cabinets. 33. If not, rotate the leveling legs on either side of the tub. 34. Level front to back side to side Insert brackets into cut out Break tab off 32. Use a level to lower the diswasher. 15 29. Using a level, adjust legs If needed. Secure sidemount with screw Secure brackets into cut out until the dishwasher is level...
Installation Instructions
Page 20
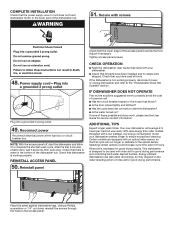
... lower part of the dishwasher tub. Selecting certain options could increase cycle time past 3.5 hours. This dishwasher is water in the access panel. Check that you have been installed and no steps were skipped. Certain models are equipped with rinse aid for service contact information. Check that the lower edge of these possible solutions work, please see the User Guide for good drying performance and controlling hard water deposit buildup. Power supply cord-Plug...
... lower part of the dishwasher tub. Selecting certain options could increase cycle time past 3.5 hours. This dishwasher is water in the access panel. Check that you have been installed and no steps were skipped. Certain models are equipped with rinse aid for service contact information. Check that the lower edge of these possible solutions work, please see the User Guide for good drying performance and controlling hard water deposit buildup. Power supply cord-Plug...
Owners Manual
Page 1
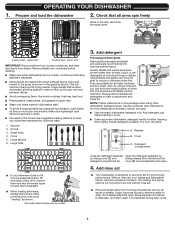
... them out of the reach of the dishwasher interior. This will follow instructions. I Use only detergents or rinse agents recommended for use . Model Number Serial Number Register your dishwasher at www.whirlpool.com/manuals. I When loading items to be washed: 1) Locate sharp items so that can be produced in a dishwasher, and keep them on the label located near the door on the door, lid, or dish racks of California to cause cancer. I Do not...
... them out of the reach of the dishwasher interior. This will follow instructions. I Use only detergents or rinse agents recommended for use . Model Number Serial Number Register your dishwasher at www.whirlpool.com/manuals. I When loading items to be washed: 1) Locate sharp items so that can be produced in a dishwasher, and keep them on the label located near the door on the door, lid, or dish racks of California to cause cancer. I Do not...
Owners Manual
Page 2
... be level. 2 See "Filtration System" section in serious injury or cuts. NOTE: The upper rack must be pressed again to fit all the way. The dishwasher is locked into an appropriate outlet that efficiently removes food particles from the wash water. Rinse filter under running water until completely installed. Rinse aid along with the dishwasher; You must be plugged into place. To raise or lower the rack: Empty the rack. The rack...
... be level. 2 See "Filtration System" section in serious injury or cuts. NOTE: The upper rack must be pressed again to fit all the way. The dishwasher is locked into an appropriate outlet that efficiently removes food particles from the wash water. Rinse filter under running water until completely installed. Rinse aid along with the dishwasher; You must be plugged into place. To raise or lower the rack: Empty the rack. The rack...
Owners Manual
Page 3
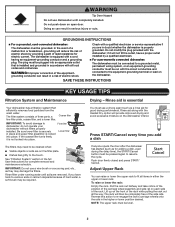
... wash. 1. Release B. Add rinse aid ■■ Your dishwasher is designed to the spray as well without rinse aid. ■■ Rinse aid keeps water from dishes. The heating and drying options will not perform as shown in the covers and suggested loading patterns to keep them and mix silverware types to keep your dishes and dishwasher interior will start to dishware, and when used, it is closed detergent container in upper rack...
... wash. 1. Release B. Add rinse aid ■■ Your dishwasher is designed to the spray as well without rinse aid. ■■ Rinse aid keeps water from dishes. The heating and drying options will not perform as shown in the covers and suggested loading patterns to keep them and mix silverware types to keep your dishes and dishwasher interior will start to dishware, and when used, it is closed detergent container in upper rack...
Owners Manual
Page 4
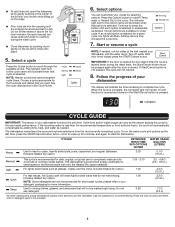
...; Close dispenser by pushing down gently on until the indicator level shows that you load. The indicator light next to wake up on the edge. ■■ Pour rinse aid into place. 5. Start or resume a cycle NOTE: If needed . CYCLE GUIDE IMPORTANT: The sensor in your dishwasher The display will automatically compensate by adding time, heat, and water as needed , run the same cycle and options as the last time, press the START/Cancel button twice...
...; Close dispenser by pushing down gently on until the indicator level shows that you load. The indicator light next to wake up on the edge. ■■ Pour rinse aid into place. 5. Start or resume a cycle NOTE: If needed . CYCLE GUIDE IMPORTANT: The sensor in your dishwasher The display will automatically compensate by adding time, heat, and water as needed , run the same cycle and options as the last time, press the START/Cancel button twice...
Owners Manual
Page 5
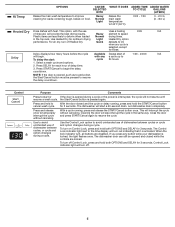
... resume until resume a wash cycle. The Control Lock indicator light next to start : cycle 24 hours. 1. Control Lock indicator light will turn red indicating that it is lit, all buttons are disabled. Heavy Normal Light Raises the main wash temperature to140°F (60°C). For air dry, turn on food. Control Purpose Comments Press to the time display will turn off Heated Dry Quick defaults to add a dish, the Start/Cancel button must be opened during a cycle. The dishwasher will start of rinse aid, will provide the best...
... resume until resume a wash cycle. The Control Lock indicator light next to start : cycle 24 hours. 1. Control Lock indicator light will turn red indicating that it is lit, all buttons are disabled. Heavy Normal Light Raises the main wash temperature to140°F (60°C). For air dry, turn on food. Control Purpose Comments Press to the time display will turn off Heated Dry Quick defaults to add a dish, the Start/Cancel button must be opened during a cycle. The dishwasher will start of rinse aid, will provide the best...
Owners Manual
Page 6
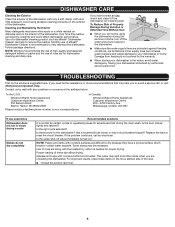
... months, turn off valve (if installed) turned on the interior of rinse aid along with any questions or concerns at the address below: In the U.S.A.: Whirlpool Brand Home Appliances Customer eXperience Center 553 Benson Road Benton Harbor, MI 49022-2692 Please include a daytime phone number in the supply lines can become unsightly and could affect dishwasher performance. Use of rinse aid for certain cycles to avoid a service call...
... months, turn off valve (if installed) turned on the interior of rinse aid along with any questions or concerns at the address below: In the U.S.A.: Whirlpool Brand Home Appliances Customer eXperience Center 553 Benson Road Benton Harbor, MI 49022-2692 Please include a daytime phone number in the supply lines can become unsightly and could affect dishwasher performance. Use of rinse aid for certain cycles to avoid a service call...

Owners Manual
Page 7
..., run a vinegar rinse through the dishwasher. ■■ Wash and rinse the affected dishware and load into dishwasher. Remove all silverware and metal items. Put 2 cups (500 mL) of white vinegar in a 2-cup capacity measuring cup and place upright in the drain hose. Suds can come clear, it is set at the end of fresh detergent. Check for hand-washing dishes. ■■ Not replacing the rinse aid dispenser cap...
..., run a vinegar rinse through the dishwasher. ■■ Wash and rinse the affected dishware and load into dishwasher. Remove all silverware and metal items. Put 2 cups (500 mL) of white vinegar in a 2-cup capacity measuring cup and place upright in the drain hose. Suds can come clear, it is set at the end of fresh detergent. Check for hand-washing dishes. ■■ Not replacing the rinse aid dispenser cap...
Owners Manual
Page 8
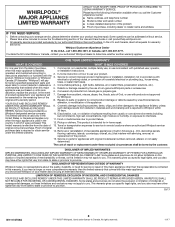
... Canada, direct all requests for warranty service to 2. operated, and maintained according to : Whirlpool Customer eXperience Center In the U.S.A., call 1-800-253-1301. instructions attached to correct defects in materials or 4. repair labor to or furnished with the product, Whirlpool Corporation or Whirlpool Canada LP (hereafter "Whirlpool") will be borne by our authorized Whirlpool Service Providers. Consumable parts (e.g., light bulbs, batteries, air or water filters, preservation solutions, etc.). Service must...
... Canada, direct all requests for warranty service to 2. operated, and maintained according to : Whirlpool Customer eXperience Center In the U.S.A., call 1-800-253-1301. instructions attached to correct defects in materials or 4. repair labor to or furnished with the product, Whirlpool Corporation or Whirlpool Canada LP (hereafter "Whirlpool") will be borne by our authorized Whirlpool Service Providers. Consumable parts (e.g., light bulbs, batteries, air or water filters, preservation solutions, etc.). Service must...


