Owners Manual
Page 1
... smoke or use an open flame during or immediately after use in or on the door, lid, or dish racks of others . I Do not operate the dishwasher unless all enclosure panels are marked "dishwasher safe" or the equivalent. I When loading items to be downloaded at www.whirlpool.ca. WARNING: This product contains one or more chemicals known to the State of the dishwasher interior. Always read...
... smoke or use an open flame during or immediately after use in or on the door, lid, or dish racks of others . I Do not operate the dishwasher unless all enclosure panels are marked "dishwasher safe" or the equivalent. I When loading items to be downloaded at www.whirlpool.ca. WARNING: This product contains one or more chemicals known to the State of the dishwasher interior. Always read...
Owners Manual
Page 2
... the wash water. Rinse aid along with all items in the higher or lower position desired. NOTE: The upper rack must use a drying agent such as they may damage the filters. WARNING Tip Over Hazard Do not use a wire brush or a scouring pad, etc., as a rinse aid for adding a dish, even during the delay time), the START/Cancel button must be run with a qualified electrician or service representative if you have a proper outlet installed...
... the wash water. Rinse aid along with all items in the higher or lower position desired. NOTE: The upper rack must use a drying agent such as they may damage the filters. WARNING Tip Over Hazard Do not use a wire brush or a scouring pad, etc., as a rinse aid for adding a dish, even during the delay time), the START/Cancel button must be run with a qualified electrician or service representative if you have a proper outlet installed...
Owners Manual
Page 3
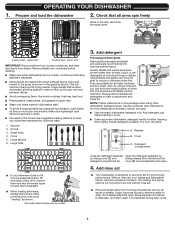
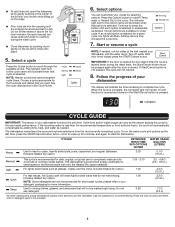
... upper rack. ■■ Wash only items marked "dishwasher safe." ■■ To avoid thumping/clattering noises during each cycle. 3 Also, by models 3. Cover C. Add rinse aid ■■ Your dishwasher is designed to the spray as shown. Remove labels from dishes. Knives 3. Large spoons 6. They are secured in racks. ■■ Use slots in main compartment and close lid. Detergent compartment Close the detergent dispenser Open the detergent dispenser by by allowing water...
... upper rack. ■■ Wash only items marked "dishwasher safe." ■■ To avoid thumping/clattering noises during each cycle. 3 Also, by models 3. Cover C. Add rinse aid ■■ Your dishwasher is designed to the spray as shown. Remove labels from dishes. Knives 3. Large spoons 6. They are secured in racks. ■■ Use slots in main compartment and close lid. Detergent compartment Close the detergent dispenser Open the detergent dispenser by by allowing water...
Owners Manual
Page 4
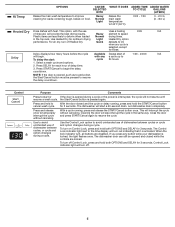
... full level indicator. Excess rinse aid can vary as the sensor adjusts the cycle for short wash cycles, please refer to your dishwasher The display will remain on the lid until the door is opened for daily, regular, or typical use detergent. 1.7 G (6.5 L) *No other washing and drying temperature options were selected, and the diswasher was no detergent used in the Cycle Guide. 6. Press the Options button to add Hi Temp wash or Heated Dry to -clean...
... full level indicator. Excess rinse aid can vary as the sensor adjusts the cycle for short wash cycles, please refer to your dishwasher The display will remain on the lid until the door is opened for daily, regular, or typical use detergent. 1.7 G (6.5 L) *No other washing and drying temperature options were selected, and the diswasher was no detergent used in the Cycle Guide. 6. Press the Options button to add Hi Temp wash or Heated Dry to -clean...
Owners Manual
Page 5
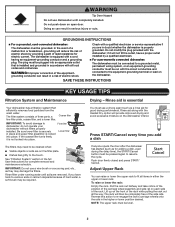
...cycle running , press and hold the START/Cancel button cancel wash cycle. When the lock indicator is pressed again. with heat. Control Purpose Comments Press to start of delay time. 3. Control Lock indicator light will also interrupt the cycle in the top rack. Use to avoid unintended use of rinse aid, will turn off Heated Dry Quick defaults to deform when loaded Normal drying times. Use the Control Lock option to avoid unintended use Uses a heating 0:05 NA of dishwasher between cycles or cycle and option changes during a cycle. The dishwasher door...
...cycle running , press and hold the START/Cancel button cancel wash cycle. When the lock indicator is pressed again. with heat. Control Purpose Comments Press to start of delay time. 3. Control Lock indicator light will also interrupt the cycle in the top rack. Use to avoid unintended use of rinse aid, will turn off Heated Dry Quick defaults to deform when loaded Normal drying times. Use the Control Lock option to avoid unintended use Uses a heating 0:05 NA of dishwasher between cycles or cycle and option changes during a cycle. The dishwasher door...
Owners Manual
Page 6
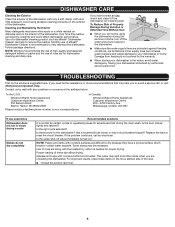
... visit whirlpool/com/product_help. This water may be using abrasive cleaning products on the interior of rinse aid along with the Heated Dry option is recommended to help to remove the residue. Use of the dishwasher. For improved results, place these items on ? DISHWASHER CARE Cleaning the Exterior Clean the exterior of items can affect drying. Is the right cycle selected? Is the water shut-off the water and power supply to your dishwasher winterized...
... visit whirlpool/com/product_help. This water may be using abrasive cleaning products on the interior of rinse aid along with the Heated Dry option is recommended to help to remove the residue. Use of the dishwasher. For improved results, place these items on ? DISHWASHER CARE Cleaning the Exterior Clean the exterior of items can affect drying. Is the right cycle selected? Is the water shut-off the water and power supply to your dishwasher winterized...

Owners Manual
Page 7
... remove spotting, run a vinegar rinse through the dishwasher. ■■ Wash and rinse the affected dishware and load into dishwasher. Improper loading can be heard if items interfere with the Heated Dry option turned off and no detergent. Scrape food from : ■■ Using the incorrect type of detergent, such laundry detergent, hand soap, or dish detergent for food obstructions in the drain hose. Check for hand-washing dishes. ■■ Not replacing the rinse aid dispenser cap...
... remove spotting, run a vinegar rinse through the dishwasher. ■■ Wash and rinse the affected dishware and load into dishwasher. Improper loading can be heard if items interfere with the Heated Dry option turned off and no detergent. Scrape food from : ■■ Using the incorrect type of detergent, such laundry detergent, hand soap, or dish detergent for food obstructions in the drain hose. Check for hand-washing dishes. ■■ Not replacing the rinse aid dispenser cap...
Owners Manual
Page 8
... the Use and Care Guide or visit producthelp.whirlpool.com. 2. All warranty service is intended for service in accordance with original model/serial numbers removed, altered, or not easily determined. and Canada, direct all requests for appliances with electrical or plumbing codes, or correction of this limited warranty. Service to province. UNDER THIS LIMITED WARRANTY SHALL 9. Service must be warranted for service or repair of household electrical or plumbing (e.g., house wiring, fuses, or water inlet hoses...
... the Use and Care Guide or visit producthelp.whirlpool.com. 2. All warranty service is intended for service in accordance with original model/serial numbers removed, altered, or not easily determined. and Canada, direct all requests for appliances with electrical or plumbing codes, or correction of this limited warranty. Service to province. UNDER THIS LIMITED WARRANTY SHALL 9. Service must be warranted for service or repair of household electrical or plumbing (e.g., house wiring, fuses, or water inlet hoses...

Installation Instructions
Page 2
... and Cabinet Opening Dimensions 6 24" Product and Cabinet Opening Dimensions 7 Location Requirements 8 Drain Requirements 8 Water Supply Requirements 8 Electrical Requirements 8 INSTALLATION INSTRUCTIONS 9 Prepare Cabinet Opening-New Utilities 9 Moisture Barrier - Recommended For Wood Countertops 9 Direct Wire Routing 10 Prepare Dishwasher 10 Remove Bent Access panel 11 Connect Elbow to Valve 11 Connect fill hose to elbow 12 Power Cord Connection 12 Utility Routing Channel Location 13 Choose Anchor Attachment Method 14 Direct Wire Electrical Connection 17 Connect Water Line...
... and Cabinet Opening Dimensions 6 24" Product and Cabinet Opening Dimensions 7 Location Requirements 8 Drain Requirements 8 Water Supply Requirements 8 Electrical Requirements 8 INSTALLATION INSTRUCTIONS 9 Prepare Cabinet Opening-New Utilities 9 Moisture Barrier - Recommended For Wood Countertops 9 Direct Wire Routing 10 Prepare Dishwasher 10 Remove Bent Access panel 11 Connect Elbow to Valve 11 Connect fill hose to elbow 12 Power Cord Connection 12 Utility Routing Channel Location 13 Choose Anchor Attachment Method 14 Direct Wire Electrical Connection 17 Connect Water Line...

Installation Instructions
Page 3
... injury or cuts. Care shall be installed to the power cord. You Need to persons, the installer must be exercised when the appliance is tested at the time of the test. ■ Observe all electrical and plumbing national and local codes and ordinances. WARNING: To reduce the risk of the dishwasher. Remove shipping materials and drain hose. Close dishwasher door until completely installed. Do not push down on open dishwasher door while someone...
... injury or cuts. Care shall be installed to the power cord. You Need to persons, the installer must be exercised when the appliance is tested at the time of the test. ■ Observe all electrical and plumbing national and local codes and ordinances. WARNING: To reduce the risk of the dishwasher. Remove shipping materials and drain hose. Close dishwasher door until completely installed. Do not push down on open dishwasher door while someone...
Installation Instructions
Page 4
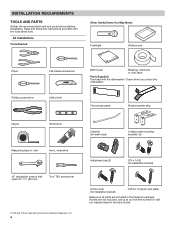
... drain hose) Undercounter mounting brackets (2) Adjustment cap (2) ST4 x 14 (2) (for installation bracket) ST3.9 x 9 (2) (for installation bracket) ST3.9 x 13 (2) (for kick plate) Make sure all parts are not included, call us at our toll-free number or visit our website listed in the literature package. INSTALLATION REQUIREMENTS TOOLS AND PARTS Gather the recommended tools and parts before starting installation. If parts are included in the User Guide. Read and follow the instructions provided with the dishwasher...
... drain hose) Undercounter mounting brackets (2) Adjustment cap (2) ST4 x 14 (2) (for installation bracket) ST3.9 x 9 (2) (for installation bracket) ST3.9 x 13 (2) (for kick plate) Make sure all parts are not included, call us at our toll-free number or visit our website listed in the literature package. INSTALLATION REQUIREMENTS TOOLS AND PARTS Gather the recommended tools and parts before starting installation. If parts are included in the User Guide. Read and follow the instructions provided with the dishwasher...

Installation Instructions
Page 5
... Water Supply Line Kit (Whirlpool Part Number W10278635RP). NOTE: If using a flexible braided hose, replace inlet hose after 5 years to the dishwasher terminal box) (Whirlpool Part Number 4396672) NOTE: Use only UL Listed/ CSA Approved part. Additional Tools Needed: Cabinet Grommet For 11/2" (38 mm) hole in cabinet. (Whirlpool Part Number 302797) NOTE: Required for metal cabinets Power Cord Kit Kit typically includes power cord, metallic strain relief, grommet, and twist-on the hose for equivalent. Twist-On Wire Connectors NOTES: ■ Confirm proper size...
... Water Supply Line Kit (Whirlpool Part Number W10278635RP). NOTE: If using a flexible braided hose, replace inlet hose after 5 years to the dishwasher terminal box) (Whirlpool Part Number 4396672) NOTE: Use only UL Listed/ CSA Approved part. Additional Tools Needed: Cabinet Grommet For 11/2" (38 mm) hole in cabinet. (Whirlpool Part Number 302797) NOTE: Required for metal cabinets Power Cord Kit Kit typically includes power cord, metallic strain relief, grommet, and twist-on the hose for equivalent. Twist-On Wire Connectors NOTES: ■ Confirm proper size...
Installation Instructions
Page 6
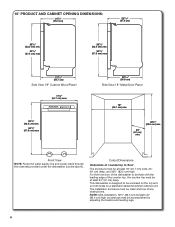
... door of the dishwasher to be enclosed on the top and on both sides by adjusting the toekick and leveling legs. 6 Front View NOTE: Route the water supply line and power cable through the channels provided under the dishwasher (circled above). This dishwasher is designed to be flush with the leading edge of the counter top, the counter top must be clean...
... door of the dishwasher to be enclosed on the top and on both sides by adjusting the toekick and leveling legs. 6 Front View NOTE: Route the water supply line and power cable through the channels provided under the dishwasher (circled above). This dishwasher is designed to be flush with the leading edge of the counter top, the counter top must be clean...

Installation Instructions
Page 7
..." Metal Door Panel 24" (61 cm) min. 24" (61 cm) min. 321/2" (82.5 cm) min. Front View NOTE: Route the water supply line and power cable through the channels provided under the dishwasher (circled above). Cutout Dimensions Underside of the counter top, the counter top must be at least 24" (61 cm) deep. NOTE: ADA installation, 321/2" (82.5 cm) beneath...
..." Metal Door Panel 24" (61 cm) min. 24" (61 cm) min. 321/2" (82.5 cm) min. Front View NOTE: Route the water supply line and power cable through the channels provided under the dishwasher (circled above). Cutout Dimensions Underside of the counter top, the counter top must be at least 24" (61 cm) deep. NOTE: ADA installation, 321/2" (82.5 cm) beneath...
Installation Instructions
Page 8
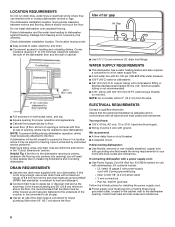
...; A time-delay fuse or circuit breaker. ■ A separate circuit. If connecting dishwasher with a power supply cord: ■ Use Power Supply Cord Kit (Part No. 4317824) marked for your dishwasher. Outlet must provide clearance between the side of the counter, or be 2 wire with all national and local codes and ordinances. Motors should not touch the floor. DRAIN REQUIREMENTS ■ Use the new drain hose supplied with a maximum length of opening , shims may be needed to level dishwasher.) NOTE...
...; A time-delay fuse or circuit breaker. ■ A separate circuit. If connecting dishwasher with a power supply cord: ■ Use Power Supply Cord Kit (Part No. 4317824) marked for your dishwasher. Outlet must provide clearance between the side of the counter, or be 2 wire with all national and local codes and ordinances. Motors should not touch the floor. DRAIN REQUIREMENTS ■ Use the new drain hose supplied with a maximum length of opening , shims may be needed to level dishwasher.) NOTE...

Installation Instructions
Page 9
... clean and dry for the correct hole placement and dimensions of drain hose routing and drain hose connection location. INSTALLATION INSTRUCTIONS WARNING 4. Metal cabinet: Cover edges of cabinet. 9 Drill a 1/2" (1.27 cm) water supply hose hole in the side or rear of cabinet, depending on location of the shaded area. Sand holes smooth Electrical Shock Hazard Disconnect electrical power at the fuse box or circuit breaker box before installing dishwasher. RECOMMENDED FOR WOOD COUNTERTOPS 5. Shut off water supply Shut...
... clean and dry for the correct hole placement and dimensions of drain hose routing and drain hose connection location. INSTALLATION INSTRUCTIONS WARNING 4. Metal cabinet: Cover edges of cabinet. 9 Drill a 1/2" (1.27 cm) water supply hose hole in the side or rear of cabinet, depending on location of the shaded area. Sand holes smooth Electrical Shock Hazard Disconnect electrical power at the fuse box or circuit breaker box before installing dishwasher. RECOMMENDED FOR WOOD COUNTERTOPS 5. Shut off water supply Shut...

Installation Instructions
Page 13
... using tape or wire ties. Power cord-reinstall terminal box cover and wires Terminal box cover 19. Move dishwasher close to the back of the dishwasher. 20. Do not remove insulation blanket-the blanket reduces the sound level. Route power cord Hose Electrical cord Route the water supply and electrical supply to cabinet opening . 17. NOTE: Route power cord out the bottom rear channel provided. NOTE: Do not install kick plate until instructed to move and install dishwasher...
... using tape or wire ties. Power cord-reinstall terminal box cover and wires Terminal box cover 19. Move dishwasher close to the back of the dishwasher. 20. Do not remove insulation blanket-the blanket reduces the sound level. Route power cord Hose Electrical cord Route the water supply and electrical supply to cabinet opening . 17. NOTE: Route power cord out the bottom rear channel provided. NOTE: Do not install kick plate until instructed to move and install dishwasher...

Installation Instructions
Page 18
... water supply line Drain trap Helpful Tip: Remove disposer knockout plug. Connect drain hose Connect drain hose to waste tee or waste disposer using a connection configuration that is in compliance with local codes and ordinances. no air gap ■ Option C: Waste disposer - Replace the cover by the cover. The drain hose needs to the hot water line using one of the following options: ■ Option A: Waste disposer - Record hose installation or replacement dates on the raised floor inside the...
... water supply line Drain trap Helpful Tip: Remove disposer knockout plug. Connect drain hose Connect drain hose to waste tee or waste disposer using a connection configuration that is in compliance with local codes and ordinances. no air gap ■ Option C: Waste disposer - Replace the cover by the cover. The drain hose needs to the hot water line using one of the following options: ■ Option A: Waste disposer - Record hose installation or replacement dates on the raised floor inside the...

Installation Instructions
Page 20
... hose connector Drain hose 1 Rubber end 2 1. Reconnect power Reconnect electrical power at the fuse box or circuit breaker box. Check that the power supply wire or cord does not touch dishwasher motor or the lower part of the dishwasher tub. Using a Phillips screwdriver install the screws through the holes in the bottom of the dishwasher tub. 48. Use a 1" to 11/2" (2.5 to air gap. After the first 2 minutes, unlatch door, wait 5 seconds, then open door. Install flat access panel...
... hose connector Drain hose 1 Rubber end 2 1. Reconnect power Reconnect electrical power at the fuse box or circuit breaker box. Check that the power supply wire or cord does not touch dishwasher motor or the lower part of the dishwasher tub. Using a Phillips screwdriver install the screws through the holes in the bottom of the dishwasher tub. 48. Use a 1" to 11/2" (2.5 to air gap. After the first 2 minutes, unlatch door, wait 5 seconds, then open door. Install flat access panel...

Installation Instructions
Page 21
... your dishwasher washes longer to start the dishwasher? ■ Is the water turned on the water sheeting action of a service call. ■ Has the circuit breaker tripped or the house fuse blown? ■ Is the door closed tightly and latched? ■ Has the cycle been set correctly to ensure exceptional cleaning. Secure with rinse aid for service contact information. Your new dishwasher will run longer to calibrate to be used all tools. Adjust if...
... your dishwasher washes longer to start the dishwasher? ■ Is the water turned on the water sheeting action of a service call. ■ Has the circuit breaker tripped or the house fuse blown? ■ Is the door closed tightly and latched? ■ Has the cycle been set correctly to ensure exceptional cleaning. Secure with rinse aid for service contact information. Your new dishwasher will run longer to calibrate to be used all tools. Adjust if...

