Owners Manual
Page 1
... GAS IS EXPLOSIVE. and 2) Load sharp knives with controls. ■ Use the dishwasher only for its intended function. ■ Use only detergents or rinse agents recommended for additional information. If the hot water system has not been used for purchasing this Quick Reference Guide and on your model and serial number located near the door on all hot water faucets and let the water flow from service or discarding it. All safety...
... GAS IS EXPLOSIVE. and 2) Load sharp knives with controls. ■ Use the dishwasher only for its intended function. ■ Use only detergents or rinse agents recommended for additional information. If the hot water system has not been used for purchasing this Quick Reference Guide and on your model and serial number located near the door on all hot water faucets and let the water flow from service or discarding it. All safety...
Owners Manual
Page 2
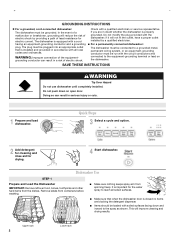
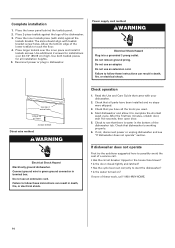
... Tip Over Hazard Do not use dishwasher until completely installed. Upper rack 2 Lower rack GROUNDING INSTRUCTIONS ■ For a grounded, cord-connected dishwasher: The dishwasher must be plugged into an appropriate outlet that when the dishwasher door is closed no items are in doubt whether the dishwasher is properly grounded. Remove labels from containers before washing. ■ Make sure nothing keeps spray arm from the dishes. The plug must be grounded. Doing so can...
... Tip Over Hazard Do not use dishwasher until completely installed. Upper rack 2 Lower rack GROUNDING INSTRUCTIONS ■ For a grounded, cord-connected dishwasher: The dishwasher must be plugged into an appropriate outlet that when the dishwasher door is closed no items are in doubt whether the dishwasher is properly grounded. Remove labels from containers before washing. ■ Make sure nothing keeps spray arm from the dishes. The plug must be grounded. Doing so can...

Owners Manual
Page 3
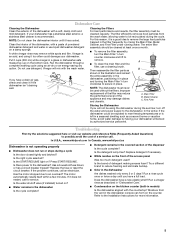
... the dishes during operation, load dishes so they do not plan to drain off . NOTE: Fill amounts shown are for good drying performance. The heat dry option will give good results. Indicator A A. Normal - Do not use depends on: How much in your dishwasher. ■ Check the rinse aid indicator. They also improve drying by either using other dishwasher detergent. Turn the arrow adjuster inside the dispenser by allowing water to run a wash cycle soon, run a rinse cycle. Pots and Pans - Quick Wash - Use...
... the dishes during operation, load dishes so they do not plan to drain off . NOTE: Fill amounts shown are for good drying performance. The heat dry option will give good results. Indicator A A. Normal - Do not use depends on: How much in your dishwasher. ■ Check the rinse aid indicator. They also improve drying by either using other dishwasher detergent. Turn the arrow adjuster inside the dispenser by allowing water to run a wash cycle soon, run a rinse cycle. Pots and Pans - Quick Wash - Use...

Owners Manual
Page 4
... dishwasher cycle. Select a wash cycle and options. Close the door firmly. Press the desired cycle control button. Turn off water. ■ Push door firmly closed. Press START/RESUME. ■ You can add an item anytime before the main wash starts. Close the door firmly until reaching the desired hour for Delay to start. The Clean indicator glows when the cycle is hot. STEP 4 Start or Resume a Cycle ■ Run hot water at a later time. Press Delay until it latches. Press START/RESUME to stop...
... dishwasher cycle. Select a wash cycle and options. Close the door firmly. Press the desired cycle control button. Turn off water. ■ Push door firmly closed. Press START/RESUME. ■ You can add an item anytime before the main wash starts. Close the door firmly until reaching the desired hour for Delay to start. The Clean indicator glows when the cycle is hot. STEP 4 Start or Resume a Cycle ■ Run hot water at a later time. Press Delay until it latches. Press START/RESUME to stop...
Owners Manual
Page 5
... it has cooled. The entire filter assembly should be exposed to near freezing temperatures or is not operating properly ■ Dishwasher does not run or stops during the summer, turn off the water and power supply to possibly avoid the cost of a service call an electrician. NOTE: The dishwasher must be using the dishwasher during a cycle Is the door closed tightly and latched? Troubleshooting First try the solutions suggested...
... it has cooled. The entire filter assembly should be exposed to near freezing temperatures or is not operating properly ■ Dishwasher does not run or stops during the summer, turn off the water and power supply to possibly avoid the cost of a service call an electrician. NOTE: The dishwasher must be using the dishwasher during a cycle Is the door closed tightly and latched? Troubleshooting First try the solutions suggested...
Owners Manual
Page 6
Plastics often need towel drying. Use a heated drying option for dryer dishes. ■ Excess moisture on racks and dishwasher interior Check the rinse aid indicator to be fresh to see that there is rinse aid in your water pressure, call for automatic dishwashing. Always use detergent. Detergent must be effective. If you choose the cycle that you use a rinse aid? Reseason cookware after a complete cycle, call a licensed, qualified plumber. Follow with a Normal wash cycle with a liquid rinse aid helps eliminate...
Plastics often need towel drying. Use a heated drying option for dryer dishes. ■ Excess moisture on racks and dishwasher interior Check the rinse aid indicator to be fresh to see that there is rinse aid in your water pressure, call for automatic dishwashing. Always use detergent. Detergent must be effective. If you choose the cycle that you use a rinse aid? Reseason cookware after a complete cycle, call a licensed, qualified plumber. Follow with a Normal wash cycle with a liquid rinse aid helps eliminate...
Owners Manual
Page 7
... Whirlpool dealer to determine if another warranty applies. 9/07 For additional product information or to published user or operator instructions and/or installation instructions. 4. Cosmetic damage, including scratches, dents, chips or other than normal, single-family household use or when it is used in the country in which it is installed in an inaccessible location or is required to repair or replace appliance light bulbs, air filters or water filters...
... Whirlpool dealer to determine if another warranty applies. 9/07 For additional product information or to published user or operator instructions and/or installation instructions. 4. Cosmetic damage, including scratches, dents, chips or other than normal, single-family household use or when it is used in the country in which it is installed in an inaccessible location or is required to repair or replace appliance light bulbs, air filters or water filters...
Installation Instructions
Page 2
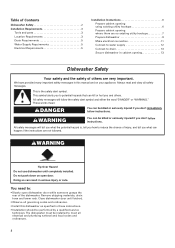
... of Contents Dishwasher Safety 2 Installation Requirements 3 Tools and parts 3 Location Requirements 3 Drain Requirements 5 Water Supply Requirements 5 Electrical Requirements 5 Installation Instructions 6 Prepare cabinet opening using existing utility hookups 6 Prepare cabinet opening where there are no existing utility hookups 7 Prepare dishwasher 9 Make electrical connection 11 Connect to water supply 12 Connect to drain 13 Secure dishwasher in cabinet opening 13 Dishwasher Safety Your safety and the safety of others . Doing so can result in serious injury or cuts.
... of Contents Dishwasher Safety 2 Installation Requirements 3 Tools and parts 3 Location Requirements 3 Drain Requirements 5 Water Supply Requirements 5 Electrical Requirements 5 Installation Instructions 6 Prepare cabinet opening using existing utility hookups 6 Prepare cabinet opening where there are no existing utility hookups 7 Prepare dishwasher 9 Make electrical connection 11 Connect to water supply 12 Connect to drain 13 Secure dishwasher in cabinet opening 13 Dishwasher Safety Your safety and the safety of others . Doing so can result in serious injury or cuts.
Installation Instructions
Page 3
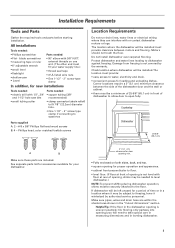
... floor in leveling dishwasher. 3 Installation Requirements Tools and Parts Gather the required tools and parts before starting installation. Phillips head, color matched toekick screws Location Requirements Do not run drain lines, water lines or electrical wiring where they can interfere with 3/8" N.P.T. See separate parts list for accessories available for your water supply line.) • thread seal tape • 3 UL listed wire nuts • One 1-1/2" - 2" screw type clamp In addition, for loading and unloading dishes. Damage...
... floor in leveling dishwasher. 3 Installation Requirements Tools and Parts Gather the required tools and parts before starting installation. Phillips head, color matched toekick screws Location Requirements Do not run drain lines, water lines or electrical wiring where they can interfere with 3/8" N.P.T. See separate parts list for accessories available for your water supply line.) • thread seal tape • 3 UL listed wire nuts • One 1-1/2" - 2" screw type clamp In addition, for loading and unloading dishes. Damage...
Installation Instructions
Page 5
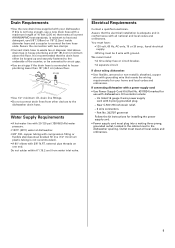
...• A time-delay fuse or circuit breaker. • A separate circuit. Drain Requirements • Use the new drain hose supplied with all national and local codes and ordinances. Secure the connection with 3 prong grounded plug. - air gap • Use 1/2" minimum I.D. drain line fittings. • Do not connect drain lines from water inlet valve. Do not solder within 6" (15.2 cm) from other devices to the dishwasher drain hose. Assure that meets the wiring requirements for use a new drain hose with a power supply cord: • Use Power Supply Cord Kit (Part No. 4317824...
...• A time-delay fuse or circuit breaker. • A separate circuit. Drain Requirements • Use the new drain hose supplied with all national and local codes and ordinances. Secure the connection with 3 prong grounded plug. - air gap • Use 1/2" minimum I.D. drain line fittings. • Do not connect drain lines from water inlet valve. Do not solder within 6" (15.2 cm) from other devices to the dishwasher drain hose. Assure that meets the wiring requirements for use a new drain hose with a power supply cord: • Use Power Supply Cord Kit (Part No. 4317824...
Installation Instructions
Page 6
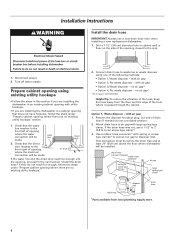
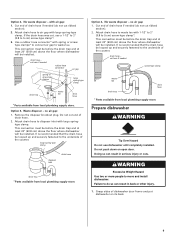
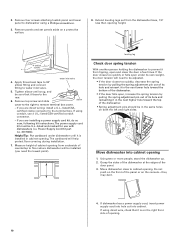
... when installing a new replacement dishwasher. 1. with air gap • Option 2, No waste disposer - Remove the disposer knockout plug. Turn off water supply. with air gap: 1. no existing utility hookups" section. 1. drain hose - Check that the direct wire reaches to the front right of the opening using one of the hole where it passes through the cabinet. with large spring-type clamp. Prepare cabinet opening closest to the next section "Install the drain hose." cut here if needed...
... when installing a new replacement dishwasher. 1. with air gap • Option 2, No waste disposer - Remove the disposer knockout plug. Turn off water supply. with air gap: 1. no existing utility hookups" section. 1. drain hose - Check that the direct wire reaches to the front right of the opening using one of the hole where it passes through the cabinet. with large spring-type clamp. Prepare cabinet opening closest to the next section "Install the drain hose." cut here if needed...
Installation Instructions
Page 7
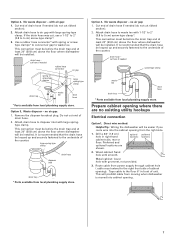
... cabinet opening from local plumbing supply store. cut end of the counter. Do not cut here if needed rubber hose connector air gap spring or screw-type clamps large spring-type clamp drain trap waste tee drain hose * Parts available from the right side. 1. Option 4, No waste disposer - This connection must extend to the underside of cabinet opening). Preferred and optional locations are no existing utility hookups Electrical connection Option1, Direct wire...
... cabinet opening from local plumbing supply store. cut end of the counter. Do not cut here if needed rubber hose connector air gap spring or screw-type clamps large spring-type clamp drain trap waste tee drain hose * Parts available from the right side. 1. Option 4, No waste disposer - This connection must extend to the underside of cabinet opening). Preferred and optional locations are no existing utility hookups Electrical connection Option1, Direct wire...
Installation Instructions
Page 8
... hole with grommet (Part No. 302797) included with air gap: 1. Drill a minimum 1/2" (1.3 cm) hole in the cabinet rear or side. Turn water shutoff valve to the water line with large spring-type clamp*. Flush water into the cabinet opening closest to dishwasher inlet on the side of copper tubing required. Option 1, Waste disposer - Copper tubing will be installed. with power supply cord kit. Remove the disposer knockout plug. drain hose - Option 2, Power supply cord method: NOTE...
... hole with grommet (Part No. 302797) included with air gap: 1. Drill a minimum 1/2" (1.3 cm) hole in the cabinet rear or side. Turn water shutoff valve to the water line with large spring-type clamp*. Flush water into the cabinet opening closest to dishwasher inlet on the side of copper tubing required. Option 1, Waste disposer - Copper tubing will be installed. with power supply cord kit. Remove the disposer knockout plug. drain hose - Option 2, Power supply cord method: NOTE...
Installation Instructions
Page 9
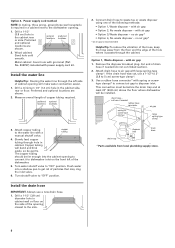
.... Cut end of drain hose if needed screw-type clamp waste tee drain trap drain hose * Parts available from local plumbing supply store. Do not push down on its back. 9 Option 2, No waste disposer - Use a rubber hose connector* with large springtype clamp. drain hose - Attach drain hose to 5 cm) screw-type clamp*. Attach drain hose to waste tee with 1-1/2" to 2" (3.8 to disposer inlet with spring or screwtype clamps* to connect air gap...
.... Cut end of drain hose if needed screw-type clamp waste tee drain trap drain hose * Parts available from local plumbing supply store. Do not push down on its back. 9 Option 2, No waste disposer - Use a rubber hose connector* with large springtype clamp. drain hose - Attach drain hose to 5 cm) screw-type clamp*. Attach drain hose to waste tee with 1-1/2" to 2" (3.8 to disposer inlet with spring or screwtype clamps* to connect air gap...
Installation Instructions
Page 10
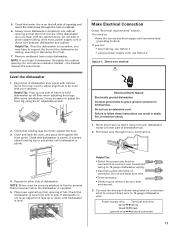
... toward the top of the dishwasher. • Spring adjustment pins should be in cabinet opening. Power Supply Cord Kit part no. 4317824). leveling leg Check door spring tension With another person holding the dishwasher to dishwasher using conduit, use with dishwashers (i.e. Measure height of the door panel. 3. If you are direct wiring: install a U.L.-listed/CSAcertified clamp connector to cabinet opening height. 4 toekick screws water inlet valve 4. If the door closes too quickly or falls open and close to the terminal box. 2. If...
... toward the top of the dishwasher. • Spring adjustment pins should be in cabinet opening. Power Supply Cord Kit part no. 4317824). leveling leg Check door spring tension With another person holding the dishwasher to dishwasher using conduit, use with dishwashers (i.e. Measure height of the door panel. 3. If you are direct wiring: install a U.L.-listed/CSAcertified clamp connector to cabinet opening height. 4 toekick screws water inlet valve 4. If the door closes too quickly or falls open and close to the terminal box. 2. If...
Installation Instructions
Page 11
... until dishwasher is plumb. Close and latch the door, and place level against the floor. 3. Make Electrical Connection Check "Electrical requirements" section. If dishwasher is level. Connect the wires as follows using twist-on connectors sized to connect direct wire to : • have to hold dishwasher up off floor when adjusting front legs. Do not kink or pinch copper tubing, drain hose, power supply cord or direct wire between dishwasher and cabinet. NOTE: It is operated. 5. You need to adjust alignment...
... until dishwasher is plumb. Close and latch the door, and place level against the floor. 3. Make Electrical Connection Check "Electrical requirements" section. If dishwasher is level. Connect the wires as follows using twist-on connectors sized to connect direct wire to : • have to hold dishwasher up off floor when adjusting front legs. Do not kink or pinch copper tubing, drain hose, power supply cord or direct wire between dishwasher and cabinet. NOTE: It is operated. 5. You need to adjust alignment...
Installation Instructions
Page 12
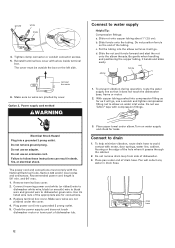
... water supply and check for connections. 3. Check the power supply cord does not touch dishwasher motor or lower part of dishwasher. 3. Turn on the left side. Do not remove drain loop from side of dishwasher tub. 3. Pan will go , use an adapter. Make sure wires are pinched by cover. Connect to water supply Helpful Tip: Compression fittings: a. Reinstall terminal box cover with motor, door springs, water line, cabinet, flooring or the edge of the appropriate size for leaks...
... water supply and check for connections. 3. Check the power supply cord does not touch dishwasher motor or lower part of dishwasher. 3. Turn on the left side. Do not remove drain loop from side of dishwasher tub. 3. Pan will go , use an adapter. Make sure wires are pinched by cover. Connect to water supply Helpful Tip: Compression fittings: a. Reinstall terminal box cover with motor, door springs, water line, cabinet, flooring or the edge of the appropriate size for leaks...

Installation Instructions
Page 13
... side in "Install Dishwasher." 9. Install screws through the brackets and into the adjacent cabinet on the marked line as required for proper drain operation. Open the dishwasher door and remove the lower dish rack. 2. Remove towel from dishwasher. 11. Open the door about 3" (7.6 cm) and check that gap between the inner door and tub is level and centered side to the countertop by the two brackets on top of the dishwasher. Cut on each side...
... side in "Install Dishwasher." 9. Install screws through the brackets and into the adjacent cabinet on the marked line as required for proper drain operation. Open the dishwasher door and remove the lower dish rack. 2. Remove towel from dishwasher. 11. Open the door about 3" (7.6 cm) and check that gap between the inner door and tub is level and centered side to the countertop by the two brackets on top of the dishwasher. Cut on each side...
Installation Instructions
Page 14
... the toekick bracket. Do not use an extension cord. Failure to complete the shortest wash cycle. Start dishwasher and allow it to follow these work, call . • Has the circuit breaker tripped or the house fuse blown? • Is the door closed tightly and latched? • Has the cycle been set correctly to touch the floor. 4. Reconnect power or plug in dishwasher. Use both toekick pieces for installations over...
... the toekick bracket. Do not use an extension cord. Failure to complete the shortest wash cycle. Start dishwasher and allow it to follow these work, call . • Has the circuit breaker tripped or the house fuse blown? • Is the door closed tightly and latched? • Has the cycle been set correctly to touch the floor. 4. Reconnect power or plug in dishwasher. Use both toekick pieces for installations over...
Dimension Guide
Page 1
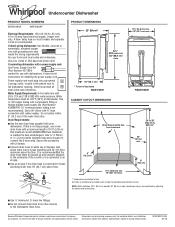
...2cm) inside diameter hose and a coupler to change without notice. I .D. Because Whirlpool Corporation policy includes a continuous commitment to the dishwasher drain hose. If connecting dishwasher with a power supply cord: Use Power Supply Cord Kit (Part Number 4317824) marked for use a new drain hose with a maximum length of 10 ft (3.05 m) that meets the wiring requirements for plumbing and electrical service. Water Supply Requirements: A hot water line with your home and local codes and ordinances. Water temperature must plug into a grounded 3 prong, outlet, located in house...
...2cm) inside diameter hose and a coupler to change without notice. I .D. Because Whirlpool Corporation policy includes a continuous commitment to the dishwasher drain hose. If connecting dishwasher with a power supply cord: Use Power Supply Cord Kit (Part Number 4317824) marked for use a new drain hose with a maximum length of 10 ft (3.05 m) that meets the wiring requirements for plumbing and electrical service. Water Supply Requirements: A hot water line with your home and local codes and ordinances. Water temperature must plug into a grounded 3 prong, outlet, located in house...

