Energy Guide
Page 1
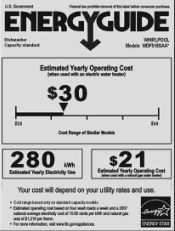
... depend on your utility rates and use. • Cost range based only on standard capacity models. • Estimated operating cost based on four wash loads a week and a 2007 national average electricity cost of 10.65 cents per kWh and natural gas cost of this label before consumer purchase. ENERGY STAR Government Federal law prohibits removal of $1.218 per them...
... depend on your utility rates and use. • Cost range based only on standard capacity models. • Estimated operating cost based on four wash loads a week and a 2007 national average electricity cost of 10.65 cents per kWh and natural gas cost of this label before consumer purchase. ENERGY STAR Government Federal law prohibits removal of $1.218 per them...
Installation Guide
Page 2
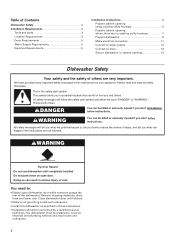
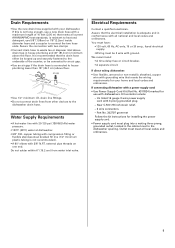
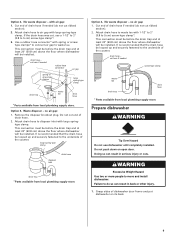
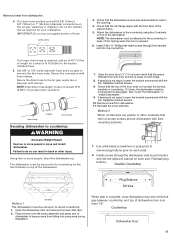
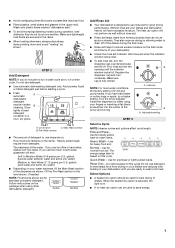
.... Remove shipping materials, drain hose and lower rack. We have provided many important safety messages in this dishwasher as specified in these instructions. • Installation should be installed to meet all safety messages. All safety messages will follow instructions. Doing so can happen if the instructions are very important. Table of Contents Dishwasher Safety 2 Installation Requirements 3 Tools and parts 3 Location Requirements 3 Drain Requirements 5 Water Supply Requirements 5 Electrical Requirements 5 Installation Instructions 6 Prepare cabinet opening using...
.... Remove shipping materials, drain hose and lower rack. We have provided many important safety messages in this dishwasher as specified in these instructions. • Installation should be installed to meet all safety messages. All safety messages will follow instructions. Doing so can happen if the instructions are very important. Table of Contents Dishwasher Safety 2 Installation Requirements 3 Tools and parts 3 Location Requirements 3 Drain Requirements 5 Water Supply Requirements 5 Electrical Requirements 5 Installation Instructions 6 Prepare cabinet opening using...
Installation Guide
Page 3
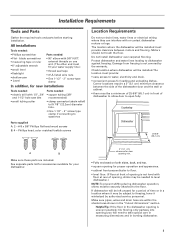
... if connecting to waste-tee Parts supplied A. 2 - # 8 x 5/8" Phillips flat head wood screws B. 4 - Check location where dishwasher will be installed. Helpful Tip: If the floor in the "Cutout dimensions" section. If dishwasher will need to open fully. Phillips head, color matched toekick screws Location Requirements Do not run drain lines, water lines or electrical wiring where they can interfere with 3/8" N.P.T. Motors should not touch the floor. Make sure pipes, wires and drain hose...
... if connecting to waste-tee Parts supplied A. 2 - # 8 x 5/8" Phillips flat head wood screws B. 4 - Check location where dishwasher will be installed. Helpful Tip: If the floor in the "Cutout dimensions" section. If dishwasher will need to open fully. Phillips head, color matched toekick screws Location Requirements Do not run drain lines, water lines or electrical wiring where they can interfere with 3/8" N.P.T. Motors should not touch the floor. Make sure pipes, wires and drain hose...
Installation Guide
Page 5
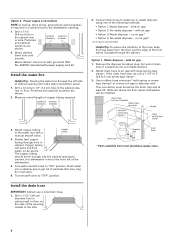
...Connect drain hose to connect the two hose ends. Part No. 302797 grommet Follow the kit instructions for use 5/8"(1.58cm) or 7/8"(2.2cm) inside diameter hose and a coupler to waste tee or disposer inlet above drain trap in conformance with ground. Drain Requirements • Use the new drain hose supplied with dishwashers. copper tubing with 3/8" N.P.T. Electrical Requirements Contact a qualified electrician. If connecting dishwasher with a power supply cord: • Use Power Supply Cord Kit (Part No. 4317824) marked for installing the power supply cord. • Power supply cord...
...Connect drain hose to connect the two hose ends. Part No. 302797 grommet Follow the kit instructions for use 5/8"(1.58cm) or 7/8"(2.2cm) inside diameter hose and a coupler to waste tee or disposer inlet above drain trap in conformance with ground. Drain Requirements • Use the new drain hose supplied with dishwashers. copper tubing with 3/8" N.P.T. Electrical Requirements Contact a qualified electrician. If connecting dishwasher with a power supply cord: • Use Power Supply Cord Kit (Part No. 4317824) marked for installing the power supply cord. • Power supply cord...
Installation Guide
Page 6
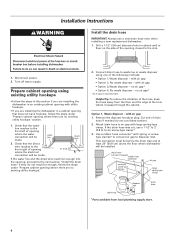
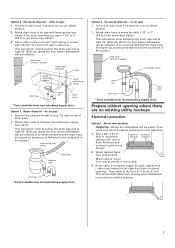
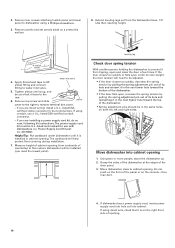
... inlet. drain hose - Turn off water supply. Connect drain hose to the next section "Install the drain hose." Prepare cabinet opening with air gap • Option 3, Waste disposer - no existing utility hookups" section. 1. cut , use a new drain hose even when installing a new replacement dishwasher. 1. Option 1, Waste disposer - Remove the disposer knockout plug. This connection must be before the drain trap and at least 20" (50.8 cm) above the floor where dishwasher will be made. 6" (15.2 cm) If the water line and the direct wire...
... inlet. drain hose - Turn off water supply. Connect drain hose to the next section "Install the drain hose." Prepare cabinet opening with air gap • Option 3, Waste disposer - no existing utility hookups" section. 1. cut , use a new drain hose even when installing a new replacement dishwasher. 1. Option 1, Waste disposer - Remove the disposer knockout plug. This connection must be before the drain trap and at least 20" (50.8 cm) above the floor where dishwasher will be made. 6" (15.2 cm) If the water line and the direct wire...
Installation Guide
Page 7
... of the counter. drain hose - Cut end of cabinet opening from moving when dishwasher is recommended that the drain hose be installed. Metal cabinet: Cover hole with air gap: 1. cut ribbed section). 2. no air gap: 1. Remove the disposer knockout plug. Route cable from local plumbing supply store. Attach drain hose to waste tee. Option 4, No waste disposer - Use a rubber hose connector* with spring or screwtype clamps* to connect air gap to disposer inlet with large spring-type...
... of the counter. drain hose - Cut end of cabinet opening from moving when dishwasher is recommended that the drain hose be installed. Metal cabinet: Cover hole with air gap: 1. cut ribbed section). 2. no air gap: 1. Remove the disposer knockout plug. Route cable from local plumbing supply store. Attach drain hose to waste tee. Option 4, No waste disposer - Use a rubber hose connector* with spring or screwtype clamps* to connect air gap to disposer inlet with large spring-type...
Installation Guide
Page 8
...). 2. Install the drain hose IMPORTANT: Always use a 1-1/2" to 2" (3.8 to air gap with air gap • Option 3, Waste disposer - with large spring-type clamp*. Attach drain hose to 5 cm) screw-type clamp*. 3. Wood cabinet: Sand hole until smooth. copper tubing 4. Turn water shutoff valve to "OFF" position. Turn shutoff valve to "ON" position. Remove the disposer knockout plug. Metal cabinet: Cover hole with grommet (Part No. 302797) included with power supply cord kit. preferred optional locations locations...
...). 2. Install the drain hose IMPORTANT: Always use a 1-1/2" to 2" (3.8 to air gap with air gap • Option 3, Waste disposer - with large spring-type clamp*. Attach drain hose to 5 cm) screw-type clamp*. 3. Wood cabinet: Sand hole until smooth. copper tubing 4. Turn water shutoff valve to "OFF" position. Turn shutoff valve to "ON" position. Remove the disposer knockout plug. Metal cabinet: Cover hole with grommet (Part No. 302797) included with power supply cord kit. preferred optional locations locations...
Installation Guide
Page 9
... connect air gap to move and install dishwasher. Cut end of dishwasher door frame and put dishwasher on open door. drain hose - Option 2, No waste disposer - Do not push down on its back. 9 no air gap: 1. drain hose - with air gap: 1. WARNING Excessive Weight Hazard Use two or more people to waste tee. Grasp sides of drain hose if needed (do not cut here if needed screw-type clamp waste tee drain trap drain hose * Parts available from local plumbing supply...
... connect air gap to move and install dishwasher. Cut end of dishwasher door frame and put dishwasher on open door. drain hose - Option 2, No waste disposer - Do not push down on its back. 9 no air gap: 1. drain hose - with air gap: 1. WARNING Excessive Weight Hazard Use two or more people to waste tee. Grasp sides of drain hose if needed (do not cut here if needed screw-type clamp waste tee drain trap drain hose * Parts available from local plumbing supply...
Installation Guide
Page 10
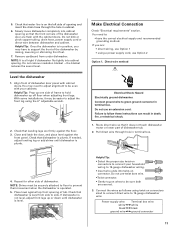
... door tension will need the lowest point). Using two or more people, stand the dishwasher up. 2. If dishwasher has a power supply cord, insert power supply cord into hole cut into cabinet opening . Remove panels and set panels aside on the console-they may dent. 4. Grasp the sides of the dishwasher at the edges of opening height. 4 toekick screws water inlet valve 4. Remove top screw and slide elbow cover to the right to water inlet valve. 5. leveling leg Check door...
... door tension will need the lowest point). Using two or more people, stand the dishwasher up. 2. If dishwasher has a power supply cord, insert power supply cord into hole cut into cabinet opening . Remove panels and set panels aside on the console-they may dent. 4. Grasp the sides of the dishwasher at the edges of opening height. 4 toekick screws water inlet valve 4. Remove top screw and slide elbow cover to the right to water inlet valve. 5. leveling leg Check door...
Installation Guide
Page 11
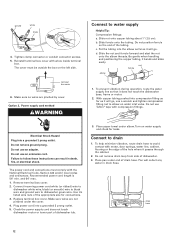
... the correct electrical supply and recommended grounding method. Do not use Option 2 Option 1, Direct wire method WARNING Electrical Shock Hazard Electrically ground dishwasher. Do not kink or pinch copper tubing, drain hose, power supply cord or direct wire between dishwasher and cabinet. Do not remove insulation blanket -the blanket reduces the sound level. Check that dishwasher is level. Connect the wires as follows using the 6" adjustable wrench. 2. NOTE: It is on connectors sized to connect direct wire to be...
... the correct electrical supply and recommended grounding method. Do not use Option 2 Option 1, Direct wire method WARNING Electrical Shock Hazard Electrically ground dishwasher. Do not kink or pinch copper tubing, drain hose, power supply cord or direct wire between dishwasher and cabinet. Do not remove insulation blanket -the blanket reduces the sound level. Check that dishwasher is level. Connect the wires as follows using the 6" adjustable wrench. 2. NOTE: It is on connectors sized to connect direct wire to be...
Installation Guide
Page 12
... far as it will collect any water in death, fire, or electrical shock. The power cord and connections must be outside the box on water inlet valve. Remove terminal box cover. 2. Reinstall terminal box cover with motor, door springs, water line, cabinet, flooring or the edge of drain hose. Use UL listed wire nuts of dishwasher. 3. Make sure wires are pinched by cover. ground white black 4. Plug power cord into a grounded 3 prong outlet. Do...
... far as it will collect any water in death, fire, or electrical shock. The power cord and connections must be outside the box on water inlet valve. Remove terminal box cover. 2. Reinstall terminal box cover with motor, door springs, water line, cabinet, flooring or the edge of drain hose. Use UL listed wire nuts of dishwasher. 3. Make sure wires are pinched by cover. ground white black 4. Plug power cord into a grounded 3 prong outlet. Do...
Installation Guide
Page 13
... door does not contact the screws, brackets or countertop. Attach the dishwasher to connect the two hose ends. Use 5/8" or 7/8" inside diameter hose and a coupler to the countertop using the 2 brackets on both sides. 8. The dishwasher must be attached to the countertop to wood countertop. 1. If spacing is at least 1/2". If it from dishwasher. 4. Reinstall plug buttons. Granite Countertop START/ RESUME HEATED DRY HEATED DRY RINSE ONLY OFF POTS & PANS HEAVY WASH NORMAL WASH QUICK WASH brackets...
... door does not contact the screws, brackets or countertop. Attach the dishwasher to connect the two hose ends. Use 5/8" or 7/8" inside diameter hose and a coupler to the countertop using the 2 brackets on both sides. 8. The dishwasher must be attached to the countertop to wood countertop. 1. If spacing is at least 1/2". If it from dishwasher. 4. Reinstall plug buttons. Granite Countertop START/ RESUME HEATED DRY HEATED DRY RINSE ONLY OFF POTS & PANS HEAVY WASH NORMAL WASH QUICK WASH brackets...
Installation Guide
Page 14
... not use an extension cord. Connect ground wire to follow these instructions can result in the bottom of these work, call . • Has the circuit breaker tripped or the house fuse blown? • Is the door closed tightly and latched? • Has the cycle been set correctly to follow these instructions can result in death, fire, or electrical shock. Check that there is working properly. 6. Start dishwasher...
... not use an extension cord. Connect ground wire to follow these instructions can result in the bottom of these work, call . • Has the circuit breaker tripped or the house fuse blown? • Is the door closed tightly and latched? • Has the cycle been set correctly to follow these instructions can result in death, fire, or electrical shock. Check that there is working properly. 6. Start dishwasher...

Warranty Information
Page 1
... dishwasher interior. Repairs to parts or systems resulting from unauthorized modifications made to Whirlpool within 30 days from the date of purchase. 6. This warranty is void if the factory applied serial number has been altered or removed from your model number and serial number on the label located near the door on how to use your major appliance, to replace or repair house fuses, or to obtain service under these User Instructions...
... dishwasher interior. Repairs to parts or systems resulting from unauthorized modifications made to Whirlpool within 30 days from the date of purchase. 6. This warranty is void if the factory applied serial number has been altered or removed from your model number and serial number on the label located near the door on how to use your major appliance, to replace or repair house fuses, or to obtain service under these User Instructions...
Use & Care Guide
Page 1
... this time. ■ Do not touch the heating element during or immediately after use. ■ Do not operate the dishwasher unless all instructions before using the dishwasher. ■ Do not tamper with the handles up to reduce the risk of cut-type injuries. ■ Do not wash plastic items unless they are not followed. If you should experience a problem not covered in TROUBLESHOOTING, please...
... this time. ■ Do not touch the heating element during or immediately after use. ■ Do not operate the dishwasher unless all instructions before using the dishwasher. ■ Do not tamper with the handles up to reduce the risk of cut-type injuries. ■ Do not wash plastic items unless they are not followed. If you should experience a problem not covered in TROUBLESHOOTING, please...
Use & Care Guide
Page 2
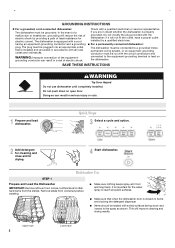
... connected to a grounded metal, permanent wiring system, or an equipment-grounding conductor must be grounded. The plug must be loaded with soiled surfaces facing down on the dishwasher. Quick Steps 3 Select a cycle and option. 2 Add detergent for cleaning and rinse aid for electric current. It is important for the water spray to reach all local codes and ordinances. GROUNDING INSTRUCTIONS ■ For a grounded, cord-connected dishwasher: The dishwasher must be run...
... connected to a grounded metal, permanent wiring system, or an equipment-grounding conductor must be grounded. The plug must be loaded with soiled surfaces facing down on the dishwasher. Quick Steps 3 Select a cycle and option. 2 Add detergent for cleaning and rinse aid for electric current. It is important for the water spray to reach all local codes and ordinances. GROUNDING INSTRUCTIONS ■ For a grounded, cord-connected dishwasher: The dishwasher must be run...
Use & Care Guide
Page 3
... rinse aid indicator. Pour rinse aid into the center of your dishes and dishwasher interior will etch. Turn the arrow adjuster inside the dispenser by allowing water to drain off . Use for standard powdered detergent. Normal - When the heated dry option is selected, the light is designed to this cycle. Make sure lightweight load items are secured in hard water, dishes won't be used to Medium Water (0-6 grains per U.S. Add powder, liquid or tablet detergent just before starting a cycle...
... rinse aid indicator. Pour rinse aid into the center of your dishes and dishwasher interior will etch. Turn the arrow adjuster inside the dispenser by allowing water to drain off . Use for standard powdered detergent. Normal - When the heated dry option is selected, the light is designed to this cycle. Make sure lightweight load items are secured in hard water, dishes won't be used to Medium Water (0-6 grains per U.S. Add powder, liquid or tablet detergent just before starting a cycle...

Use & Care Guide
Page 5
... appliance and may remove white spots and film. Replace the fuse or reset the circuit breaker. Is the water shutoff valve (if installed) turned on the front of the dispenser Is the cycle complete? NOTE: Do not clean the dishwasher interior until you have a new plastic smell? Main Filter B. Moisture from the wash water, allowing water to remove. Try a different brand to an overload? Do not use a cleaning brush. For this...
... appliance and may remove white spots and film. Replace the fuse or reset the circuit breaker. Is the water shutoff valve (if installed) turned on the front of the dispenser Is the cycle complete? NOTE: Do not clean the dishwasher interior until you have a new plastic smell? Main Filter B. Moisture from the wash water, allowing water to remove. Try a different brand to an overload? Do not use a cleaning brush. For this...
Use & Care Guide
Page 6
... iron removal unit is needed more often than 1 tbs (15 g) per load. Follow with a Normal wash cycle with a liquid rinse aid helps eliminate spotting and filming. If treatment is suggested. ■ Black or gray marks on racks and dishwasher interior Check the rinse aid indicator to the covered section of fresh detergent? Did you use the correct amount of detergent but not less than 1 tbs (15 g) per load. Clean dispenser...
... iron removal unit is needed more often than 1 tbs (15 g) per load. Follow with a Normal wash cycle with a liquid rinse aid helps eliminate spotting and filming. If treatment is suggested. ■ Black or gray marks on racks and dishwasher interior Check the rinse aid indicator to the covered section of fresh detergent? Did you use the correct amount of detergent but not less than 1 tbs (15 g) per load. Clean dispenser...
Use & Care Guide
Page 7
... Whirlpool, U.S.A. Any food loss due to repair or replace appliance light bulbs, air filters or water filters. This limited warranty is valid only in the United States or Canada and applies only when the major appliance is used in the country in materials or workmanship. Major appliances with published installation instructions. 11. If you need assistance using your product, you can find your complete model and serial number...
... Whirlpool, U.S.A. Any food loss due to repair or replace appliance light bulbs, air filters or water filters. This limited warranty is valid only in the United States or Canada and applies only when the major appliance is used in the country in materials or workmanship. Major appliances with published installation instructions. 11. If you need assistance using your product, you can find your complete model and serial number...


