
Warranty Information
Page 1
... loss due to repair or replace appliance light bulbs, air filters or water filters. Expenses for travel and transportation for other damage to the finish of your model number and serial number on the label located near the door on how to view FAQs (Frequently Asked Questions), in a remote area where service by the customer. DISCLAIMER OF IMPLIED WARRANTIES; In Canada: Whirlpool Brand Home Appliances Customer eXperience Centre 200...
... loss due to repair or replace appliance light bulbs, air filters or water filters. Expenses for travel and transportation for other damage to the finish of your model number and serial number on the label located near the door on how to view FAQs (Frequently Asked Questions), in a remote area where service by the customer. DISCLAIMER OF IMPLIED WARRANTIES; In Canada: Whirlpool Brand Home Appliances Customer eXperience Centre 200...
Dimension Guide
Page 1
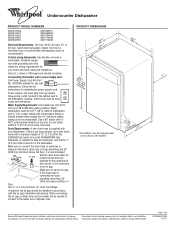
...). drain line fittings. When connecting the air gap a rubber hose (not provided) will be connected to house plumbing lower than 20" (50.8 cm) above the floor. Instructions packed with ³⁄₄" N.P.T. Specifications subject to change without notice. Copper wire only. Follow the kit instructions for your dishwasher. or 20-amp. A timedelay fuse or circuit breaker and separate circuit is not long enough, use a new drain hose with the air gap installation instructions. If direct wiring dishwasher: Use flexible...
...). drain line fittings. When connecting the air gap a rubber hose (not provided) will be connected to house plumbing lower than 20" (50.8 cm) above the floor. Instructions packed with ³⁄₄" N.P.T. Specifications subject to change without notice. Copper wire only. Follow the kit instructions for your dishwasher. or 20-amp. A timedelay fuse or circuit breaker and separate circuit is not long enough, use a new drain hose with the air gap installation instructions. If direct wiring dishwasher: Use flexible...
Use & Care Guide
Page 1
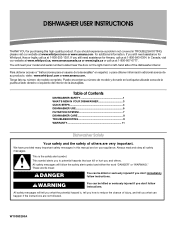
... www.whirlpool.ca, www.amanacanada.ca or www.inglis.ca or call us at 1-800-807-6777. Puede encontrar su número de modelo y de serie en la etiqueta ubicada cerca de la puerta al lado derecho o izquierdo del interior de la lavavajillas. Table of Contents DISHWASHER SAFETY 1 WHAT'S NEW IN YOUR DISHWASHER 3 QUICK STEPS 4 DISHWASHER USE 5 FILTRATION SYSTEM 7 DISHWASHER CARE 8 TROUBLESHOOTING 9 WARRANTY 11 Dishwasher...
... www.whirlpool.ca, www.amanacanada.ca or www.inglis.ca or call us at 1-800-807-6777. Puede encontrar su número de modelo y de serie en la etiqueta ubicada cerca de la puerta al lado derecho o izquierdo del interior de la lavavajillas. Table of Contents DISHWASHER SAFETY 1 WHAT'S NEW IN YOUR DISHWASHER 3 QUICK STEPS 4 DISHWASHER USE 5 FILTRATION SYSTEM 7 DISHWASHER CARE 8 TROUBLESHOOTING 9 WARRANTY 11 Dishwasher...

Use & Care Guide
Page 2
... panels are properly in place. ■ Remove the door or lid to damage the door seal; SAVE THESE INSTRUCTIONS WARNING Tip Over Hazard Do not use . ■ Do not operate the dishwasher unless all hot water faucets and let the water flow from service ...open flame during this time. ■ Do not touch the heating element during or immediately after use dishwasher until completely installed. Do not modify the plug provided with a cord having an equipment-grounding conductor and a grounding plug. and 2) Load sharp knives with the handles up to reduce the risk of electric...
... panels are properly in place. ■ Remove the door or lid to damage the door seal; SAVE THESE INSTRUCTIONS WARNING Tip Over Hazard Do not use . ■ Do not operate the dishwasher unless all hot water faucets and let the water flow from service ...open flame during this time. ■ Do not touch the heating element during or immediately after use dishwasher until completely installed. Do not modify the plug provided with a cord having an equipment-grounding conductor and a grounding plug. and 2) Load sharp knives with the handles up to reduce the risk of electric...
Use & Care Guide
Page 3
... sound and optimizes water and energy conservation while providing optimal cleaning performance. This dishwasher cleans by spraying the dishes with rinse aid for exceptional cleaning. What's New in Your Dishwasher Energy Congratulations on purchasing your upper and lower filter and rinse under running water at least once a month. With these recent changes it is used with water and pauses to allow the detergent to calibrate the optical sensor. The first cycle using the sensor will...
... sound and optimizes water and energy conservation while providing optimal cleaning performance. This dishwasher cleans by spraying the dishes with rinse aid for exceptional cleaning. What's New in Your Dishwasher Energy Congratulations on purchasing your upper and lower filter and rinse under running water at least once a month. With these recent changes it is used with water and pauses to allow the detergent to calibrate the optical sensor. The first cycle using the sensor will...

Use & Care Guide
Page 4
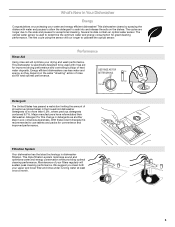
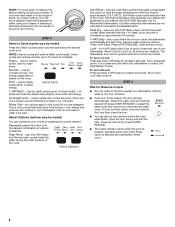
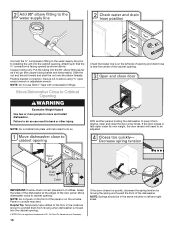
... "Recommended Time Interval to Clean Your Filter," in the "Filtration System" section for the recommended cleaning schedule. 3 Select a cycle and option (cycles and options vary by model). 1 Prepare and load dishwasher. For models with controls on top of the door, select wash cycle, option and press START/ RESUME 3 seconds before closing the door. C LO PUSH DOWN & TURN K UNLOCK 4 The door latches automatically. Quick Steps 4 Start dishwasher. Spin the spray arms. They should turn freely. 2 Add detergent and rinse aid.
... "Recommended Time Interval to Clean Your Filter," in the "Filtration System" section for the recommended cleaning schedule. 3 Select a cycle and option (cycles and options vary by model). 1 Prepare and load dishwasher. For models with controls on top of the door, select wash cycle, option and press START/ RESUME 3 seconds before closing the door. C LO PUSH DOWN & TURN K UNLOCK 4 The door latches automatically. Quick Steps 4 Start dishwasher. Spin the spray arms. They should turn freely. 2 Add detergent and rinse aid.

Use & Care Guide
Page 5
... dish racks and interior of the water - Pour rinse aid into the opening until the indicator level is designed to the level shown, if needed. Lock fill - -- 6 5 4 -- - --- Make sure lightweight load items are blocking the detergent dispenser. ■ Items should be clean. Do not use rinse aid for standard powdered detergent. Add ■ Check the rinse aid indicator. Add rinse aid when indicator drops to "Refill" level. ■ To add rinse aid, turn the dispenser cap to run a wash cycle soon, run a rinse cycle. Hard Water Soft Water Hard Water Soft Water...
... dish racks and interior of the water - Pour rinse aid into the opening until the indicator level is designed to the level shown, if needed. Lock fill - -- 6 5 4 -- - --- Make sure lightweight load items are blocking the detergent dispenser. ■ Items should be clean. Do not use rinse aid for standard powdered detergent. Add ■ Check the rinse aid indicator. Add rinse aid when indicator drops to "Refill" level. ■ To add rinse aid, turn the dispenser cap to run a wash cycle soon, run a rinse cycle. Hard Water Soft Water Hard Water Soft Water...
Use & Care Guide
Page 6
... Heavy and Normal wash cycles) heats the water during the wash portions of options is lit, all buttons are ready to start the dishwasher automatically at least 3 seconds. STEP 4 Start or Resume a Cycle ■ Run hot water at least 3 seconds. For top controls, select cycle and options first, and then close the door. ■ You can customize your dishes and glassware in your dishwasher is locked, the light flashes 3 times. Turn the arrow adjuster inside the dispenser by approximately...
... Heavy and Normal wash cycles) heats the water during the wash portions of options is lit, all buttons are ready to start the dishwasher automatically at least 3 seconds. STEP 4 Start or Resume a Cycle ■ Run hot water at least 3 seconds. For top controls, select cycle and options first, and then close the door. ■ You can customize your dishes and glassware in your dishwasher is locked, the light flashes 3 times. Turn the arrow adjuster inside the dispenser by approximately...
Use & Care Guide
Page 7
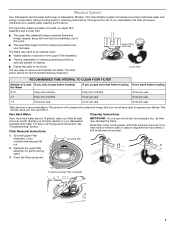
... lower filter keeps food from hard water, a soft brush may damage the filters. For tips on your dishwasher indicates hard water. PUSH DOWN & TURN L O C K C LO 3. The chart below shows the recommended cleaning frequency. Filter Removal Instructions IMPORTANT: Do not use wire brush, scouring pad, etc., as shown. Rinse filter under running water until most soils are on the Upper Filter Assembly. ■ There is degradation in dishwasher filtration. Throughout the life of Loads...
... lower filter keeps food from hard water, a soft brush may damage the filters. For tips on your dishwasher indicates hard water. PUSH DOWN & TURN L O C K C LO 3. The chart below shows the recommended cleaning frequency. Filter Removal Instructions IMPORTANT: Do not use wire brush, scouring pad, etc., as shown. Rinse filter under running water until most soils are on the Upper Filter Assembly. ■ There is degradation in dishwasher filtration. Throughout the life of Loads...
Use & Care Guide
Page 8
... locked into place. Remove all dishwasher brands. Noting the previous illustrations, place the Lower Filter under the Locating Tabs in your dishwasher. Run the dishwasher through a complete washing cycle using the dishwasher during the summer months, turn the filter clockwise until the filter is a registered trademark of the tub. 2. Close the dishwasher. Turn off the water and power supply to near freezing temperatures or is left in place and the Upper Filter Assembly is not locked...
... locked into place. Remove all dishwasher brands. Noting the previous illustrations, place the Lower Filter under the Locating Tabs in your dishwasher. Run the dishwasher through a complete washing cycle using the dishwasher during the summer months, turn the filter clockwise until the filter is a registered trademark of the tub. 2. Close the dishwasher. Turn off the water and power supply to near freezing temperatures or is left in place and the Upper Filter Assembly is not locked...
Use & Care Guide
Page 9
...? Do not use a high-temp option. Replace the fuse or reset the circuit breaker. Refer to use the correct amount of detergent making excess foam? Your dishwasher is flashing Call for proper dishwasher filling? Use a heated drying option for more information. Did you have a full load. Use recommended dishwasher detergents only. The motor automatically resets itself within the cycle times? Is the water shutoff valve (if installed) turned on racks and dishwasher interior Check the rinse aid indicator to see...
...? Do not use a high-temp option. Replace the fuse or reset the circuit breaker. Refer to use the correct amount of detergent making excess foam? Your dishwasher is flashing Call for proper dishwasher filling? Use a heated drying option for more information. Did you have a full load. Use recommended dishwasher detergents only. The motor automatically resets itself within the cycle times? Is the water shutoff valve (if installed) turned on racks and dishwasher interior Check the rinse aid indicator to see...
Use & Care Guide
Page 10
... g) per load. Use a liquid rinse aid and underload the dishwasher to avoid the problem, except by some models). Silica film and etching are stable and do not strike together from washing action. Rewash dishes using a mild abrasive cleaner. ■ Orange stains on plastic dishes or dishwasher interior Are large amounts of tomato-based foods on dishes and dishwasher interior Does your water pressure, call for service. Noises ■ Grinding...
... g) per load. Use a liquid rinse aid and underload the dishwasher to avoid the problem, except by some models). Silica film and etching are stable and do not strike together from washing action. Rewash dishes using a mild abrasive cleaner. ■ Orange stains on plastic dishes or dishwasher interior Are large amounts of tomato-based foods on dishes and dishwasher interior Does your water pressure, call for service. Noises ■ Grinding...

Use & Care Guide
Page 11
... installed in your complete model number ready. ITEMS EXCLUDED FROM WARRANTY This limited warranty does not cover: 1. Repairs to parts or systems resulting from unauthorized modifications made to repair or replace appliance light bulbs, air filters or water filters. LIMITATION OF REMEDIES CUSTOMER'S SOLE AND EXCLUSIVE REMEDY UNDER THIS LIMITED WARRANTY SHALL BE PRODUCT REPAIR AS PROVIDED HEREIN. If you do not have been removed, altered or cannot be repaired...
... installed in your complete model number ready. ITEMS EXCLUDED FROM WARRANTY This limited warranty does not cover: 1. Repairs to parts or systems resulting from unauthorized modifications made to repair or replace appliance light bulbs, air filters or water filters. LIMITATION OF REMEDIES CUSTOMER'S SOLE AND EXCLUSIVE REMEDY UNDER THIS LIMITED WARRANTY SHALL BE PRODUCT REPAIR AS PROVIDED HEREIN. If you do not have been removed, altered or cannot be repaired...
Installation Guide
Page 2
... Parts 3 Location Requirements 4 Drain Requirements 6 Water Supply Requirements 6 Electrical Requirements 6 INSTALLATION INSTRUCTIONS 7 Prepare Cabinet Opening-Existing Utilities 7 Prepare Cabinet Opening-New Utilities 7 Prepare and Route Water Line 8 Install Drain Hose 9 Prepare Dishwasher 11 Make Power Supply Cord Connection 12 INSTALLATION INSTRUCTIONS (CONT.) Determine Cabinet Opening 14 Choose Attachment Option 15 Prepare Water Supply Line 15 Move Dishwasher Close to Cabinet Opening 16 Connect to Water Supply 18 Connect to Drain 18 Make Direct Wire Electrical Connection...
... Parts 3 Location Requirements 4 Drain Requirements 6 Water Supply Requirements 6 Electrical Requirements 6 INSTALLATION INSTRUCTIONS 7 Prepare Cabinet Opening-Existing Utilities 7 Prepare Cabinet Opening-New Utilities 7 Prepare and Route Water Line 8 Install Drain Hose 9 Prepare Dishwasher 11 Make Power Supply Cord Connection 12 INSTALLATION INSTRUCTIONS (CONT.) Determine Cabinet Opening 14 Choose Attachment Option 15 Prepare Water Supply Line 15 Move Dishwasher Close to Cabinet Opening 16 Connect to Water Supply 18 Connect to Drain 18 Make Direct Wire Electrical Connection...
Installation Guide
Page 4
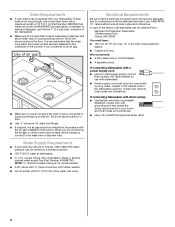
... level dishwasher.) Helpful Tip: Be sure to freezing, have it winterized by the warranty. If dishwasher will be left unused for a period of opening, shims may be securely attached to water, electricity and drain. ■ convenient access for installing your dishwasher at front of opening ). Do not run drain lines, water lines or electrical wiring where they can interfere with floor at rear of time or in the "Product and Cabinet Opening Dimensions...
... level dishwasher.) Helpful Tip: Be sure to freezing, have it winterized by the warranty. If dishwasher will be left unused for a period of opening, shims may be securely attached to water, electricity and drain. ■ convenient access for installing your dishwasher at front of opening ). Do not run drain lines, water lines or electrical wiring where they can interfere with floor at rear of time or in the "Product and Cabinet Opening Dimensions...
Installation Guide
Page 6
...-only, 15- If connecting dishwasher with a power supply cord: ■ Use UL Listed power supply cord kit (Part Number 4317824) marked for your dishwasher. Drain Requirements ■ A new drain hose is not recommended. ■ A 90° elbow with ³⁄₄" hose connection with rubber washer. ■ Do not solder within 6" (15.2 cm) of the water inlet valve. A copy of the dishwasher. ■ Make sure to connect drain hose to waste tee or disposer inlet above drain trap in house...
...-only, 15- If connecting dishwasher with a power supply cord: ■ Use UL Listed power supply cord kit (Part Number 4317824) marked for your dishwasher. Drain Requirements ■ A new drain hose is not recommended. ■ A 90° elbow with ³⁄₄" hose connection with rubber washer. ■ Do not solder within 6" (15.2 cm) of the water inlet valve. A copy of the dishwasher. ■ Make sure to connect drain hose to waste tee or disposer inlet above drain trap in house...
Installation Guide
Page 7
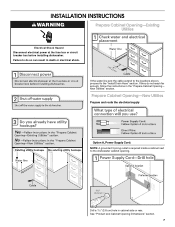
... in death or electrical shock. New Utilities" section. Drill a 1¹⁄₂" (3.8 cm) hole in the "Prepare Cabinet Opening- Failure to the "Install Drain Hose" section. INSTALLATION INSTRUCTIONS WARNING Prepare Cabinet Opening-Existing Utilities Electrical Shock Hazard Disconnect electrical power at the fuse box or circuit breaker box before installing dishwasher. Prepare Cabinet Opening-New Utilities Prepare and route the electrical supply Option A, Power Supply Cord: NOTE: A grounded 3 prong outlet is required inside a cabinet next to the dishwasher cabinet opening.
... in death or electrical shock. New Utilities" section. Drill a 1¹⁄₂" (3.8 cm) hole in the "Prepare Cabinet Opening- Failure to the "Install Drain Hose" section. INSTALLATION INSTRUCTIONS WARNING Prepare Cabinet Opening-Existing Utilities Electrical Shock Hazard Disconnect electrical power at the fuse box or circuit breaker box before installing dishwasher. Prepare Cabinet Opening-New Utilities Prepare and route the electrical supply Option A, Power Supply Cord: NOTE: A grounded 3 prong outlet is required inside a cabinet next to the dishwasher cabinet opening.
Installation Guide
Page 16
... and Company. 16 If the door closes too quickly, decrease the spring tension by moving when dishwasher is moved into the cabinet opening . NOTE: Springs should be adjusted. NOTE: Do not install kick plate until instructed to be in the same notches on left side of opening and drain hose is near the center of E.I. Move dishwasher close the door a few times. Helpful Tip: Temporarily tape utilities...
... and Company. 16 If the door closes too quickly, decrease the spring tension by moving when dishwasher is moved into the cabinet opening . NOTE: Springs should be adjusted. NOTE: Do not install kick plate until instructed to be in the same notches on left side of opening and drain hose is near the center of E.I. Move dishwasher close the door a few times. Helpful Tip: Temporarily tape utilities...
Installation Guide
Page 19
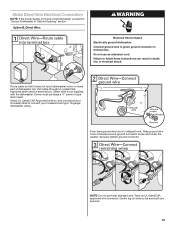
... Dishwasher in Cabinet Opening" section. Route cable so that it does not touch dishwasher motor or lower part of dishwasher tub. Select UL Listed/CSA Approved twist-on wires to be sure both are secured. 19 Gently tug on wire connectors (not included) rated to connect your household wiring to follow these instructions can result in death, fire, or electrical shock. Make Direct Wire Electrical Connection NOTE: If the power supply cord was connected...
... Dishwasher in Cabinet Opening" section. Route cable so that it does not touch dishwasher motor or lower part of dishwasher tub. Select UL Listed/CSA Approved twist-on wires to be sure both are secured. 19 Gently tug on wire connectors (not included) rated to connect your household wiring to follow these instructions can result in death, fire, or electrical shock. Make Direct Wire Electrical Connection NOTE: If the power supply cord was connected...
Installation Guide
Page 23
... dishwashers use nearly 40% less energy than older models. Record hose installation or replacement dates on the hose for service contact information. Designed with rinse aid for good drying results: This dishwasher is necessary for good drying performance and controlling buildup of a service call. ■ Has the circuit breaker tripped or the house fuse blown? ■ Is the door closed within 3 seconds, the Start/Resume light will flash until you have all parts...
... dishwashers use nearly 40% less energy than older models. Record hose installation or replacement dates on the hose for service contact information. Designed with rinse aid for good drying results: This dishwasher is necessary for good drying performance and controlling buildup of a service call. ■ Has the circuit breaker tripped or the house fuse blown? ■ Is the door closed within 3 seconds, the Start/Resume light will flash until you have all parts...

