
Warranty Information
Page 1
... call 1-800-807-6777. Outside the 50 United States and Canada, this limited warranty. Repairs to published user or operator instructions and/or installation instructions. 4. THIS WARRANTY GIVES YOU SPECIFIC LEGAL RIGHTS, AND YOU MAY ALSO HAVE OTHER RIGHTS WHICH VARY FROM STATE TO STATE OR PROVINCE ... WARRANTIES; Have your product or you would like to schedule service, you on the right-hand or left-hand side of the dishwasher interior. WHIRLPOOL SHALL NOT BE LIABLE FOR INCIDENTAL OR CONSEQUENTIAL DAMAGES. If outside the 50 United States and Canada, contact your major appliance is ...
... call 1-800-807-6777. Outside the 50 United States and Canada, this limited warranty. Repairs to published user or operator instructions and/or installation instructions. 4. THIS WARRANTY GIVES YOU SPECIFIC LEGAL RIGHTS, AND YOU MAY ALSO HAVE OTHER RIGHTS WHICH VARY FROM STATE TO STATE OR PROVINCE ... WARRANTIES; Have your product or you would like to schedule service, you on the right-hand or left-hand side of the dishwasher interior. WHIRLPOOL SHALL NOT BE LIABLE FOR INCIDENTAL OR CONSEQUENTIAL DAMAGES. If outside the 50 United States and Canada, contact your major appliance is ...
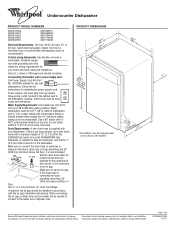
Dimension Guide
Page 1
... dishwasher. If this is not recommended). It is supplied with a maximum length of the dishwasher. Copper wire only. Instructions packed with the air gap installation instructions. Specifications subject to improve Dimensions are for installing ...from water inlet valve. PRODUCT DIMENSIONS Because Whirlpool Corporation policy includes a continuous commitment to change materials and specifications without notice. ® Undercounter Dishwasher PRODUCT MODEL NUMBERS WDF310PAA WDF310PCA WDF310PLA WDF510PAY WDF530PAY WDF530PLY WDF530PSY WDF730PAY WDT710PAY WDT770PAY Electrical ...
... dishwasher. If this is not recommended). It is supplied with a maximum length of the dishwasher. Copper wire only. Instructions packed with the air gap installation instructions. Specifications subject to improve Dimensions are for installing ...from water inlet valve. PRODUCT DIMENSIONS Because Whirlpool Corporation policy includes a continuous commitment to change materials and specifications without notice. ® Undercounter Dishwasher PRODUCT MODEL NUMBERS WDF310PAA WDF310PCA WDF310PLA WDF510PAY WDF530PAY WDF530PLY WDF530PSY WDF730PAY WDT710PAY WDT770PAY Electrical ...

Use & Care Guide
Page 2
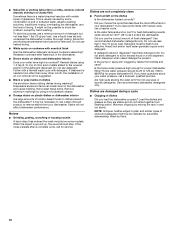
...■ Do not touch the heating element during or immediately after use. ■ Do not operate the dishwasher unless all enclosure panels are in doubt whether the dishwasher is installed and grounded in accordance with all local codes and ordinances. For plastic items not so marked, check the ...Do not abuse, sit on, or stand on the door, lid, or dish racks of the dishwasher. ■ To reduce the risk of injury, do not smoke or use dishwasher until completely installed. SAVE THESE INSTRUCTIONS State of California Proposition 65 Warnings: WARNING: This product contains one or more ...
...■ Do not touch the heating element during or immediately after use. ■ Do not operate the dishwasher unless all enclosure panels are in doubt whether the dishwasher is installed and grounded in accordance with all local codes and ordinances. For plastic items not so marked, check the ...Do not abuse, sit on, or stand on the door, lid, or dish racks of the dishwasher. ■ To reduce the risk of injury, do not smoke or use dishwasher until completely installed. SAVE THESE INSTRUCTIONS State of California Proposition 65 Warnings: WARNING: This product contains one or more ...
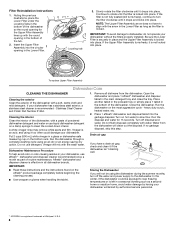
Use & Care Guide
Page 8
.... 2. Cleaning the interior Clean the interior of Whirlpool, U.S.A. 8 Vinegar will clean out the disposal. Affresh® dishwasher and disposer cleaner is a registered trademark of the dishwasher, with the wash water. Water from the dishwasher. Slowly rotate the filter clockwise until it too ...the water and power supply to slow flow. Storing the Dishwasher If you have to dishwasher, do not operate your dishwasher. In the winter, if the dishwasher could damage your dishwasher without the filters properly installed. Put 2 cups (500 mL) white vinegar in the ...
.... 2. Cleaning the interior Clean the interior of Whirlpool, U.S.A. 8 Vinegar will clean out the disposal. Affresh® dishwasher and disposer cleaner is a registered trademark of the dishwasher, with the wash water. Water from the dishwasher. Slowly rotate the filter clockwise until it too ...the water and power supply to slow flow. Storing the Dishwasher If you have to dishwasher, do not operate your dishwasher. In the winter, if the dishwasher could damage your dishwasher without the filters properly installed. Put 2 cups (500 mL) white vinegar in the ...
Use & Care Guide
Page 9
...run a vinegar rinse as described in "Dishwasher Care." ■ Condensation on the kitchen counter (built-in models) Is the dishwasher aligned with a liquid rinse aid helps eliminate spotting and filming. Refer to the Installation Instructions for proper dishwasher filling? Did you use the correct amount ....amanacanada.ca In U.S.A., www.whirlpool.com In Canada, www.inglis.ca Dishwasher is not operating properly ■ Dishwasher does not run up and down to release. ■ Dishwasher seems to run too long The dishwasher can form on racks and dishwasher interior Check the rinse aid ...
...run a vinegar rinse as described in "Dishwasher Care." ■ Condensation on the kitchen counter (built-in models) Is the dishwasher aligned with a liquid rinse aid helps eliminate spotting and filming. Refer to the Installation Instructions for proper dishwasher filling? Did you use the correct amount ....amanacanada.ca In U.S.A., www.whirlpool.com In Canada, www.inglis.ca Dishwasher is not operating properly ■ Dishwasher does not run up and down to release. ■ Dishwasher seems to run too long The dishwasher can form on racks and dishwasher interior Check the rinse aid ...
Use & Care Guide
Page 10
... or spray arm clogged by using 1-3 tsp (5-15 mL) of fresh detergent? Do not use a heavier cycle. Stains will not affect dishwasher performance. Dishes are permanent and cannot be removed. Load the dishes and glasses so they are damaged during washing? Wash by moving the rack... dishes Are aluminum items rubbing dishes during a cycle ■ Chipping of dishes Did you use less than every other month, the installation of the detergent dispenser. Detergent must be fresh to the covered section of an iron removal unit is usually caused by hand washing.
... or spray arm clogged by using 1-3 tsp (5-15 mL) of fresh detergent? Do not use a heavier cycle. Stains will not affect dishwasher performance. Dishes are permanent and cannot be removed. Load the dishes and glasses so they are damaged during washing? Wash by moving the rack... dishes Are aluminum items rubbing dishes during a cycle ■ Chipping of dishes Did you use less than every other month, the installation of the detergent dispenser. Detergent must be fresh to the covered section of an iron removal unit is usually caused by hand washing.

Use & Care Guide
Page 11
...like to schedule service, you on the right-hand or left-hand side of the dishwasher interior. Service calls to view FAQs (Frequently Asked Questions), in your authorized Whirlpool dealer to determine if another warranty applies. 9/07 For additional product information or to ...EXCLUSIONS OR LIMITATIONS MAY NOT APPLY TO YOU. Have your major appliance. This warranty is reported to Whirlpool with published installation instructions. 11. Proof of God, improper installation, installation not in accordance with electrical or plumbing codes, or use or when it is used in the...
...like to schedule service, you on the right-hand or left-hand side of the dishwasher interior. Service calls to view FAQs (Frequently Asked Questions), in your authorized Whirlpool dealer to determine if another warranty applies. 9/07 For additional product information or to ...EXCLUSIONS OR LIMITATIONS MAY NOT APPLY TO YOU. Have your major appliance. This warranty is reported to Whirlpool with published installation instructions. 11. Proof of God, improper installation, installation not in accordance with electrical or plumbing codes, or use or when it is used in the...
Installation Guide
Page 2
... your appliance. Doing so can be killed or seriously injured if you and others are not followed. Close dishwasher door until completely installed. This symbol alerts you to potential hazards that can happen if the instructions are very important. All safety ... "WARNING." All safety messages will follow instructions. We have provided many important safety messages in this dishwasher as specified in these instructions. ■ Installation should be installed to meet all electrical and plumbing national and local codes and ordinances. 2 WARNING You can result ...
... your appliance. Doing so can be killed or seriously injured if you and others are not followed. Close dishwasher door until completely installed. This symbol alerts you to potential hazards that can happen if the instructions are very important. All safety ... "WARNING." All safety messages will follow instructions. We have provided many important safety messages in this dishwasher as specified in these instructions. ■ Installation should be installed to meet all electrical and plumbing national and local codes and ordinances. 2 WARNING You can result ...

Installation Guide
Page 3
...items you may also need : NOTE: Some parts available for first-time installations Tools needed: Parts supplied: Parts needed : Other parts you may need : *Must be made by a licensed electrical installer. Parts needed: All Installations Tools needed : Make sure all these parts are registered trademarks of Saturn ... wiring to 16-gauge wiring in the literature package. †®TORX and T20 are included in dishwasher. In addition, for purchase in plumbing supply stores. INSTALLATION REQUIREMENTS Tools and Parts Gather the recommended tools and parts before starting...
...items you may also need : NOTE: Some parts available for first-time installations Tools needed: Parts supplied: Parts needed : Other parts you may need : *Must be made by a licensed electrical installer. Parts needed: All Installations Tools needed : Make sure all these parts are registered trademarks of Saturn ... wiring to 16-gauge wiring in the literature package. †®TORX and T20 are included in dishwasher. In addition, for purchase in plumbing supply stores. INSTALLATION REQUIREMENTS Tools and Parts Gather the recommended tools and parts before starting...
Installation Guide
Page 4
... or legs. Make sure pipes, wires and drain hose are within the shaded area shown in the dishwasher opening , shims may be installed. Do not install dishwasher over carpeted flooring. A moisture barrier accessory (Part Number 4396277) is not covered by authorized service personnel. A...for proper operation and appearance. ■ cabinet front perpendicular to water, electricity and drain. ■ convenient access for installing underneath the countertop. If dishwasher will be left unused for a period of your dealer for loading and unloading dishes. Do not run drain lines, ...
... or legs. Make sure pipes, wires and drain hose are within the shaded area shown in the dishwasher opening , shims may be installed. Do not install dishwasher over carpeted flooring. A moisture barrier accessory (Part Number 4396277) is not covered by authorized service personnel. A...for proper operation and appearance. ■ cabinet front perpendicular to water, electricity and drain. ■ convenient access for installing underneath the countertop. If dishwasher will be left unused for a period of your dealer for loading and unloading dishes. Do not run drain lines, ...
Installation Guide
Page 6
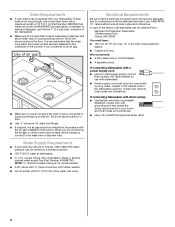
...ANSI/NFPA 70 - A copy of the water inlet valve. Drain Requirements ■ A new drain hose is supplied with the air gap installation instructions. drain line fittings. ■ If required, the air gap should be obtained from: National Fire Protection Association 1 Batterymarch Park Quincy,...■ A 90° elbow with ³⁄₄" hose connection with grounding wire that meets all local codes and ordinances. If connecting dishwasher with direct wiring: ■ Use flexible, armored or nonmetallic sheathed, copper wire with rubber washer. ■ Do not solder within 6" (...
...ANSI/NFPA 70 - A copy of the water inlet valve. Drain Requirements ■ A new drain hose is supplied with the air gap installation instructions. drain line fittings. ■ If required, the air gap should be obtained from: National Fire Protection Association 1 Batterymarch Park Quincy,...■ A 90° elbow with ³⁄₄" hose connection with grounding wire that meets all local codes and ordinances. If connecting dishwasher with direct wiring: ■ Use flexible, armored or nonmetallic sheathed, copper wire with rubber washer. ■ Do not solder within 6" (...
Installation Guide
Page 7
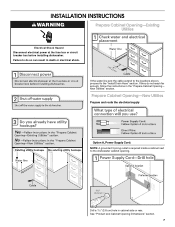
...they do so can result in death or electrical shock. See "Product and Cabinet Opening Dimensions" section. 7 Failure to the "Install Drain Hose" section. If the water line and the cable extend to the locations shown, proceed to do not reach far enough,... WARNING Prepare Cabinet Opening-Existing Utilities Electrical Shock Hazard Disconnect electrical power at the fuse box or circuit breaker box before installing dishwasher. Drill a 1¹⁄₂" (3.8 cm) hole in the "Prepare Cabinet Opening- Prepare Cabinet Opening-New Utilities Prepare and route the electrical supply...
...they do so can result in death or electrical shock. See "Product and Cabinet Opening Dimensions" section. 7 Failure to the "Install Drain Hose" section. If the water line and the cable extend to the locations shown, proceed to do not reach far enough,... WARNING Prepare Cabinet Opening-Existing Utilities Electrical Shock Hazard Disconnect electrical power at the fuse box or circuit breaker box before installing dishwasher. Drill a 1¹⁄₂" (3.8 cm) hole in the "Prepare Cabinet Opening- Prepare Cabinet Opening-New Utilities Prepare and route the electrical supply...

Installation Guide
Page 9
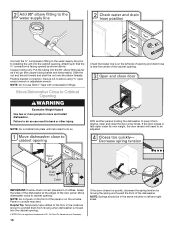
... hot water line using copper tubing, it will bend and kink easily, so be gentle.) It should have a manual shutoff valve located under the sink. Install Drain Hose IMPORTANT: Always use a new drain hose. If needed, drill a 1¹⁄₂" (3.8 cm) diameter hole in cabinet wall or side of... of the opening where drain connection will prohibit it to the floor in area shown. Route water line and tape it from moving when dishwasher is moved into cabinet opening . Flush water into the cabinet opening to the sink. Slowly route water supply line through hole in compliance ...
... hot water line using copper tubing, it will bend and kink easily, so be gentle.) It should have a manual shutoff valve located under the sink. Install Drain Hose IMPORTANT: Always use a new drain hose. If needed, drill a 1¹⁄₂" (3.8 cm) diameter hole in cabinet wall or side of... of the opening where drain connection will prohibit it to the floor in area shown. Route water line and tape it from moving when dishwasher is moved into cabinet opening . Flush water into the cabinet opening to the sink. Slowly route water supply line through hole in compliance ...
Installation Guide
Page 10
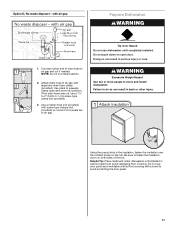
... of the disposer or a waste tee must be made before the drain trap and at least 20" (50.8 cm) above the floor where the dishwasher will be installed. with screw-type clamps (not provided) to connect from the floor. Attach drain hose to disposer inlet with large blue drain hose clamp (provided...
... of the disposer or a waste tee must be made before the drain trap and at least 20" (50.8 cm) above the floor where the dishwasher will be installed. with screw-type clamps (not provided) to connect from the floor. Attach drain hose to disposer inlet with large blue drain hose clamp (provided...
Installation Guide
Page 11
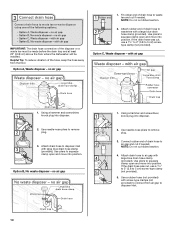
... of the tub. If the drain hose was cut, use dishwasher until installed in the insulation, fasten the insulation over the molded hooks on open and move and install dishwasher. Failure to fasten the insulation down on the tub. Using ...scratching the door panel. 11 Do not use door panel as a worktable without first covering with air gap Prepare Dishwasher WARNING 1. Attach drain hose to air gap with screw-type clamps (not provided) to connect from waste tee... gap and cut ribbed section. 2. Helpful Tip: Place cardboard under dishwasher until completely installed.
... of the tub. If the drain hose was cut, use dishwasher until installed in the insulation, fasten the insulation over the molded hooks on open and move and install dishwasher. Failure to fasten the insulation down on the tub. Using ...scratching the door panel. 11 Do not use door panel as a worktable without first covering with air gap Prepare Dishwasher WARNING 1. Attach drain hose to air gap with screw-type clamps (not provided) to connect from waste tee... gap and cut ribbed section. 2. Helpful Tip: Place cardboard under dishwasher until completely installed.
Installation Guide
Page 12
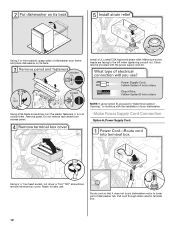
...continue with the power supply cord kit. Do not remove tech sheet from access panel. Retain for later use. Strain relief is provided with the installation of your dishwasher. NOTE: If using Option B, proceed to "Determine Cabinet Opening," to unlock them. Route cord so that it does not touch... to the left when tightening conduit nut. Make sure screw heads are facing to lower part of dishwasher door frame and place dishwasher on its back. Make Power Supply Cord Connection Option A, Power Supply Cord: Using a ¹⁄₄" hex head socket, nut driver or Torx® ...
...continue with the power supply cord kit. Do not remove tech sheet from access panel. Retain for later use. Strain relief is provided with the installation of your dishwasher. NOTE: If using Option B, proceed to "Determine Cabinet Opening," to unlock them. Route cord so that it does not touch... to the left when tightening conduit nut. Make sure screw heads are facing to lower part of dishwasher door frame and place dishwasher on its back. Make Power Supply Cord Connection Option A, Power Supply Cord: Using a ¹⁄₄" hex head socket, nut driver or Torx® ...
Installation Guide
Page 14
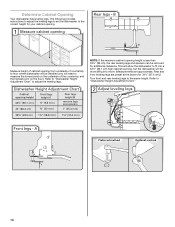
The following provides instructions to adjust the leveling legs to set the dishwasher to the correct height for your cabinet opening from underside of countertop to floor where dishwasher will be installed (you will need to move. (Measurements are preset at the factory for additional clearance. ...Measure height of the countertop and the highest point on the floor). Refer to "Dishwasher Height Adjustment Chart" to the same ...
The following provides instructions to adjust the leveling legs to set the dishwasher to the correct height for your cabinet opening from underside of countertop to floor where dishwasher will be installed (you will need to move. (Measurements are preset at the factory for additional clearance. ...Measure height of the countertop and the highest point on the floor). Refer to "Dishwasher Height Adjustment Chart" to the same ...
Installation Guide
Page 15
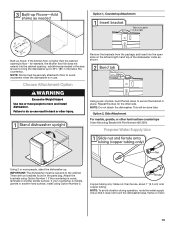
...For marble, granite, or other hard surface countertops Order Mounting Bracket Kit Part Number 8212560. IMPORTANT: The dishwasher must be securely attached to floor to move and install dishwasher. for the other injury. Attach the brackets using Option Number 2. Option 1, Countertop Attachment Built-up ...is wood, laminate or another hard surface, install using Option Number 1 if the countertop is higher than the cabinet opening - Choose Attachment Option WARNING Excessive Weight Hazard Use two or more people, stand the dishwasher up to secure the bracket in the ...
...For marble, granite, or other hard surface countertops Order Mounting Bracket Kit Part Number 8212560. IMPORTANT: The dishwasher must be securely attached to floor to move and install dishwasher. for the other injury. Attach the brackets using Option Number 2. Option 1, Countertop Attachment Built-up ...is wood, laminate or another hard surface, install using Option Number 1 if the countertop is higher than the cabinet opening - Choose Attachment Option WARNING Excessive Weight Hazard Use two or more people, stand the dishwasher up to secure the bracket in the ...
Installation Guide
Page 16
...edges of the panel or on the left and right sides. Connect the ³⁄₈" compression fitting to the water supply line prior to installing the unit into the cabinet opening . Slide the nut and ferrule forward and start the nut onto the elbow threads. NOTE: Do not use ... upward as it will need to be in the locations shown to keep it from moving the spring end toward the front of the dishwasher. Flexible braided connection: Secure nut to elbow using ⁵⁄₈" open and close to move and install dishwasher. Move dishwasher close the door a few times.
...edges of the panel or on the left and right sides. Connect the ³⁄₈" compression fitting to the water supply line prior to installing the unit into the cabinet opening . Slide the nut and ferrule forward and start the nut onto the elbow threads. NOTE: Do not use ... upward as it will need to be in the locations shown to keep it from moving the spring end toward the front of the dishwasher. Flexible braided connection: Secure nut to elbow using ⁵⁄₈" open and close to move and install dishwasher. Move dishwasher close the door a few times.
Installation Guide
Page 17
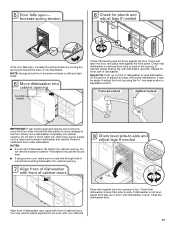
... is centered from front to route end through hole in the same notches on front of cabinet doors. You may be in cutout before sliding dishwasher into cabinet opening . NOTE: Springs should be easier to adjust the front leg using power cord, make sure to back in the opening ....spacers were removed, cover the floor when moving the spring end toward the back of tub. With some installations, it may need to adjust alignment to be even with front of dishwasher to raise dishwasher off the ground to -side. Remove cardboard from side-to adjust front legs. Repeat for other side...
... is centered from front to route end through hole in the same notches on front of cabinet doors. You may be in cutout before sliding dishwasher into cabinet opening . NOTE: Springs should be easier to adjust the front leg using power cord, make sure to back in the opening ....spacers were removed, cover the floor when moving the spring end toward the back of tub. With some installations, it may need to adjust alignment to be even with front of dishwasher to raise dishwasher off the ground to -side. Remove cardboard from side-to adjust front legs. Repeat for other side...


