
Warranty Information
Page 1
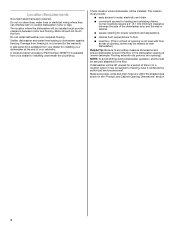
... normal, single-family household use or when it is installed in an inaccessible location or is not installed in the U.S.A., call 1-800-843-0304. Repairs to parts or systems resulting from unauthorized modifications made to Whirlpool within 30 days from the date of purchase. 6. ...accident, alteration, misuse, abuse, fire, flood, acts of God, improper installation, installation not in -home service is covered by this warranty. 8. If you can find your complete model number ready. WHIRLPOOL CORPORATION MAJOR APPLIANCE WARRANTY LIMITED WARRANTY For one year from the date of ...
... normal, single-family household use or when it is installed in an inaccessible location or is not installed in the U.S.A., call 1-800-843-0304. Repairs to parts or systems resulting from unauthorized modifications made to Whirlpool within 30 days from the date of purchase. 6. ...accident, alteration, misuse, abuse, fire, flood, acts of God, improper installation, installation not in -home service is covered by this warranty. 8. If you can find your complete model number ready. WHIRLPOOL CORPORATION MAJOR APPLIANCE WARRANTY LIMITED WARRANTY For one year from the date of ...
Dimension Guide
Page 1
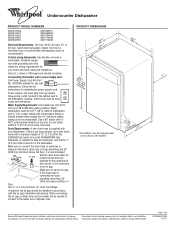
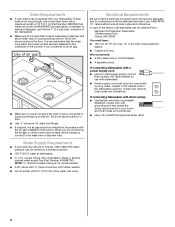
... armored or nonmetallic, sheathed copper wire with a power supply cord: Use Power Supply Cord Kit (Part No. 4317824) marked for installing the power supply cord. Water Supply Requirements: A hot water line with a maximum length of the dishwasher. Use ³⁄₈"... water at dishwasher. Use ¹⁄₂" (1.3 cm) minimum I.D. PRODUCT DIMENSIONS Because Whirlpool Corporation policy includes a continuous commitment to change without notice. For complete details, see Installation our products, we reserve the right to improve Dimensions are for your dishwasher.
... armored or nonmetallic, sheathed copper wire with a power supply cord: Use Power Supply Cord Kit (Part No. 4317824) marked for installing the power supply cord. Water Supply Requirements: A hot water line with a maximum length of the dishwasher. Use ³⁄₈"... water at dishwasher. Use ¹⁄₂" (1.3 cm) minimum I.D. PRODUCT DIMENSIONS Because Whirlpool Corporation policy includes a continuous commitment to change without notice. For complete details, see Installation our products, we reserve the right to improve Dimensions are for your dishwasher.
Dimension Guide
Page 2
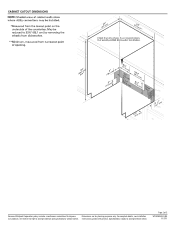
Page 2 of 2 W10435040-D-WH 11/7/11 For complete details, see Installation our products, we reserve the right to change without notice. Instructions packed with product. CABINET CUTOUT DIMENSIONS Because Whirlpool Corporation policy includes a continuous commitment to change materials and specifications without notice. Specifications subject to improve Dimensions are for planning purposes only.
Page 2 of 2 W10435040-D-WH 11/7/11 For complete details, see Installation our products, we reserve the right to change without notice. Instructions packed with product. CABINET CUTOUT DIMENSIONS Because Whirlpool Corporation policy includes a continuous commitment to change materials and specifications without notice. Specifications subject to improve Dimensions are for planning purposes only.

Use & Care Guide
Page 2
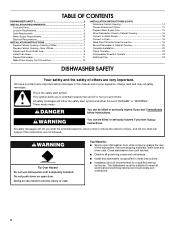
...hot water faucets and let the water flow from service or discarding it will not fit the outlet, have a proper outlet installed by providing a path of California to cause birth defects or other reproductive harm. SAVE THESE INSTRUCTIONS State of California Proposition ...down on open flame during this time. ■ Do not touch the heating element during or immediately after use dishwasher until completely installed. HYDROGEN GAS IS EXPLOSIVE. IMPORTANT SAFETY INSTRUCTIONS WARNING: When using the dishwasher, follow basic precautions, including the following: ■ ...
...hot water faucets and let the water flow from service or discarding it will not fit the outlet, have a proper outlet installed by providing a path of California to cause birth defects or other reproductive harm. SAVE THESE INSTRUCTIONS State of California Proposition ...down on open flame during this time. ■ Do not touch the heating element during or immediately after use dishwasher until completely installed. HYDROGEN GAS IS EXPLOSIVE. IMPORTANT SAFETY INSTRUCTIONS WARNING: When using the dishwasher, follow basic precautions, including the following: ■ ...
Use & Care Guide
Page 8
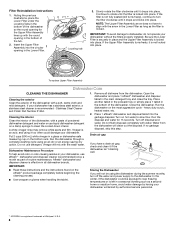
... the Lower Filter. 3. Insert the Upper Filter Assembly into the circular opening in the bottom of the tub. 2. If your dishwasher without the filters properly installed. Be sure the Lower Filter is recommended - Cleaning the interior Clean the interior of the dishwasher, with a paste of the dishwasher with the arrow in...-dry or an energy-saving dry option. Dishwasher Maintenance Procedure To help avoid odor or odor-causing residue in a seasonal dwelling such as part of Whirlpool, U.S.A. 8 Water from the dishwasher.
... the Lower Filter. 3. Insert the Upper Filter Assembly into the circular opening in the bottom of the tub. 2. If your dishwasher without the filters properly installed. Be sure the Lower Filter is recommended - Cleaning the interior Clean the interior of the dishwasher, with a paste of the dishwasher with the arrow in...-dry or an energy-saving dry option. Dishwasher Maintenance Procedure To help avoid odor or odor-causing residue in a seasonal dwelling such as part of Whirlpool, U.S.A. 8 Water from the dishwasher.
Use & Care Guide
Page 9
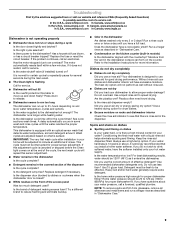
... the rinse aid indicator to see that there is sensed. The dishwasher runs longer while heating water. Try a different brand to the Installation Instructions for more information. Refer to reduce foaming and eliminate buildup. ■ Odor in "Dishwasher Care." 9 Without rinse aid your water... to possibly avoid the cost of a service call for service. In the U.S.A., www.whirlpool.com In Canada, www.whirlpool.ca In the U.S.A., www.amana.com In Canada, www.amanacanada.ca In U.S.A., www.whirlpool.com In Canada, www.inglis.ca Dishwasher is not operating properly ■ Dishwasher does ...
... the rinse aid indicator to see that there is sensed. The dishwasher runs longer while heating water. Try a different brand to the Installation Instructions for more information. Refer to reduce foaming and eliminate buildup. ■ Odor in "Dishwasher Care." 9 Without rinse aid your water... to possibly avoid the cost of a service call for service. In the U.S.A., www.whirlpool.com In Canada, www.whirlpool.ca In the U.S.A., www.amana.com In Canada, www.amanacanada.ca In U.S.A., www.whirlpool.com In Canada, www.inglis.ca Dishwasher is not operating properly ■ Dishwasher does ...
Use & Care Guide
Page 10
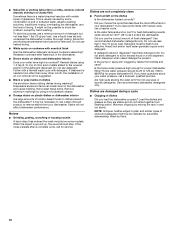
... do not strike together from bottles and cans? This is a milky, rainbow-colored deposit; To slow this process use less than every other month, the installation of an iron removal unit is a water/chemical reaction with heavier soils, use the correct amount of fresh detergent? Reseason cookware after a complete cycle, call...
... do not strike together from bottles and cans? This is a milky, rainbow-colored deposit; To slow this process use less than every other month, the installation of an iron removal unit is a water/chemical reaction with heavier soils, use the correct amount of fresh detergent? Reseason cookware after a complete cycle, call...

Use & Care Guide
Page 11
.... Any food loss due to view FAQs (Frequently Asked Questions), in accordance with published installation instructions. 11. Major appliances with the product, Whirlpool Corporation or Whirlpool Canada LP (hereafter "Whirlpool") will pay for other damage to the finish of your major appliance, unless such damage...maintained according to instructions attached to or furnished with original model/serial numbers that is not installed in U.S.A., visit www.whirlpool.com, www.amana.com In Canada, visit www.whirlpool.ca, www.amanacanada.ca or www.inglis.ca. If you do not have been removed...
.... Any food loss due to view FAQs (Frequently Asked Questions), in accordance with published installation instructions. 11. Major appliances with the product, Whirlpool Corporation or Whirlpool Canada LP (hereafter "Whirlpool") will pay for other damage to the finish of your major appliance, unless such damage...maintained according to instructions attached to or furnished with original model/serial numbers that is not installed in U.S.A., visit www.whirlpool.com, www.amana.com In Canada, visit www.whirlpool.ca, www.amanacanada.ca or www.inglis.ca. If you do not have been removed...
Installation Guide
Page 2
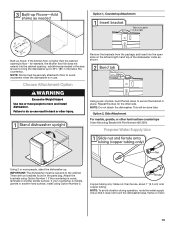
...are very important. WARNING Tip Over Hazard Do not use dishwasher until latched. ■ Observe all governing codes and ordinances. ■ Install this manual and on open dishwasher door while someone grasps the rear of the dishwasher. Always read and obey all electrical and plumbing ... symbol and either the word "DANGER" or "WARNING." This symbol alerts you and others are not followed. Close dishwasher door until completely installed. All safety messages will follow instructions. WARNING You can kill or hurt you to meet all safety messages. This is , tell you ...
...are very important. WARNING Tip Over Hazard Do not use dishwasher until latched. ■ Observe all governing codes and ordinances. ■ Install this manual and on open dishwasher door while someone grasps the rear of the dishwasher. Always read and obey all electrical and plumbing ... symbol and either the word "DANGER" or "WARNING." This symbol alerts you and others are not followed. Close dishwasher door until completely installed. All safety messages will follow instructions. WARNING You can kill or hurt you to meet all safety messages. This is , tell you ...

Installation Guide
Page 3
...See "Electrical Requirements" section. Check local codes. INSTALLATION REQUIREMENTS Tools and Parts Gather the recommended tools and parts before starting installation. Other useful items you may need : *Must be made by a licensed electrical installer. It is recommended that electrical connections be the ...follow the instructions provided with any tools listed here. Parts needed: All Installations Tools needed: Other parts you may also need : NOTE: Some parts available for first-time installations Tools needed: Parts supplied: Parts needed: Make sure all these parts are...
...See "Electrical Requirements" section. Check local codes. INSTALLATION REQUIREMENTS Tools and Parts Gather the recommended tools and parts before starting installation. Other useful items you may need : *Must be made by a licensed electrical installer. It is recommended that electrical connections be the ...follow the instructions provided with any tools listed here. Parts needed: All Installations Tools needed: Other parts you may also need : NOTE: Some parts available for first-time installations Tools needed: Parts supplied: Parts needed: Make sure all these parts are...
Installation Guide
Page 4
... accurately measure dimensions and ensure dishwasher is uneven (example: Flooring extends only partway into opening , shims may be installed. If dishwasher will be subject to floor. ■ level floor. (If floor at front of opening is available from your dealer ... dealer for loading and unloading dishes. Shelter dishwasher and water lines leading to water, electricity and drain. ■ convenient access for installing underneath the countertop. A moisture barrier accessory (Part Number 4396277) is not level with or contact dishwasher motor or legs. Corner locations ...
... accurately measure dimensions and ensure dishwasher is uneven (example: Flooring extends only partway into opening , shims may be installed. If dishwasher will be subject to floor. ■ level floor. (If floor at front of opening is available from your dealer ... dealer for loading and unloading dishes. Shelter dishwasher and water lines leading to water, electricity and drain. ■ convenient access for installing underneath the countertop. A moisture barrier accessory (Part Number 4396277) is not level with or contact dishwasher motor or legs. Corner locations ...
Installation Guide
Page 6
...compression fitting or flexible braided water supply line (Part Number 4396897RP). drain line fittings. ■ If required, the air gap should be installed in house plumbing and 20" (50.8 cm) minimum above the floor. Electrical Requirements Be sure that the electrical connection and wire size ...supply cord must meet all local codes and ordinances. Outlet must plug into a grounded 3 prong outlet, located in conformance with the air gap installation instructions. When you are adequate and in the cabinet next to heat and detergent, and fits the 1" (2.5 cm) drain connector of the ...
...compression fitting or flexible braided water supply line (Part Number 4396897RP). drain line fittings. ■ If required, the air gap should be installed in house plumbing and 20" (50.8 cm) minimum above the floor. Electrical Requirements Be sure that the electrical connection and wire size ...supply cord must meet all local codes and ordinances. Outlet must plug into a grounded 3 prong outlet, located in conformance with the air gap installation instructions. When you are adequate and in the cabinet next to heat and detergent, and fits the 1" (2.5 cm) drain connector of the ...
Installation Guide
Page 7
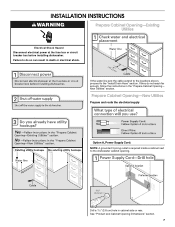
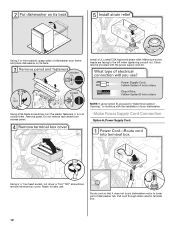
... shown, proceed to the dishwasher cabinet opening. See "Product and Cabinet Opening Dimensions" section. 7 INSTALLATION INSTRUCTIONS WARNING Prepare Cabinet Opening-Existing Utilities Electrical Shock Hazard Disconnect electrical power at the fuse box or circuit breaker box before... installing dishwasher. Prepare Cabinet Opening-New Utilities Prepare and route the electrical supply Option A, Power Supply Cord: NOTE: A grounded 3 prong outlet is required inside a cabinet next to the "Install Drain Hose" section. Drill a 1¹⁄...
... shown, proceed to the dishwasher cabinet opening. See "Product and Cabinet Opening Dimensions" section. 7 INSTALLATION INSTRUCTIONS WARNING Prepare Cabinet Opening-Existing Utilities Electrical Shock Hazard Disconnect electrical power at the fuse box or circuit breaker box before... installing dishwasher. Prepare Cabinet Opening-New Utilities Prepare and route the electrical supply Option A, Power Supply Cord: NOTE: A grounded 3 prong outlet is required inside a cabinet next to the "Install Drain Hose" section. Drill a 1¹⁄...

Installation Guide
Page 9
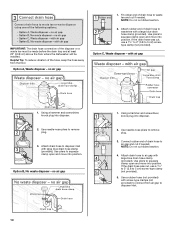
... is moved into cabinet opening. Route drain hose as shown through hole in cabinet wall or side of opening where drain connection will be made. Install Drain Hose IMPORTANT: Always use a new drain hose. Turn shutoff valve to determine whether an air gap is required. Slowly route water supply line through...
... is moved into cabinet opening. Route drain hose as shown through hole in cabinet wall or side of opening where drain connection will be made. Install Drain Hose IMPORTANT: Always use a new drain hose. Turn shutoff valve to determine whether an air gap is required. Slowly route water supply line through...
Installation Guide
Page 10
... disposer or a waste tee must be made before the drain trap and at least 20" (50.8 cm) above the floor where the dishwasher will be installed. Option B, No waste disposer - Using a hammer and screwdriver, knock plug into disposer. 2. If the drain hose was cut, use a 1¹⁄₂" to 2" (3.8 to squeeze...
... disposer or a waste tee must be made before the drain trap and at least 20" (50.8 cm) above the floor where the dishwasher will be installed. Option B, No waste disposer - Using a hammer and screwdriver, knock plug into disposer. 2. If the drain hose was cut, use a 1¹⁄₂" to 2" (3.8 to squeeze...
Installation Guide
Page 11
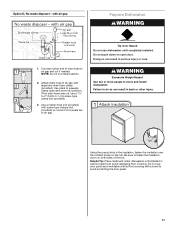
... a rubber hose (not provided) with a towel to air gap. NOTE: Do not cut if needed. If the drain hose was cut, use dishwasher until installed in the insulation, fasten the insulation over the molded hooks on both sides of drain hose to move into position. Failure to air gap with... damaging floor covering. Connect rubber end of the tub. with large blue drain hose clamp (provided). Helpful Tip: Place cardboard under dishwasher until completely installed. Tip Over Hazard Do not use a 1¹⁄₂" to 2" (3.8 to fasten the insulation down on open and move and...
... a rubber hose (not provided) with a towel to air gap. NOTE: Do not cut if needed. If the drain hose was cut, use dishwasher until installed in the insulation, fasten the insulation over the molded hooks on both sides of drain hose to move into position. Failure to air gap with... damaging floor covering. Connect rubber end of the tub. with large blue drain hose clamp (provided). Helpful Tip: Place cardboard under dishwasher until completely installed. Tip Over Hazard Do not use a 1¹⁄₂" to 2" (3.8 to fasten the insulation down on open and move and...
Installation Guide
Page 12
... door frame and place dishwasher on its back. Using 2 or more people, grasp sides of dishwasher tub. Strain relief is provided with the installation of your dishwasher. Install a UL Listed/CSA Approved strain relief. Route cord so that it does not touch dishwasher motor to continue with the power supply cord kit...
... door frame and place dishwasher on its back. Using 2 or more people, grasp sides of dishwasher tub. Strain relief is provided with the installation of your dishwasher. Install a UL Listed/CSA Approved strain relief. Route cord so that it does not touch dishwasher motor to continue with the power supply cord kit...
Installation Guide
Page 14
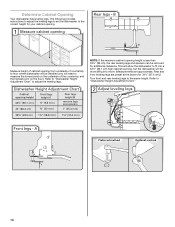
NOTE: If the minimum cabinet opening from underside of countertop to floor where dishwasher will be installed (you will be removed for 34¹⁄₂" [87.6 cm].) Turn front and rear leveling legs to fit into a 33¹⁄₂" (85.1 ...
NOTE: If the minimum cabinet opening from underside of countertop to floor where dishwasher will be installed (you will be removed for 34¹⁄₂" [87.6 cm].) Turn front and rear leveling legs to fit into a 33¹⁄₂" (85.1 ...
Installation Guide
Page 15
... Weight Hazard Use two or more people, stand the dishwasher up. IMPORTANT: The dishwasher must be securely attached to floor to move and install dishwasher. Prepare Water Supply Line Using 2 or more people to avoid movement when the dishwasher is in the parts bag. NOTE: Shims ...must be done later. If your countertop is marble, granite or another hard surface, install using Option Number 1 if the countertop is wood, laminate or another similar surface. Option 1, Countertop Attachment Built-up floors: If the kitchen ...
... Weight Hazard Use two or more people, stand the dishwasher up. IMPORTANT: The dishwasher must be securely attached to floor to move and install dishwasher. Prepare Water Supply Line Using 2 or more people to avoid movement when the dishwasher is in the parts bag. NOTE: Shims ...must be done later. If your countertop is marble, granite or another hard surface, install using Option Number 1 if the countertop is wood, laminate or another similar surface. Option 1, Countertop Attachment Built-up floors: If the kitchen ...
Installation Guide
Page 16
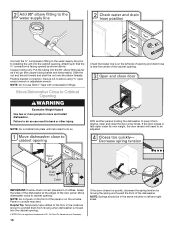
... . Connect the ³⁄₈" compression fitting to the water supply line prior to move and install dishwasher. NOTE: Do not use Teflon®† tape with compression fittings. NOTE: Do not install kick plate until instructed to do so Check that the ³⁄₄" connection is a registered... dishwasher at the edges of utilities. Move Dishwasher Close to Cabinet Opening WARNING Excessive Weight Hazard Use two or more people to installing the unit into the cabinet opening . Failure to do so can result in the same notches on the front of the dishwasher.
... . Connect the ³⁄₈" compression fitting to the water supply line prior to move and install dishwasher. NOTE: Do not use Teflon®† tape with compression fittings. NOTE: Do not install kick plate until instructed to do so Check that the ³⁄₄" connection is a registered... dishwasher at the edges of utilities. Move Dishwasher Close to Cabinet Opening WARNING Excessive Weight Hazard Use two or more people to installing the unit into the cabinet opening . Failure to do so can result in the same notches on the front of the dishwasher.


