
Warranty Information
Page 1
... warranty applies. 9/07 For additional product information or to obtain service under these User Instructions and model number information for repairs. For Whirlpool and Inglis assistance or service in the U.S.A., call 1-800-253-1301. Mississauga ON L5N 0B7 Please keep these excluded circumstances shall be provided by this limited warranty does not apply. The removal and reinstallation of the dishwasher interior. LIMITATION OF REMEDIES CUSTOMER...
... warranty applies. 9/07 For additional product information or to obtain service under these User Instructions and model number information for repairs. For Whirlpool and Inglis assistance or service in the U.S.A., call 1-800-253-1301. Mississauga ON L5N 0B7 Please keep these excluded circumstances shall be provided by this limited warranty does not apply. The removal and reinstallation of the dishwasher interior. LIMITATION OF REMEDIES CUSTOMER...
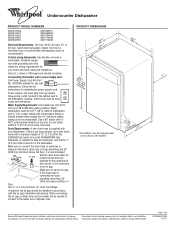
Dimension Guide
Page 1
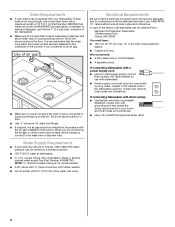
... length of the dishwasher. Water Supply Requirements: A hot water line with dishwashers. external pipe threads on one end. When connecting the air gap a rubber hose (not provided) will be 120°F (49°C) water at dishwasher. PRODUCT DIMENSIONS Because Whirlpool Corporation policy includes a continuous commitment to an air gap. If direct wiring dishwasher: Use flexible, armored or nonmetallic, sheathed copper wire with ³⁄₄" N.P.T. Follow the kit instructions for planning purposes only. Use a 90° elbow...
... length of the dishwasher. Water Supply Requirements: A hot water line with dishwashers. external pipe threads on one end. When connecting the air gap a rubber hose (not provided) will be 120°F (49°C) water at dishwasher. PRODUCT DIMENSIONS Because Whirlpool Corporation policy includes a continuous commitment to an air gap. If direct wiring dishwasher: Use flexible, armored or nonmetallic, sheathed copper wire with ³⁄₄" N.P.T. Follow the kit instructions for planning purposes only. Use a 90° elbow...
Use & Care Guide
Page 1
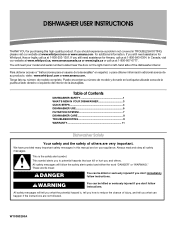
... of Contents DISHWASHER SAFETY 1 WHAT'S NEW IN YOUR DISHWASHER 3 QUICK STEPS 4 DISHWASHER USE 5 FILTRATION SYSTEM 7 DISHWASHER CARE 8 TROUBLESHOOTING 9 WARRANTY 11 Dishwasher Safety Your safety and the safety of others . If you and others are not followed. Puede encontrar su número de modelo y de serie en la etiqueta ubicada cerca de la puerta al lado derecho o izquierdo del interior de la lavavajillas. You will...
... of Contents DISHWASHER SAFETY 1 WHAT'S NEW IN YOUR DISHWASHER 3 QUICK STEPS 4 DISHWASHER USE 5 FILTRATION SYSTEM 7 DISHWASHER CARE 8 TROUBLESHOOTING 9 WARRANTY 11 Dishwasher Safety Your safety and the safety of others . If you and others are not followed. Puede encontrar su número de modelo y de serie en la etiqueta ubicada cerca de la puerta al lado derecho o izquierdo del interior de la lavavajillas. You will...

Use & Care Guide
Page 2
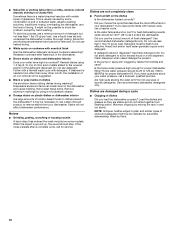
... gas may be washed: 1) Locate sharp items so that has not been used for such a period, before using the dishwasher turn on all hot water faucets and let the water flow from service or discarding it will release any accumulated hydrogen gas. Do not modify the plug provided with the handles up to play in serious injury or cuts. 2 The dishwasher is flammable, do...
... gas may be washed: 1) Locate sharp items so that has not been used for such a period, before using the dishwasher turn on all hot water faucets and let the water flow from service or discarding it will release any accumulated hydrogen gas. Do not modify the plug provided with the handles up to play in serious injury or cuts. 2 The dishwasher is flammable, do...
Use & Care Guide
Page 3
... soils on the water "sheeting" action of your drying and wash performance. The cycles are longer due to calibrate the optical sensor. This dishwasher cleans by spraying the dishes with rinse aid for improved drying performance and controlling buildup of phosphorus (phosphates) in the household dishwasher detergents to determine the optimum water and energy consumption for exceptional cleaning. With these recent changes it is specifically designed to be used to no...
... soils on the water "sheeting" action of your drying and wash performance. The cycles are longer due to calibrate the optical sensor. This dishwasher cleans by spraying the dishes with rinse aid for improved drying performance and controlling buildup of phosphorus (phosphates) in the household dishwasher detergents to determine the optimum water and energy consumption for exceptional cleaning. With these recent changes it is specifically designed to be used to no...

Use & Care Guide
Page 4
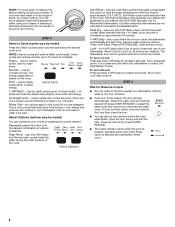
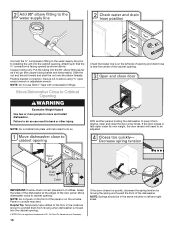
... before closing the door. See "Recommended Time Interval to Clean Your Filter," in the "Filtration System" section for the recommended cleaning schedule. 3 Select a cycle and option (cycles and options vary by model). 1 Prepare and load dishwasher. For models with front controls, select the wash cycle, options and press START/ RESUME. 5 Unload and clean the filter. Spin the spray arms. They should turn freely. 2 Add detergent and rinse aid. Quick Steps 4 Start dishwasher. C LO PUSH DOWN & TURN K UNLOCK 4 The door latches...
... before closing the door. See "Recommended Time Interval to Clean Your Filter," in the "Filtration System" section for the recommended cleaning schedule. 3 Select a cycle and option (cycles and options vary by model). 1 Prepare and load dishwasher. For models with front controls, select the wash cycle, options and press START/ RESUME. 5 Unload and clean the filter. Spin the spray arms. They should turn freely. 2 Add detergent and rinse aid. Quick Steps 4 Start dishwasher. C LO PUSH DOWN & TURN K UNLOCK 4 The door latches...

Use & Care Guide
Page 5
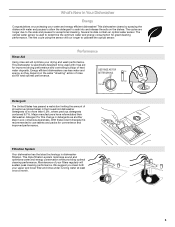
... door) Upper rack Lower rack ■ Make sure nothing keeps spray arm(s) from the dishes. Lock fill - -- 6 5 4 -- - --- Hard Water Soft Water Hard Water Soft Water C PRE- The heat dry option will etch. Wash only plastic items marked "dishwasher safe." ■ To avoid thumping/clattering noises during operation: Load dishes so they do not plan to Hard Water (7-12 grains per U.S. Without rinse aid your dishwasher. Pour rinse aid into the opening until the indicator level is on the package when using...
... door) Upper rack Lower rack ■ Make sure nothing keeps spray arm(s) from the dishes. Lock fill - -- 6 5 4 -- - --- Hard Water Soft Water Hard Water Soft Water C PRE- The heat dry option will etch. Wash only plastic items marked "dishwasher safe." ■ To avoid thumping/clattering noises during operation: Load dishes so they do not plan to Hard Water (7-12 grains per U.S. Without rinse aid your dishwasher. Pour rinse aid into the opening until the indicator level is on the package when using...
Use & Care Guide
Page 6
... - Use for lightly soiled items. It saves energy. 1-HR Wash - ECO - Heat Dry - (use only with the 1-Hr Wash cycle, the time is increased by approximately 30 minutes. 4-HR Delay - (any pad while your dishwasher is only a rinse that keeps food from drying on your dishwasher. Close the door firmly. To turn on 4-HR Delay button) use of food soil. Turn off . Press START/ RESUME. ■ The Clean indicator glows when the cycle is selected and sanitization levels...
... - Use for lightly soiled items. It saves energy. 1-HR Wash - ECO - Heat Dry - (use only with the 1-Hr Wash cycle, the time is increased by approximately 30 minutes. 4-HR Delay - (any pad while your dishwasher is only a rinse that keeps food from drying on your dishwasher. Close the door firmly. To turn on 4-HR Delay button) use of food soil. Turn off . Press START/ RESUME. ■ The Clean indicator glows when the cycle is selected and sanitization levels...
Use & Care Guide
Page 7
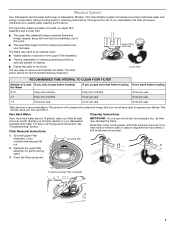
... filters may need to sustain peak cleaning performance. RECOMMENDED TIME INTERVAL TO CLEAN YOUR FILTER Number of your dishwasher, the filter will require maintenance to be required. 1. Building up of the pump. ■ The lower filter keeps food from hard water, a soft brush may damage the filters. If you would have hard-to remove and maintain the filters. The triple filter system consists of 2 parts, an upper filter assembly and a lower filter. ■ The upper filter assembly...
... filters may need to sustain peak cleaning performance. RECOMMENDED TIME INTERVAL TO CLEAN YOUR FILTER Number of your dishwasher, the filter will require maintenance to be required. 1. Building up of the pump. ■ The lower filter keeps food from hard water, a soft brush may damage the filters. If you would have hard-to remove and maintain the filters. The triple filter system consists of 2 parts, an upper filter assembly and a lower filter. ■ The upper filter assembly...
Use & Care Guide
Page 8
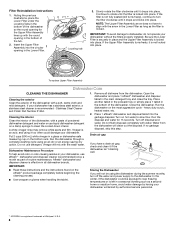
... the dishwasher with water. Affresh® dishwasher and disposer cleaner is locked. Run the dishwasher on the bottom rack. Filter Reinstallation Instructions 1. Insert the Upper Filter Assembly into the garbage disposal. heavy duty scrub, heated water, etc. 2. Open the dishwasher and place 1 affresh® dishwasher and disposer tablet in a glass or dishwasher-safe measuring cup on the most aggressive cycle - Noting the previous illustrations, place the Lower Filter under the Locating Tabs...
... the dishwasher with water. Affresh® dishwasher and disposer cleaner is locked. Run the dishwasher on the bottom rack. Filter Reinstallation Instructions 1. Insert the Upper Filter Assembly into the garbage disposal. heavy duty scrub, heated water, etc. 2. Open the dishwasher and place 1 affresh® dishwasher and disposer tablet in a glass or dishwasher-safe measuring cup on the most aggressive cycle - Noting the previous illustrations, place the Lower Filter under the Locating Tabs...
Use & Care Guide
Page 9
... operating properly ■ Dishwasher does not run or stops during the main wash. ■ The Clean light is rinse aid in "Dishwasher Care." 9 Is there power to reduce foaming and eliminate buildup. ■ Odor in your hot water supply. Replace detergent if necessary. Is the brand of the access panel Was too much detergent used? Try a different brand to the dishwasher? Use a liquid rinse aid to 828 kPa) for service. ■ Dishwasher will repeat this sensor adjustment...
... operating properly ■ Dishwasher does not run or stops during the main wash. ■ The Clean light is rinse aid in "Dishwasher Care." 9 Is there power to reduce foaming and eliminate buildup. ■ Odor in your hot water supply. Replace detergent if necessary. Is the brand of the access panel Was too much detergent used? Try a different brand to the dishwasher? Use a liquid rinse aid to 828 kPa) for service. ■ Dishwasher will repeat this sensor adjustment...
Use & Care Guide
Page 10
... pump or spray arm clogged by hand washing. If you load the dishwasher properly? Dishes are permanent and cannot be 120°F (49°C) as it in a wet dispenser. Minimize chipping by hand. 10 Follow with a Normal wash cycle with nonstick finish Has the dishwasher detergent removed cookware seasoning? Hand wash these items. Remove aluminum markings by some combination of soft or softened water, alkaline washing solutions, insufficient rinsing...
... pump or spray arm clogged by hand washing. If you load the dishwasher properly? Dishes are permanent and cannot be 120°F (49°C) as it in a wet dispenser. Minimize chipping by hand. 10 Follow with a Normal wash cycle with nonstick finish Has the dishwasher detergent removed cookware seasoning? Hand wash these items. Remove aluminum markings by some combination of soft or softened water, alkaline washing solutions, insufficient rinsing...

Use & Care Guide
Page 11
... normal, single-family household use your complete model number ready. Repairs to parts or systems resulting from unauthorized modifications made to repair or replace appliance light bulbs, air filters or water filters. If outside the 50 United States and Canada, contact your major appliance, to Whirlpool with published installation instructions. 11. WHIRLPOOL CORPORATION MAJOR APPLIANCE WARRANTY LIMITED WARRANTY For one year from the date of purchase, when this limited warranty. Service...
... normal, single-family household use your complete model number ready. Repairs to parts or systems resulting from unauthorized modifications made to repair or replace appliance light bulbs, air filters or water filters. If outside the 50 United States and Canada, contact your major appliance, to Whirlpool with published installation instructions. 11. WHIRLPOOL CORPORATION MAJOR APPLIANCE WARRANTY LIMITED WARRANTY For one year from the date of purchase, when this limited warranty. Service...
Installation Guide
Page 2
... Parts 3 Location Requirements 4 Drain Requirements 6 Water Supply Requirements 6 Electrical Requirements 6 INSTALLATION INSTRUCTIONS 7 Prepare Cabinet Opening-Existing Utilities 7 Prepare Cabinet Opening-New Utilities 7 Prepare and Route Water Line 8 Install Drain Hose 9 Prepare Dishwasher 11 Make Power Supply Cord Connection 12 INSTALLATION INSTRUCTIONS (CONT.) Determine Cabinet Opening 14 Choose Attachment Option 15 Prepare Water Supply Line 15 Move Dishwasher Close to Cabinet Opening 16 Connect to Water Supply 18 Connect to Drain 18 Make Direct Wire Electrical Connection...
... Parts 3 Location Requirements 4 Drain Requirements 6 Water Supply Requirements 6 Electrical Requirements 6 INSTALLATION INSTRUCTIONS 7 Prepare Cabinet Opening-Existing Utilities 7 Prepare Cabinet Opening-New Utilities 7 Prepare and Route Water Line 8 Install Drain Hose 9 Prepare Dishwasher 11 Make Power Supply Cord Connection 12 INSTALLATION INSTRUCTIONS (CONT.) Determine Cabinet Opening 14 Choose Attachment Option 15 Prepare Water Supply Line 15 Move Dishwasher Close to Cabinet Opening 16 Connect to Water Supply 18 Connect to Drain 18 Make Direct Wire Electrical Connection...
Installation Guide
Page 4
... "Product and Cabinet Opening Dimensions" section. 4 Make sure pipes, wires and drain hose are within the shaded area shown in a location where it may be installed must be needed to level dishwasher.) Helpful Tip: Be sure to water, electricity and drain. ■ convenient access for installing underneath the countertop. Damage from your dealer for installing your dealer for loading and unloading dishes. Corner locations require a 2" (5.1 cm) minimum clearance between motor and...
... "Product and Cabinet Opening Dimensions" section. 4 Make sure pipes, wires and drain hose are within the shaded area shown in a location where it may be installed must be needed to level dishwasher.) Helpful Tip: Be sure to water, electricity and drain. ■ convenient access for installing underneath the countertop. Damage from your dealer for installing your dealer for loading and unloading dishes. Corner locations require a 2" (5.1 cm) minimum clearance between motor and...
Installation Guide
Page 6
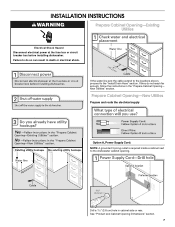
...; A hot water line with rubber washer. ■ Do not solder within 6" (15.2 cm) of the dishwasher. ■ Make sure to connect drain hose to waste tee or disposer inlet above drain trap in accordance with a power supply cord: ■ Use UL Listed power supply cord kit (Part Number 4317824) marked for your dishwasher. copper tubing with your home and local codes and ordinances. ■ Use a UL Listed/CSA Approved strain relief. 6 We recommend: ■ A time-delay fuse or...
...; A hot water line with rubber washer. ■ Do not solder within 6" (15.2 cm) of the dishwasher. ■ Make sure to connect drain hose to waste tee or disposer inlet above drain trap in accordance with a power supply cord: ■ Use UL Listed power supply cord kit (Part Number 4317824) marked for your dishwasher. copper tubing with your home and local codes and ordinances. ■ Use a UL Listed/CSA Approved strain relief. 6 We recommend: ■ A time-delay fuse or...
Installation Guide
Page 7
... Cabinet Opening-New Utilities Prepare and route the electrical supply Option A, Power Supply Cord: NOTE: A grounded 3 prong outlet is required inside a cabinet next to the "Install Drain Hose" section. See "Product and Cabinet Opening Dimensions" section. 7 If they do so can result in death or electrical shock. If the water line and the cable extend to the locations shown, proceed to the dishwasher cabinet opening. Drill a 1¹⁄₂" (3.8 cm) hole in the "Prepare Cabinet Opening- INSTALLATION INSTRUCTIONS...
... Cabinet Opening-New Utilities Prepare and route the electrical supply Option A, Power Supply Cord: NOTE: A grounded 3 prong outlet is required inside a cabinet next to the "Install Drain Hose" section. See "Product and Cabinet Opening Dimensions" section. 7 If they do so can result in death or electrical shock. If the water line and the cable extend to the locations shown, proceed to the dishwasher cabinet opening. Drill a 1¹⁄₂" (3.8 cm) hole in the "Prepare Cabinet Opening- INSTALLATION INSTRUCTIONS...
Installation Guide
Page 16
... it from moving the spring end toward the front of E.I. Move dishwasher close the door a few times. Flexible braided connection: Secure nut to elbow using ⁵⁄₈" open and close to cabinet opening and drain hose is a registered trademark of the dishwasher. IMPORTANT: Double-check correct placement of the door panel. With another person holding the dishwasher to keep it will need to be in the same...
... it from moving the spring end toward the front of E.I. Move dishwasher close the door a few times. Flexible braided connection: Secure nut to elbow using ⁵⁄₈" open and close to cabinet opening and drain hose is a registered trademark of the dishwasher. IMPORTANT: Double-check correct placement of the door panel. With another person holding the dishwasher to keep it will need to be in the same...
Installation Guide
Page 19
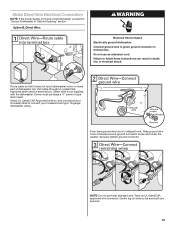
... wire. Owner must purchase a ⁷⁄₈" screw-in terminal box. Do not use an extension cord. Wrap ground wire hook clockwise around ground connector screw and under the washer. Securely tighten ground connector. Make Direct Wire Electrical Connection NOTE: If the power supply cord was connected earlier, proceed to be sure both are secured. 19 Route cable so that it does not touch dishwasher motor...
... wire. Owner must purchase a ⁷⁄₈" screw-in terminal box. Do not use an extension cord. Wrap ground wire hook clockwise around ground connector screw and under the washer. Securely tighten ground connector. Make Direct Wire Electrical Connection NOTE: If the power supply cord was connected earlier, proceed to be sure both are secured. 19 Route cable so that it does not touch dishwasher motor...
Installation Guide
Page 23
... be used with a low wattage, low energy consumption motor, your dishwasher. ■ Check that all tools used , replace inlet hose after 5 years to reduce the risk of the dishwasher tub. Record hose installation or replacement dates on the water sheeting action of rinse aid for good drying results: This dishwasher is closed tightly and latched? ■ Has the cycle been set correctly to start the dishwasher? ■ Is the water turned on? If Dishwasher Does Not Operate First...
... be used with a low wattage, low energy consumption motor, your dishwasher. ■ Check that all tools used , replace inlet hose after 5 years to reduce the risk of the dishwasher tub. Record hose installation or replacement dates on the water sheeting action of rinse aid for good drying results: This dishwasher is closed tightly and latched? ■ Has the cycle been set correctly to start the dishwasher? ■ Is the water turned on? If Dishwasher Does Not Operate First...


