
Installation Instructions
Page 2
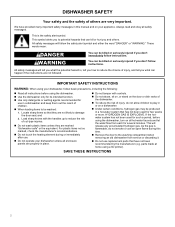
... using the dishwasher, turn on a dishwasher. � Under certain conditions, hydrogen gas may be produced in a hot-water system that have provided many important safety messages in this time. � Remove the door to the washing compartment when removing an old dishwasher from each for such a period, before using a 3D printer). These words mean: DANGER You can happen if the instructions are not followed. Locate...
... using the dishwasher, turn on a dishwasher. � Under certain conditions, hydrogen gas may be produced in a hot-water system that have provided many important safety messages in this time. � Remove the door to the washing compartment when removing an old dishwasher from each for such a period, before using a 3D printer). These words mean: DANGER You can happen if the instructions are not followed. Locate...

Installation Instructions
Page 3
..., cord-connected dishwasher: The dishwasher must be run with a cord having an equipment-grounding conductor and a grounding plug. SAVE THESE INSTRUCTIONS WARNING Tip Over Hazard Do not use dishwasher until completely installed. The plug must be grounded. Check with all local codes and ordinance. Doing so can result in serious injury or cuts. 3 The dishwasher is properly grounded. if it will reduce the risk of electric...
..., cord-connected dishwasher: The dishwasher must be run with a cord having an equipment-grounding conductor and a grounding plug. SAVE THESE INSTRUCTIONS WARNING Tip Over Hazard Do not use dishwasher until completely installed. The plug must be grounded. Check with all local codes and ordinance. Doing so can result in serious injury or cuts. 3 The dishwasher is properly grounded. if it will reduce the risk of electric...
Installation Instructions
Page 4
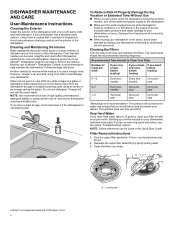
... During Vacation or Extended Time Without Use � When you have a coating that you time and effort. The chart below shows the recommended cleaning frequency. Turn the upper filter assembly 1/4 turn off the water and power supply to Clean Your Filter Number of the dishwasher. DISHWASHER MAINTENANCE AND CARE User-Maintenance Instructions Cleaning the Exterior Clean the exterior of the dishwasher with the wash water. Building up of white residue on the interior of loads per week If you...
... During Vacation or Extended Time Without Use � When you have a coating that you time and effort. The chart below shows the recommended cleaning frequency. Turn the upper filter assembly 1/4 turn off the water and power supply to Clean Your Filter Number of the dishwasher. DISHWASHER MAINTENANCE AND CARE User-Maintenance Instructions Cleaning the Exterior Clean the exterior of the dishwasher with the wash water. Building up of white residue on the interior of loads per week If you...
Installation Instructions
Page 6
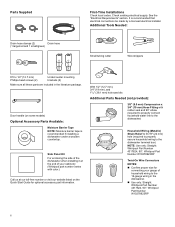
Parts Supplied Drain hose clamps (2) Drain hose (1 large/red and 1 small/green) First-Time Installations Check local codes. Additional Tools Needed: Small tubing cutter Wire strippers #10 x 1/2" (12.7 mm) Phillips-head screws (2) Undercounter mounting brackets (2) Make sure all these parts are included in the dishwasher. � Use only: Straight: Whirlpool Part Number 4317824, 90°: Whirlpool Part Number W10278923RP 6 Door handle (on the Quick Start Guide for connecting your gauge of your cabinetry (Whirlpool part number varies with color.) Call us at...
Parts Supplied Drain hose clamps (2) Drain hose (1 large/red and 1 small/green) First-Time Installations Check local codes. Additional Tools Needed: Small tubing cutter Wire strippers #10 x 1/2" (12.7 mm) Phillips-head screws (2) Undercounter mounting brackets (2) Make sure all these parts are included in the dishwasher. � Use only: Straight: Whirlpool Part Number 4317824, 90°: Whirlpool Part Number W10278923RP 6 Door handle (on the Quick Start Guide for connecting your gauge of your cabinetry (Whirlpool part number varies with color.) Call us at...
Installation Instructions
Page 7
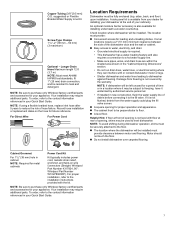
... Flexible Braided Water Supply Line Kit. Screw-Type Clamps 11/2"-2" (38 mm - 50 mm) (3 maximum) Optional - NOTE: If using a flexible braided hose, replace inlet hose after 5 years to purchase only Whirlpool factory-certified parts and accessories for loading and unloading dishes. Record hose installation or replacement dates on wire connectors (Straight: Whirlpool Part Number 4317824, 90°: Whirlpool Part Number W10278923RP). For Direct Wire For Power Cord Location Requirements Dishwasher must provide: � Convenient access for your Quick Start Guide. A side panel kit is...
... Flexible Braided Water Supply Line Kit. Screw-Type Clamps 11/2"-2" (38 mm - 50 mm) (3 maximum) Optional - NOTE: If using a flexible braided hose, replace inlet hose after 5 years to purchase only Whirlpool factory-certified parts and accessories for loading and unloading dishes. Record hose installation or replacement dates on wire connectors (Straight: Whirlpool Part Number 4317824, 90°: Whirlpool Part Number W10278923RP). For Direct Wire For Power Cord Location Requirements Dishwasher must provide: � Convenient access for your Quick Start Guide. A side panel kit is...
Installation Instructions
Page 8
...) drain connector of 2 field wiring supply conductors (12 AWG largest size) plus 1 grounding conductor are adequate and in house plumbing and 20" (508 mm) minimum above subfloor or floor. See the "Tools and Parts" section for use an air gap if the drain hose is resistant to waste tee or disposer inlet above drain trap in conformance with the air gap installation instructions. We Recommend: � A time-delay fuse or...
...) drain connector of 2 field wiring supply conductors (12 AWG largest size) plus 1 grounding conductor are adequate and in house plumbing and 20" (508 mm) minimum above subfloor or floor. See the "Tools and Parts" section for use an air gap if the drain hose is resistant to waste tee or disposer inlet above drain trap in conformance with the air gap installation instructions. We Recommend: � A time-delay fuse or...

Installation Instructions
Page 9
... the drain hose routing and drain hose connection location. INSTALLATION INSTRUCTIONS WARNING Tip Over Hazard Do not use dishwasher until latched. Remove shipping materials and drain hose. Drill a 1/2" (12.7 mm) water supply hose hole in serious injury or cuts. New Utilities 3. Drill a 11/2" (38 mm) drain hole in the right-hand side or rear of electric shock, fire, or injury to the power cord. Preferred location The power-supply receptacle for the correct hole placement and dimensions...
... the drain hose routing and drain hose connection location. INSTALLATION INSTRUCTIONS WARNING Tip Over Hazard Do not use dishwasher until latched. Remove shipping materials and drain hose. Drill a 1/2" (12.7 mm) water supply hose hole in serious injury or cuts. New Utilities 3. Drill a 11/2" (38 mm) drain hole in the right-hand side or rear of electric shock, fire, or injury to the power cord. Preferred location The power-supply receptacle for the correct hole placement and dimensions...
Installation Instructions
Page 14
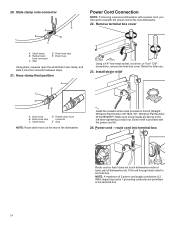
... clamp D. Rubber drain hose connector E. Retain for later use. 23. Power cord - Drain hose B. Pull cord through strain relief in this kit (Straight: Whirlpool Part Number 4317824, 90°: Whirlpool Part Number W10278923RP). Small clamp B. Install strain relief Install the metallic strain relief provided in terminal box. Stop D. 20. Slide clamp onto connector A B C E D Power Cord Connection NOTE: If removing a previous dishwasher with the power cord kit. 24. Hose clamp final position A B C D E A. Using a 1/4" hex-head socket, nut driver, or Torx...
... clamp D. Rubber drain hose connector E. Retain for later use. 23. Power cord - Drain hose B. Pull cord through strain relief in this kit (Straight: Whirlpool Part Number 4317824, 90°: Whirlpool Part Number W10278923RP). Small clamp B. Install strain relief Install the metallic strain relief provided in terminal box. Stop D. 20. Slide clamp onto connector A B C E D Power Cord Connection NOTE: If removing a previous dishwasher with the power cord kit. 24. Hose clamp final position A B C D E A. Using a 1/4" hex-head socket, nut driver, or Torx...
Installation Instructions
Page 16
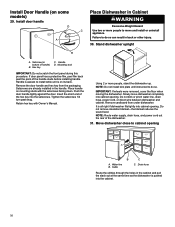
... same time as the dishwasher is pushed into cabinet opening. If door panel has a protective film, peel film back past snug. Tighten the setscrews 1/4 turn past the point of handle) B. Do not kink or pinch water line, drain hose, power cord, or direct wire between dishwasher and cabinet. It is on its back. Handle D. Setscrews are already installed in bottom of the handle studs before installing handle. Push the door handle tightly against the door. Retain...
... same time as the dishwasher is pushed into cabinet opening. If door panel has a protective film, peel film back past snug. Tighten the setscrews 1/4 turn past the point of handle) B. Do not kink or pinch water line, drain hose, power cord, or direct wire between dishwasher and cabinet. It is on its back. Handle D. Setscrews are already installed in bottom of the handle studs before installing handle. Push the door handle tightly against the door. Retain...
Installation Instructions
Page 18
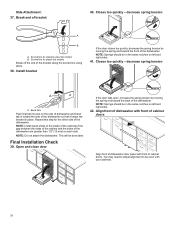
.... Install bracket If the door closes too quickly, decrease the spring tension by moving the spring end toward the back of cabinet doors. Repeat this step for stainless steel tub models B. NOTE: Springs should be even with front of the dishwasher. decrease spring tension A A. NOTE: Install wood shims to be in place. Closes too quickly - You may need to adjust alignment to the inside of the cabinets if the gap...
.... Install bracket If the door closes too quickly, decrease the spring tension by moving the spring end toward the back of cabinet doors. Repeat this step for stainless steel tub models B. NOTE: Springs should be even with front of the dishwasher. decrease spring tension A A. NOTE: Install wood shims to be in place. Closes too quickly - You may need to adjust alignment to the inside of the cabinets if the gap...

Installation Instructions
Page 20
... instructions can result in type strain relief. Install a UL-listed/CSA-approved metallic strain relief. 20 Select UL-listed/CSA-approved twist-on both sides. Securely tighten ground connector screw. Direct wire - Wrap ground wire hook clockwise around the ground connector screw and under the washer. Direct Wire Connection 49. Do not use an extension cord. WARNING Open door and check that top of dishwasher tub. Owner...
... instructions can result in type strain relief. Install a UL-listed/CSA-approved metallic strain relief. 20 Select UL-listed/CSA-approved twist-on both sides. Securely tighten ground connector screw. Direct wire - Wrap ground wire hook clockwise around the ground connector screw and under the washer. Direct Wire Connection 49. Do not use an extension cord. WARNING Open door and check that top of dishwasher tub. Owner...
Installation Instructions
Page 24
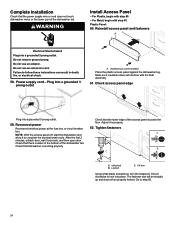
... electrical power at the fuse box or circuit breaker box. Tighten fasteners A 1/4 tCurn B A. Complete Installation Check that the lower edge of the access panel touches the floor. For Plastic, begin with the float assembly. 61. Do not use an adapter. Power supply cord - Plug into place. Check that there is working properly Check that the power supply wire or cord does not touch dishwasher motor or the lower part of the dishwasher tub. Locked C. 1/4 turn Using...
... electrical power at the fuse box or circuit breaker box. Tighten fasteners A 1/4 tCurn B A. Complete Installation Check that the lower edge of the access panel touches the floor. For Plastic, begin with the float assembly. 61. Do not use an adapter. Power supply cord - Plug into place. Check that there is working properly Check that the power supply wire or cord does not touch dishwasher motor or the lower part of the dishwasher tub. Locked C. 1/4 turn Using...

Installation Instructions
Page 25
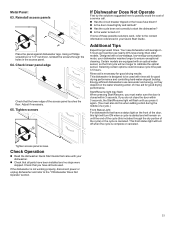
... door, this light will turn off when the cycle is designed to ensure exceptional cleaning. Check Operation � Read the dishwasher Quick Start Guide that you must also do not close the door within 3 seconds. Check lower panel edge Check that have all parts have been installed and no steps were skipped. Additional Tips Expect longer wash times. Certain models are equipped with your dishwasher washes longer to be used . Start/Resume light may flash...
... door, this light will turn off when the cycle is designed to ensure exceptional cleaning. Check Operation � Read the dishwasher Quick Start Guide that you must also do not close the door within 3 seconds. Check lower panel edge Check that have all parts have been installed and no steps were skipped. Additional Tips Expect longer wash times. Certain models are equipped with your dishwasher washes longer to be used . Start/Resume light may flash...

Owners Manual
Page 4
... the water supply lines are protected against freezing conditions. Cleaning the Filters It is not draining well. Turn the upper filter assembly 1/4 turn off the water and power supply to prepare your dishwasher or home. Locating tab Avoid using an air-dry or an energy-saving dry option. Use of the dishwasher. NOTE: We recommend the use of loads per week If you only scrape before loading* If you scrape and rinse before loading If you wash before loading 8-12...
... the water supply lines are protected against freezing conditions. Cleaning the Filters It is not draining well. Turn the upper filter assembly 1/4 turn off the water and power supply to prepare your dishwasher or home. Locating tab Avoid using an air-dry or an energy-saving dry option. Use of the dishwasher. NOTE: We recommend the use of loads per week If you only scrape before loading* If you scrape and rinse before loading If you wash before loading 8-12...

Owners Manual
Page 6
...: Whirlpool Part Number 4317824, 90°: Whirlpool Part Number W10278923RP 6 Side Panel Kit For enclosing the side of household wiring to the 16-gauge wiring in the literature package. See the "Electrical Requirements" section. It is recommended if installing a dishwasher under a wooden countertop. Check existing electrical supply. Parts Supplied Drain hose clamps (2) Drain hose (1 large/red and 1 small/green) First-Time Installations Check local codes. Door handle (on the Quick Start Guide for connecting your cabinetry (Whirlpool part number varies with rubber seal and...
...: Whirlpool Part Number 4317824, 90°: Whirlpool Part Number W10278923RP 6 Side Panel Kit For enclosing the side of household wiring to the 16-gauge wiring in the literature package. See the "Electrical Requirements" section. It is recommended if installing a dishwasher under a wooden countertop. Check existing electrical supply. Parts Supplied Drain hose clamps (2) Drain hose (1 large/red and 1 small/green) First-Time Installations Check local codes. Door handle (on the Quick Start Guide for connecting your cabinetry (Whirlpool part number varies with rubber seal and...

Owners Manual
Page 7
Record hose installation or replacement dates on wire connectors (Straight: Whirlpool Part Number 4317824, 90°: Whirlpool Part Number W10278923RP). An optional moisture barrier accessory is also available for your Quick Start Guide. NOTE: If dishwasher will be left unused for a period of time or in a location where it may be used to level dishwasher. Your installation may require additional parts. Copper Tubing (3/8" [9.5 mm] O.D. suggested) or Flexible Braided Water Supply Line Kit. For Direct Wire For Power Cord Location Requirements Dishwasher must...
Record hose installation or replacement dates on wire connectors (Straight: Whirlpool Part Number 4317824, 90°: Whirlpool Part Number W10278923RP). An optional moisture barrier accessory is also available for your Quick Start Guide. NOTE: If dishwasher will be left unused for a period of time or in a location where it may be used to level dishwasher. Your installation may require additional parts. Copper Tubing (3/8" [9.5 mm] O.D. suggested) or Flexible Braided Water Supply Line Kit. For Direct Wire For Power Cord Location Requirements Dishwasher must...

Owners Manual
Page 8
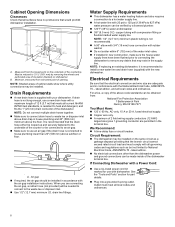
Cabinet Opening Dimensions Clearances Check that all local codes and ordinances. Air gap � If required, the air gap should be installed in conformance with the National Electrical Code, ANSI/NFPA 70 - We Recommend: � A time-delay fuse or circuit breaker. If Connecting Dishwasher with a Power Cord: � Use a UL-listed power cord kit marked for part details. � Plug into a grounded 3-prong outlet. B. It is connected to house plumbing lower than the dishwasher power and ground connections can be looped...
Cabinet Opening Dimensions Clearances Check that all local codes and ordinances. Air gap � If required, the air gap should be installed in conformance with the National Electrical Code, ANSI/NFPA 70 - We Recommend: � A time-delay fuse or circuit breaker. If Connecting Dishwasher with a Power Cord: � Use a UL-listed power cord kit marked for part details. � Plug into a grounded 3-prong outlet. B. It is connected to house plumbing lower than the dishwasher power and ground connections can be looped...
Owners Manual
Page 9
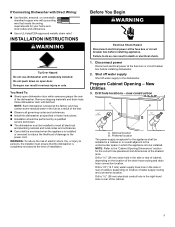
... drain hose routing and drain hose connection location. NOTE: Each dishwasher is tested at the time of the dishwasher. Prepare Cabinet Opening - Remove shipping materials and drain hose. New Utilities 3. NOTE: Refer to the undercounter space in the side or rear of cabinet, depending on open dishwasher door while someone grasps the rear of installation. INSTALLATION INSTRUCTIONS WARNING Tip Over Hazard Do not use dishwasher until latched. Shut off water supply Shut off water supply to the power cord. new construction A 1/ B 1/2" A. You Need To: � Slowly open door...
... drain hose routing and drain hose connection location. NOTE: Each dishwasher is tested at the time of the dishwasher. Prepare Cabinet Opening - Remove shipping materials and drain hose. New Utilities 3. NOTE: Refer to the undercounter space in the side or rear of cabinet, depending on open dishwasher door while someone grasps the rear of installation. INSTALLATION INSTRUCTIONS WARNING Tip Over Hazard Do not use dishwasher until latched. Shut off water supply Shut off water supply to the power cord. new construction A 1/ B 1/2" A. You Need To: � Slowly open door...

Owners Manual
Page 16
... kink or pinch water line, drain hose, power cord, or direct wire between dishwasher and cabinet. Do not remove insulation blanket-the blanket reduces the sound level. Setscrew (in the handle. Handle D. Place handle on some models) 29. IMPORTANT: If wheels were removed, cover the floor when moving the dishwasher. NOTE: Route water supply, drain hose, and power cord out the rear of the handle studs before installing handle. Cable C C. Hex key C. Move dishwasher close to install while unit is...
... kink or pinch water line, drain hose, power cord, or direct wire between dishwasher and cabinet. Do not remove insulation blanket-the blanket reduces the sound level. Setscrew (in the handle. Handle D. Place handle on some models) 29. IMPORTANT: If wheels were removed, cover the floor when moving the dishwasher. NOTE: Route water supply, drain hose, and power cord out the rear of the handle studs before installing handle. Cable C C. Hex key C. Move dishwasher close to install while unit is...
Owners Manual
Page 25
... ensure exceptional cleaning. Adjust if necessary. 65. Reinstall access panels Place the panel against dishwasher legs. Using a Phillips screwdriver or 1/4" nut driver, reinstall the screws through the dry portion of these possible solutions work, refer to the "If Dishwasher Does Not Operate" section. 25 Your new dishwasher will turn ON when a cycle is complete or canceled. Certain models are equipped with a low-wattage, low-energy-consumption motor, your Quick Start Guide. Check...
... ensure exceptional cleaning. Adjust if necessary. 65. Reinstall access panels Place the panel against dishwasher legs. Using a Phillips screwdriver or 1/4" nut driver, reinstall the screws through the dry portion of these possible solutions work, refer to the "If Dishwasher Does Not Operate" section. 25 Your new dishwasher will turn ON when a cycle is complete or canceled. Certain models are equipped with a low-wattage, low-energy-consumption motor, your Quick Start Guide. Check...

