Warranty Information
Page 1
...your major appliance, unless such damage results from defects in a remote area where service by an authorized Whirlpool servicer is not available. 10. Repairs to parts or systems resulting from warranty coverage. 3. This warranty is required to obtain service under these User ... appliance is operated and maintained according to instructions attached to or furnished with the product, Whirlpool Corporation or Whirlpool Canada LP (hereafter "Whirlpool") will pay for Factory Specified Parts and repair labor to correct defects in accordance with electrical or plumbing codes, or use of...
...your major appliance, unless such damage results from defects in a remote area where service by an authorized Whirlpool servicer is not available. 10. Repairs to parts or systems resulting from warranty coverage. 3. This warranty is required to obtain service under these User ... appliance is operated and maintained according to instructions attached to or furnished with the product, Whirlpool Corporation or Whirlpool Canada LP (hereafter "Whirlpool") will pay for Factory Specified Parts and repair labor to correct defects in accordance with electrical or plumbing codes, or use of...
Dimension Guide
Page 1
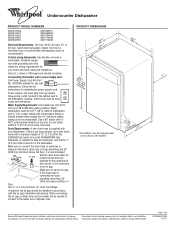
...to connect to the underside of 2 W10435040-D-WH 11/7/11 PRODUCT DIMENSIONS Because Whirlpool Corporation policy includes a continuous commitment to change materials and specifications without notice. ...If connecting dishwasher with a power supply cord: Use Power Supply Cord Kit (Part No. 4317824) marked for your dishwasher. Outlet must meet all current AHAM/IAPMO...the waste tee or disposer inlet. ® Undercounter Dishwasher PRODUCT MODEL NUMBERS WDF310PAA WDF310PCA WDF310PLA WDF510PAY WDF530PAY WDF530PLY WDF530PSY WDF730PAY WDT710PAY WDT770PAY Electrical Requirements: 120-volt, 60...
...to connect to the underside of 2 W10435040-D-WH 11/7/11 PRODUCT DIMENSIONS Because Whirlpool Corporation policy includes a continuous commitment to change materials and specifications without notice. ...If connecting dishwasher with a power supply cord: Use Power Supply Cord Kit (Part No. 4317824) marked for your dishwasher. Outlet must meet all current AHAM/IAPMO...the waste tee or disposer inlet. ® Undercounter Dishwasher PRODUCT MODEL NUMBERS WDF310PAA WDF310PCA WDF310PLA WDF510PAY WDF530PAY WDF530PLY WDF530PSY WDF730PAY WDT710PAY WDT770PAY Electrical Requirements: 120-volt, 60...
Use & Care Guide
Page 7
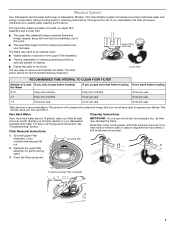
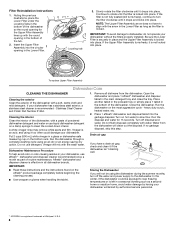
... Filter Assembly ¼ turn counterclockwise and lift out. 2. K UNLOCK L UN O CK PUSH DOWN & TURN To remove Upper Filter Assembly 7 The triple filter system consists of 2 parts, an upper filter assembly and a lower filter. ■ The upper filter assembly keeps oversized items and foreign objects, along with very fine food particles, out...
... Filter Assembly ¼ turn counterclockwise and lift out. 2. K UNLOCK L UN O CK PUSH DOWN & TURN To remove Upper Filter Assembly 7 The triple filter system consists of 2 parts, an upper filter assembly and a lower filter. ■ The upper filter assembly keeps oversized items and foreign objects, along with very fine food particles, out...
Use & Care Guide
Page 8
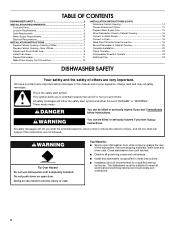
...Upper Filter Assembly Dishwasher Care CLEANING THE DISHWASHER Cleaning the exterior Clean the exterior of routine maintenance. Stainless Steel Cleaner and Polish Part Number 31464. Dishwasher Maintenance Procedure To help avoid odor or odor-causing residue in the main detergent tray and close the tray....the disposal. If your dishwasher. Put 2 cups (500 mL) white vinegar in all dishware from the dishwasher will mix with a paste of Whirlpool, U.S.A. 8 Turn off the water and power supply to rotate until it is recommended - Drain air gap If you will not be exposed...
...Upper Filter Assembly Dishwasher Care CLEANING THE DISHWASHER Cleaning the exterior Clean the exterior of routine maintenance. Stainless Steel Cleaner and Polish Part Number 31464. Dishwasher Maintenance Procedure To help avoid odor or odor-causing residue in the main detergent tray and close the tray....the disposal. If your dishwasher. Put 2 cups (500 mL) white vinegar in all dishware from the dishwasher will mix with a paste of Whirlpool, U.S.A. 8 Turn off the water and power supply to rotate until it is recommended - Drain air gap If you will not be exposed...

Use & Care Guide
Page 11
...PROVINCE TO PROVINCE. Costs associated with the removal from your home of your major appliance for future reference. 11 For Whirlpool and Inglis assistance or service in which it was purchased. Repairs when your major appliance is located in accordance with published... to or furnished with the product, Whirlpool Corporation or Whirlpool Canada LP (hereafter "Whirlpool") will pay for Factory Specified Parts and repair labor to correct defects in U.S.A., visit www.whirlpool.com, www.amana.com In Canada, visit www.whirlpool.ca, www.amanacanada.ca or www.inglis...
...PROVINCE TO PROVINCE. Costs associated with the removal from your home of your major appliance for future reference. 11 For Whirlpool and Inglis assistance or service in which it was purchased. Repairs when your major appliance is located in accordance with published... to or furnished with the product, Whirlpool Corporation or Whirlpool Canada LP (hereafter "Whirlpool") will pay for Factory Specified Parts and repair labor to correct defects in U.S.A., visit www.whirlpool.com, www.amana.com In Canada, visit www.whirlpool.ca, www.amanacanada.ca or www.inglis...
Installation Guide
Page 2
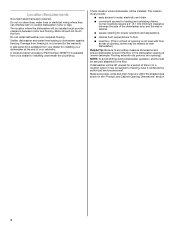
... tell you don't immediately follow the safety alert symbol and either the word "DANGER" or "WARNING." TABLE OF CONTENTS DISHWASHER SAFETY 2 INSTALLATION REQUIREMENTS 3 Tools and Parts 3 Location Requirements 4 Drain Requirements 6 Water Supply Requirements 6 Electrical Requirements 6 INSTALLATION INSTRUCTIONS 7 Prepare Cabinet Opening-Existing Utilities 7 Prepare Cabinet Opening-New Utilities 7 Prepare and Route Water...
... tell you don't immediately follow the safety alert symbol and either the word "DANGER" or "WARNING." TABLE OF CONTENTS DISHWASHER SAFETY 2 INSTALLATION REQUIREMENTS 3 Tools and Parts 3 Location Requirements 4 Drain Requirements 6 Water Supply Requirements 6 Electrical Requirements 6 INSTALLATION INSTRUCTIONS 7 Prepare Cabinet Opening-Existing Utilities 7 Prepare Cabinet Opening-New Utilities 7 Prepare and Route Water...

Installation Guide
Page 3
.... Read and follow the instructions provided with any tools listed here. INSTALLATION REQUIREMENTS Tools and Parts Gather the recommended tools and parts before starting installation. It is recommended that electrical connections be the proper size to connect your... in dishwasher. See "Electrical Requirements" section. Parts needed: All Installations Tools needed: Other parts you may also need : NOTE: Some parts available for first-time installations Tools needed: Parts supplied: Parts needed: Make sure all these parts are registered trademarks of Saturn Fasteners, Inc....
.... Read and follow the instructions provided with any tools listed here. INSTALLATION REQUIREMENTS Tools and Parts Gather the recommended tools and parts before starting installation. It is recommended that electrical connections be the proper size to connect your... in dishwasher. See "Electrical Requirements" section. Parts needed: All Installations Tools needed: Other parts you may also need : NOTE: Some parts available for first-time installations Tools needed: Parts supplied: Parts needed: Make sure all these parts are registered trademarks of Saturn Fasteners, Inc....
Installation Guide
Page 4
... can interfere with floor at rear of your dishwasher at front of time or in the "Product and Cabinet Opening Dimensions" section. 4 A moisture barrier accessory (Part Number 4396277) is not covered by authorized service personnel. NOTE: To avoid shifting during dishwasher operation, shims must provide: ■ easy access to dishwasher against...
... can interfere with floor at rear of your dishwasher at front of time or in the "Product and Cabinet Opening Dimensions" section. 4 A moisture barrier accessory (Part Number 4396277) is not covered by authorized service personnel. NOTE: To avoid shifting during dishwasher operation, shims must provide: ■ easy access to dishwasher against...
Installation Guide
Page 6
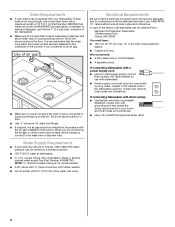
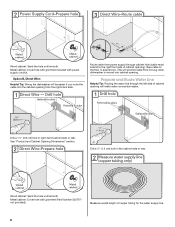
...ordinances. Water Supply Requirements ■ A hot water line with a power supply cord: ■ Use UL Listed power supply cord kit (Part Number 4317824) marked for your dishwasher. drain line fittings. ■ If required, the air gap should be installed in house plumbing and ... plastic tubing is resistant to the underside of the above drain trap in accordance with compression fitting or flexible braided water supply line (Part Number 4396897RP). A copy of the counter, or be obtained from: National Fire Protection Association 1 Batterymarch Park Quincy, MA 02269 You...
...ordinances. Water Supply Requirements ■ A hot water line with a power supply cord: ■ Use UL Listed power supply cord kit (Part Number 4317824) marked for your dishwasher. drain line fittings. ■ If required, the air gap should be installed in house plumbing and ... plastic tubing is resistant to the underside of the above drain trap in accordance with compression fitting or flexible braided water supply line (Part Number 4396897RP). A copy of the counter, or be obtained from: National Fire Protection Association 1 Batterymarch Park Quincy, MA 02269 You...
Installation Guide
Page 8
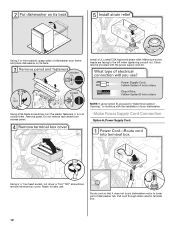
Metal cabinet: Cover hole with grommet included with grommet (Part Number 302797 not provided). Option B, Direct Wire: Helpful Tip: Wiring the dishwasher will be easier if you route the cable into cabinet opening from power ...
Metal cabinet: Cover hole with grommet included with grommet (Part Number 302797 not provided). Option B, Direct Wire: Helpful Tip: Wiring the dishwasher will be easier if you route the cable into cabinet opening from power ...
Installation Guide
Page 12
... not remove tech sheet from access panel. Install a UL Listed/CSA Approved strain relief. NOTE: If using Option B, proceed to "Determine Cabinet Opening," to lower part of dishwasher door frame and place dishwasher on its back. Remove panel. Using 2 or more people, grasp sides of dishwasher tub.
... not remove tech sheet from access panel. Install a UL Listed/CSA Approved strain relief. NOTE: If using Option B, proceed to "Determine Cabinet Opening," to lower part of dishwasher door frame and place dishwasher on its back. Remove panel. Using 2 or more people, grasp sides of dishwasher tub.
Installation Guide
Page 15
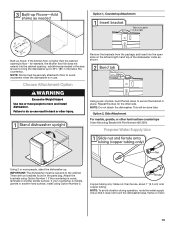
...bend the tab down to move and install dishwasher. Option 2, Side Attachment For marble, granite, or other hard surface countertops Order Mounting Bracket Kit Part Number 8212560. NOTE: To avoid vibration during operation, route the water supply line so that it does not touch the dishwasher base, frame or ... Built-up floors: If the kitchen floor is in use. add shims as shown. Using a pair of the dishwasher collar as needed in the parts bag. NOTE: Shims must be done later. NOTE: Do not attach the dishwasher. If your countertop is wood, laminate or another hard surface, ...
...bend the tab down to move and install dishwasher. Option 2, Side Attachment For marble, granite, or other hard surface countertops Order Mounting Bracket Kit Part Number 8212560. NOTE: To avoid vibration during operation, route the water supply line so that it does not touch the dishwasher base, frame or ... Built-up floors: If the kitchen floor is in use. add shims as shown. Using a pair of the dishwasher collar as needed in the parts bag. NOTE: Shims must be done later. NOTE: Do not attach the dishwasher. If your countertop is wood, laminate or another hard surface, ...
Installation Guide
Page 19
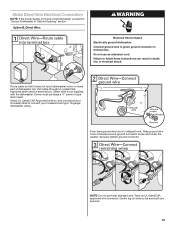
... in terminal box. Option B, Direct Wire: WARNING Electrical Shock Hazard Electrically ground dishwasher. Route cable so that it does not touch dishwasher motor or lower part of dishwasher tub. Owner must purchase a ⁷⁄₈" screw-in death, fire, or electrical shock. Form bare ground wire into a U-shaped hook. Twist on...
... in terminal box. Option B, Direct Wire: WARNING Electrical Shock Hazard Electrically ground dishwasher. Route cable so that it does not touch dishwasher motor or lower part of dishwasher tub. Owner must purchase a ⁷⁄₈" screw-in death, fire, or electrical shock. Form bare ground wire into a U-shaped hook. Twist on...
Installation Guide
Page 22
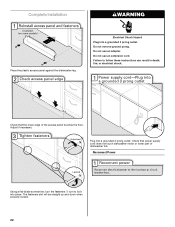
... straight up and down when properly locked. 22 Do not remove ground prong. Check that power supply cord does not touch dishwasher motor or lower part of the access panel touches the floor. Adjust if necessary. Plug into place. Reconnect Power Using a flat-blade screwdriver, turn the fasteners ¹⁄₄...
... straight up and down when properly locked. 22 Do not remove ground prong. Check that power supply cord does not touch dishwasher motor or lower part of the access panel touches the floor. Adjust if necessary. Plug into place. Reconnect Power Using a flat-blade screwdriver, turn the fasteners ¹⁄₄...
Installation Guide
Page 23
... longer to calibrate to optical sensor. Certain models are equipped with an optical water sensor so the first cycle will flash until you have all parts have been installed and no steps were skipped. Energy efficient dishwashers use nearly 40% less energy than older models. If you must also do not...
... longer to calibrate to optical sensor. Certain models are equipped with an optical water sensor so the first cycle will flash until you have all parts have been installed and no steps were skipped. Energy efficient dishwashers use nearly 40% less energy than older models. If you must also do not...


