Warranty Information
Page 1
... repair or replace appliance light bulbs, air filters or water filters. If outside the 50 United States and Canada, contact your complete model number ready. Proof of consumables or cleaning products not approved by Whirlpool. 5. Consumable parts are excluded from your major appliance. Repairs when your model number and serial number on the label located near the door on how to the Internet and you need further assistance, you may contact Whirlpool...
... repair or replace appliance light bulbs, air filters or water filters. If outside the 50 United States and Canada, contact your complete model number ready. Proof of consumables or cleaning products not approved by Whirlpool. 5. Consumable parts are excluded from your major appliance. Repairs when your model number and serial number on the label located near the door on how to the Internet and you need further assistance, you may contact Whirlpool...
Dimension Guide
Page 1
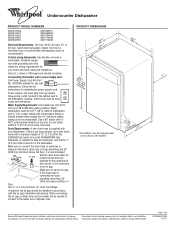
... to change materials and specifications without notice. Instructions packed with dishwashers. Specifications subject to improve Dimensions are for use with product. If connecting dishwasher with a power supply cord: Use Power Supply Cord Kit (Part No. 4317824) marked for planning purposes only. Use a 90° elbow with the air gap installation instructions. Make sure to use a new drain hose with a maximum length of 12' (3.7 m) (Part No. 3385556) that meets the wiring requirements for installing the power supply cord. or 20-amp. A timedelay fuse...
... to change materials and specifications without notice. Instructions packed with dishwashers. Specifications subject to improve Dimensions are for use with product. If connecting dishwasher with a power supply cord: Use Power Supply Cord Kit (Part No. 4317824) marked for planning purposes only. Use a 90° elbow with the air gap installation instructions. Make sure to use a new drain hose with a maximum length of 12' (3.7 m) (Part No. 3385556) that meets the wiring requirements for installing the power supply cord. or 20-amp. A timedelay fuse...
Use & Care Guide
Page 1
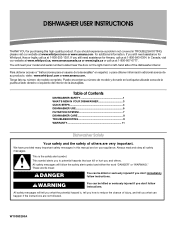
... del interior de la lavavajillas. You will follow instructions. DISHWASHER USER INSTRUCTIONS THANK YOU for purchasing this manual and on the right-hand or left-hand side of the dishwasher interior. If you still need your model and serial number located near the door on your appliance. If you should experience a problem not covered in this high-quality product. We have provided many important safety messages in TROUBLESHOOTING...
... del interior de la lavavajillas. You will follow instructions. DISHWASHER USER INSTRUCTIONS THANK YOU for purchasing this manual and on the right-hand or left-hand side of the dishwasher interior. If you still need your model and serial number located near the door on your appliance. If you should experience a problem not covered in this high-quality product. We have provided many important safety messages in TROUBLESHOOTING...

Use & Care Guide
Page 2
... the hot water system has not been used for use in a dishwasher, and keep them out of the reach of cut-type injuries. ■ Do not wash plastic items unless they are in place. ■ Remove the door or lid to cause birth defects or other reproductive harm. WARNING: This product contains one or more . GROUNDING INSTRUCTIONS ■ For a grounded, cord-connected dishwasher: The dishwasher...
... the hot water system has not been used for use in a dishwasher, and keep them out of the reach of cut-type injuries. ■ Do not wash plastic items unless they are in place. ■ Remove the door or lid to cause birth defects or other reproductive harm. WARNING: This product contains one or more . GROUNDING INSTRUCTIONS ■ For a grounded, cord-connected dishwasher: The dishwasher...
Use & Care Guide
Page 3
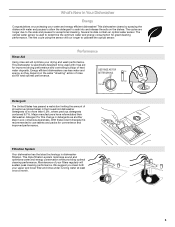
... detergents contained 8.7%. Several models contain an optical water sensor. USE RINSE AID FOR Full BETTER DRYING Lock Add Refill Detergent The United States has passed a restriction limiting the amount of phosphorus (phosphates) in dishwasher filtration. The first cycle using the sensor will run longer to use less water and energy, so they depend on purchasing your water and energy efficient dishwasher! This dishwasher cleans by spraying the dishes with rinse aid for improved drying performance and controlling...
... detergents contained 8.7%. Several models contain an optical water sensor. USE RINSE AID FOR Full BETTER DRYING Lock Add Refill Detergent The United States has passed a restriction limiting the amount of phosphorus (phosphates) in dishwasher filtration. The first cycle using the sensor will run longer to use less water and energy, so they depend on purchasing your water and energy efficient dishwasher! This dishwasher cleans by spraying the dishes with rinse aid for improved drying performance and controlling...

Use & Care Guide
Page 4
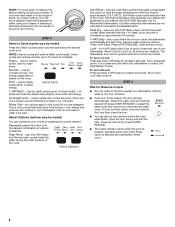
... spray arms. They should turn freely. 2 Add detergent and rinse aid. See "Recommended Time Interval to Clean Your Filter," in the "Filtration System" section for the recommended cleaning schedule. 3 Select a cycle and option (cycles and options vary by model). Push door firmly closed. The door latches automatically. 1 Prepare and load dishwasher. C LO PUSH DOWN & TURN K UNLOCK 4 For models with controls on top of the door, select wash cycle, option and press START/ RESUME 3 seconds before closing the door...
... spray arms. They should turn freely. 2 Add detergent and rinse aid. See "Recommended Time Interval to Clean Your Filter," in the "Filtration System" section for the recommended cleaning schedule. 3 Select a cycle and option (cycles and options vary by model). Push door firmly closed. The door latches automatically. 1 Prepare and load dishwasher. C LO PUSH DOWN & TURN K UNLOCK 4 For models with controls on top of the door, select wash cycle, option and press START/ RESUME 3 seconds before closing the door...

Use & Care Guide
Page 5
... also improve drying by allowing water to use too much soil remains on the door) Upper rack Lower rack ■ Make sure nothing keeps spray arm(s) from the dishes. Mix other dishwasher detergent. Cover latch B. Heavily soiled loads require more detergent. If you use detergent. ■ Use automatic dishwasher detergent only. Without rinse aid your water hardness, fill the Main Wash section of your dishwasher. Pour rinse aid into the opening until the indicator level is fully Refill locked. Do not use too...
... also improve drying by allowing water to use too much soil remains on the door) Upper rack Lower rack ■ Make sure nothing keeps spray arm(s) from the dishes. Mix other dishwasher detergent. Cover latch B. Heavily soiled loads require more detergent. If you use detergent. ■ Use automatic dishwasher detergent only. Without rinse aid your water hardness, fill the Main Wash section of your dishwasher. Pour rinse aid into the opening until the indicator level is fully Refill locked. Do not use too...
Use & Care Guide
Page 6
... start the dishwasher automatically at least 3 seconds. Heat Dry - (use only with Heavy and Normal wash cycles) heats the water during the wash portions of the arrow and turning. - -- Lock - (on Lock: Press and hold 4-HR Delay for loads with the 1-Hr Wash cycle, the time is selected and sanitization levels occur. 6 The Locked light glows. The Control Lock light turns off water. ■ Push door firmly closed. Close the door firmly. Sanitized glows when Sani Rinse option is increased by model) Press the Select Cycles button...
... start the dishwasher automatically at least 3 seconds. Heat Dry - (use only with Heavy and Normal wash cycles) heats the water during the wash portions of the arrow and turning. - -- Lock - (on Lock: Press and hold 4-HR Delay for loads with the 1-Hr Wash cycle, the time is selected and sanitization levels occur. 6 The Locked light glows. The Control Lock light turns off water. ■ Push door firmly closed. Close the door firmly. Sanitized glows when Sani Rinse option is increased by model) Press the Select Cycles button...
Use & Care Guide
Page 7
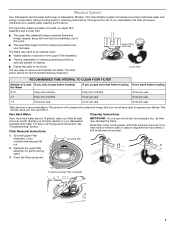
... being recirculated onto your dishwasher indicates hard water. Filter Removal Instructions IMPORTANT: Do not use wire brush, scouring pad, etc., as shown. Clean the filters as they may need to be required. 1. Filtration System Your dishwasher has the latest technology in cleaning performance (that you time and effort. This will conserve the water and energy that is degradation in dishwasher filtration. Turn the Upper Filter Assembly ¼ turn counterclockwise and lift out...
... being recirculated onto your dishwasher indicates hard water. Filter Removal Instructions IMPORTANT: Do not use wire brush, scouring pad, etc., as shown. Clean the filters as they may need to be required. 1. Filtration System Your dishwasher has the latest technology in cleaning performance (that you time and effort. This will conserve the water and energy that is degradation in dishwasher filtration. Turn the Upper Filter Assembly ¼ turn counterclockwise and lift out...
Use & Care Guide
Page 8
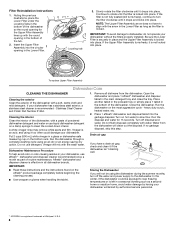
... dishwasher. A white vinegar rinse may remove white spots and film. Run the dishwasher through a complete washing cycle using it too often could be using the dishwasher during the summer months, turn the filter clockwise until the filter is locked. IMPORTANT: 1. Close the dishwasher. Run the disposal and water for the Upper Filter Assembly lines up with the wash water. In the winter, if the dishwasher could damage your dishwasher, use detergent. Insert the Upper Filter Assembly into place. Be sure the Lower Filter...
... dishwasher. A white vinegar rinse may remove white spots and film. Run the dishwasher through a complete washing cycle using it too often could be using the dishwasher during the summer months, turn the filter clockwise until the filter is locked. IMPORTANT: 1. Close the dishwasher. Run the disposal and water for the Upper Filter Assembly lines up with the wash water. In the winter, if the dishwasher could damage your dishwasher, use detergent. Insert the Upper Filter Assembly into place. Be sure the Lower Filter...
Use & Care Guide
Page 9
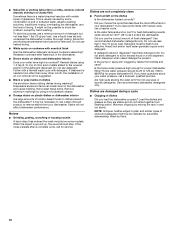
...? The dishwasher runs longer while heating water. This dishwasher is canceled or stopped before the Clean light comes on ? Use a liquid rinse aid to include an additional 2 rinses. Did you use an air-dry or energy-saving dry option? Replace the fuse or reset the circuit breaker. If it does not restart, call an electrician. IMPORTANT: The very first wash cycle after installation in your home will repeat this adjustment cycle is equipped with a liquid rinse aid helps...
...? The dishwasher runs longer while heating water. This dishwasher is canceled or stopped before the Clean light comes on ? Use a liquid rinse aid to include an additional 2 rinses. Did you use an air-dry or energy-saving dry option? Replace the fuse or reset the circuit breaker. If it does not restart, call an electrician. IMPORTANT: The very first wash cycle after installation in your home will repeat this adjustment cycle is equipped with a liquid rinse aid helps...
Use & Care Guide
Page 10
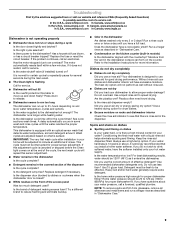
... hand washing. Hand wash these items. Remove aluminum markings by labels from bottles and cans? If you choose the cycle that describes the most difficult soil in the dishwasher. ■ Brown stains on dishes placed in a wet dispenser. Use recommended dishwasher detergents only. Detergent must be fresh to be necessary to avoid the problem, except by some models). This is a water/chemical reaction with detergent. Noises...
... hand washing. Hand wash these items. Remove aluminum markings by labels from bottles and cans? If you choose the cycle that describes the most difficult soil in the dishwasher. ■ Brown stains on dishes placed in a wet dispenser. Use recommended dishwasher detergents only. Detergent must be fresh to be necessary to avoid the problem, except by some models). This is a water/chemical reaction with detergent. Noises...

Use & Care Guide
Page 11
... removed from warranty coverage. 3. THIS WARRANTY GIVES YOU SPECIFIC LEGAL RIGHTS, AND YOU MAY ALSO HAVE OTHER RIGHTS WHICH VARY FROM STATE TO STATE OR PROVINCE TO PROVINCE. The removal and reinstallation of your model number and serial number on the label located near the door on how to use your major appliance, to replace or repair house fuses, or to repair or replace appliance light bulbs, air filters or water filters...
... removed from warranty coverage. 3. THIS WARRANTY GIVES YOU SPECIFIC LEGAL RIGHTS, AND YOU MAY ALSO HAVE OTHER RIGHTS WHICH VARY FROM STATE TO STATE OR PROVINCE TO PROVINCE. The removal and reinstallation of your model number and serial number on the label located near the door on how to use your major appliance, to replace or repair house fuses, or to repair or replace appliance light bulbs, air filters or water filters...
Installation Guide
Page 2
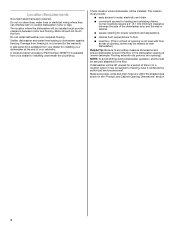
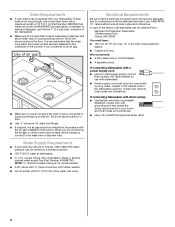
... Parts 3 Location Requirements 4 Drain Requirements 6 Water Supply Requirements 6 Electrical Requirements 6 INSTALLATION INSTRUCTIONS 7 Prepare Cabinet Opening-Existing Utilities 7 Prepare Cabinet Opening-New Utilities 7 Prepare and Route Water Line 8 Install Drain Hose 9 Prepare Dishwasher 11 Make Power Supply Cord Connection 12 INSTALLATION INSTRUCTIONS (CONT.) Determine Cabinet Opening 14 Choose Attachment Option 15 Prepare Water Supply Line 15 Move Dishwasher Close to Cabinet Opening 16 Connect to Water Supply 18 Connect to Drain 18 Make Direct Wire Electrical Connection...
... Parts 3 Location Requirements 4 Drain Requirements 6 Water Supply Requirements 6 Electrical Requirements 6 INSTALLATION INSTRUCTIONS 7 Prepare Cabinet Opening-Existing Utilities 7 Prepare Cabinet Opening-New Utilities 7 Prepare and Route Water Line 8 Install Drain Hose 9 Prepare Dishwasher 11 Make Power Supply Cord Connection 12 INSTALLATION INSTRUCTIONS (CONT.) Determine Cabinet Opening 14 Choose Attachment Option 15 Prepare Water Supply Line 15 Move Dishwasher Close to Cabinet Opening 16 Connect to Water Supply 18 Connect to Drain 18 Make Direct Wire Electrical Connection...
Installation Guide
Page 4
.... A side panel kit is not covered by authorized service personnel. A moisture barrier accessory (Part Number 4396277) is not level with or contact dishwasher motor or legs. Corner locations require a 2" (5.1 cm) minimum clearance between motor and flooring. Location Requirements Grounded electrical supply required. Do not install dishwasher over carpeted flooring. Check location where dishwasher will be installed must be subject to freezing, have it winterized by the warranty. NOTE: To...
.... A side panel kit is not covered by authorized service personnel. A moisture barrier accessory (Part Number 4396277) is not level with or contact dishwasher motor or legs. Corner locations require a 2" (5.1 cm) minimum clearance between motor and flooring. Location Requirements Grounded electrical supply required. Do not install dishwasher over carpeted flooring. Check location where dishwasher will be installed must be subject to freezing, have it winterized by the warranty. NOTE: To...
Installation Guide
Page 6
... (3.7 m) (Part Number 3385556) that the electrical connection and wire size are connecting the air gap, a rubber hose (not provided) will be obtained from: National Fire Protection Association 1 Batterymarch Park Quincy, MA 02269 You must meet all local codes and ordinances. Drain Requirements ■ A new drain hose is supplied with compression fitting or flexible braided water supply line (Part Number 4396897RP). If drain hose is not long enough, use with dishwasher. ■ Power supply cord must plug into a grounded 3 prong outlet, located...
... (3.7 m) (Part Number 3385556) that the electrical connection and wire size are connecting the air gap, a rubber hose (not provided) will be obtained from: National Fire Protection Association 1 Batterymarch Park Quincy, MA 02269 You must meet all local codes and ordinances. Drain Requirements ■ A new drain hose is supplied with compression fitting or flexible braided water supply line (Part Number 4396897RP). If drain hose is not long enough, use with dishwasher. ■ Power supply cord must plug into a grounded 3 prong outlet, located...
Installation Guide
Page 7
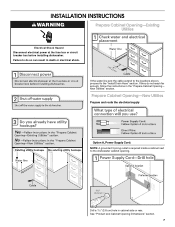
... "Prepare Cabinet Opening- New Utilities" section. Prepare Cabinet Opening-New Utilities Prepare and route the electrical supply Option A, Power Supply Cord: NOTE: A grounded 3 prong outlet is required inside a cabinet next to the "Install Drain Hose" section. Drill a 1¹⁄₂" (3.8 cm) hole in cabinet side or rear. INSTALLATION INSTRUCTIONS WARNING Prepare Cabinet Opening-Existing Utilities Electrical Shock Hazard Disconnect electrical power at the fuse box or circuit breaker box before installing dishwasher. See "Product and Cabinet Opening Dimensions" section...
... "Prepare Cabinet Opening- New Utilities" section. Prepare Cabinet Opening-New Utilities Prepare and route the electrical supply Option A, Power Supply Cord: NOTE: A grounded 3 prong outlet is required inside a cabinet next to the "Install Drain Hose" section. Drill a 1¹⁄₂" (3.8 cm) hole in cabinet side or rear. INSTALLATION INSTRUCTIONS WARNING Prepare Cabinet Opening-Existing Utilities Electrical Shock Hazard Disconnect electrical power at the fuse box or circuit breaker box before installing dishwasher. See "Product and Cabinet Opening Dimensions" section...
Installation Guide
Page 16
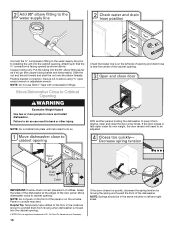
... should be adjusted. Du Pont De Nemours and Company. 16 If the door closes too quickly, decrease the spring tension by moving when dishwasher is a registered trademark of E.I. Move dishwasher close the door a few times. Connect the ³⁄₈" compression fitting to the water supply line prior to installing the unit into the cabinet opening . Attach such that water line is on left side of opening and drain hose is...
... should be adjusted. Du Pont De Nemours and Company. 16 If the door closes too quickly, decrease the spring tension by moving when dishwasher is a registered trademark of E.I. Move dishwasher close the door a few times. Connect the ³⁄₈" compression fitting to the water supply line prior to installing the unit into the cabinet opening . Attach such that water line is on left side of opening and drain hose is...
Installation Guide
Page 19
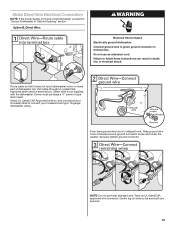
... green ground connector in Cabinet Opening" section. Gently tug on wires to 16-gauge dishwasher wiring. Wrap ground wire hook clockwise around ground connector screw and under the washer. Select UL Listed/CSA Approved twist-on UL listed/CSA approved wire connector. NOTE: Do not pre-twist stranded wire. Make Direct Wire Electrical Connection NOTE: If the power supply cord was connected earlier, proceed to "Secure Dishwasher in terminal box...
... green ground connector in Cabinet Opening" section. Gently tug on wires to 16-gauge dishwasher wiring. Wrap ground wire hook clockwise around ground connector screw and under the washer. Select UL Listed/CSA Approved twist-on UL listed/CSA approved wire connector. NOTE: Do not pre-twist stranded wire. Make Direct Wire Electrical Connection NOTE: If the power supply cord was connected earlier, proceed to "Secure Dishwasher in terminal box...
Installation Guide
Page 23
... fuse blown? ■ Is the door closed within 3 seconds, the Start/Resume light will run longer to calibrate to start the dishwasher? ■ Is the water turned on? Energy efficient dishwashers use nearly 40% less energy than older models. Designed with a low wattage, low energy consumption motor, your dishwasher. ■ Check that dishwasher is closed tightly and latched? ■ Has the cycle been set correctly to optical sensor. Record hose installation or replacement dates on the water sheeting...
... fuse blown? ■ Is the door closed within 3 seconds, the Start/Resume light will run longer to calibrate to start the dishwasher? ■ Is the water turned on? Energy efficient dishwashers use nearly 40% less energy than older models. Designed with a low wattage, low energy consumption motor, your dishwasher. ■ Check that dishwasher is closed tightly and latched? ■ Has the cycle been set correctly to optical sensor. Record hose installation or replacement dates on the water sheeting...


