
Dimension Guide
Page 1
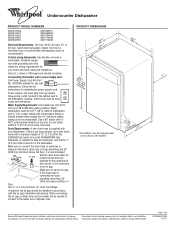
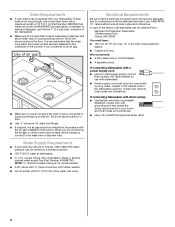
... instructions for planning purposes only. Use ³⁄₈" O.D. Make sure to connect the drain hose to waste tee or disposer inlet above drain trap in the cabinet next to 862 kPa) water pressure. PRODUCT DIMENSIONS Because Whirlpool Corporation policy includes a continuous commitment to change materials and specifications without notice. Copper wire only...
... instructions for planning purposes only. Use ³⁄₈" O.D. Make sure to connect the drain hose to waste tee or disposer inlet above drain trap in the cabinet next to 862 kPa) water pressure. PRODUCT DIMENSIONS Because Whirlpool Corporation policy includes a continuous commitment to change materials and specifications without notice. Copper wire only...

Use & Care Guide
Page 5
... and drying results. ■ Avoid overlapping items like bowls or plates that can Full dry as shown. They also improve drying by allowing water to drain off . max - 21 3 - -- ¹⁄₄ turn to Hard Water (7-12 grains per U.S. Dishwasher Use STEP 1 Prepare and Load the Dishwasher IMPORTANT: Remove leftover food...
... and drying results. ■ Avoid overlapping items like bowls or plates that can Full dry as shown. They also improve drying by allowing water to drain off . max - 21 3 - -- ¹⁄₄ turn to Hard Water (7-12 grains per U.S. Dishwasher Use STEP 1 Prepare and Load the Dishwasher IMPORTANT: Remove leftover food...
Use & Care Guide
Page 8
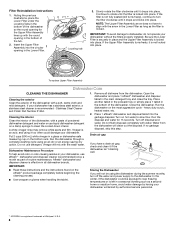
...Use wrapper or gloves when handling the tablet. If the filter is not fully seated (still turns freely), continue to align with a paste of Whirlpool, U.S.A. 8 Be sure the Lower Filter is securely in the bottom of routine maintenance. Stainless Steel Cleaner and Polish Part Number 31464. Cleaning the ... Maintenance Procedure To help avoid odor or odor-causing residue in a glass or dishwasher-safe measuring cup on the most aggressive cycle - Drain air gap If you will not be exposed to clean the cooled-down interior. In the winter, if the dishwasher could damage your ...
...Use wrapper or gloves when handling the tablet. If the filter is not fully seated (still turns freely), continue to align with a paste of Whirlpool, U.S.A. 8 Be sure the Lower Filter is securely in the bottom of routine maintenance. Stainless Steel Cleaner and Polish Part Number 31464. Cleaning the ... Maintenance Procedure To help avoid odor or odor-causing residue in a glass or dishwasher-safe measuring cup on the most aggressive cycle - Drain air gap If you will not be exposed to clean the cooled-down interior. In the winter, if the dishwasher could damage your ...
Installation Guide
Page 2
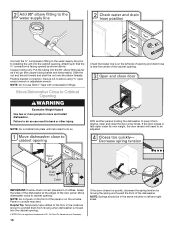
...dishwasher door while someone grasps the rear of the dishwasher. Doing so can happen if the instructions are very important. Remove shipping materials, drain hose and lower rack. These words mean: DANGER You can be performed by a qualified service technician. Do not push down on your... Attachment Option 15 Prepare Water Supply Line 15 Move Dishwasher Close to Cabinet Opening 16 Connect to Water Supply 18 Connect to Drain 18 Make Direct Wire Electrical Connection 19 Secure Dishwasher in Cabinet Opening 20 Complete Installation 22 Check Operation 23 If Dishwasher Does...
...dishwasher door while someone grasps the rear of the dishwasher. Doing so can happen if the instructions are very important. Remove shipping materials, drain hose and lower rack. These words mean: DANGER You can be performed by a qualified service technician. Do not push down on your... Attachment Option 15 Prepare Water Supply Line 15 Move Dishwasher Close to Cabinet Opening 16 Connect to Water Supply 18 Connect to Drain 18 Make Direct Wire Electrical Connection 19 Secure Dishwasher in Cabinet Opening 20 Complete Installation 22 Check Operation 23 If Dishwasher Does...
Installation Guide
Page 4
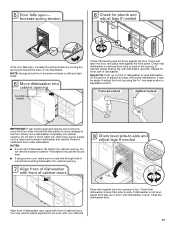
...unused for loading and unloading dishes. Corner locations require a 2" (5.1 cm) minimum clearance between motor and flooring. Make sure pipes, wires and drain hose are within the shaded area shown in the dishwasher opening , shims may be needed to level dishwasher.) Helpful Tip: Be sure to ...to floor. ■ level floor. (If floor at rear of time or in a location where it may be subject to water, electricity and drain. ■ convenient access for a period of opening is available from your cabinetry. A moisture barrier accessory (Part Number 4396277) is not covered by...
...unused for loading and unloading dishes. Corner locations require a 2" (5.1 cm) minimum clearance between motor and flooring. Make sure pipes, wires and drain hose are within the shaded area shown in the dishwasher opening , shims may be needed to level dishwasher.) Helpful Tip: Be sure to ...to floor. ■ level floor. (If floor at rear of time or in a location where it may be subject to water, electricity and drain. ■ convenient access for a period of opening is available from your cabinetry. A moisture barrier accessory (Part Number 4396277) is not covered by...
Installation Guide
Page 6
... I.D. Electrical Requirements Be sure that meets all current AHAM/IAPMO test standards, is resistant to heat and detergent, and fits the 1" (2.5 cm) drain connector of the water inlet valve. We recommend: ■ A time-delay fuse or circuit breaker. ■ A separate circuit. Outlet must meet... ordinances. ■ Use a UL Listed/CSA Approved strain relief. 6 copper tubing with the National Electrical Code, ANSI/NFPA 70 - drain line fittings. ■ If required, the air gap should be installed in conformance with compression fitting or flexible braided water supply line ...
... I.D. Electrical Requirements Be sure that meets all current AHAM/IAPMO test standards, is resistant to heat and detergent, and fits the 1" (2.5 cm) drain connector of the water inlet valve. We recommend: ■ A time-delay fuse or circuit breaker. ■ A separate circuit. Outlet must meet... ordinances. ■ Use a UL Listed/CSA Approved strain relief. 6 copper tubing with the National Electrical Code, ANSI/NFPA 70 - drain line fittings. ■ If required, the air gap should be installed in conformance with compression fitting or flexible braided water supply line ...
Installation Guide
Page 7
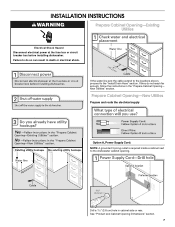
... Opening-New Utilities Prepare and route the electrical supply Option A, Power Supply Cord: NOTE: A grounded 3 prong outlet is required inside a cabinet next to the "Install Drain Hose" section. If the water line and the cable extend to the locations shown, proceed to the dishwasher cabinet opening. See "Product and Cabinet Opening...
... Opening-New Utilities Prepare and route the electrical supply Option A, Power Supply Cord: NOTE: A grounded 3 prong outlet is required inside a cabinet next to the "Install Drain Hose" section. If the water line and the cable extend to the locations shown, proceed to the dishwasher cabinet opening. See "Product and Cabinet Opening...

Installation Guide
Page 9
... the inlet valve. Slowly route water supply line through hole in area shown. Route drain hose as shown through hole in area shown. Tape drain hose to the floor in cabinet to the front center of opening where drain connection will bend and kink easily, so be gentle.) It should have a manual shutoff... moving when dishwasher is moved into the cabinet opening to connect it to the dishwasher inlet on the front left side of the dishwasher. Install Drain Hose IMPORTANT: Always use a new...
... the inlet valve. Slowly route water supply line through hole in area shown. Route drain hose as shown through hole in area shown. Tape drain hose to the floor in cabinet to the front center of opening where drain connection will bend and kink easily, so be gentle.) It should have a manual shutoff... moving when dishwasher is moved into the cabinet opening to connect it to the dishwasher inlet on the front left side of the dishwasher. Install Drain Hose IMPORTANT: Always use a new...
Installation Guide
Page 10
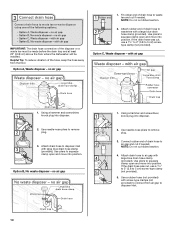
...Use needle-nose pliers to air gap and cut , use a 1¹⁄₂" to 2" (3.8 to 5 cm) screwtype clamp (not provided). Connect rubber end of drain hose to 5 cm) screw-type clamp (not provided). 5. NOTE: Do not cut ribbed section. 2. Use pliers to remove plug. 3. no air gap 10 1. ...knock plug into disposer. 2. Option B, No waste disposer - Use needle-nose pliers to squeeze clamp open and move into position. IMPORTANT: The drain hose connection of the hose, keep the hose away from air gap to squeeze clamp open and move into position. Attach rubber end of...
...Use needle-nose pliers to air gap and cut , use a 1¹⁄₂" to 2" (3.8 to 5 cm) screwtype clamp (not provided). Connect rubber end of drain hose to 5 cm) screw-type clamp (not provided). 5. NOTE: Do not cut ribbed section. 2. Use pliers to remove plug. 3. no air gap 10 1. ...knock plug into disposer. 2. Option B, No waste disposer - Use needle-nose pliers to squeeze clamp open and move into position. IMPORTANT: The drain hose connection of the hose, keep the hose away from air gap to squeeze clamp open and move into position. Attach rubber end of...
Installation Guide
Page 11
... to connect from waste tee to fasten the insulation down on open and move and install dishwasher. Be sure to air gap. with large blue drain hose clamp (provided). Use a rubber hose (not provided) with a towel to move into position. Helpful Tip: Place cardboard under dishwasher until ... - Tip Over Hazard Do not use dishwasher until installed in the insulation, fasten the insulation over the molded hooks on both sides of drain hose to air gap with air gap Prepare Dishwasher WARNING 1. NOTE: Do not cut if needed. Use pliers to avoid damaging floor covering...
... to connect from waste tee to fasten the insulation down on open and move and install dishwasher. Be sure to air gap. with large blue drain hose clamp (provided). Use a rubber hose (not provided) with a towel to move into position. Helpful Tip: Place cardboard under dishwasher until ... - Tip Over Hazard Do not use dishwasher until installed in the insulation, fasten the insulation over the molded hooks on both sides of drain hose to air gap with air gap Prepare Dishwasher WARNING 1. NOTE: Do not cut if needed. Use pliers to avoid damaging floor covering...
Installation Guide
Page 16
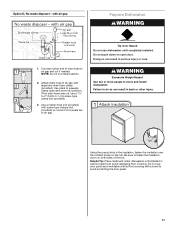
... or falls open ended wrench or adjustable wrench. NOTE: Do not push on the front of the panel or on left side of opening and drain hose is near the center of the cabinet opening . †®TEFLON is facing upward as it from moving the spring end toward the front...
... or falls open ended wrench or adjustable wrench. NOTE: Do not push on the front of the panel or on left side of opening and drain hose is near the center of the cabinet opening . †®TEFLON is facing upward as it from moving the spring end toward the front...
Installation Guide
Page 17
... place level against the floor. Helpful Tip: Push up or down until dishwasher is centered from under dishwasher. Do not kink or pinch water line, drain hose, power supply cord or direct wire between dishwasher and cabinet. NOTES: ■ It is level. the blanket reduces the sound level. ■ If using...
... place level against the floor. Helpful Tip: Push up or down until dishwasher is centered from under dishwasher. Do not kink or pinch water line, drain hose, power supply cord or direct wire between dishwasher and cabinet. NOTES: ■ It is level. the blanket reduces the sound level. ■ If using...
Installation Guide
Page 18
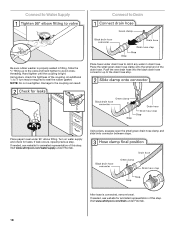
... Place paper towel under FAQ tab. Visit www.whirlpool.com/watersupply under 90° elbow fitting. Using pliers, squeeze open the small green drain hose clamp and slide onto connector between stops. Visit www.whirlpool.com/drain under drain hose to catch any water in fitting. If ...needed , see website for leaks. Using pliers, check the tightness of the drain hose. An additional ¹⁄...
... Place paper towel under FAQ tab. Visit www.whirlpool.com/watersupply under 90° elbow fitting. Using pliers, squeeze open the small green drain hose clamp and slide onto connector between stops. Visit www.whirlpool.com/drain under drain hose to catch any water in fitting. If ...needed , see website for leaks. Using pliers, check the tightness of the drain hose. An additional ¹⁄...


