
Warranty Information
Page 1
... warranty is void if the factory applied serial number has been altered or removed from defects in -home service is contrary to published user or operator instructions and/or installation instructions. 4. You can write to Whirlpool with the product, Whirlpool Corporation or Whirlpool Canada LP (hereafter "Whirlpool") will pay for repairs. In Canada, call 1-800-807-6777. Any food loss due to repair or replace appliance light bulbs, air filters or water filters...
... warranty is void if the factory applied serial number has been altered or removed from defects in -home service is contrary to published user or operator instructions and/or installation instructions. 4. You can write to Whirlpool with the product, Whirlpool Corporation or Whirlpool Canada LP (hereafter "Whirlpool") will pay for repairs. In Canada, call 1-800-807-6777. Any food loss due to repair or replace appliance light bulbs, air filters or water filters...
Dimension Guide
Page 1
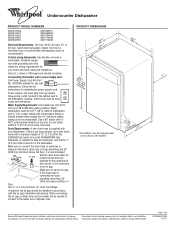
...;⁄₈" O.D. ® Undercounter Dishwasher PRODUCT MODEL NUMBERS WDF310PAA WDF310PCA WDF310PLA WDF510PAY WDF530PAY WDF530PLY WDF530PSY WDF730PAY WDT710PAY WDT770PAY Electrical Requirements: 120-volt, 60-Hz, AC-only, 15- If connecting dishwasher with a power supply cord: Use Power Supply Cord Kit (Part No. 4317824) marked for installing the power supply cord. Make sure to connect the drain hose to 862 kPa) water pressure. Make sure to use a new drain hose with your home and local codes and ordinances. Specifications subject to the dishwasher opening.
...;⁄₈" O.D. ® Undercounter Dishwasher PRODUCT MODEL NUMBERS WDF310PAA WDF310PCA WDF310PLA WDF510PAY WDF530PAY WDF530PLY WDF530PSY WDF730PAY WDT710PAY WDT770PAY Electrical Requirements: 120-volt, 60-Hz, AC-only, 15- If connecting dishwasher with a power supply cord: Use Power Supply Cord Kit (Part No. 4317824) marked for installing the power supply cord. Make sure to connect the drain hose to 862 kPa) water pressure. Make sure to use a new drain hose with your home and local codes and ordinances. Specifications subject to the dishwasher opening.
Use & Care Guide
Page 1
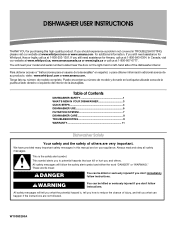
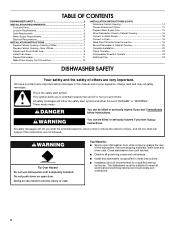
... left-hand side of the dishwasher interior. Tenga listo su número de modelo completo. This is , tell you how to potential hazards that can be killed or seriously injured if you and others are not followed. Table of Contents DISHWASHER SAFETY 1 WHAT'S NEW IN YOUR DISHWASHER 3 QUICK STEPS 4 DISHWASHER USE 5 FILTRATION SYSTEM 7 DISHWASHER CARE 8 TROUBLESHOOTING 9 WARRANTY 11 Dishwasher Safety Your safety and...
... left-hand side of the dishwasher interior. Tenga listo su número de modelo completo. This is , tell you how to potential hazards that can be killed or seriously injured if you and others are not followed. Table of Contents DISHWASHER SAFETY 1 WHAT'S NEW IN YOUR DISHWASHER 3 QUICK STEPS 4 DISHWASHER USE 5 FILTRATION SYSTEM 7 DISHWASHER CARE 8 TROUBLESHOOTING 9 WARRANTY 11 Dishwasher Safety Your safety and...

Use & Care Guide
Page 2
... not operate the dishwasher unless all hot water faucets and let the water flow from service or discarding it will not fit the outlet, have a proper outlet installed by providing a path of cut-type injuries. ■ Do not wash plastic items unless they are properly in doubt whether the dishwasher is equipped with all instructions before using the dishwasher turn on open flame during this time...
... not operate the dishwasher unless all hot water faucets and let the water flow from service or discarding it will not fit the outlet, have a proper outlet installed by providing a path of cut-type injuries. ■ Do not wash plastic items unless they are properly in doubt whether the dishwasher is equipped with all instructions before using the dishwasher turn on open flame during this time...
Use & Care Guide
Page 3
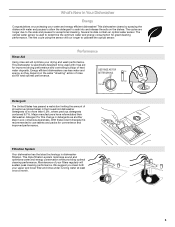
... and pauses for improved drying performance and controlling buildup of your filters regularly will optimize your drying and wash performance. This dishwasher cleans by spraying the dishes with rinse aid for exceptional cleaning. O CK L O C K PUSH DOWN & TURN L UN 3 We suggest you clean both your water and energy efficient dishwasher! What's New in Your Dishwasher Energy Congratulations on purchasing your upper and lower filter and rinse under running water at least once a month. The cycles are longer due...
... and pauses for improved drying performance and controlling buildup of your filters regularly will optimize your drying and wash performance. This dishwasher cleans by spraying the dishes with rinse aid for exceptional cleaning. O CK L O C K PUSH DOWN & TURN L UN 3 We suggest you clean both your water and energy efficient dishwasher! What's New in Your Dishwasher Energy Congratulations on purchasing your upper and lower filter and rinse under running water at least once a month. The cycles are longer due...

Use & Care Guide
Page 4
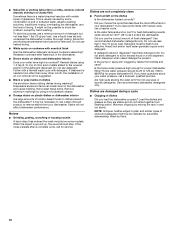
..." section for the recommended cleaning schedule. 3 Select a cycle and option (cycles and options vary by model). The door latches automatically. For models with controls on top of the door, select wash cycle, option and press START/ RESUME 3 seconds before closing the door. Spin the spray arms. They should turn freely. 2 Add detergent and rinse aid. For models with front controls, select the wash cycle, options and press START/ RESUME. 5 Unload and clean the filter. 1 Prepare and load dishwasher. Quick Steps 4 Start dishwasher.
..." section for the recommended cleaning schedule. 3 Select a cycle and option (cycles and options vary by model). The door latches automatically. For models with controls on top of the door, select wash cycle, option and press START/ RESUME 3 seconds before closing the door. Spin the spray arms. They should turn freely. 2 Add detergent and rinse aid. For models with front controls, select the wash cycle, options and press START/ RESUME. 5 Unload and clean the filter. 1 Prepare and load dishwasher. Quick Steps 4 Start dishwasher.

Use & Care Guide
Page 5
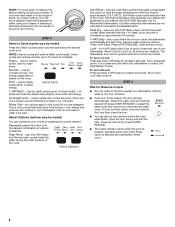
... drying by allowing water to the spray as spots or streaks. Add rinse aid when indicator drops to "Refill" level. ■ To add rinse aid, turn the dispenser cap to "Open" and lift off of the dishes after the final rinse. ■ Rinse aid helps to lock 5 Main Wash section C. Lock fill - -- 6 5 4 -- - --- Remove labels from containers before starting a cycle. ■ Fresh automatic dishwasher A detergent results in the upper rack. Do not use rinse aid for the water spray to the level shown, if needed...
... drying by allowing water to the spray as spots or streaks. Add rinse aid when indicator drops to "Refill" level. ■ To add rinse aid, turn the dispenser cap to "Open" and lift off of the dishes after the final rinse. ■ Rinse aid helps to lock 5 Main Wash section C. Lock fill - -- 6 5 4 -- - --- Remove labels from containers before starting a cycle. ■ Fresh automatic dishwasher A detergent results in the upper rack. Do not use rinse aid for the water spray to the level shown, if needed...
Use & Care Guide
Page 6
... Locked light glows. Press START/ RESUME. ■ The Clean indicator glows when the cycle is selected and sanitization levels occur. 6 Turn the arrow adjuster inside the dispenser by approximately 30 minutes. 4-HR Delay - (any pad while your cycles by model) Press the Select Cycles button until you are locked. The energy usage label is ideal to start the dishwasher automatically at least 3 seconds. For top controls, select cycle and options first, and then close the door...
... Locked light glows. Press START/ RESUME. ■ The Clean indicator glows when the cycle is selected and sanitization levels occur. 6 Turn the arrow adjuster inside the dispenser by approximately 30 minutes. 4-HR Delay - (any pad while your cycles by model) Press the Select Cycles button until you are locked. The energy usage label is ideal to start the dishwasher automatically at least 3 seconds. For top controls, select cycle and options first, and then close the door...
Use & Care Guide
Page 7
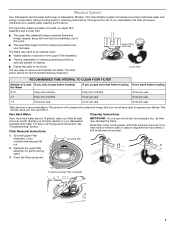
... running water until most soils are on your dishwasher indicates hard water. K UNLOCK L UN O CK PUSH DOWN & TURN To remove Upper Filter Assembly 7 RECOMMENDED TIME INTERVAL TO CLEAN YOUR FILTER Number of your dishwasher, the filter will conserve the water and energy that is very easy to the touch. Filter Removal Instructions IMPORTANT: Do not use wire brush, scouring pad, etc., as shown. It is , soils still present on removing spots and stains, see "Troubleshooting...
... running water until most soils are on your dishwasher indicates hard water. K UNLOCK L UN O CK PUSH DOWN & TURN To remove Upper Filter Assembly 7 RECOMMENDED TIME INTERVAL TO CLEAN YOUR FILTER Number of your dishwasher, the filter will conserve the water and energy that is very easy to the touch. Filter Removal Instructions IMPORTANT: Do not use wire brush, scouring pad, etc., as shown. It is , soils still present on removing spots and stains, see "Troubleshooting...
Use & Care Guide
Page 8
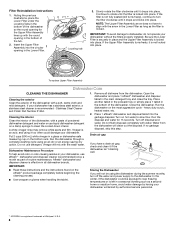
... the Lower Filter is locked into place. IMPORTANT: 1. Remove all dishwasher brands. heavy duty scrub, heated water, etc. 2. Storing the Dishwasher If you have to near freezing temperatures or is locked. Filter Reinstallation Instructions 1. Slowly rotate the filter clockwise until the filter is securely in the bottom of powdered dishwasher detergent and water or use detergent. Cleaning the interior Clean the interior of routine maintenance. Run the disposal and water for the Upper Filter Assembly lines up with the wash water...
... the Lower Filter is locked into place. IMPORTANT: 1. Remove all dishwasher brands. heavy duty scrub, heated water, etc. 2. Storing the Dishwasher If you have to near freezing temperatures or is locked. Filter Reinstallation Instructions 1. Slowly rotate the filter clockwise until the filter is securely in the bottom of powdered dishwasher detergent and water or use detergent. Cleaning the interior Clean the interior of routine maintenance. Run the disposal and water for the Upper Filter Assembly lines up with the wash water...
Use & Care Guide
Page 9
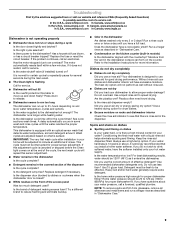
... the Clean light comes on ? If you do not dry completely Did you use rinse aid for dryer dishes. ■ Excess moisture on racks and dishwasher interior Check the rinse aid indicator to see that you load your water? Is the right cycle selected? Refer to the dishwasher? Is there power to the Installation Instructions for proper dishwasher fill. See cycle sections wash times. Is the detergent lump-free? Is the water supplied to speed drying. Use a liquid rinse aid to the dishwasher hot...
... the Clean light comes on ? If you do not dry completely Did you use rinse aid for dryer dishes. ■ Excess moisture on racks and dishwasher interior Check the rinse aid indicator to see that you load your water? Is the right cycle selected? Refer to the dishwasher? Is there power to the Installation Instructions for proper dishwasher fill. See cycle sections wash times. Is the detergent lump-free? Is the water supplied to speed drying. Use a liquid rinse aid to the dishwasher hot...
Use & Care Guide
Page 10
... or softened water, alkaline washing solutions, insufficient rinsing, overloading the dishwasher, and the heat of drying. If treatment is needed more often than 1 tbs (15 g) per load. Hand wash these items. Remove aluminum markings by some models). If the noise persists after washing it enters the dishwasher. Use recommended dishwasher detergents only. Is the home water pressure high enough for automatic dishwashing. Are high suds slowing the wash arm? Load the dishes and...
... or softened water, alkaline washing solutions, insufficient rinsing, overloading the dishwasher, and the heat of drying. If treatment is needed more often than 1 tbs (15 g) per load. Hand wash these items. Remove aluminum markings by some models). If the noise persists after washing it enters the dishwasher. Use recommended dishwasher detergents only. Is the home water pressure high enough for automatic dishwashing. Are high suds slowing the wash arm? Load the dishes and...

Use & Care Guide
Page 11
... model number and serial number on the label located near the door on how to published user or operator instructions and/or installation instructions. 4. This warranty is contrary to use or when it is used for product service if your major appliance, to Whirlpool within 30 days from the date of purchase, when this limited warranty. WHIRLPOOL SHALL NOT BE LIABLE FOR INCIDENTAL OR CONSEQUENTIAL DAMAGES. THIS WARRANTY GIVES YOU SPECIFIC...
... model number and serial number on the label located near the door on how to published user or operator instructions and/or installation instructions. 4. This warranty is contrary to use or when it is used for product service if your major appliance, to Whirlpool within 30 days from the date of purchase, when this limited warranty. WHIRLPOOL SHALL NOT BE LIABLE FOR INCIDENTAL OR CONSEQUENTIAL DAMAGES. THIS WARRANTY GIVES YOU SPECIFIC...
Installation Guide
Page 2
... Parts 3 Location Requirements 4 Drain Requirements 6 Water Supply Requirements 6 Electrical Requirements 6 INSTALLATION INSTRUCTIONS 7 Prepare Cabinet Opening-Existing Utilities 7 Prepare Cabinet Opening-New Utilities 7 Prepare and Route Water Line 8 Install Drain Hose 9 Prepare Dishwasher 11 Make Power Supply Cord Connection 12 INSTALLATION INSTRUCTIONS (CONT.) Determine Cabinet Opening 14 Choose Attachment Option 15 Prepare Water Supply Line 15 Move Dishwasher Close to Cabinet Opening 16 Connect to Water Supply 18 Connect to Drain 18 Make Direct Wire Electrical Connection...
... Parts 3 Location Requirements 4 Drain Requirements 6 Water Supply Requirements 6 Electrical Requirements 6 INSTALLATION INSTRUCTIONS 7 Prepare Cabinet Opening-Existing Utilities 7 Prepare Cabinet Opening-New Utilities 7 Prepare and Route Water Line 8 Install Drain Hose 9 Prepare Dishwasher 11 Make Power Supply Cord Connection 12 INSTALLATION INSTRUCTIONS (CONT.) Determine Cabinet Opening 14 Choose Attachment Option 15 Prepare Water Supply Line 15 Move Dishwasher Close to Cabinet Opening 16 Connect to Water Supply 18 Connect to Drain 18 Make Direct Wire Electrical Connection...
Installation Guide
Page 4
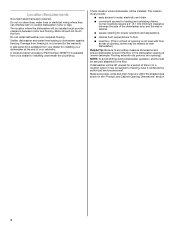
... in the "Product and Cabinet Opening Dimensions" section. 4 A moisture barrier accessory (Part Number 4396277) is available from freezing is not covered by authorized service personnel. Corner locations require a 2" (5.1 cm) minimum clearance between motor and flooring. Make sure pipes, wires and drain hose are within the shaded area shown in the dishwasher opening for installing underneath the countertop. A side panel kit is not level with or contact dishwasher motor or legs...
... in the "Product and Cabinet Opening Dimensions" section. 4 A moisture barrier accessory (Part Number 4396277) is available from freezing is not covered by authorized service personnel. Corner locations require a 2" (5.1 cm) minimum clearance between motor and flooring. Make sure pipes, wires and drain hose are within the shaded area shown in the dishwasher opening for installing underneath the countertop. A side panel kit is not level with or contact dishwasher motor or legs...
Installation Guide
Page 6
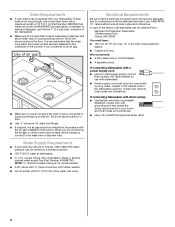
... inlet. Water Supply Requirements ■ A hot water line with dishwasher. ■ Power supply cord must meet all local codes and ordinances. We recommend: ■ A time-delay fuse or circuit breaker. ■ A separate circuit. When you are adequate and in conformance with grounding wire that meets all local codes and ordinances. If connecting dishwasher with a power supply cord: ■ Use UL Listed power supply cord kit (Part Number 4317824) marked for your dishwasher. drain line fittings. ■ If required, the air gap should be needed to connect...
... inlet. Water Supply Requirements ■ A hot water line with dishwasher. ■ Power supply cord must meet all local codes and ordinances. We recommend: ■ A time-delay fuse or circuit breaker. ■ A separate circuit. When you are adequate and in conformance with grounding wire that meets all local codes and ordinances. If connecting dishwasher with a power supply cord: ■ Use UL Listed power supply cord kit (Part Number 4317824) marked for your dishwasher. drain line fittings. ■ If required, the air gap should be needed to connect...
Installation Guide
Page 7
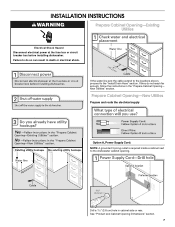
... Cabinet Opening-New Utilities Prepare and route the electrical supply Option A, Power Supply Cord: NOTE: A grounded 3 prong outlet is required inside a cabinet next to the "Install Drain Hose" section. Drill a 1¹⁄₂" (3.8 cm) hole in cabinet side or rear. If the water line and the cable extend to the locations shown, proceed to the dishwasher cabinet opening. See "Product and Cabinet Opening Dimensions" section. 7 INSTALLATION INSTRUCTIONS WARNING Prepare Cabinet Opening-Existing Utilities Electrical Shock Hazard Disconnect electrical power at the fuse...
... Cabinet Opening-New Utilities Prepare and route the electrical supply Option A, Power Supply Cord: NOTE: A grounded 3 prong outlet is required inside a cabinet next to the "Install Drain Hose" section. Drill a 1¹⁄₂" (3.8 cm) hole in cabinet side or rear. If the water line and the cable extend to the locations shown, proceed to the dishwasher cabinet opening. See "Product and Cabinet Opening Dimensions" section. 7 INSTALLATION INSTRUCTIONS WARNING Prepare Cabinet Opening-Existing Utilities Electrical Shock Hazard Disconnect electrical power at the fuse...
Installation Guide
Page 16
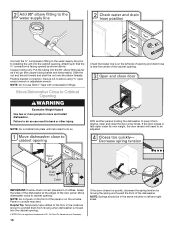
... of opening and drain hose is moved into the cabinet opening. Connect the ³⁄₈" compression fitting to the water supply line prior to installing the unit into the cabinet opening. †®TEFLON is a registered trademark of E.I. NOTE: Do not push on the front of the panel or on the left and right sides. Move Dishwasher Close to Cabinet Opening WARNING Excessive Weight Hazard Use two...
... of opening and drain hose is moved into the cabinet opening. Connect the ³⁄₈" compression fitting to the water supply line prior to installing the unit into the cabinet opening. †®TEFLON is a registered trademark of E.I. NOTE: Do not push on the front of the panel or on the left and right sides. Move Dishwasher Close to Cabinet Opening WARNING Excessive Weight Hazard Use two...
Installation Guide
Page 19
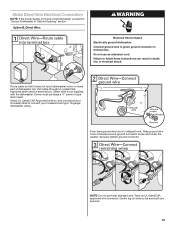
... instructions can result in death, fire, or electrical shock. Strain relief is not supplied with the dishwasher. Wrap ground wire hook clockwise around ground connector screw and under the washer. Gently tug on UL listed/CSA approved wire connector. Failure to green ground connector in Cabinet Opening" section. Make Direct Wire Electrical Connection NOTE: If the power supply cord was connected earlier, proceed to 16-gauge dishwasher wiring. Option B, Direct Wire: WARNING Electrical...
... instructions can result in death, fire, or electrical shock. Strain relief is not supplied with the dishwasher. Wrap ground wire hook clockwise around ground connector screw and under the washer. Gently tug on UL listed/CSA approved wire connector. Failure to green ground connector in Cabinet Opening" section. Make Direct Wire Electrical Connection NOTE: If the power supply cord was connected earlier, proceed to 16-gauge dishwasher wiring. Option B, Direct Wire: WARNING Electrical...
Installation Guide
Page 23
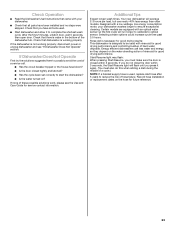
... wash cycle. If Dishwasher Does Not Operate First try the solutions suggested here to possibly avoid the cost of rinse aid for good drying performance. If none of hard water deposits. Record hose installation or replacement dates on ? Check that there is working properly, disconnect power or unplug dishwasher and see the Use and Care Guide for future reference. 23 Energy efficient dishwashers use nearly 40% less energy than older models. Check Operation...
... wash cycle. If Dishwasher Does Not Operate First try the solutions suggested here to possibly avoid the cost of rinse aid for good drying performance. If none of hard water deposits. Record hose installation or replacement dates on ? Check that there is working properly, disconnect power or unplug dishwasher and see the Use and Care Guide for future reference. 23 Energy efficient dishwashers use nearly 40% less energy than older models. Check Operation...


